117
Custom Picture Settings
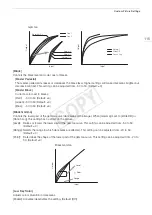
[Knee Aperture]: Allows you to set the sharpness of only the areas above the knee point by adjusting the gain and
slope. This is not available when [Gamma] is set to [Cine 1], [Cine 2], [EOS Std.] or [Canon Log].
[Gain]: Sets the amount of sharpness. This setting can be adjusted from 0 to 9. (Default: 0)
[Slope]: Sets the slope of the sharpness. This setting can be adjusted from 0 to 3, with 0 having no slope, 1
having a steep slope and 3 having a gradual slope. (Default: 1)
[Level Depend]: Lowers the amount of sharpness applied to dark areas of the image.
[Level]: Sets the brightness of the dark areas of the image that will be affected. This setting can be adjusted
from 0 to 50. (Default: 0)
[Slope]: Determines the slope of the area between the upper and lower parts of the gamma curve. This setting
can be adjusted from 0 to 3, with 0 having no slope, 1 having a steep slope and 3 having a gradual slope.
(Default: 0)
[Offset]: Adjusts the sharpness level of dark areas in the image. Setting higher values will lower the sharpness
level. This setting can be adjusted from 0 to 50. (Default: 0)
[Noise Reduction]
Reduces the amount of noise that appears in the image. Select a level from 1 (lowest level) to 12 (highest level),
or select [Off] to turn the noise reduction off. (Default: [Off])
[Skin Detail]
The camcorder applies a softening filter to areas in the picture with skin tones to give a more pleasant
appearance. By changing these settings, you can determine what areas will be detected as skin tones. A zebra
pattern will appear over areas on the screen that are detected as having skin tones.
[Effect Level]: Adjusts the level of the filter. The available options are [Off], [Low], [Middle] and [High].
(Default: [Off])
[Hue]:
Adjusts the hue for detection of skin tones. This setting can be adjusted from -16 to 16.
(Default: ±0)
[Chroma]:
Adjusts the color saturation for detection of skin tones. This setting can be adjusted from 0 to 31.
(Default: 16)
[Area]:
Adjusts the color range for detection of skin tones. This setting can be adjusted from 0 to 31.
(Default: 16)
[Y Level]:
Adjusts the brightness for detection of skin tones. This setting can be adjusted from 0 to 31.
(Default: 16)
[Selective NR]
The camcorder detects the characteristics of a certain color or tone and applies a noise reduction filter to the
targeted areas. A zebra pattern will appear over targeted areas on the screen.
[Effect Level]: Adjusts the level of the noise reduction filter. The available options are [Off], [Low], [Middle] and
[High]. (Default: [Off])
[Hue]:
Adjusts the hue for the color to be detected. This setting can be adjusted from 0 to 31. (Default: 0)
[Chroma]:
Adjusts the color saturation for the color to be detected. This setting can be adjusted from 0 to 31.
(Default: 16)
[Area]:
Adjusts the color range for the color to be detected. This setting can be adjusted from 0 to 31.
(Default: 16)
[Y Level]:
Adjusts the brightness for the color to be detected. This setting can be adjusted from 0 to 31.
(Default: 16)
[Color Matrix]
Color matrix affects the color tones throughout the whole image.
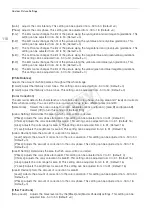
[Select]: Available options are [Normal 1] to [Normal 4], [Cine 1] and [Cine 2], [EOS Std.], [Wide DR] and [Canon
Log]. Generally, this should be the same setting as [Gamma]. After selecting an option, you can make
more precise adjustments. When [Gamma] is set to [Canon Log], this setting has no effect on the
picture. (Default: [Normal 1])
COP
Y
Summary of Contents for EOS C100 Mark II
Page 1: ...Instruction Manual HD Camcorder PUB DIE 0463 000 COPY ...
Page 12: ...12 COPY ...
Page 46: ...Adjusting the Black Balance 46 COPY ...
Page 106: ...Using Accessories 106 COPY ...
Page 124: ...Saving and Loading Camera Settings 124 COPY ...
Page 144: ...Saving Clips to a Computer 144 COPY ...
Page 162: ...Playback via Browser 162 COPY ...
Page 168: ...Photo Operations 168 COPY ...


