Preparing the Power Supply
24
• Repeatedly charging and discharging the battery pack will eventually shorten its battery life. You can check the
battery life on the [Battery/Hour Meter] status screen (
A
179). Fully charging the battery pack and then
discharging it will give you a more accurate reading.
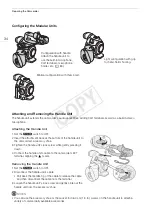
Attaching the Battery Pack
1 Set the
Q
switch to OFF.
2 Insert the battery pack all the way into the compartment as shown
in the illustration and press it gently toward the left until it clicks.
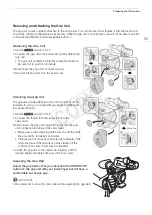
Removing the Battery Pack
1 Set the
Q
switch to OFF.
2 Press the BATTERY RELEASE button. While holding it down, slide
the battery pack toward the right and then pull it out.
Checking the Remaining Battery Charge
With battery packs compatible with Intelligent System, you can check the estimated remaining usage time of the
battery pack by looking at any recording/playback screen or the [Battery/Hour Meter] status screen (
A
179).
You can also check the approximate remaining battery charge on the battery pack itself.
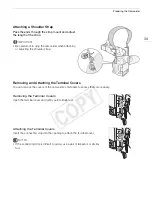
Press the CHECK button on the battery pack. An indicator will light for
approximately 3 seconds and show the approximate remaining battery
charge.
0-25%
26-50%
51-75%
76-100%
NOTES
• The first time you use a battery pack, fully charge it and then use the camcorder until the battery pack is
completely exhausted. Doing so will ensure that the remaining recording time will be displayed accurately in
the various recording/playback screens.
0
100%
CHECK button
Battery charge indicator
COP
Y
Summary of Contents for EOS C100 Mark II
Page 1: ...Instruction Manual HD Camcorder PUB DIE 0463 000 COPY ...
Page 12: ...12 COPY ...
Page 46: ...Adjusting the Black Balance 46 COPY ...
Page 106: ...Using Accessories 106 COPY ...
Page 124: ...Saving and Loading Camera Settings 124 COPY ...
Page 144: ...Saving Clips to a Computer 144 COPY ...
Page 162: ...Playback via Browser 162 COPY ...
Page 168: ...Photo Operations 168 COPY ...


