8
PDS • User’s Guide
2. Hardware Orientation
PDS Front Panel
map=cêçåí=m~åÉä
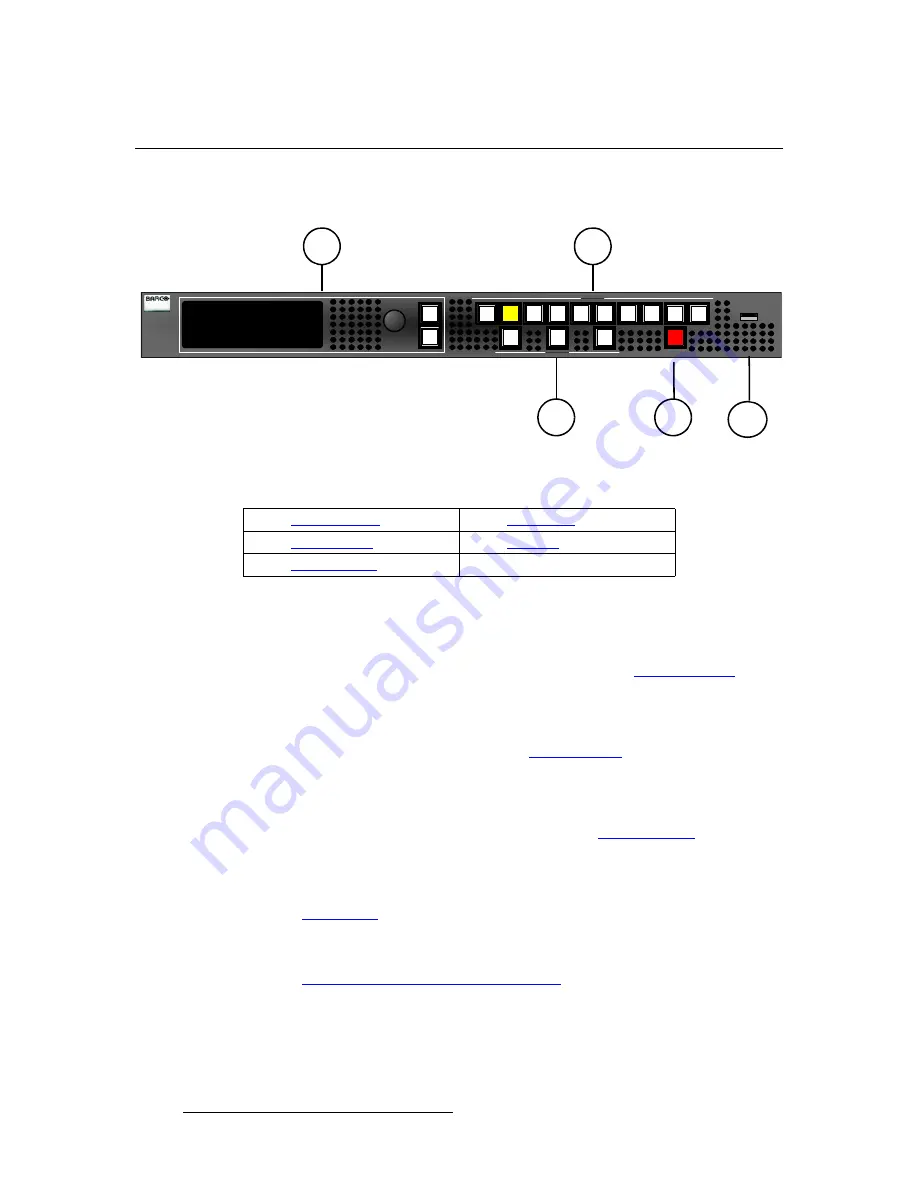
The figure below illustrates the PDS front panel:
Figure 2-1.
PDS Front Panel
Following are descriptions of each front panel section:
1)
Display Section
The
Display Section
includes a four-line display, the
ADJUST
knob and two
“menu navigation” buttons:
SEL
and
ESC
. Refer to the “
Display Section
”
heading on page 9 for complete details.
2) Inputs
Section
The
Inputs Section
includes ten “source” buttons that enable you to select inputs
and a full screen
LOGO
. Refer to the “
Inputs Section
” heading on page 10 for
complete details.
3) Effects
Section
The
Effects Section
provides three buttons that enable you to select the type of
effect that you want to perform next. Refer to the “
Effects Section
” heading on
page 11 for complete details.
4) Take
Button
The red
TAKE
button initiates a transition to the selected source. Refer to the
“
Take Button
” section on page 12 for details.
5) USB
Port
The USB port can be used for upgrading system firmware. Refer to the
“
Upgrading Firmware Using the USB Port
” section on page 96 for details.
1
2
3
4
SEL
ESC
Adjust
2
3
6
1
5
4
SDI
Inputs
LOGO
FRZ
BLACK
TAKE
Effects
PDS-701
Main Menu
Input >>
> In Auto Acquire ON
Output >>
5
1)
Display Section
4)
Take Button
2)
Inputs Section
5)
USB Port
3)
Effects Section
Summary of Contents for PDS
Page 1: ...r d map Manual 26 1204000 00 Revision 00...
Page 36: ...22 PDS User s Guide 3 Installation Format Connection Table...
Page 98: ...84 PDS User s Guide 4 Operation Using Front Panel Lockout...
Page 118: ...104 PDS User s Guide 6 Upgrading Firmware Upgrading Firmware Using the Web Upgrade...
Page 121: ...PDS User s Guide 107 K p Output Specifications...
Page 174: ...160 PDS User s Guide Index...


