background image


52 

52 

ADJUSTMENT 


Before operation, the machine should be carefully adjusted for best performance. 


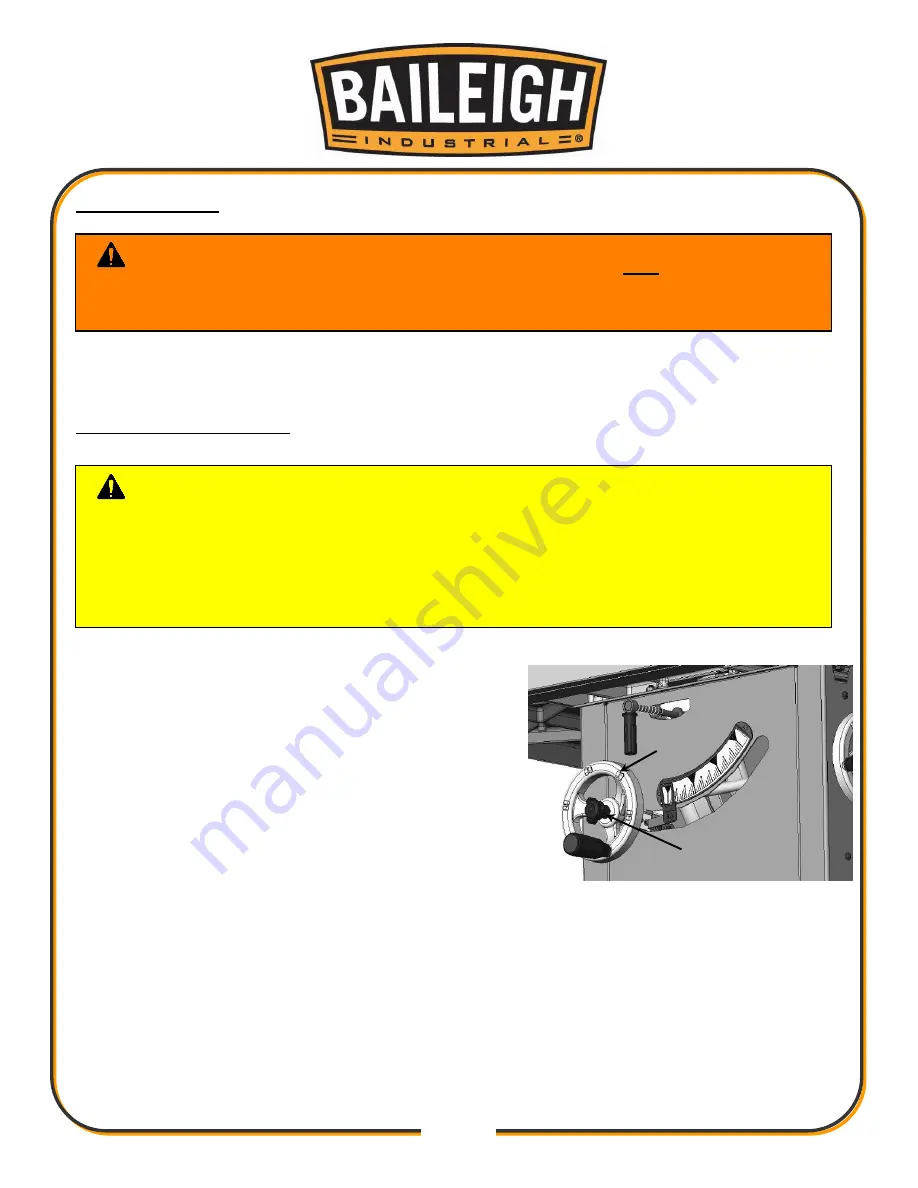
Blade Height Adjustment 


The blade height adjustment handwheel is located on 
the front of the saw and there is a lock knob on the 
handwheel that allows you to lock the wheel and 
secure the blade at the desired height. 
 
To raise or lower the blade: 
1.  Loosen the blade height lock knob by turning 

counter clockwise. 

2.  To raise the blade: Turn the handwheel clockwise. 

To lower the blade: Turn the handwheel counter 
clockwise. 

3.  With the blade set to the desired height, tighten the lock knob by turning clockwise to lock 

the blade. 


WARNING:


Make sure the electrical disconnect is OFF before working on 

the machine. 
Always follow proper safety precautions when working on or around any machinery. 

CAUTION: 

To  limit  your  exposure  to  the  blade  and  maximize  the 

effectiveness of the anti-kickback pawls (when using the riving style splitter & blade 
guard),  never  take  more  blade  height  than  is  required  to  complete  the  cut.  When 
setting the blade height for through-cuts (cuts all the way through the thickness of a 
board)  set  the  height  of  the  blade  to  roughly  1/4"  higher  than  the  thickness  of  the 
board. 

Summary of Contents for TS-1248P

Page 1: ...TRIAL INC IS PROHIBITED Baileigh Industrial Inc does not assume and hereby disclaims any liability for any damage or loss caused by an omission or error in this Operator s Manual resulting from accide...

Page 2: ...23 ELECTRICAL 24 Power Supply Connection 25 INITIAL OPERATION 26 OPERATION OVERVIEW 27 Non Through Through Cuts 28 Workpiece Inspection 28 BLADE REQUIREMENTS 29 BLADE SELECTION 29 Dado Blades 31 BLADE...

Page 3: ...ALLATION AND CALIBRATION 63 Mounting the DRO 63 Initial Calibration Tune 64 Basic Operation 65 ZERO ENTER FUNCTION 65 mm inch FUNCTION 66 ABS REL FUNCTION 66 MENU FUCTIONS 66 MITRE GAUGE 68 Checking S...

Page 4: ...52 Saw Body Parts List A B 94...

Page 5: ...e to Seller of any suspected defect in the Goods prior to the expiration of the warranty period The original end user must also obtain a RGA from Seller prior to returning any Goods to Seller for warr...

Page 6: ...urther remedies provided under this Agreement or at law or equity Attorney s Fees In the event legal action is necessary to recover monies due from Buyer or to enforce any provision of this Agreement...

Page 7: ...tion of the functional parts of the machine Capacity charts Set up and start up instructions Machine operation Scheduled maintenance Parts lists GENERAL NOTES After receiving your equipment remove the...

Page 8: ...es a hazard or unsafe practice that will result in severe Injury or Death Safety signs with signal word DANGER or WARNING are typically near specific hazards General precautions are listed on CAUTION...

Page 9: ...comfortable loud noises DUST HAZARD Wear appropriate dust mask Dust created while using machinery can cause cancer birth defects and long term respiratory damage Be aware of the dust hazards associate...

Page 10: ...rator may result Safety equipment such as guards push sticks hold downs feather boards goggles dust masks and hearing protection can reduce your potential for injury But even the best guard won t make...

Page 11: ...hat the blade guard be removed Be aware of your personal safety while the guard is off and replace the blade guard after these operations are completed 10 Keep work area clean Cluttered areas invite i...

Page 12: ...he crosscut fence NEVER back a piece part out of a cut 27 Supporting Piece Part Provide adequate support to the sides and rear of the saw table for material that is extra wide and long 28 Keep visitor...

Page 13: ...g asbestos or lead paint Some of these materials contain hazardous dust and can cause severe respiratory problems 39 Warning The dust generated by certain woods and wood products can be injurious to y...

Page 14: ...t of Blade 18 457mm Table Floor To Table Height 35 3 4 908mm Table Dimensions W x D x T 36 52 48 75 x 30 75 x 1 93 1238 x 781 x 49mm 78 75 x 30 75 x 1 93 2000 x 781 x 49mm Distance Front of Table To C...

Page 15: ...s Length x Width x Height 41 x 34 x 42 Carton 2 Type Solid Wood Crate Content Rails Weight 88 lbs Length x Width x Height 96 x 6 x 9 Carton 3 Type Cardboard Content Fence Weight 24 lbs Length x Width...

Page 16: ...Support handles questions on machine setup schematics warranty issues and individual parts needs other than die sets and blades For specific application needs or future machine purchases contact the...

Page 17: ...age painted surfaces Follow manufacturer s label instructions when using any type of cleaning product After cleaning wipe unpainted metal surfaces with a light coating of quality oil or grease for pro...

Page 18: ...de 12 1 D Spreader Guard 1 E Push Stick 1 F Wrenches 2 G Handwheel Handles 2 H Fence Resting Brackets 2 I Miter Gauge 1 J Miter Gauge Handle 1 K Fence Tube 75 long 1 L Front Rail 75 long 1 M Rear Rail...

Page 19: ...securing bolts that attach the machine to the pallet Approaching the machine from the side lift the machine on the frame taking care that there are no cables or pipes in the area of the forks Move the...

Page 20: ...es a large amount of weight over a small area Make certain that the floor is capable of supporting the weight of the machine work stock and the operator The floor should also be a level surface If the...

Page 21: ...Stand 52 only C Fence Scale Indicator L Storage Table 52 only D Blade Guard and Spreader M Blade Tilt Handwheel w Lock E Blade Guard Table Insert N Tilt Angle Digital Read Out F Fence O Blade Tilt Sca...

Page 22: ...t B 3 Fasten the rear rail to the table with 4 M8 1 25 x 25 cap screws 8mm lock washers and 8mm flat washers C 4 Fasten the right end of the rail to the pre installed extension wing with 1 M8 1 25 x 2...

Page 23: ...lock washers 1 8mm flat washer and 1 M8 1 25 hex nut B 5 Attach the cast iron wing to the main table with 3 M10 1 5 x 35 hex bolts and 10mm lock washers C 6 Place a straightedge across the extension...

Page 24: ...table slots over the bolts installed into the main table 4 Fasten the front rail to the extension table with 3 M8 1 25 x 25 flat head screws 8mm flat washers and M8 1 25 hex nuts B 5 Fasten the rear...

Page 25: ...t the legs to secure the feet 10 Fasten the shelf end plate to the legs with 4 M6 1 x 12 Phillips head screws and 6mm flat washers G 11 Place the shelf brackets with the angle inward to retain the she...

Page 26: ...e handle D and 8mm flat washer onto the miter gauge 6 Slide the miter gauge into the t slot on the left side of the blade or store it on the brackets near the blade angle handwheel 7 Turn the lock kno...

Page 27: ...nstalling Blade Guard Spreader 5 Calibrate the blade tilt angle digital readout Each time power is disconnected the digital readout will also need to be recalibrated 6 Install and calibrate the fence...

Page 28: ...cs as indicated on the tool All line connections should make good contact Running on low voltage will damage the motor In the event of a malfunction or breakdown grounding provides a path of least res...

Page 29: ...1 30 10 10 No WIRE GAUGE An undersized cord decreases line voltage causing loss of power and overheating All cords should use a ground wire and plug pin Replace any damaged cords immediately Power Sup...

Page 30: ...al and that the machine is setup properly 2 Lower the blade all the way down below the table surface 3 Connect the machine to the power source 4 Verify that the machine is operating correctly by turni...

Page 31: ...outside of this manual by reading how to books trade magazines or websites To complete a typical operation the operator will 1 Examines the workpiece to make sure it is suitable for cutting 2 Adjusts...

Page 32: ...a sawing operation in which the workpiece is completely sawn through as shown in the Figure below Examples of through cuts are rip cuts cross cuts miter cuts and beveled cuts The blade guard assembly...

Page 33: ...g the table or fence however work pieces supported on the bowed side will rock during the cut which could cause kickback BLADE REQUIREMENTS To ensure that the spreader or riving knife works safely the...

Page 34: ...Gullets are small and shallow similar to a cross cut blade then large and deep similar to a ripping blade Laminate Blade Features Best for cutting plywood or veneer 40 80 teeth Triple chip tooth profi...

Page 35: ...th Stacked dado blades are more expensive than wobble blades but typically produce higher quality results Wobble Dado Blade A single blade mounted at a slight angle on an arbor hub The blade angle is...

Page 36: ...DO NOT overtighten 6 Re install the blade guard riving knife and the table insert WARNING Blades are dangerously sharp Use extreme caution when working with or around the blade Wear proper safety prot...

Page 37: ...e that the guard does its job effectively it must always be in the downward position against the table during idle operation and the hinge mechanism must be maintained in good working condition so the...

Page 38: ...de guard when properly installed should pivot freely up and down and return to the table in the resting position It should also swing up high enough to accommodate the workpiece 7 Swing one side of th...

Page 39: ...e or if you believe that they will obstruct a narrow workpiece and cause feeding difficulty or loss of control Use your best judgment before removing the pawls as they are provided for your safety 1 L...

Page 40: ...rough cuts Operating the saw without the guard increases the risk of kickback or blade contact If the blade guard is removed for specific operations immediately replace it after those operations are c...

Page 41: ...st point of rotation so that it can remain installed for non through cuts The riving knife must be kept within the range shown in the following figure For that reason a 12 blade is required for operat...

Page 42: ...Knife Do not use the riving knife with a dado blade or any blade that has a diameter smaller than 12 If the riving knife is used with smaller blades the height of the riving knife will exceed the blad...

Page 43: ...us 1 Clamp the board securely to the table top at both ends as shown This will provide extra support for the insert and reduce tear out when cutting 6 Set the blade angle at 0 This will position the b...

Page 44: ...with the saw blade when starting The switch can be disabled and locked by inserting a pin through the ON START button as shown Locking the switch in this manner can prevent unauthorized operation of...

Page 45: ...kickback fingers and a splitter to prevent the saw kerf from closing Never rip or cut wood without using the fence or miter gauge to guide it because the stock could kickback Always use the blade gua...

Page 46: ...chances of the workpiece moving during the cut and reduces the risk of kickback 3 Disconnect and lockout power to the saw 4 Verify that the blade guard and spreader is installed 5 Set the fence to th...

Page 47: ...evels compound miters or chamfers After changing the bevel angle verify the alignment of the guard and splitter make sure there is clearance with the saw blade Ripping Small Work Pieces Do not attempt...

Page 48: ...0 5 Adjust the saw blade to not more than 1 4 higher than the workpiece to be cut 6 Slide the miter gauge near the blade and adjust the workpiece so the blade will cut on the waste side of the line 7...

Page 49: ...d and splitter and verify that there is clearance with the saw blade Hold the work piece firmly against the miter gauge and feed the workpiece slowly into the blade to prevent it from moving during th...

Page 50: ...cut Various combination of saws and cutters are used to cut grooves from 1 8 to 13 16 for use in shelving making joints tenoning grooving etc The cutters are heavily swaged and must be arranged so tha...

Page 51: ...keeping in mind that you may need to make several passes to complete the cut 4 Align the workpiece to the dado blade to remove the waste material Use either the fence or the miter gauge to guide the m...

Page 52: ...st the zero clearance feature by modification if so you must install a new standard zero clearance insert 3 Mark the width of the dado cut on the workpiece Include marks on the edge of the workpiece s...

Page 53: ...to reduce the risk of kickback 3 Adjust the fence and align the workpiece to perform the cutting operation 4 Reconnect the saw to the power source and turn the saw ON When the blade has reached full...

Page 54: ...t while it is lying flat on the saw table 4 Raise the blade up to the desired depth of cut depth of rabbet channel desired 5 Stand the workpiece on edge and then adjust the fence so the blade is align...

Page 55: ...gazines lumber supply locations and the internet We recommend using these sources to obtain information and plans for these tools not only to build them but to allow you to be exposed to a wider varie...

Page 56: ...dwheel counter clockwise 3 With the blade set to the desired height tighten the lock knob by turning clockwise to lock the blade WARNING Make sure the electrical disconnect is OFF before working on th...

Page 57: ...e table verify that the tilt indicator pointer points to the 0 mark on the scale If the blade is not 90 to the table you will need to adjust the 90 stop screw Tilt the blade to about 5 so there is roo...

Page 58: ...bolt 3 Adjust the stop bolt in or out per how far off the blade was from 45 Repeat Step 3 6 until the blade stops at 45 4 Tighten the jam nut 5 Reconnect the power 6 Recalibrate the digital readout b...

Page 59: ...out displays the current blade angle Note When power is disconnected the digital display will automatically reset to 0 00 When power is reconnected the blade tilt angle DRO needs to be calibrated To c...

Page 60: ...ock the square in place Now mark the carbide tip with a marker where you made this measurement 5 Rotate the marked blade tip to the other end of the table insert 6 Slide the adjustable square down to...

Page 61: ...nce at the back of the table is shorter than the front of the table shim s will need to be placed under back center mount Thin shim stock works well 3 Tighten each bolt in sequence a little at a time...

Page 62: ...knife is not parallel with the blade and inside the alignment zone then it needs to be adjusted Proceed to Adjusting Alignment instructions If the spreader riving knife is not parallel with the blade...

Page 63: ...the table Height Gap between the table and the bottom of the fence Parallelism to the Blade Clamping pressure to hold the fence in position while cutting These adjustments are interconnected and some...

Page 64: ...etween the table and the fence is approximately 1 16 and even from the front of the table to the back Note If the front end of the fence needs to be adjusted up or down use the set screws B however tu...

Page 65: ...ade you must follow the procedures described in Miter Slot to Blade parallelism Fence Clamping Pressure and Parallelism Adjustment 1 Disconnect and lockout power to the saw 2 Remove the fence D equall...

Page 66: ...ted by the scale then cut your scrap piece of wood 2 Reposition and lock the fence at 12 as indicated by the scale 3 Flip your scrap piece of wood over placing the side that was cut in Step 2 against...

Page 67: ...on Note The power consumption is very low and always on When the battery low mark pops up replace the batteries Normal battery life is about 6 months Mounting the DRO 1 Remove the screw and battery co...

Page 68: ...ne and retest 1 Disconnect and lockout power to the saw 2 Place the fence on the rail about 2 3 to the right of the blade Leave the handle in the unlock position 3 Press the Menu Return button then pr...

Page 69: ...ing 3 Unlock the fence and slide it up to the blade Be sure to lift the blade guard and the anti kickback pawl 4 If the standard fence is used not an auxiliary or sacrificial fence the fence scale sho...

Page 70: ...ment is considered a hard reset and requires being in the menu function to reset the zero position See Menu Function orG to zero this measurement The REL measurement is considered a soft reset and may...

Page 71: ...voltage 1 Press the Menu Return button 2 Press arrow button to move to bAt screen 3 Press Zero Enter the current battery voltage will display 4 Press the Menu Return button to return to the operating...

Page 72: ...rkpiece does not rock or rotate Always use both hands when operating the miter gauge The miter gauge is used for crosscutting compound miter cutting rabbeting bevel cutting and dadoing Checking Settin...

Page 73: ...to 0 and then tighten the screw Checking Setting 45 Stops Replace the 90 square with a 45 and then follow the same process to adjust the 45 stops that you followed with the 0 stop Move the miter gauge...

Page 74: ...protect the cast iron surface Occasionally open the cabinet and brush off and vacuum out accumulated dust from inside the cabinet and on the blade tilting gears and on or around the motor Periodically...

Page 75: ...or housing and the arbor assembly they will not require any additional lubrication Use a wire brush to clean off the worm gears and trunnions and apply a white lithium grease to keep them lubricated I...

Page 76: ...ide rails D with mineral spirits before lubricating Lubricate the bevel gear and elevation leadscrew and slide rails with lithium grease Apply a dab into the bevel gear teeth and around the elevation...

Page 77: ...heel to carefully tension the belt by moving the blade up Do this slowly and take care not to apply too much pressure to the belt Note Be careful not to damage the motor and do not force it up farther...

Page 78: ...lso do not force the arbor down farther when it becomes difficult to move the handwheel 6 Tighten the motor mounting nuts to hold the motor in place 7 Raise the motor all the way up and remove the woo...

Page 79: ...erheated 13 Motor at fault 1 Decrease feed rate cutting speed 2 Only cut wood ensure moisture is below 20 3 Straighten or replace workpiece adjust fence 4 Use correct blade reduce feed rate or depth o...

Page 80: ...Motor fan rubbing on fan cover 7 Motor mounting loose 8 Belt worn or damaged 9 Belt s slapping cover 10 Pulley loose or not in alignment shaft bent 11 Arbor bearings at fault 12 Motor bearings worn o...

Page 81: ...77 77 ELECTRICAL DIAGRAM...

Page 82: ...78 78 ELECTRICAL CONNECTIONS...

Page 83: ...79 79 BLADE GUARD MITER AND ACCESSORIES PARTS DIAGRAM A A...

Page 84: ...od Bracket Left 2 1 10 Rod Bracket Right 2 1 11 Round Head Screw M4 x 0 7P x 10 2 1 12 Pin 2 1 13 Right Cover 1 1 14 Protective Shield Right 1 1 15 Anti Loose Nut M5 x 0 8P 8B x 6H 1 1 16 Anti Kick Fi...

Page 85: ...er Screw 1 3 9 Special Set Screw 3 3 10 Miter Gauge Handle 1 3 11 Flat Washer 8 5 x 18 x 3t 1 3 12 Miter Gauge Body 1 3 13 Slot Bar 1 3 14 Guide Plate 1 3 15 Flat Head Screw M6 x 1 0P x 6 1 3 16 O Rin...

Page 86: ...82 82 FENCE PARTS DIAGRAM...

Page 87: ...ad Bracket 1 2 10 Hex Nut M8 x 1 25P 13B x 6 5H 8 2 11 Lock Knob 1 2 12 Compress Cam Assembly 1 2 13 Flat Head Screw M6 x 1 0P x 8 2 2 14 Anti Loose Nut M10 x 1 5P 17B x 12H 1 2 15 Frictional Pad 2 2...

Page 88: ...4 4 Rail Support Plate 1 4 5 Flat Washer 85 x 60 x 1757mm 1 4 9 Flat Washer 8 5 x 16 x 2 0t 6 4 10 Spring Washer 8 2 x 15 4 10 4 11 Cap Screw M8 x 1 25P x 25 6 4 12 Hex Screw W Washer M8 x 1 25P x 12...

Page 89: ...85 85 52 EXTENSION TABLE AND RAILS PARTS DIAGRAM...

Page 90: ...pport Leg 2 4 15 Self Tapping Screw 14 4 29 Round Head Screw M6 x 1 0P x 12 12 4 30 Flat Washer 6 4 x 11 5 x 1 6t 16 4 31 Flat Washer 10 3 x 22 x 2 0t 2 4 32 Hex Nut M6 x 1 0P 10B x 5H 2 4 33 Hex Nut...

Page 91: ...87 87 SAW BODY PARTS DIAGRAM A...

Page 92: ...88 88 SAW BODY PARTS DIAGRAM B...

Page 93: ...ll Bearing 6005 2 16 Hex Screw W Washer M8 x 1 25P x 12 13B x 6 5H 7 17 Mounting Plate 1 18 Cap Screw M8 x 1 25P x 20 3 19 Spring 1 20 Gas Lift 1 21 Bushing 1 22 Bracket 1 23 Shoulder Screw 1 24 Wavy...

Page 94: ...etaining Ring 1 52 Flat Washer 19 1 x 25 4 x 1 6 4 53 Shaft 1 54 Pin 2 55 Hex Nut M8 x 1 25P 13B x 6 5H 7 56 Worm Gear 1 57 Cap Screw M6 x 1 0P x 25 3 58 Spring Washer 6 1 x 12 3 3 59 Round Head Screw...

Page 95: ...BW 4 1 81 2 Sticker 1 81 2 Magnetic Switch Assembly 5HP 220V 240V 1PH 1 81 2 Magnetic Switch 5HP 220V 240V 1PH 1 81 2 Strain Relief Adapter KSS M2520 4 81 2 Strain Relief MG20A 10 STB XA 2 81 2 Strai...

Page 96: ...1 102 Table Insert Assembly TJ07 08 1 102 1 Table Insert 1 102 2 Bolt 1 102 3 Left Plate 1 102 4 Right Tape 1 102 5 Left Plate 3M 468MP 19mm 1 102 6 Right Tape 3M 468MP 35mm 1 102 7 Set Screw M6 x 1...

Page 97: ...ew M6 x 1 0P x 20 4 152 Extension Table Assembly 1 152 Screw Package 1 152 2 Spring Washer 10 2 x 18 5 3 152 3 Hex Screw M10 x 1 5P x 35 3 153 Extension Table 1 157 Display Transparent Shield 1 158 Pa...

Page 98: ...ring 6005 2 16 Hex Screw W Washer M8 x 1 25P x 12 13B x 6 5H 7 17 Mounting Plate 1 18 Cap Screw M8 x 1 25P x 20 3 19 Spring 1 20 Gas Lift 1 21 Bushing 1 22 Bracket 1 23 Shoulder Screw 1 24 Wavy Washer...

Page 99: ...etaining Ring 1 52 Flat Washer 19 1 x 25 4 x 1 6 4 53 Shaft 1 54 Pin 2 55 Hex Nut M8 x 1 25P 13B x 6 5H 7 56 Worm Gear 1 57 Cap Screw M6 x 1 0P x 25 3 58 Spring Washer 6 1 x 12 3 3 59 Round Head Screw...

Page 100: ...BW 4 1 81 2 Sticker 1 81 2 Magnetic Switch Assembly 5HP 220V 240V 1PH 1 81 2 Magnetic Switch 5HP 220V 240V 1PH 1 81 2 Strain Relief Adapter KSS M2520 4 81 2 Strain Relief MG20A 10 STB XA 2 81 2 Strai...

Page 101: ...1 102 Table Insert Assembly TJ07 08 1 102 1 Table Insert 1 102 2 Bolt 1 102 3 Left Plate 1 102 4 Right Tape 1 102 5 Left Plate 3M 468MP 19mm 1 102 6 Right Tape 3M 468MP 35mm 1 102 7 Set Screw M6 x 1...

Page 102: ...36 Fixed Plate 1 137 Dust Guard 1 138 Arbor Wrench 2 139 Flat Head Screw M6 x 1 0P x 20 4 157 Display Transparent Shield 1 158 Parts Package 1 159 Wire Outlet Group 1 159 1 Strain Relief PGA16 14B 1 1...

Page 103: ...99 99 NOTES...

Page 104: ...IAL LTD UNIT 1 FULLWOOD CLOSE SWIFT VALLEY INDUSTRIAL ESTATE RUGBY WEST MIDLANDS CV21 1QH UNITED KINGDOM PHONE 44 0 24 7661 9267 FAX 44 0 24 7661 9276 WWW BAILEIGH CO UK BAILEIGH INDUSTRIAL GMBH HOFEN...

Reviews: