background image

K-Series Loom User Manual 

Weaving Instructions 

Warping The Sectional Beam 

Page | 99 

7)


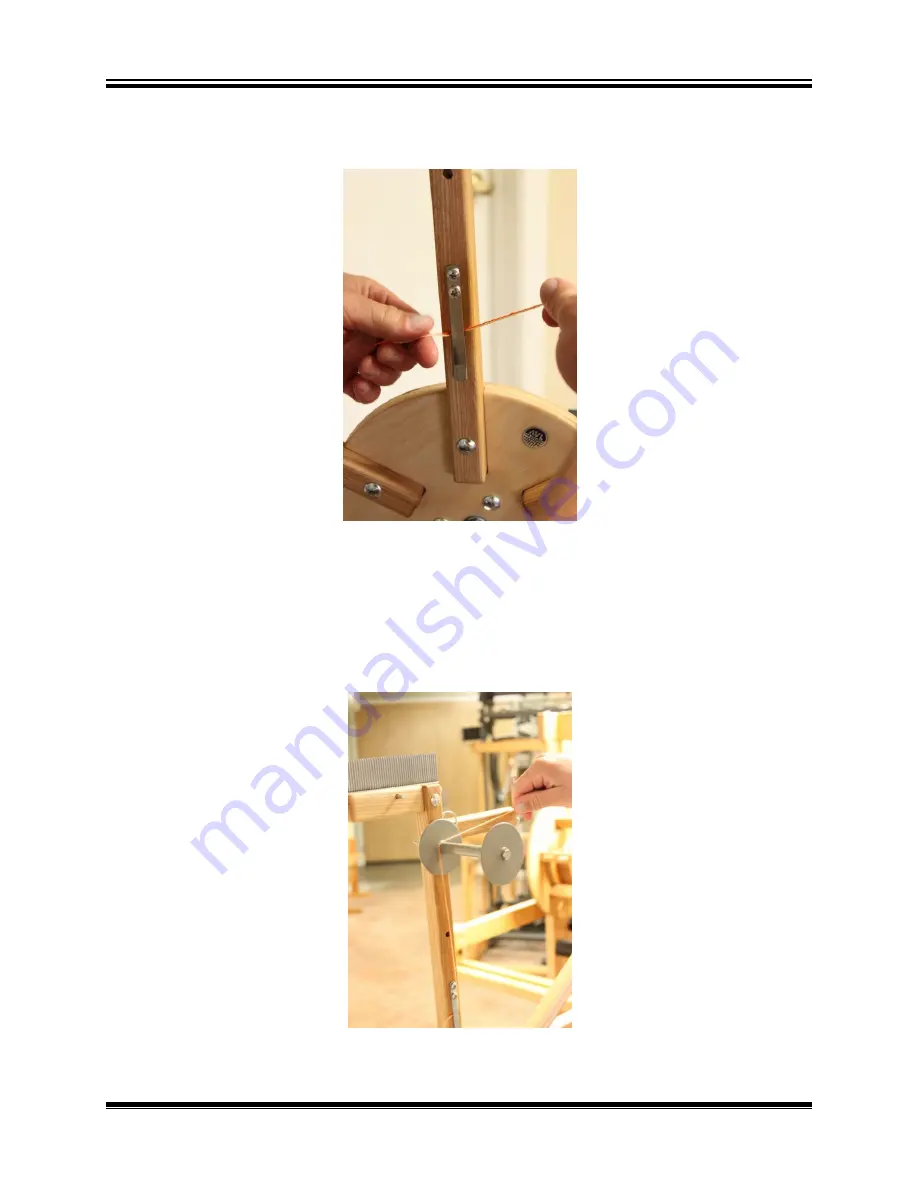
Slide the thread(s) under the metal catch clip, tails facing to the 
left. Tails should be about 5 inches long. 


Figure 93 - Catch Thread Ends 


8)


Bring the thread(s) up and over the left side of the top spool so that 
you are ready to wind the Warping Wheel in a counterclockwise 
motion. 


Figure 94 - Wind Counter Clockwise


Summary of Contents for K Series

Page 1: ...K Series Loom User Manual AVL Looms 2360 Park Avenue Chico CA 95928 6785 U S A 530 893 4915 530 893 1372 fax sales avlusa com www avlusa com Version 2 2 January 29 2020 ...

Page 2: ......

Page 3: ...ss Member 19 Install Lower Harness Pulley Support 22 Install the Front Treadle pulley support with axle 23 Installation of Lower front assembly 25 Install The Upper Harness Pulley Support 27 Attach the Lower treadle cable pulley guide 29 Squaring The Completed Frame 30 Install Harness Assemblies 31 Add Heddles to the harnesses 36 Attach the Treadle Cables 37 Place the Power Box on the Loom 41 Inst...

Page 4: ...Warping The Plain Beam 83 Warping The Sectional Beam 89 Combining Sectional And Plain Warping 102 Threading Sleying Tying On 104 Setting The Tension 108 To Remove or to Change the Reed 109 Using the Beater 114 Using the Automatic Cloth Advance 115 Using the Cloth Storage Roller 115 Using the Ring Temples 115 Removing the Cloth from the Loom 117 Additional Loom Information 119 Additional Loom Infor...

Page 5: ...K Series Loom User Manual Introductory Information Introductory Information Page 1 INTRODUCTORY INFORMATION INTRODUCTORY INFORMATION ...

Page 6: ...UFACTURING IF THE EQUIPMENT IS USED IN A MANNER NOT SPECIFIED BY THE MANUFACTURER THE PROTECTION PROVIDED BY THE EQUIPMENT MAY BE IMPAIRED WARNING ELECTRICAL SHOCK HAZARD DO NOT TAMPER WITH ELECTRICAL WIRES OR OPERATE THE LOOM WITH SAFETY PANELS OPENED OR REMOVED WARNING PINCH CRUSH AND FINGER CUT OFF HAZARDS DO NOT OPERATE THE LOOM WITH SAFETY PANELS OPENED OR REMOVED DO NOT PLACE HANDS IN MOVING...

Page 7: ... POSITION EQUIPMENT IN A WAY TO BLOCK OR IMPEDE ACCESS TO DISCONNECTING DEVICES WARNING USE OF CONDUCTIVE FIBER OR YARN ON OR AROUND THIS EQUIPMENT WILL VOID WARRANTY AND MAY DAMAGE EQUIPMENT Safety Features Covers and shielding separate weaver from moving components where pinch hazards exist and high voltage circuitry Do not remove covers and shielding while the loom is operating ...

Page 8: ...s operated ever since In 1982 Violette was instrumental in the development of the first computerized dobby then called the Apple Dobby He retired from active life in the company in 1987 Once known for our production looms AVL has broadened its line considerably and we now offer customers a full spectrum of fine weaving equipment ranging from our small Home Looms to our Industrial Dobby Looms Rug L...

Page 9: ...all other systems Ultra fast pick writing The system can achieve weaving speeds in excess of 100 picks per minute Hundreds of weaving files may be stored for later use Eliminates latency timing issues inherent in computer communications systems Latencies can cause slower weaving and even missed picks As a web enabled device this loom connects to your computer or tablet via WiFi or USB and controls...

Page 10: ...le to the warp beam The motor is controlled by the Compu Dobby AVLDrive Easily change the warp tension at any time during weaving with a click of the mouse or a touch of the finger on the touchscreen This system allows very fine repeatable control with a range from locked beam to free turning for winding on the warp Cloth Beam with Automatic Cloth Advance The K Series comes standard with AVL s sig...

Page 11: ... a knob hidden inside the cloth storage beam hub Bottom Swing Beater A bottom swing beater is standard and comes with a stainless steel reed of your choice ranging in spacing of 8 15 dents per inch Changing the reed can be done quickly by loosening the bolts holding the premium hardwood beater top The automatic cloth take up linkage is easily detached via tri knob thumbscrew and the beater lifts r...

Page 12: ...th no need to stop and reset as with standard temples The K Series rotary ring temples come with a cover to prevent contact with delicate skin or clothing The K Series comes with hidden built brackets making ring temple installation quick and simple Track Mount The track and mount system mounts directly to the rear vertical side frame members to provide a stable platform for a tension box Raddle R...

Page 13: ...Compu ort bench is the suitable seat for this loom provides adjustable height pivoting seat for ideal angle and a firm wide Choose from either the standard or short hand shuttle with end feed e shuttles provide optimal tensioning to achieve excellent ON THE K SERIES Dobby V power should not be removed from the loom off procedure AVL recommends that yo an Uninterrupted Power Supply or UPS with the ...

Page 14: ... 4142625 SET UP Looms may be shipped fully assembled or knocked down Fully assembled looms will arrive crated Please verify that all entries halls and doorways are large enough to pass thru with the crate If knocked down your loom will arrive in several boxes of various sizes Shipping Damage or Missing Boxes Looms are rarely damaged in shipping AVL takes special effort in providing suitable packag...

Page 15: ...box Please take pictures of what you see especially of damage to parts This information will help us identify what to replace and how much to claim against the insurance 4 Lastly save your packaging materials and parts in case the freight insurance company wishes to inspect the damage Assuming you have followed above procedure AVL will replace the damaged parts as quickly as possible An invoice wi...

Page 16: ......

Page 17: ...K Series Loom User Manual Loom Assembly Loom Assembly Page 13 LOOM ASSEMBLY LOOM ASSEMBLY ...

Page 18: ... to use and maintain it Tools First you ll need tools 1 Hammer 2 Socket Wrench with 1 2 and 7 16 sockets 3 1 2 and 7 16 Box Wrenches 4 Large standard screwdriver 5 Small jewelry sized standard screwdriver 6 Phillips screwdriver 7 Scissors 8 Crescent Wrench 9 Level a small one will do 10 Tape Measure 11 Mallet You will also need a helper at some points K SERIES CROSSMEMBER HARDWARE This list of har...

Page 19: ...HMS IDENTIFYING PIECES There are a number of different types of hardware that will hold your loom together The following chart will help you familiarize yourself with the types of hardware you will encounter Figure 1 Hex Bolt These always get a washer between the head of the bolt and the wood Figure 2 Flat Head Machine Screw FHMS Figure 3 Flat Washer Figure 4 Square Nut These always go in a nut ac...

Page 20: ...Loom Assembly K Series Loom User Manual Page 16 Identifying Pieces Figure 5 Black Knob Figure 6 Measuring Bolts ...

Page 21: ...ccess hole Move the nut into position over the end of the bolt and hold it with your finger Slowly turn the bolt clockwise and when the nut engages tighten it most of the way down If your fingers are too big to comfortably manipulate the nut try holding it with a flat blade screwdriver or needle nose pliers Figure 7 Inserting Nuts Note As you are building the loom do not tighten the nuts all the w...

Page 22: ... wood of your loom to avoid any blemishes Note Please DO NOT REMOVE the tape or other wrapping from any of the components until we tell you In some of the boxes you will find hardware packages Each package is marked with the subassembly it goes to and the pieces within it You should leave the hardware bags unopened until they are required Keep as many of your packing materials as you can in case y...

Page 23: ... between the side frame and the cross member 5 DO NOT remove any wrapping tape or bags from the loom until told to do so Do not remove the wrapping from the side frame and cross member until you have found the hardware and are ready to attach them together Note The weights at the bottom of the Compu Dobby are held in place for shipping with a metal rod Leave the rod in place while you are assembli...

Page 24: ...match Have someone hold the lower rear cross member in position 7 Insert two of the bolts through the holes in the right side frame into the matching holes on the Lower Rear 8 Add the nuts and tighten to secure the bolt Do not completely tighten the nuts until you square the finished frame 9 Add the left side frame in the same way Position the left side frame so that the mounting holes on the side...

Page 25: ...o the power box The wires are already embedded If the loom is setup for two beams with two brake motors a connection cover is not needed 1 Find the cover for the connection between the side frame and the rear cross member Figure 9 Connection cover 2 Place the cover over the connection and push it into place Figure 10 Connection Cover on loom For now allow the wires to hang They will be plugged in ...

Page 26: ...ether until it has been attached to the loom Do not remove the cable retainers until the lower harness pulley support assembly has been bolted to the loom 2 In the hardware pack find four 1 4x4 hex bolts with washers 3 Orient the Harness Pulley Support Assembly at the bottom of the loom so that the piece with square ends is at the front right of the loom Figure 11 Bottom Harness Assembly from left...

Page 27: ...re 13 Bolt for bottom harness pulley support assembly 6 Attach each of the four bolts 7 Remove the cable retainers by removing the 8 screws Place these in a safe location until you have installed the harnesses INSTALL THE FRONT TREADLE PULLEY SUPPORT WITH AXLE 1 In the hardware pack find four 1 4x2 1 2 Flat head machine screws with square nuts 2 Position the rods with the treadles so that they fit...

Page 28: ...Front Treadle pulley support with axle 3 Align the mounting holes in the front cross member with the holes in the side frame Figure 14 Front Cross Member 4 Attach the front cross member to the frame with bolts Figure 15 Front cross member attached to side frame ...

Page 29: ...piece In order to access them the loom needs to be tilted back Secure it in place by putting blocks of wood under the front Because of the position of the nut access holes the blocks should be placed near the outer edge of the loom side frames 1 You will need to tilt the loom back and place blocks under the front to add the treadle cross member Figure 16 Loom on blocks Figure 17 Closeup of blocks ...

Page 30: ...s and square nuts Remove the nuts 4 Locate the mounting holes for the Treadle cross member There will be two mounting holes on each side frame Note The nut access holes on the treadle cross member are on the bottom of the cross member Figure 18 Closeup of nut access holes 5 Have your helper take the Treadle cross member piece and place it between the two Side Frames at the mounting holes Figure 19...

Page 31: ...wrapping Do not remove any wrapping materials until the assembly is attached to the loom 2 In the hardware pack find four 1 4x2 3 4 Hex bolts with washers 3 Orient the Harness Pulley Support Assembly on the top horizontals so that the end with the two rows of pulleys is at the right side of the loom and the small plaque with the loom s serial number faces the front of the loom It should overhang a...

Page 32: ... 6 Attach each of the four bolts 7 Remove any wrapping materials from the top harness pulley support assembly 8 Remove the top shelf by pulling the retainer pin located at the back of the rear Harness Pulley Support and sliding the board out to one side Set the shelf aside while the harnesses are mounted into place Figure 22 Shelf Retainer Pin ...

Page 33: ...plastic bag hanging off the front of the dobby 1 Remove the assembly from the bag 2 In the hardware pack find two 1 4x4 flat head machine screws 3 The screws go into the two holes near the dobby on the front of the bottom harness pulley assembly 4 Take the pulley assembly and hold it to the bottom of the front bottom harness pulley assembly Figure 23 Lower treadle pulley assembly ...

Page 34: ...ou have completely assembled the Loom Frame it is time to make sure that the frame is square and level Please make a note of this process as it is an important part of the maintenance of your loom Your loom will perform better and give more years of service if this process becomes a part of your regular loom maintenance 1 Using a tape measure note these measurements a Right front leg to left rear ...

Page 35: ... of these components a regular part of your loom maintenance INSTALL HARNESS ASSEMBLIES It s time to add the Harness Cables and Harnesses to your loom The harnesses for this loom consist of rigid wooden frames which hold metal rods The metal rods are removable and will hold your heddles The loom can use either metal heddles or polyester heddles The loom comes with enough cable retainers to place o...

Page 36: ...he long from the Dobby 25 Placing top har Check that the cable is not twisted on itself If needed remove the shelf as described earlier attached to t There is a set at the top and at the bottom ties hang the harnesses beginning at the back of the loom and Each harness cable has two loops that fa one of the top cable Place the long from the Dobby Placing top har Check that the cable is not twisted ...

Page 37: ...the cable to the hook Push the frame down if necessary to meet the cable Top harness cables Orient the frame so the hooks that are are at the TOP Hook the eyehooks at the top of the frame to the harness cable Hanging harnesses top cables Make sure the harness cables are traveling in a straight line to th the harness Holding the harness or cable at the wrong angle will make it more difficult to att...

Page 38: ...shipping If anything has come loose just hook the spring to the bottom of the dobby weight then the cable to the spring Figure 28 Lower Harness Cable Springs 7 Find the correct cable for the bottom pulley and separate it into the long and short section 8 Take the end of one of the bottom cables Place the shorter piece over the middle pulley 9 Place the long end of the cable over the pulley furthes...

Page 39: ...for the bottom harness cables You removed these while installing th harness pulley support on page pulley cable to the bottom eyehook on the right Hanging harnesses bottom cables the longer pulley cable to the bottom eyehook on the t these steps for each harness Check your work periodically it s easy to connect the wrong harnesses into Replace the cable retainers for the bottom harness cables You ...

Page 40: ...e provided For 32 looms 75 heddles per harness are provided For 40 looms 100 heddles per harness are provided Additional heddles can be purchased from us if needed Our heddles are bundled in batches of 100 1 Pull the top heddle support rod up from the hook on one end and thread heddles on Do the same for the bottom heddle support rod 2 Move the heddles towards the center pulling the heddle rods aw...

Page 41: ... 37 ATTACH THE TREADLE CABLES Left Treadle 1 There are two cables coming off of pulleys behind the dobby Figure 31 Treadle cables 2 Take the top one that runs down to and under the groove of the pulley nearest to the front of the loom in the dobby cam and pulley assembly ...

Page 42: ...to the treadle Figure 32 Left treadle pulley with cable 4 There is a bolt going through the large access hole near the far end of each treadle Remove the nut from the bolt in the left treadle 5 Back the bolt out so that the end of the bolt is at about the middle of the large access hole 6 Now slip the loop of the long cable you have just routed over the pulley over the end of the bolt ...

Page 43: ...om the bolt and over the left side of the left pulley Figure 33 Left treadle cable on treadle Right Treadle 1 Take the bottom cable that runs down to and under the groove of the pulley closest to the rear of the loom in the dobby cam and pulley assembly 2 Run the cable over the top of the pulley directly above the right treadle and down to meet the treadle Figure 34 Right treadle pulley with cable...

Page 44: ...hole as you did for the left treadle and secure the cable to the treadle by holding the loop in line with the bolt inside the access hole and passing the bolt through the loop and on through the treadle 4 Replace and tighten the bolt and nut as you did on the left treadle Figure 35 Right treadle cable on treadle ...

Page 45: ...oom Page 41 PLACE THE POWER BOX ON THE LOOM 1 Find the power box There are holes on the bottom which fit over pins 2 The bottom pulley assembly has pins on the right side Figure 36 Pins for power box 3 Place the power box on top of these pins Figure 37 Power box on loom ...

Page 46: ...with a screw at the top attached to the bearing 2 Unwrap the bearing Figure 38 Cloth Storage Bearing 3 Remove the retainer pin 4 Locate the Cloth Storage Beam The left end has a small cut out in it 5 Place the left side of the Cloth Storage Beam over the bearing so the cut out slips into place over the arm 6 Adjust the beam so that the hole in the beam matches the hole in the bearing ...

Page 47: ... Figure 39 Cloth Storage Beam Pin 8 On the right side remove the pin from the support by removing the small hitch pin at the bottom 9 Drop the right side of the Cloth Storage Beam into the support on the right side of the loom Figure 40 Cloth Storage Beam 10 Replace the pin in the support and secure it with the hitch pin ...

Page 48: ...utch so that the cloth storage beam will continue to work as designed 1 Remove the retainer pin holding the cloth storage beam in place 2 Remove the cloth storage beam from the loom 3 Tighten the bolt on the cloth storage beam bearing on the left side of the loom Tighten by twisting the bolt towards the inside of the loom until it is hand tight Figure 41 Cloth Storage Bearing INSTALL THE SWINGING ...

Page 49: ...om Assembly Install The Swinging Beater Assembly Page 45 Figure 42 Beater support pins 3 Lift the beater into the loom and over the front cross member Figure 43 Beater on loom 4 Connect the rod from the cloth advance to the beater ...

Page 50: ...r Assembly Figure 44 Beater attached to cloth advance 5 To remove the beater unscrew it from the cloth advance then lift it out of the loom 6 To install a beater weight on the beater use the threaded insert on the back There is one on each side Figure 45 Beater weight insert ...

Page 51: ...e bottom support down slightly Figure 47 To Remove or to Change the Reed EMOVE OR TO CHANGE THE Loosen the bolts on the top and Figure 46 m support down slightly 47 Push down bottom support HANGE THE top and bottom support 46 Loosen bolts m support down slightly Push down bottom support HANGE THE REED bottom support Loosen bolts m support down slightly Push down bottom support bottom supports to t...

Page 52: ... side Figure Slide the reed out to the side Figure 48 Slide the reed out to the side Push the reed out To Remove or to Chan Push the reed out K Series Loom User Manual To Remove or to Chan Push the reed out Series Loom User Manual To Remove or to Change the Reed Series Loom User Manual ge the Reed ...

Page 53: ...emove or to Change the Reed Slide the new reed in Series Loom User Manual To Remove or to Change the Reed Slide the new reed in Figure To Remove or to Change the Reed Slide the new reed in Figure 49 New reed inse New reed inse New reed inserted rted Loom Assembly Page Loom Assembly Page 49 ...

Page 54: ...igure Make sure the reed is centered Figure 50 Make sure the reed is centered 50 Center reed To Remove or to Change the Reed Center reed K Series Loom User Manual To Remove or to Change the Reed Series Loom User Manual To Remove or to Change the Reed Series Loom User Manual To Remove or to Change the Reed ...

Page 55: ...he top of the top support is even with the top of the Figure 51 Even top and bracket Tighten the bolts on the top s Slide the bottom support back into position Tighten the bolts on the bottom Make sure the top of the top support is even with the top of the Even top and bracket Tighten the bolts on the top support Slide the bottom support back into position bottom support Make sure the top of the t...

Page 56: ...lers guides the cloth from the sandpaper beam to the cloth storage beam Install the Rear Cloth Guide Roller 1 Locate the long black guide rollers 2 The front beater bumpers have a support at the top for the cloth guide roller 3 Drop the cloth guide roller into the supports on the beater bumpers Figure 52 Cloth guide roller on loom ...

Page 57: ... Cloth Guide Rollers Page 53 Install the Front Cloth Guide Roller 1 At the front of the loom near the warp beam support is a round guide roller support on each side Figure 53 Guide Roller Support 2 Drop the beam into the supports Figure 54 Guide Roller ...

Page 58: ...m the cloth beam holes Figure 55 Cloth Beam pins 2 Put the left side of the beam in the hole on the left frame The left side is the one without the gear 3 Place the right side of the beam in the hole on the right side of the frame You may have to push the frame apart slightly to fit the beam in Figure 56 Cloth Beam ...

Page 59: ...e gear at the end of the cloth beam fits into the grooves at the top of the cloth beam motor Just put it in place Figure 57 Cloth Beam motor Note The ends of the beams have plastic bearings to ensure smooth rotation Make sure the bearings do not fall off the ends of the beams ...

Page 60: ...Loom Assembly K Series Loom User Manual Page 56 Install the Cloth Beam 5 Replace the pins to hold the cloth beam in place Figure 58 Retainer pins for cloth beam ...

Page 61: ...move the cover push the levers down and pull the cover away INSTALL THE UPPER PRIMARY WARP BEAM The K series loom is designed to carry two beams When using two beams at the same time a second separation beam will need to be used If you are using a single Beam install it in the upper position The brake drum and tension system will be on the non Dobby side of the loom the left if you are in position...

Page 62: ...the two pockets Figure 60 Beam Retainer 3 Swing the retainers aside and position the Beam in place 4 Bring the warp beam into position If you are using the upper location orient the beam so that the brake drum is opposite the Dobby Head 5 Place the long spacer on the non brake side of the warp beam Figure 61 Warp Beam Spacer on non brake side ...

Page 63: ...eam in the axle pockets and holding the beam in place rotate each retainer back down to safely secure the beam Figure 63 Warp Beam 8 Locate the Warp Beam Handle and remove its hardware 9 Slip the handle over the protruding end of the Beam Axle Insert the bolt and secure with the washer and nut Note that the handle is connected with a carriage bolt the head of which must fit into a stamped recess ...

Page 64: ...e frame The motor on the non dobby side is for the upper beam 2 The cable for the tension system is attached to the eyehook on the side frame Remove the twist tie Figure 64 Tension system from back of loom 3 Bring the cable immediately up and around the top of the Brake Drum Start at the end of the drum nearest to the handle Wrap the cable around the Brake Drum it will pass over the top of the dru...

Page 65: ...e loom Note Check again to make sure the cable isn t crossed on itself Note If the cable is installed in the wrong direction the Beam will turn easily toward the front of the loom and you will be unable to establish good tension INSTALL THE LOWER SECONDARY WARP BEAM For the lower beam the brake drum and tension system will be on the Dobby side of the loom the right if you are in position to weave ...

Page 66: ...n the brake side of the warp beam 7 Since there is not much room for the lower beam it is easiest if you add the tension cable before placing the right side of the beam in the pocket Hold the right side of the beam slightly above the floor Mount the Tension System Note Once you install the tension cable you will only need to remove it if you remove the beam 1 The tension motor is already installed...

Page 67: ... Page 63 4 When you ve just enough cable remaining to almost reach the eyehook join the coil at the end of the spring to the eyehook using a small pair of needle nose pliers Figure 66 Tension system for second beam Note Check again to make sure the cable isn t crossed on itself ...

Page 68: ... bolt and secure with the washer and nut Note that the handle is connected with a carriage bolt the head of which must fit into a stamped recess Note If the cable is installed in the wrong direction the Beam will turn easily toward the front of the loom and you will be unable to establish good tension Install the Separation Beam If the loom has two warp beams the warp from the upper beam will go o...

Page 69: ...sses 2 Slide the shelf into the grooves in the Harness Pulley Supports 3 Insert the retention pin into its hole It will and should be tight It will loosen over time Figure 69 Shelf in place on loom 4 If you cannot push the pin all the way into the shelf check that you haven t put the shelf in backwards CONNECTING THE COMPU DOBBY The Compu Dobby on this loom looks rather different from its predeces...

Page 70: ... 70 Dobby with sound insulation 3 The weights at the bottom are held in place for shipping with a metal rod Remove the rod before using the loom for weaving Keep the rod safe so that it can be used if you need to move or ship your loom or Compu Dobby Figure 71 Dobby weights with rod 4 The dobby is also secured with straps that make sure the slide plates will not move during shipping You will be ab...

Page 71: ...kly and does not need to be shut off If you remove the loom from a power source you should go through the shutdown sequence in the software first 6 The cables from the loom frame and the power box plug into a coupler attached to the bottom of the bottom harness assembly Plug those in now Figure 72 Cable coupler 7 Locate the cable that goes from the box to the Compu Dobby and plug it into the power...

Page 72: ... included with your Compu Dobby into the USB port and plug the other end into your computer You can also access the loom through wi fi or a router 11 Refer to the Compu Dobby V manual for information on using the loom Note Remove any remaining packing materials Your loom is now ready to weave with ...

Page 73: ...K Series Loom User Manual Additional Loom Options Additional Loom Options Page 69 ADDITIONAL LOOM OPTIONS ADDITIONAL LOOM OPTIONS ...

Page 74: ...sists of two rollers barrels working in tandem which grab the selvage and prevent it from drawing in Ring Temple System Assembly It is best to install the rod and supports before tying on your warp The ring temple cloth guides can be put on after you have woven enough yardage to get your apron rods around the front beam Note The ring temples should be installed so that the temple is closest to the...

Page 75: ...en down the knob so that the supports will stay in place Figure 74 Ring temple supports on rod 3 Locate the brackets for the ring temple system which are hidden in the support for the sandpaper beam Figure 75 Ring temple bracket 4 Place the rod in the brackets Lock it down with the screw knobs Figure 76 Ring temple rod on loom ...

Page 76: ...on Fabric Further information on using the ring temples when weaving can be found in the Weaving section of this manual on page 115 TRACK MOUNT The optional track and mount system mounts directly to the rear vertical side frame members to provide a stable platform for a tension box Installing Track and Mount Mounting Studs 1 In your tension box hardware bag find four 5 16 x2 1 2 carriage bolts bla...

Page 77: ... Page 73 2 Install this assembly from the outside of the loom through one of the two holes provided on either rear vertical Figure 79 Track and Mount support with bolt 3 Slip the washer and nut on the inside of the loom frame and tighten with a 1 2 socket wrench ...

Page 78: ...ackets on the track arms using two 5 16 x 2 1 2 hex bolts washers and square nuts on each side Mounting the Track and Mount on the Loom The AVL tension box track mounting system employs a quick release 1 To install the track arm assembly place the track arms between the two externally mounted studs that you attached to each rear vertical of the loom 2 The track arms should initially go in at an an...

Page 79: ... When you are finished with the tension box the track can be removed easily RADDLE The raddle is inserted into the holes in the back edge of the rear vertical side frame members You can mount the raddle here for warping the standard beam in either upper or lower positions 1 Make sure that the removable portion of the raddle is to the top 2 Once mounted into the holes the raddle is not only held fi...

Page 80: ...locked into position Note The casters at the front of the loom are positioned at the sides The casters at the rear of the loom face the back 1 Find the four casters and the hardware There are four long bolts and four short ones 2 Place two casters at the front of the loom against the pre drilled holes on the side frames with the bracket facing up Place the short bolts through the holes in the cast...

Page 81: ...oom User Manual Additional Loom Options Casters Page 77 4 Place two casters at the rear of the loom against the pre drilled holes with the bracket facing down Use the long bolts to secure the casters to the loom ...

Page 82: ......

Page 83: ...ge 79 WEAVING INSTRUCTIONS WEAVING INSTRUCTIONS Note Unless otherwise noted the instructions in this section are basic general instructions for weaving and are applicable to many AVL and non AVL looms They should not be regarded as a substitute for training or experience ...

Page 84: ...chnology For best results completely read this weaving section and the Compu Dobby AVL Drive Manual that came with your loom before weaving WARPING THE LOOM AVL advocates warping from back to front We believe that this system works best with our looms and our warping tools are designed around this philosophy If you prefer other warping methods you will be able to adapt them to work on your new loo...

Page 85: ...e warp needs to be wound on to the warp beam in the opposite direction from the way it will wind off when weaving The nature of the warp tension system on the K rly when wound in the correct If the warp is wound on in the wrong direction the only option is to take it off and start over The warp beams should rotate ll need to wind on If you feel like you re forcing the beam to wind on you may be go...

Page 86: ...handle for the top warp beam will be on the left side of the loom when you are in weaving position It will be moved clock wise when warping The handle for the bottom warp beam will be on the right side of the loom It will also be moved clock wise when warping For both beams when weaving the warp will come off the beam up and over the separation beam and into the heddles Figure 84 Warped beam from ...

Page 87: ...Various warping methods can be adapted to an AVL loom However we recommend the following method in which the warp is wound on to the Plain Beam with the use of a Raddle Please study this method and try it We have found that it aids in getting a uniform warp tension especially when dealing with long warps Creating Two Crosses To begin wind the warp on a warping board or reel Make sure you put in tw...

Page 88: ...oop Figure 86 Warping Board with Two Crosses 2 The Raddle Cross warp threads are tied in groups depending on how many ends will be put in each section of the raddle Securing The Crosses Before removing the warp from the board or the reel secure the crosses Use four ties to secure each cross in addition to the tie at the cross axis These ties go on each side of both pegs holding the cross ...

Page 89: ...e back of the rear vertical members Winding The Apron Put your apron on the beam with velcro and wind your top beam clockwise so that your apron is wound on the beam Attaching The Warp To The Apron Bring the apron around the Separation Beam and put the metal rod through the sleeve at the end You can lash your warp sections onto that rod or you can attach another rod which has been slipped through ...

Page 90: ...est that the warp be as smooth tight and compact as possible This would mean not using corrugated paper or sticks as they will make the warp too soft and or lumpy Corrugated paper is just too soft and the warp can never be wound tight enough with it Heavy wrapping paper works well seventy pound craft paper is good If you are going to be using smooth slippery warp yarns like fine linens or perle co...

Page 91: ...k and then go to the back of the loom and jerk one narrow section 2 3 inches in width at a time to make the newly wound warp tight on the beam The idea of this method is that the warp does not need to be under tension all the time but the part that is on the beam has to be tight Make another turn go to the back of the loom and jerk all the sections again and so on If you have a wide warp you might...

Page 92: ...ies Different densities Different structures Supplementary warp techniques because some warp threads do not interlace as often as others A group of special yarns for selvedges and borders Loops piles or puckers like seersucker More than one layer with different setts in each layer More than one layer with a different pick count in each layer Setting Two Beams The process of setting up a second bea...

Page 93: ...o have a strong loop of string on it so the warp bundles can be slip knotted into it This makes it easy to undo the slip knot and move the weight when it climbs up to the back beam and must be let down again 4 The weight also needs to be adjustable Plastic bottles with handles filled with water are perfect You can also use fishing weights washers nuts bolts They are not as easily adjustable as wat...

Page 94: ...ed to the Extension Cord the knot between the cord and the warp needs to fall between the Crosspieces of the Sectional Beam not on them This will keep the warp smooth on the Beam so it doesn t go over the knots created when attaching the warp to the cords 3 Now double that length and cut it All Extension Cords should be exactly the same length so cut them all at the same time 4 Take the two ends o...

Page 95: ...PER SPOOL To calculate the number of yards per spool we need to know 1 the LENGTH OF THE WARP 2 NUMBER OF SECTIONS on the Beam We calculate the number of sections by dividing the WIDTH OF THE WARP by the SIZE OF THE SECTION If the warp width is 30 and we are using 2 sections our number of Sections is 15 OF YARDS PER SPOOL LENGTH OF THE WARP x OF SECTIONS TOTAL YARDAGE If it is a single color warp ...

Page 96: ... bottom or bottom to top the important thing is to be consistent in vertical columns and to place the spools in the order that the threads are in the warp Tension Box Heddle Installation Instructions The first time you use a Tension Box you need to install heddles on the harnesses of your Tension Box Your Tension Box is delivered with one bundle of one hundred heddles These are held together with ...

Page 97: ...7 Now push down on the harness that is up making the other harness come up 8 Remove the heddle retainer 9 Pull apart the top two twist ties and insert the top of the harness which is up into the space created Pull apart the bottom two twist ties and insert the bottom of the harness into the space created 10 Reattach the heddle retainer Positioning The Tension Box Mount the Tension Box in the groov...

Page 98: ... through the first heddle on the rear Harness Repeat this alternating harnesses for the rest of the ends The heddle system will be used later to create the Threading Cross Now thread the end through the front Pivoting Reed Here you have a choice of using an eight dent or ten dent reed Pick the one that can be sleyed evenly and as close to the desired section width as possible If you cannot get the...

Page 99: ...revolution onto the Beam As you wind you will need to fine tune the placement of the Tension Box along the track When it is centered properly tighten down the wing nuts under the Tension Box At this point you can pivot the pivoting reed section so that the yarn comes close to but doesn t quite touch either the hoop to the left or the hoop to the right Now tighten the wing nut under the pivoting re...

Page 100: ...tions or yards To count turns you can do it in your head but it is more reliable to use a digital or mechanical revolution counter Counting revolutions even with a digital counter will only give the approximate warp length because the circumference of the Beam will increase slightly with each rotation This is called Beam Build Up To count yards with a Yardage Counter while warping the Sectional Be...

Page 101: ...n on until the Cross is nearly on the Beam Cut the ends and secure to the section using a piece of masking tape Continue winding all the sections in the same manner by moving the Tension Box along its track Remove the Tension Box from its track in the Back Beam and flip the Beam over Replace the Separation Beam into its former position atop the front verticals with the groove facing down to serve ...

Page 102: ...se of Warping Wheel The Setup 1 Adjust height so position of mini raddle is just below eye level 2 Adjust the wind off tension with toggle and cord Tie cord to prevent slipping Figure 92 Adjust Wind off Tension 3 Adjust Warp Length using different spool placement by moving the spools on the arms 4 Reset the Revolution Counter to Zero 5 Setup Cones with the Cone Caddy Making the First Section 6 Ope...

Page 103: ...hread s under the metal catch clip tails facing to the left Tails should be about 5 inches long Figure 93 Catch Thread Ends 8 Bring the thread s up and over the left side of the top spool so that you are ready to wind the Warping Wheel in a counterclockwise motion Figure 94 Wind Counter Clockwise ...

Page 104: ...ring Thread Through Raddle 10 Bring thread s down over the end you just wound and secure in the silver clip swooping under from left to right Tying Off 11 Put the raddle top back on Cut the bout threads just to the left of the clip and under the threads going over the wheel 12 Hold onto the threads securely at the raddle so they don t slip through Below wrap the cut threads around the clip Figure ...

Page 105: ...top secure remove the pin from the raddle holder while holding onto the threads Figure 97 Remove Raddle from Top Position 14 Bring the raddle down to the winding on position and secure with the pin Tie a knot in the thread past the raddle so it won t slip through Figure 98 Place Raddle in Lower Position ...

Page 106: ...e using masking tape This will help you keep the threads in order when you thread the harness 17 As you wind on pivot the raddle to adjust the width of the section to fit exactly in between the pegs on your sectional beam Figure 100 Pivot Raddle COMBINING SECTIONAL AND PLAIN WARPING Depending on your equipment and preferences you may prefer to wind separate warp sections on a warping board or reel...

Page 107: ... the Tension Box In this case the Tension Box is used only for guiding threads into the sections It is not necessary to sley threads in the Tension Box either through the harnesses or through the back reed and you do not need to adjust tension with the Pegs 7 Attach each baby warp to the Extension Cords and proceed as in regular Sectional Beaming procedure 8 Since you are not using the Tension Box...

Page 108: ...le with a hook The hook will prevent you from moving heddles from one side to the other Arrange your heddles so that you have the number you need on each side before you begin threading the loom Now we re ready to thread the loom If you are right handed it is recommended to start at the right side of the warp Grasp one group of ends in your left hand and your sley hook in your right hand Direct th...

Page 109: ... offset if the warp on the beam is already offset Use the way you prefer to position and stabilize the reed between the harnesses and the Breast Beam for ease during the sleying process Tying On To The Apron Replace the guide rollers and the cloth beam Now that you have your warp ends ready to tie we need to prepare the apron The ends will be tied to the apron rod Notice that the apron has two hem...

Page 110: ...ack over the cloth beam towards the harnesses Spread it out flat and center it over the Cloth Beam and insert the metal rod into the loops at the hem Figure 101 Loom with Cloth Now tie the ends to the metal rod Starting from the middle bring a first bundle toward you over the apron rod then around and under it Divide it in half and bring one half up on each side of the bundle Use the ends to tie a...

Page 111: ...tely the same tension It is important to remember at this point that you are not trying to achieve weaving tension only uniform tension across the width of your warp As directed in the preceding warping instructions you ll secure the front of your warp to the Cloth Storage Beam via the apron Tying On To An Old Warp A new warp can be tied on to an old warp thus eliminating the threading and sleying...

Page 112: ... of lease sticks together An overhand or weaver s knot work well This may seem slow at first but you will work up a faster rhythm with some practice A good goal to reach would be to tie 200 to 250 ends together an hour When all ends are tied together go to the front of the loom and gently pull on the bundles of yarn going through the reed to pull the new warp through the heddles and reed You may f...

Page 113: ... the bolts on the top and bottom suppo Figure To Remove or to Change the Reed EMOVE OR TO CHANGE THE Loosen the bolts on the top and bottom suppo Figure 103 HANGE THE Loosen the bolts on the top and bottom suppo 103 Loosen bolts HANGE THE REED Loosen the bolts on the top and bottom suppo Loosen bolts Weaving Instructions Loosen the bolts on the top and bottom supports to the reed Weaving Instructi...

Page 114: ...lide the bottom support down slightly 104 Push down bottom support Slide the bottom support down slightly Push down bottom support To Remove or to C Slide the bottom support down slightly Push down bottom support K Series Loom User Manual To Remove or to C Push down bottom support Series Loom User Manual To Remove or to Change the Reed Series Loom User Manual hange the Reed ...

Page 115: ... to the side Series Loom User Manual To Remove or to Change the Reed Slide the reed out to the side Figure To Remove or to Change the Reed Slide the reed out to the side Figure 105 Slide the reed out to the side Push the reed out h the reed out Weaving Instructions h the reed out Weaving Instructions Page Weaving Instructions Page 111 ...

Page 116: ...e new reed in Figure Slide the new reed in Figure 106 New reed inserted To Remove or to Change the Reed New reed inserted K Series Loom User Manual To Remove or to Change the Reed New reed inserted Series Loom User Manual To Remove or to Change the Reed Series Loom User Manual To Remove or to Change the Reed ...

Page 117: ...e the reed is centered Series Loom User Manual To Remove or to Change the Reed Make sure the reed is centered Figure To Remove or to Change the Reed Make sure the reed is centered Figure 107 Make sure the reed is centered 107 Center reed Center reed Weaving Instructions Weaving Instructions Page Weaving Instructions Page 113 ...

Page 118: ...practice of the throwing technique selvage edges turn out Make sure the top of the top support is even with the top of the Even top and bracket Tighten the bolts on the top support Slide the bottom support back into position Tighten the bolts on the bottom support is designed to increase we and easy action and little physical exertion is needed to operate it Weaving can be done for hours without t...

Page 119: ...oth storage roller which can accommodate a roll up to 16 in diameter The cloth storage system is designed to automatically wind the woven cloth onto the storage roller as the cloth is advanced A looser tension is maintained on the storage roller than on the weaving This eliminates any strain on the fabric while the special abrasive surface of the cloth beam holds the proper tension on the weaving ...

Page 120: ...lot of the mount bracket This slot gives you the choice of how much tension is needed depending on the type of fabric you re weaving 4 Now put on another washer and then the nut 5 Leave a little loose and mount the other side following the same procedure 6 Once both sides are in place you re ready to adjust to the perfect tension Figure 109 Ring Temple on Fabric 7 Press down on the ring temple unt...

Page 121: ...OVING THE CLOTH FROM THE LOOM After you ve completed your weaving use the following procedure for removing the cloth from your loom 1 Cut your cloth off where desired and lift it off the cloth beam 2 Manually wind the excess cloth onto the storage roller 3 Remove the cloth storage beam from the loom Lift the right side of the roller up and toward you until it disengages with the tube end on the le...

Page 122: ......

Page 123: ...K Series Loom User Manual Additional Loom Information Additional Loom Information Page 119 ADDITIONAL LOOM INFORMATION ADDITIONAL LOOM INFORMATION ...

Page 124: ...l over time actually impede the action of your loom Some of the parts on your loom require a dry film lubricant such as RZ 50 This comes in a spray can which will allow you to direct the lubricant to a specific area A few parts require the use of clear synthetic grease such as Tri Flow Clear Synthetic Grease TF23004 Pay attention to the directions below regarding which lubricant to use and where t...

Page 125: ...c places shown below are lubricated 2 There are two bearing slides on each side of the loom This picture shows one side 3 The bearings are small round balls on which the slides are able to move smoothly and quickly On each slide look for the bearings and spray dry lubrication from the top directly onto the bearings ...

Page 126: ...nd of each arm is a blue thrust bearing that will require lubrication 1 Locate the blue thrust bearings It is easy to see two of them from the top when the dobby arm is closed 2 Open the dobby arm by pressing the bottom slide plate down to locate the other two thrust bearings The following picture shows one arm at the bottom 3 Spray each of the four thrust bearings ...

Page 127: ... Information Loom Maintenance Page 123 Dobby Lint Cover You should also check the lint cover on the dobby occasionally to make sure it is not plugged up If it is use a handheld vacuum or the brush attachment on a larger vacuum to clean if off ...

Page 128: ...Page 124 Loom Maintenance Power Box The power box has two lint covers one for air intake and one for outtake Check to make sure the air intake cover is not plugged up If it is use a handheld vacuum or the brush attachment on a larger vacuum to clean if off ...

Page 129: ...intenance Page 125 Cloth Storage Beam Bearing The cloth storage beam is advanced with a clutch bearing on one side of the loom 1 On each side of this bearing you will see a small plastic gear with bearings underneath it 2 Spray each side with dry film lubrication ...

Page 130: ...ove the sandpaper beam cover and the sandpaper beam from the loom 2 Put some light globs of grease on the grooves on the front of the gear Note As you use the loom the grease will be distributed over the gear 3 Replace the sandpaper beam and the sandpaper beam cover Tension Motor The tension motor uses a screw to move up and down changing the tension on your loom This screw should receive a light ...

Page 131: ...p most position 2 Put a small glob of the clear synthetic grease on the screw where there has been grease on the screw before Note You will see a color change between the gray screw and the section that has been blackened with grease 3 In AVL Drive push the button to lock the warp beam This will move the screw to the bottom most position spreading the grease as it moves ...

Page 132: ...Brake Cable Note The K series loom is designed so that you do not need to unhook the brake cable in order to warp the loom If you remove the Brake Cable please be sure when you reinstall it that the looped end is secured to the J bolt that the cable is drawn immediately up from this bolt and around the back of the drum x3 and that it then routes down the front of the drum where it connects to the ...

Page 133: ... 2 Spare Parts You Might Consider Having Spare Treadle Cable left right TROUBLESHOOTING Harness Issues Symptom Possible Cause How to Fix it Harnesses don t raise properly 1 Harness cables have been hooked to the wrong harness Reattach the cables to the correct harnesses 2 Bottom cables have been hooked to the wrong harnesses Reattach the cables to the correct harnesses ...

Page 134: ...ot grabbing the warp and pulling it around as it should You ll very likely need to add SoftGrip or another kind of beam cover in order to get satisfactory warp tension B Your warp tension is different in different places over the width of the warp 1 It is not indicative of a tensioning problem It is a matter of not having maintained even tension when warping the beam and there s no redress from th...

Page 135: ...shed but it s also a waste of time and effort You only need enough warp separation for the shuttle to pass freely However because the shed on AVLs is so precisely calibrated you do need to be sure that you re getting all that the loom can deliver Symptom Possible Cause How to Fix It A Restricted Sheds 1 Treadle cables fell off the pulleys Replace the treadle cables so they go over the pulleys Beat...

Page 136: ... is not wrapping around the cloth storage beam correctly 1 The clutch controlling the cloth storage beam may need tightened Tighten the bolt on the cloth storage beam clutch See page 44 Dobby Symptom Possible Cause How to Fix It A Dobby skips 1 Pressing too hard or too quickly on the treadles Press the treadles with a smooth rhythmical motion ...

Page 137: ...am and the beater 7 Sley the reed 8 Replace the cloth guide rollers cloth beam and cover 9 Attach the warp to cloth storage apron 10 Set the desired warp tension in the loom software The default is 55 11 Advance the warp for weaving If you set the PPI in the software to 1 you will be able to advance rapidly 12 Set the PPI to the setting you want to weave with 13 Open the WIF you want to weave in t...

Page 138: ......

Page 139: ...K Series Loom User Manual The Fine Print The Fine Print Page 135 THE FINE PRINT THE FINE PRINT ...

Page 140: ...rm according to AVL s specifications Any repair during the Original Warranty Period will be carried out without charge to you for parts except applicable taxes if any You will be responsible for all labor in connection with installation of the parts and service upon the Product as well as the cost of shipping involved New Accessories Loom Upgrade Parts and Replacement Parts Subject to the limitati...

Page 141: ...ital Assistant or a Personal Computer which are manufactured by a third party ies and which may be under warranty through the original manufacturer AVL is not responsible for any warranty coverage that may be offered concerning these products and you must contact those manufacturers directly regarding any available warranty coverage The performance or functionality of any software that is sold eit...

Reviews: