background image

P846/EN FD/D 

Firmware Design

 
(FD) 9-14 


MiCOM P846


P4091ENa


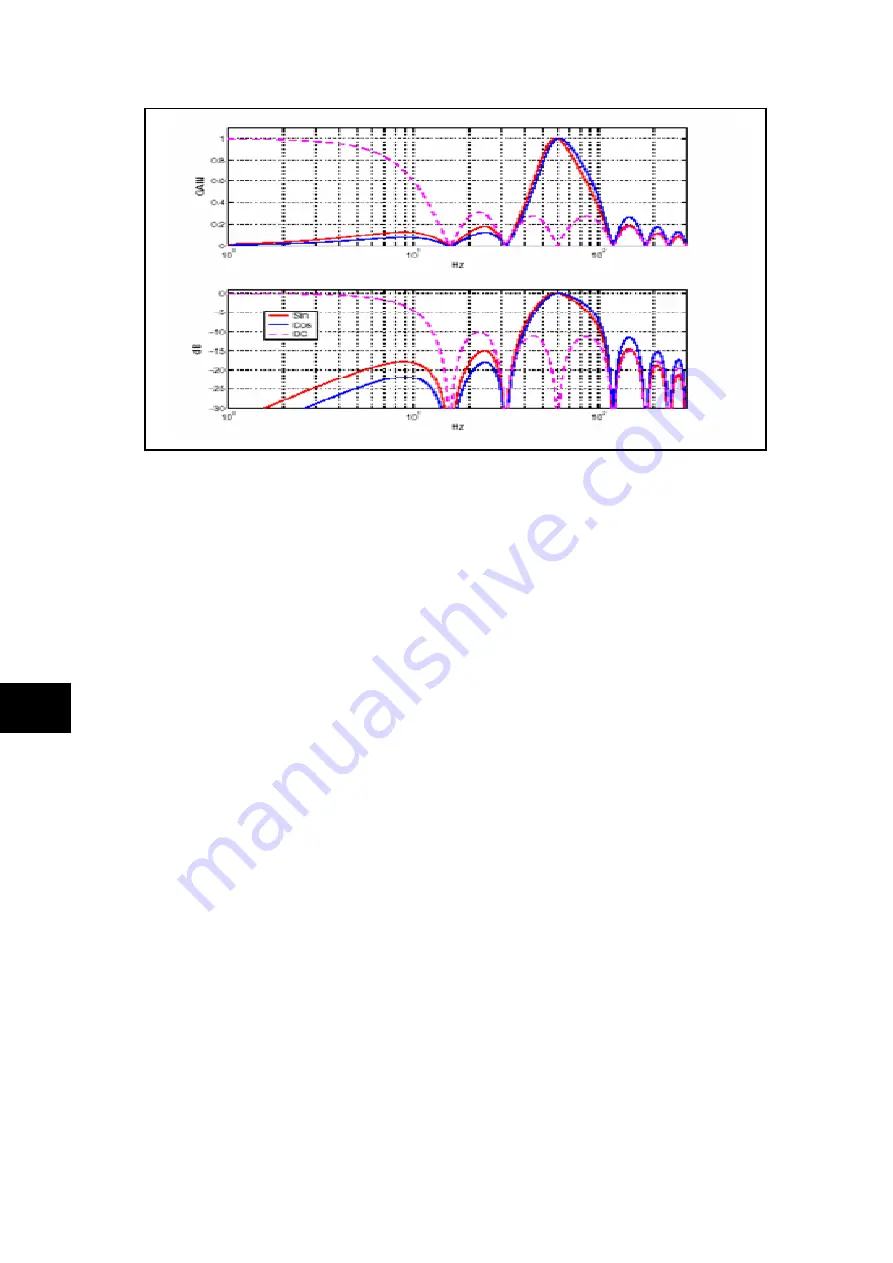
Figure 5:  Frequency response of the DLO Kalman filter  

1.4.6 

Fourier filtering  

All backup protection and measurement functions use one cycle fourier digital filtering to 
extract the power frequency component. This filtering is performed on the main processor 
board.  

1.4.6.1  Programmable scheme logic 

The purpose of the programmable scheme logic (PSL) is to allow the relay user to configure 
an individual protection scheme to suit their own particular application.  This is achieved 
through the use of programmable logic gates and delay timers. 

FD 

The input to the PSL is any combination of the status of the digital input signals from the 
opto-isolators on the input board, the outputs of the protection elements, e.g. protection 
starts and trips, control inputs, function keys and the outputs of the fixed protection scheme 
logic.  The fixed scheme logic provides the relay’s standard protection schemes.  The PSL 
itself consists of software logic gates and timers.  The logic gates can be programmed to 
perform a range of different logic functions and can accept any number of inputs.  The timers 
are used either to create a programmable delay, and/or to condition the logic outputs, e.g. to 
create a pulse of fixed duration on the output regardless of the length of the pulse on the 
input.  The outputs of the PSL are the LEDs on the front panel of the relay and the output 
contacts at the rear.  

The execution of the PSL logic is event driven; the logic is processed whenever any of its 
inputs change, for example as a result of a change in one of the digital input signals or a trip 
output from a protection element.  Also, only the part of the PSL logic that is affected by the 
particular input change that has occurred is processed.  This reduces the amount of 
processing time that is used by the PSL.  The protection and control software updates the 
logic delay timers and checks for a change in the PSL input signals every time it runs. 

This system provides flexibility for the user to create their own scheme logic design.  
However, it also means that the PSL can be configured into a very complex system, and 
because of this, setting of the PSL is implemented through the PC support package MiCOM 
S1. 

Summary of Contents for MiCOM P846

Page 1: ...the property of their respective companies The technical and other data contained in this document is provided for information only Neither ALSTOM its officers or employees accept responsibility for o...

Page 2: ......

Page 3: ...P846 EN AP D Section 7 Programmable Logic P846 EN PL D Section 8 Measurements and Recording P846 EN MR D Section 9 Firmware Design P846 EN FD D Section 10 Commissioning P846 EN CM D Section 11 Mainte...

Page 4: ......

Page 5: ...Safety Section P846 EN SS H11 SS SAFETY SECTION...

Page 6: ...P846 EN SS H11 Safety Section SS...

Page 7: ...3 3 SYMBOLS AND LABELS ON THE EQUIPMENT 4 3 1 Symbols 4 3 2 Labels 4 4 INSTALLING COMMISSIONING AND SERVICING 4 5 DE COMMISSIONING AND DISPOSAL 7 6 TECHNICAL SPECIFICATIONS FOR SAFETY 8 6 1 Protective...

Page 8: ...P846 EN SS H11 Safety Section SS 2 SS...

Page 9: ...uipment is in operation dangerous voltages will be present in certain parts of the equipment Failure to observe warning notices incorrect use or improper use may endanger personnel and equipment and a...

Page 10: ...g work for this equipment should be aware of the correct working procedures to ensure safety The equipment documentation should be consulted before installing commissioning or servicing the equipment...

Page 11: ...ical data section of the equipment documentation or otherwise required by local or country wiring regulations The protective conductor earth connection must be low inductance and as short as possible...

Page 12: ...er termination has automatic CT shorting on removal of the module Therefore external shorting of the CTs may not be required the equipment documentation should be checked to see if this applies For eq...

Page 13: ...quipment may be cleaned using a lint free cloth dampened with clean water when no connections are energized Contact fingers of test plugs are normally protected by petroleum jelly which should not be...

Page 14: ...ective conductor earth connection to ensure user safety 6 3 Installation category IEC 60255 27 2005 Installation category III Overvoltage Category III EN 60255 27 2005 Distribution level fixed install...

Page 15: ...Introduction P846 EN IT D MiCOM P846 IT INTRODUCTION Date June 2011 Hardware Suffix J Software Version 30L Connection Diagrams 10P846xx xx 01 to 07...

Page 16: ...P846 EN IT D Introduction MiCOM P846 IT...

Page 17: ...P846 EN IT D MiCOM P846 IT 1 1 IT CONTENTS IT 1 1 MICOM DOCUMENTATION STRUCTURE 3 2 INTRODUCTION TO MICOM 5 3 PRODUCT SCOPE 6 3 1 Functional overview 6 3 2 Ordering options 8 FIGURES Figure 1 Function...

Page 18: ...P846 EN IT D Introduction IT 1 2 MiCOM P846 IT...

Page 19: ...step sizes and defaults together with a brief explanation of each setting P846 EN OP Operation A comprehensive and detailed functional description of all protection and non protection functions P846...

Page 20: ...SCADA communication interfaces of the relay Detailed protocol mappings semantics profiles and provided with al Separate documents download from bsite P846 EN SG Symbols and Glossary List of common te...

Page 21: ...wer supply control system The components within MiCOM are P range protection relays C range control products M range measurement products for accurate metering and monitoring S range versatile PC supp...

Page 22: ...6 open line detector contains a wide variety of protection functions The protection features are summarized below PROTECTION FUNCTIONS OVERVIEW P846 DLO Loss of Power Corridor open line detection X VT...

Page 23: ...s Sequence of event recording Comprehensive disturbance recording waveform capture Fully customizable menu texts Multi level password protection Power up diagnostics and continuous self monitoring of...

Page 24: ...s IRIG B Rear Comms 8 Product Specific Minimal hardware with 8 output contacts 4 static 4 standard 8 digital inputs Full hardware Version with 32 output contacts 8 static 24 standard 24 digital inputs...

Page 25: ...Technical Data P846 EN TD D MiCOM P846 TD TECHNICAL DATA Date June 2011 Hardware Suffix J Software Version 30L Connection Diagrams 10P846xx xx 01 to 07...

Page 26: ...P846 EN TD D Technical Data MiCOM P846 TD...

Page 27: ...Monitor Port EIA RS 232 25 pin D type female connector For firmware downloads Isolation to ELV level Rear Communications Port EIA RS 485 signal levels two wire Connections located on general purpose b...

Page 28: ...ruption in an AC auxiliary supply without de energizing Battery Backup Front panel mounted Type AA 3 6V SAFT advanced battery reference LS14250 Battery life assuming relay energized for 90 time 10 yea...

Page 29: ...s No tacts are polarity R details Watchdog Contacts Non prog healthy relay fail indica Breaking capacity DC 30W resistive DC 15W inductiv AC 375VA inductive IRIG B Interface standard 200 98 f Input im...

Page 30: ...C 60255 22 4 2002 Test sev Class III and IV Amplitude 2 kV burst frequency 5kHz Class III Amplitude 4 kV burst frequency 2 5kHz Class IV Applied directly to auxiliary supply and applied to all other i...

Page 31: ...06 95 EC Compliance with Voltage Directive Compliance is demonstrated by reference to product safety standards EN60255 27 2005 2004 108 EC Mechanical Robustness ss 2 Per IEC 60255 21 2 1995 lass 2 3 1...

Page 32: ...Voltage 0 05 2Vn Accuracy 1 0 of reading Power W 0 2 2Vn 0 05 3In Accuracy 5 0 of reading at unity power factor Reactive Power Vars 0 2 2Vn 0 05 3In Accuracy 5 0 of reading at zero power factor Appar...

Page 33: ...cator Disabled Enabled Input Labels Invisible Visible Output Labels Invisible Visible CT VT Ratios Invisible Visible Record Control Invisible Visible Disturb Recorder Invisible Visible M Comms Setting...

Page 34: ...e Fault Location Distance Ohms of Line Remote2 V Communications RP1 Protocol Courier DNP 3 0 RP1 Addres 0 255 RP1 InactivTim 1 RP1 Parity Odd Even None RP1 Meas P RP1 PhysicalLink Copper Fiber Optic D...

Page 35: ...m 0 001 1000 Line Length mi 0 20 625 00 Line Angle 20 85 KZN Residual 0 00 7 00 KZN Res Angle 90 90 o Opto Input Labels Opto Input 1 up to User defined text string he particul function of t Output Lab...

Page 36: ...OldDLO zz PP_OldFu PP_Startu PP_Fault Vs Is Vp Vn Vdc Ip P Q Me Pre S_k kA N Fuzz Old Old Old O Line Closed Line Open Fuzzy Rule 1 2 Fuzzy Rule Fuzzy Rule 3 Fuzzy Rule 4 Fuzzy Rule 5 Fuzzy Rule 6 Fuzz...

Page 37: ...Getting Started P846 EN GS D MiCOM P846 GS GETTING STARTED Date June 2011 Hardware Suffix J Software Version 30L Connection Diagrams 10P846xx xx 01 to 07...

Page 38: ...P846 EN GS D Getting Started MiCOM P846 GS...

Page 39: ...configuration 8 1 8 Front panel user interface keypad and LCD 8 1 8 1 Default display and menu time out 9 1 8 2 Menu navigation and setting browsing 10 1 8 3 Hotkey menu navigation 10 1 8 3 1 Setting...

Page 40: ...re 1 Relay front view 3 Figure 2 Relay rear view 5 Figure 3 Menu structure 6 Figure 4 Front panel user interface 9 Figure 5 Hotkey menu navigation 11 Figure 6 Front port connection 13 Figure 7 PC rela...

Page 41: ...hen full access to the relay keypad is required for editing the settings the transparent cover can be unclipped and removed when the top and bottom covers are open If the lower cover is secured with a...

Page 42: ...cleared from the front display Alternatively the trip LED can be configured to be self resetting Alarm Yellow flashes to indicate that the relay has registered an alarm This may be triggered by a faul...

Page 43: ...ed for ac or dc operation Please note that the label does not specify the logic input ratings The P846 relay is fitted with universal opto isolated logic inputs that can be programmed for the nominal...

Page 44: ...2 able 1 Menu st The relay s menu as a cell and each cell in the menu may be accessed by reference to a row and column address The settings are arranged so that each column contains related settings f...

Page 45: ...nt settings Scheme logic settings Fault locator settings There are four groups of protection settings with each group containing the same setting cells One group of protection settings is selected as...

Page 46: ...h a default access level of 2 such that no password is required to change any of the relay settings It is also possible to set the default menu access level to either level 0 or level 1 preventing wri...

Page 47: ...menu time out The front panel menu has a default display the contents of which can be selected from the following options in the default display cell of the Measure t setup column Date and time Relay...

Page 48: ...ls using the auto repeat facility of the key as the auto repeat will stop at the column heading To move to the default display the key must be released and pressed again Hotkey menu navigation The hot...

Page 49: ...and keys to vary each character between A and Z To move between the character pressing the enter k The display will revert to Enter Password if an incorrect which character fields of the password use...

Page 50: ...pen if the appropriate password has been entered otherwise the prompt to enter a password will appear The setting value can then be changed by pressing the or keys If the setting to be changed is a bi...

Page 51: ...ch have a serial port pin connection as below if in doubt check your PC manual 25 Pin no 2 3 2 Pin no 3 2 3 Tx Transmit data Pin no 5 7 5 0V Zero volts com F ccessful da cat he Tx pin on the relay m o...

Page 52: ...t is designed for use during installation and commissioning maintenance and is not suitable for permanent connection Since this interface will not be used to link the relay to a substation communicati...

Page 53: ...communication port MiCOM S1 provides full access to M MiCOM Mx20 measurements un PC requirements The following minimum requirements must be met work on a PC IBM computer or 100 compatible WindowsTM P...

Page 54: ...es 1 10 3 Open communication link with relay To open the communications link from S1 to the P846 relay the following procedure must be followed First the communication setup must be adjusted if necess...

Page 55: ...the password appears When these have been entered satisfactorily the relay is then able to communicate with MiCOM S1 When a communication link has been established between the PC and an IED both are...

Page 56: ...lay model type where you can sele your application This brings up a prompt for the relay model type where you can sele your application GS 1 10 4 Off line use of MiCOM S1 As well as being used for the...

Page 57: ...Settings P846 EN ST D MiCOM P846 ST SETTINGS Date June 2011 Hardware Suffix J Software Version 30L Connection Diagrams 10P846xx xx 01 to 07...

Page 58: ...P846 EN ST D Getting Started MiCOM P846 ST...

Page 59: ...3 1 System data 7 1 3 2 Circuit breaker control 9 1 3 3 Date and time 10 1 3 4 Record control 10 1 3 5 Measurements 11 1 3 6 Communications 12 1 3 6 1 Communications settings for courier protocol 12 1...

Page 60: ...P846 EN ST D Settings ST 4 2 MiCOM P846 ST...

Page 61: ...e four protection settings groups is selected as active through the Active settings cell A protection setting group can also be disabled in the configuration column provided it is not the present acti...

Page 62: ...gs menu Record Control Invisible Invisible or Visible Sets the Record Control menu visible further on in the relay settings menu Disturb Recorder Invisible Invisible or Visible Sets the Disturbance Re...

Page 63: ...clude all the following items that become active once enabled in the configuration column of the relay menu database Protection element settings Fault locator settings There are four groups of protect...

Page 64: ...ive phase sequence nps Setting Range Menu Text Default Setting Min Max Step Size SUPERVISION GROUP 1 VT SUPERVISION Sub heading VTS Status Blocking Blocking Indication This setting determines whether...

Page 65: ...word language settings Circuit breaker control Communications settings Measurement settings Event fault record settings User interface settings Commissioning settings 1 3 1 System data This menu provi...

Page 66: ...oftware Ref 1 P846____4_0300_K Displays the relay softw tocol and relay model are version including pro Opto I P Status 0000000000000000 Display the status of opto inputs fitted Relay O P Status 00000...

Page 67: ...The relay includes the following options for control of a single circuit breaker Local tripping and closing via the relay menu or hotkeys Local tripping and closing via relay opto isolated inputs Remo...

Page 68: ...as follows Menu Text Default Setting Available Settings Alarm Event Enabled Enabled or Disabled Disabling this setting means that all the occurrences that produce an alarm will result in no event bein...

Page 69: ...or secondary quantities Remote Values Primary Primary Secondary This setting controls whether measured values via the rear communication port are displayed as primary or secondary quantities Measureme...

Page 70: ...vity Timer 15 mins 1 mins 30 mins 1 min This cell controls how long the relay will wait without receiving any messages on the rear port before it reverts to its default state including resetting any p...

Page 71: ...only Setting Range Menu Text Default Setting Min Max Step Size COMMUNICATIONS RP2 Protocol Indicates Courier as the communications protocol that will be used on the rear communications port RP2 Card S...

Page 72: ...mmable LEDs on the relay are illuminated with the input active when accessing the relay from a remote location a 1 indicating a particular LED is lit and a 0 not lit Monitor Bit 1 64 LED 1 0 to 511 Se...

Page 73: ...ce can not be used to confirm operation of the output relays Therefore it will be necessary to monitor the state of each contact in turn Test LEDs No Operation No Operation Apply Test When the Apply T...

Page 74: ...11111111111111111111111111111111 Setting to allow the control inputs to be individually assigned to the Hotkey menu by setting 1 in the appropriate bit in the Hotkey Enabled cell The hotkey menu allow...

Page 75: ...01 s This sets the overall recording time Trigger Position 33 3 0 100 0 1 This sets the trigger point as a percentage of the duration For example the default settings show that the overall recording t...

Page 76: ...Min Max Step Size Inputs 1 to 32 Trigger No Trigger except Dedicated Trip Relay O P s which are set to Trigger L H No Trigger Trigger L H Trigger H L Any of the digital channels may be selected to tr...

Page 77: ...Operation P846 EN OP D MiCOM P846 OP OPERATION Date June 2011 Hardware Suffix J Software Version 30L Connection Diagrams 10P846xx xx 01 to 07...

Page 78: ...P846 EN OP D Operation MiCOM P846 OP...

Page 79: ...es or criteria 9 1 3 4 3 Crisp decision sent to the output 11 1 4 Two out of three detection 11 2 OPERATION OF NON PROTECTION FUNCTIONS 12 2 1 Trip LED logic 12 2 2 Voltage transformer supervision VTS...

Page 80: ...tion of the DLO s fuzzy decision system 8 Figure 6 Fuzzification of two decision features 9 Figure 7 Operating conditions resulting in zero MW and Mvar at the sending end 9 Figure 8 DeltaP filter resp...

Page 81: ...are more important than ever to provide a fast secure and reliable ans of providing the power company with contingency p n em or their neighbours system r systems are designed to withstand normal fau...

Page 82: ...internal filters and the delay of its output contacts Figure 1 shows the typical configuration of a line in a HV EHV substation voltage transformer CVT and current transformers CT1 CT2 for breakers a...

Page 83: ...ront end of the system is a data acquisition module w 16 channels of sample and hold capture running at a rate nominal this corresponds to 1920 samples per second o nominal this corresponds to 2000 sa...

Page 84: ...e component at fundamental and the excess electromagnetic resonances that may transiently appear when a line is opened at both ends The principle of the Kalman filter based harmonic analyzer implement...

Page 85: ...g base parameters specified in the relay settings Vbase Base voltage equal to the rated line to line voltage Pbase Base power equal to the line surge impedance loading SIL a nditions the positive sequ...

Page 86: ...nd through them to the disturbance analyzed by the protection A sample general structure of the fuzzy logic engine is shown in Figure 5 It consists of three main steps 1 Fuzzyfication of 10 selected d...

Page 87: ...rom a closed line at a zero active power transfer Therefore it is important to access by theoretical OP computations to what happens to critical measured variables such as the voltage and reactive pow...

Page 88: ...islead a crude open line detector At 4s the power ramp crosses zero and DeltaP reaches a maximum value 30ms later Interestingly while the maximum value of DeltaP varies from 0 02 to 0 4 as the ramp sl...

Page 89: ...1 5 For lower power transfer i e 1 5 the time response is degraded but remains in the 50ms range Additionally when it is locked in a closed state and the line is actually closed the relay remains in t...

Page 90: ...rcuit is treclosd and the Any Pole Dead signal DDB 358 has been reset for three seconds Resetting however will be prevented if the Any start signal is active after the breaker closes OP Any Pole Dead...

Page 91: ...ase voltages to the relay there will be no negative phase sequence quantities present to operate the VTS function However under circumstances a collapse of the three phase voltages will occur If this...

Page 92: ...bsequent system faults to phase voltages above the phase level detector settings mentioned previously A VTS 2 4 ainly because rs However these pieces of equipment are prone to degradation of their cap...

Page 93: ...by the relay to 2 5 determine when the circuit breaker poles are open pole dead A pole dead condition is determined by either monitoring the status of the ng logic If a CB Open signal is given the re...

Page 94: ...Phase C Undervoltage Operation P1112ENe Figure 11 Pole dead logic 2 6 Circuit br onitoring The relay incorporates circuit breaker state monitoring giving an indication of the position of 2 6 1 e set...

Page 95: ...gnal for example CB control auto reclose etc Where only 52A is used on its own then the relay will assume a 52B signal from the absence of the 52A signal Circuit breaker status information will be ava...

Page 96: ...P846 EN OP D Operation OP 5 18 MiCOM P846 P1116ENh 384 388 345 349 OP 386 390 391 387 Figure 12 Circuit breaker state monitoring...

Page 97: ...se the breaker 52A and or 52B contacts the different selection options are th Status Input If no CB auxiliary contacts are available then this cell aker following the close command This time delay wil...

Page 98: ...ollowing a close command then the relay will lockout and alarm The CB CONTROL 0700 CB Control by setting selects the type of circuit breaker control used in the logic If the CB fails to respond to the...

Page 99: ...ose in Prog 702 SET Close Pulse Time Reset Dominant Latch Pulsed output latched in UI 1 1 SET Man Close Relay Reset Dominant Latch DDB Any 3 Pole Trip 487 DDB Control Trip 698 DDB External Trip 3ph 49...

Page 100: ...25 seconds while waiting for the command confirmation the relay reverts to showing the CB Status If no key presses are made for 25 seconds while displaying the CB status screen the relay reverts to th...

Page 101: ...mn has several functions one of which allows the user to configure the control inputs as either latched or pulsed A latched control input will remain in the set state until a reset command is given ei...

Page 102: ...ithin MiCOM S1 generating files with extension psl It is essential that where the installation needs application specific PSL that the appropriate psl file is downloaded sent to the relay for each and...

Page 103: ...bled DDB 32 55 Opto Inputs Set Time Sync associated opto to 0 To impr tim op imatel opto in disabled This is achieved by setting the appropriate bit to 0 in the Opto Filter cell OPTO CONFIG c g may ma...

Page 104: ...P846 EN OP D Operation OP 5 26 MiCOM P846 OP...

Page 105: ...Application Notes P846 EN AP D MiCOM P846 AP APPLICATION NOTES Date June 2011 Hardware Suffix J Software Version 30L Connection Diagrams 10P846xx xx 01 to 07...

Page 106: ...P846 EN AP D Application Notes MiCOM P846 AP...

Page 107: ...OF INDIVIDUAL PROTECTION FUNCTIONS 4 2 1 Open line detector function 4 2 2 Application 4 2 3 Setting guidelines 6 2 4 DLO simulator and some test cases 7 2 4 1 Typical test cases 10 3 AUXILIARY SUPPLY...

Page 108: ...P846 EN AP D Application Notes AP 6 2 MiCOM P846 AP...

Page 109: ...d overvoltage protection schemes are implemented to operate under these unstable power system conditions but these are usually operational when certain critical system conditions have been reached and...

Page 110: ...tectors Moreover this method can be misleading during low or reverse flow conditions These three methods are usable for local detection only The techniques implemented in the P846 relay are an improve...

Page 111: ...configuration of a line in a HV EHV substation with its capacitive voltage transformer CVT and current transformers CT1 CT2 and CT3 CT1 and CT2 are externally summated to give the feeder current to t...

Page 112: ...line Distortion on line voltages and currents during faults Fast variations in the line power flow Reversal of power flow direction Power oscillations Sub synchronous resonances Presence of harmonics...

Page 113: ...ed which requires the nominal line to line voltage and nominal surge impedance loading of the line to be specified Parameters CVT Enable and Threshold are described in paragraph 2 3 of They are used t...

Page 114: ...data files are possible Matlab extension mat Comtrade ASCII or binary extensions cfg and dat B Supplementary information The DLOsimulator requires up to 10 input variables to run a simulation Time 3...

Page 115: ...ally scaling the input variables in seconds Volts and Amps according to the cfg file scaling data C Directory and name AP Specify the data input file directory and name either manually or using the br...

Page 116: ...ctor currents are plotted as the relay analog inputs while the fault detector signal and open line decision are the two digital outputs Case 1 Long line with no fault being opened and reclosed at the...

Page 117: ...eters Nominal frequency Hz 60 0 Nominal line voltage kV 735 Line charging MVar 1228 Line base power MVA 2081 Line initial state Open The DLOout signal is 1 open for the whole simulation At first a sur...

Page 118: ...ne with low transit being opened no fault at remote end Line parameters Nominal frequency Hz 60 0 Nominal line voltage kV 735 Line charging MVar 89 Line base power MVA 2081 Line initial state close In...

Page 119: ...ing opened at both ends to clear a fault Line parameters Nominal frequency Hz 60 0 Nominal line voltage kV 735 Line charging MVar 645 Line base power MVA 2081 Line initial state close The short circui...

Page 120: ...nsit being opened at both ends Line parameters Nominal frequency Hz 60 0 Nominal line voltage kV 735 Line charging MVar 645 Line base power MVA 2081 Line initial state close The 100 compensation gener...

Page 121: ...ing capacity This gives equivalent characteristics to HRC red spot fuses type NIT TIA often specified historically The table below recommends advisory limits on relays connected per fused spur This ap...

Page 122: ...P846 EN AP D Application Notes AP 6 16 MiCOM P846 AP...

Page 123: ...Programmable Logic P846 EN PL D MiCOM P846 PL PROGRAMMABLE LOGIC Date June 2011 Hardware Suffix J Software Version 30L Connection Diagrams 10P846 xx 01 07...

Page 124: ...P846 EN PL D Programmable Logic MiCOM P846 PL...

Page 125: ...6 1 6 1 Link properties 6 1 6 2 Opto signal properties 7 1 6 3 Input signal properties 7 1 6 4 Output signal properties 7 1 6 5 Control in signal properties 8 1 6 6 Fault recorder trigger properties...

Page 126: ...P846 EN PL D Programmable Logic PL 7 2 MiCOM P846 PL...

Page 127: ...nt driven the logic is processed whenever any of its inputs change for example as a result of a change in one of the digital input signals or a trip output from a protection element Also only the part...

Page 128: ...Wrongly ignoring the warning could lead to undesired behavior in the relay If there are any potential problems of an obvious nature then a list will be generated The types of potential problems that...

Page 129: ...1 5 4 Nudge tools To move logic elements 1 5 5 Rotation tools Tools to spin mirror and flip PL 1 5 6 Structure tools To change the stacking order of logic components 1 5 7 Zoom and pan tools For scali...

Page 130: ...OR Gate PL Create an OR Gate Programmable Gate Create a programmable gate 1 6 PSL logic signals properties The logic signal toolbar is used to select logic signals Right click any logic signal and se...

Page 131: ...e cause of the refusal may not be obvious since the existing link may be represented elsewhere in the diagram 1 6 2 Opto signal properties Opto Signal Each opto input can be selected and used for prog...

Page 132: ...operties Fault Record Trigger The fault recording facility can be activated by driving the fault recorder trigger DDB signal For example assert DDB 691 to activate the fault recording in the PSL 1 6 7...

Page 133: ...new symbol 2 Select if the LED should be latching using the Latching check box PL 1 6 10 Contact conditioner properties Each contact can be conditioned with an associated timer that can be selected fo...

Page 134: ...well pulse or pick up drop off operation PL 1 Choose the operation mode from the Timer Mode tick list 2 Set the Pickup Time in milliseconds if required 3 Set the Dropoff Time in milliseconds if requir...

Page 135: ...the Gate type AND OR or Programmable 2 Set the number of inputs to trigger when Programmable is selected 3 Select if the output of the gate should be inverted using the Invert Output check box An inve...

Page 136: ...6 144 Timer out 1 Auxiliary Timer Output from Auxiliary Timer 1 145 159 Timer out 2 16 Auxiliary Timer Output from Auxiliary Timer 2 to 16 160 Control Input 1 Control Input Command Control Input 1 for...

Page 137: ...etected 361 Fault Detected DLO Logic Active when a fault condition is detected 362 2 from 3 detect 2 out of 3 Logic Active when a 2 out of 3 open line condition is detected 363 383 Reserved 384 CB Aux...

Page 138: ...atching Logic 491 Force 3Pole Trip PSL Force 3 Pole tripping 492 External Trip3ph PSL External Trip 3ph 493 External Trip A PSL External Trip A 494 External Trip B PSL External Trip B 495 External Tri...

Page 139: ...imate conditions when the relay suspends frequency tracking on the instruction of the distance elements 739 769 Reserved 770 VTS Inhibit PSL Inhibit VTS element 771 VTS Fast Block VT Supervision VT Su...

Page 140: ...start The fault record trigger DDB 691 requires a rising edge for operation In other words the input to the FRT signal must go from a low de energized to a high energized state When the rising edge oc...

Page 141: ...loading a PSL to the relay the user will be prompted to enter which group the PSL is for and a reference identifier The first 32 characters of the reference ID will be displayed in this cell The and k...

Page 142: ...HEME LOGIC Output Relay Mappings Straight 0 0 Output R3 DDB 002 Pick Up 0 0 Output R5 DDB 004 DDB 691 Fault REC TRIG DDB 360 Open Line Detect DDB 361 Fault Detected DDB 260 CVT Alarm Straight 0 0 Outp...

Page 143: ...Measurements and Recording P846 EN MR D MiCOM P846 MR MEASUREMENTS AND RECORDING Date June 2011 Hardware Suffix J Software Version 30L Connection Diagrams 10P846xx xx 01 to 07...

Page 144: ...P846 EN MR D Measurements and Recording MiCOM P846 MR...

Page 145: ...n element starts and trips 5 1 2 1 5 General events 5 1 2 1 6 Fault records 5 1 2 1 7 Maintenance reports 6 1 2 1 8 Setting changes 6 1 2 2 Resetting of event fault records 6 1 2 3 Viewing event recor...

Page 146: ...P846 EN MR D Measurements and Recording MR 8 2 MiCOM P846 MR...

Page 147: ...ing table VIEW RECORDS LCD Reference Description Select Event Setting range from 0 to 511 This selects the required event record from the possible 512 that may be stored A value of 0 corresponds to th...

Page 148: ...f the opto inputs where the least significant bit extreme right corresponds to opto input 1 etc The same information is present if the event is extracted and viewed via PC 1 2 1 2 Change of state of o...

Page 149: ...invisible when the event is viewed on the LCD 1 2 1 5 General events A number of events come under the heading of General Events an example is shown below Nature of Event Displayed Text in Event Recor...

Page 150: ...ttings are communications measurement CT VT 1 2 2 Resetting of event fault records e event fault or maintenance reports this may be done from 1 2 3 rt software PC they look slightly different than 9 G...

Page 151: ...arm bit being set in the communications status byte Alarms can still be read using the Read key on the relay front panel Relay O P Event No event will be generated for any change in relay output state...

Page 152: ...ote that will choose a scaling factor of zero for the approp CORDER menu column is shown in the Setting Range Menu Text Default Setting Step Siz Min Max e DISTURB RECORDER Duration 1 5s 0 1s 10 5s 0 0...

Page 153: ...when determining default settings etc The pre and post fault recording times are set by a combination of the Duration and Trigger Position cells Duration sets the overall recording tim sets the trigge...

Page 154: ...g the measurement mode setting The four options are defined in the table below Measurement Mode Parameter Signing 0 Default Import Power Lagging Vars Export Power Leading VArs 1 Export Power Import Po...

Page 155: ...riod length with the displayed values being updated at the end of each of the sub period k demand values each phase cu re value of the g measuremen lt Settings MEASUREMENT SETUP Default Display Descri...

Page 156: ...7 Measurement display quantities surement columns available in the relay for viewing of measurement r Manual and are shown below REMENTS 1 MEA There are two Mea quantities These can also be viewed wi...

Page 157: ...e 0 A IB Fixed Demand 0 A IA2 Phase Angle 0 A IC Fixed Demand 0 A IB2 Magnitude 0 A 3Ph W Roll Dem 0 W IB2 Phase Angle 0 A 3Ph VArs RollDem 0 VAr IC2 Magnitude 0 A IA Roll Demand 0 A IC2 Phase Angle 0...

Page 158: ...le 4 0 PP_kA 0 Fuzzy Rule 5 0 PP_OldDLO 0 Fuzzy Rule 6 0 PP_OldFuzzy 0 Fuzzy Rule 7 0 PP_Startup 0 Fuzzy Rule 8 0 PP_Fault 0 Fuzzy Rule 9 0 Vs 0 V Fuzzy Rule 10 0 Is 0 A Fuzzy Rule 11 0 Vp 0 A Fuzzy R...

Page 159: ...Firmware Design P846 EN FD D MiCOM P846 FD FIRMWARE DESIGN Date June 2011 Hardware Suffix J Software Version 30L Connection Diagrams 10P846xx xx 01 to 07...

Page 160: ...P846 EN FD D Firmware Design MiCOM P846 FD...

Page 161: ...ternal communication buses 6 1 3 4 Input module 6 1 3 4 1 Transformer board 6 1 3 4 2 Input board 6 1 3 4 3 Universal opto isolated logic inputs 7 1 3 5 Power supply module including output relays 8 1...

Page 162: ...quisition and buffer pro 16 1 5 3 Faulted phase selection 16 1 5 4 The fault location calcula 16 1 5 4 1 Obtaining the vectors 17 1 5 4 2 Solving the equation fo 17 1 5 4 3 Data acquisition and buffer...

Page 163: ...connection for the rear communication port On a second board the power supply module contains the relays that provide the output contacts The first four are fast static contacts with a response to co...

Page 164: ...n volatile memory SRAM Flash EPROM CPU Front LCD panel RS232 Front comms port Parallel test port LEDs Digital inputs Output relay contacts ADC Present values of all settings CPU code data setting data...

Page 165: ...corder The analog values and logic signals are routed from the protection and control software to the disturbance recorder software The platform software interfaces to the disturbance recorder to allo...

Page 166: ...sor has a built in serial port that is used to read the sample data from the serial bus The serial bus is also carried on the 64 way ribbon cable 1 3 4 Input module The input module provides the inter...

Page 167: ...lel data bus for processing The input board holds 8 optical isolators for the connection of up to eight digital input signals The opto isolators are used with the digital signals for the same reason a...

Page 168: ...e relay The three options are shown in table 1 below Nominal dc Range Nominal ac Range 24 54 V DC only 48 125 V 30 100 Vrms 110 250 V 100 240 Vrms Table 1 Power supply options The output from all vers...

Page 169: ...t state is written to or Depending on the relay model up to three output relay boards may be fitted to the P846 relay to provide a total number of 32 relay outputs IRIG B board The IRIG B board is an...

Page 170: ...P2083ENa Language Courier always Physical links EIA 232 or EIA 485 polarity sensitive or K Bus non polarity sensitive SK5 SK4 Physical links are s w selectable Optional IRIG B Courier Port EIA232 EIA...

Page 171: ...IRIG B signal 9 pin and 25 pin female D connectors are used at the front of the relay for data communication Inside the relay the PCBs plug into the connector blocks at the rear and can be removed fr...

Page 172: ...e time available and in the desired order of priority The operating system is also responsible in part for controlling the communication between the software tasks through the use of operating system...

Page 173: ...software is to implement the relay s internal interface between the database and each of the relay s user interfaces The database of settings and measurements must be accessible from all of the relay...

Page 174: ...gic gates can be programmed to perform a range of different logic functions and can accept any number of inputs The timers are used either to create a programmable delay and or to condition the logic...

Page 175: ...recording time is user selectable up to a maximum of 10 seconds The disturbance recorder is supplied with data by the protection and control task once per cycle The disturbance recorder collates the d...

Page 176: ...is ensures that fault location can be calculated for all shots on a typical multiple re close sequence FD 1 5 3 Faulted phase selection Selection of the faulted phase s is performed by comparing the m...

Page 177: ...A phase to B phase fault pZr a Zline THETA line b Zresidual THETA residual equation 3 and Vp VA VB 1 5 4 2 Solving the equation for the fault location As the sine wave of f passes through zero the in...

Page 178: ...via the programmable scheme logic The fault locator can store data for up to four faults This ensures that fault location can be calculated for all shots on a typical multiple re close sequence 1 6 S...

Page 179: ...ing the supervisor task In the course of the initialization process the relay checks The status of the battery The integrity of the battery backed up SRAM that is used to store event fault and disturb...

Page 180: ...within the relay s subsystems the platform software is notified and it will backed up SRAM If the problem is with the battery status or the IRIG B board the relay will continue in operation However f...

Page 181: ...Commissioning P846 EN CM D MiCOM P846 CM COMMISSIONING Date June 2011 Hardware Suffix J Software Version 30L Connection Diagrams 10P846xx xx 01 to 07...

Page 182: ...P846 EN CM D Commissioning MiCOM P846 CM...

Page 183: ...ODUCT CHECKS 9 5 1 With the relay de energized 9 5 1 1 Visual inspection 9 5 1 2 Current transformer shorting contacts optional check 10 5 1 3 Insulation 11 5 1 4 External wiring 12 5 1 5 Watchdog con...

Page 184: ...Demonstrate correct relay operation 20 6 2 1 Open line detector protection testing 20 6 2 1 1 Connection and preliminaries 20 6 2 1 2 Security test 21 6 2 1 3 Check the operating time 21 6 3 Disable a...

Page 185: ...he contrary the customer will be responsible for determining the application specific settings to be applied to the relay and for testing of any scheme logic applied by external wiring and or configur...

Page 186: ...to 1022 See section P846 EN PL for details of Digital Data Bus signals Monitor Bit 2 65 LED 2 0 to 1022 Monitor Bit 3 66 LED 3 0 to 1022 Monitor Bit 4 67 LED 4 0 to 1022 Monitor Bit 5 68 LED 5 0 to 10...

Page 187: ...e of the DDB signals can be displayed as various operating conditions or sequences are applied to the relay Thus the programmable scheme logic can be tested As an alternative to using this cell the op...

Page 188: ...s cell is issued the contacts set for operation set to 1 in the Test Pattern cell change state After the test has been applied the command text on the LCD will change to No Operation and the contacts...

Page 189: ...the secondary front cover allows access to all keys so that settings can be changed LEDs and alarms reset and fault and event records cleared However menu cells that have access levels higher than th...

Page 190: ...equipment Multi finger test plug type P992 if test block type P991 installed or MMLB if using MMLG blocks An electronic or brushless insulation tester with a dc output not exceeding 500V for insulatio...

Page 191: ...applied to the relay and with the trip circuit isolated The current and voltage transformer connections must be isolated from the relay for these checks If a P991 test block is provided the required i...

Page 192: ...ower Supply Connection Rear Comms Port EIA485 Digital Input Connection Digital Input Connection IRIG B and 2nd Rear Comms Board Digital Output Connection Figure 1 Rear terminal blocks on size 80TE cas...

Page 193: ...he earth and test the insulation with an electronic or brushless insulation tester at a dc voltage not exceeding 500V Terminals of the same circuits should be temporarily connected together CM The mai...

Page 194: ...he relay can be operated from either a dc only or AC DC auxiliary supply depending on the relay s nominal supply rating The incoming voltage must be within the operating range specified in Table 3 Wit...

Page 195: ...vent it from falling out of the battery compartment pull the red tab to remove the isolation strip The date and time should now be set to the correct values The method of setting will depend on whethe...

Page 196: ...out there is no testing required for that LED because it is known to be operational Note It is likely that alarms related to the communications channels will not reset at this stage 5 2 4 1 Testing th...

Page 197: ...is test checks that all the output relays are functioning correctly The P846 with I O option A model no begins P846xxxA has 8 relay outputs The P846 with I O option B model no begins P846xxxB has 32 r...

Page 198: ...the incoming remote from relay nverter connected to the relay s second rear communications port EI nd pa ation softwa set the s as those on the protoc RTU T lay s Courier address i must be set to a va...

Page 199: ...ATIONS RP2 Port Config must be set to K Bus Check that communications can be established with this relay using the portable PC EIA RS 485 configuration If an EIA RS 485 to EIA RS 232 convertor Alstom...

Page 200: ...e using a multimeter test set readout The measured current values displayed on the relay LCD or a portable PC connected to the front communication port will either be in primary or secondary Amperes I...

Page 201: ...n see Table 8 If cell 0D02 MEASURE T SETUP Local Values is set to Secondary the value displayed should be equal to the applied voltage Note If a PC connected to the relay via the rear communications p...

Page 202: ...lly via the relay s operator interface This method is not suitable for changing the programmable scheme logic Note It is essential that where the installation needs application specific Programmable S...

Page 203: ...voltage to 0V noting that the Open Line Detect trip does not operate and the relay remains secure for this loss of voltage condition 6 2 1 3 Check the operating time Re apply nominal current and volt...

Page 204: ...e and compare them with the original application specific setting record Ensure that all protection elements required have been ENABLED in the CONFIGURATION column Unless previously agreed to the cont...

Page 205: ...meter Compare the values of the secondary phase voltages with the relay s measured values which can be found in the MEASUREMENTS 1 menu column Voltage Cell in MEASUREMENTS 1 column 02 Corresponding VT...

Page 206: ...ual to the applied secondary current multiplied by the corresponding current transformer ratio set in CT VT RATIOS menu column see Table 9 Again the values should be within 1 of the expected value plu...

Page 207: ...allation or the circuit breaker has just been maintained the circuit breaker maintenance and current counters should be zero These counters can be reset using cell 0609 CB CONDITION Reset All Values I...

Page 208: ...ted voltage Vn Auxiliary voltage Vx Test Equipment Used This section should be completed to allow future identification of protective devices that have been commissioned using equipment that is later...

Page 209: ...V dc Yes No Not Tested 5 1 4 External wiring Wiring checked against diagram Yes No Test block connections checked Yes No N A 5 1 5 Watchdog contacts auxiliary supply off Terminals 11 and 12 Contact cl...

Page 210: ...working Yes No Opto input 4 working Yes No Opto input 5 working Yes No Opto input 6 working Yes No Opto input 7 working Yes No Opto input 8 working Yes No Opto input 9 working Yes No Opto input 10 wo...

Page 211: ...ay 5 working Yes No Relay 6 working Yes No Relay 7 working Yes No Relay 8 working Yes No Relay 9 working Yes No Relay 10 working Yes No Relay 11 working Yes No Relay 12 working Yes No Relay 13 working...

Page 212: ...Yes No N A Relay 29 working Yes No N A Relay 30 working Yes No N A Relay 31 working Yes No N A Relay 32 working Yes No N A 5 2 8 Communication standard Courier DNP3 0 Communications established Yes N...

Page 213: ...ed current A Expected operating time s Measured operating time s 6 3 All commissioning test options disabled Yes No 6 4 Application specific function settings verified Yes No N A Application specific...

Page 214: ...ircuit breaker operations counter reset Yes No N A Current counters reset Yes No N A Event records reset Yes No Fault records reset Yes No Disturbance records reset Yes No Alarms reset Yes No LEDs res...

Page 215: ...Commissioning P846 EN CM D MiCOM P846 CM 10 33 CM COMMENTS Optional for site observations or utility specific notes Commissioning Engineer Customer Witness Date Date...

Page 216: ...ated voltage Vn Auxiliary voltage Vx Setting Groups Used Delete as appropriate Group 1 Yes No Group 2 Yes No Group 3 Yes No Group 4 Yes No 01 Language English 0000 SYSTEM DATA 00 Francais Deutsche Esp...

Page 217: ...led 0909 Setting Group 3 Disabled Enabled 090A Setting Group 4 Disabled Enabled 0920 CB Fail Disabled Enabled 0921 Supervision Disabled Enabled 0922 Fault Locator Disabled Enabled 0925 Input Labels In...

Page 218: ...d 0B06 Opto Input Event Disabled Enabled 0B07 General Event Disabled Enabled 0B08 Fault Rec Event Disabled Enabled 0B09 Maint Rec Event Disabled Enabled 0B0A Protection Event Disabled Enabled 0C00 DIS...

Page 219: ...H Trigger H L 0C1A Digital Input 8 0C1B Input 8 Trigger No Trigger Trigger L H Trigger H L 0C1C Digital Input 9 0C1D Input 9 Trigger No Trigger Trigger L H Trigger H L 0C1E Digital Input 10 0C1F Inpu...

Page 220: ...ger L H L Trigger H 0C34 Digital Input 21 0C35 Input 21 Trigger No Trigger Trigger L H Trigger H L 0C36 Digital Input 22 0C37 Input 22 Trigger No Trigger Trigger L H Trigger H L 0C38 Digital Input 23...

Page 221: ...A RS 485 Fiber Optic 0E08 RP1 Time Sync Disabled Enabled 0E88 RP2 Port Config K Bus EIA RS 485 0E8A RP2 Comms Mode 2 IEC60870 FT1 10 Bit Frame 0E90 RP2 Address 0E92 RP2 InactivTimer 0E94 RP2 Baud Rate...

Page 222: ...Input 24 1150 Filter Control 1180 Characteristic Standard 60 80 50 70 1300 CTRL I P CONFIG 1301 Hotkey Enabled 1310 Control Input 1 Latched Pulsed 1311 Ctrl Command 1 1314 Control Input 2 Latched Pul...

Page 223: ...17 Latched Pulsed 1351 Ctrl Command 17 1354 Control Input 18 Latched Pulsed 1355 Ctrl Command 18 1358 Control Input 19 Latched Pulsed 1359 Ctrl Command 19 135C Control Input 20 Latched Pulsed 135D Ct...

Page 224: ...ntrol Input 5 2906 Control Input 6 2907 Control Input 7 2908 Control Input 8 2909 Control Input 9 290A Control Input 10 290B Control Input11 290C ontrol Input 12 C 290D Control Input 13 290E Control I...

Page 225: ...roup ttings Group 1 Settin 4602 VTS Status 4603 VTS Reset Mode 4604 VTS Time Delay 4605 VTS I Inhibit 4606 VTS I2 Inhibit 1 Se Group 2 s Group 3 Group 4 ing 4A00 INPUT LABELS Group ttings Group 1 Sett...

Page 226: ...Group ttings Group 1 2 Group 3 Settin 4B01 Relay 1 4B02 Relay 2 4B03 Relay 3 4B04 Relay 4 4B05 Relay 5 4B06 Relay 6 4B07 Relay 7 4B08 Relay 8 4B09 Relay 9 4B0A Relay 10 4B0B Relay 11 4B0C Relay 12 4B...

Page 227: ...Commissioning P846 EN CM D MiCOM P846 CM 10 45 CM 4B00 OUTPUT LABELS 4B1F Relay 31 4B20 Relay 32 miss Customer Witness Com ioning Engineer Date ate D...

Page 228: ...P846 EN CM D Commissioning CM 10 46 MiCOM P846 CM...

Page 229: ...Maintenance P846 EN MT D MiCOM P846 MT MAINTENANCE Date June 2011 Hardware Suffix J Software Version 30L Connection Diagrams 10P846xx xx 01 to 07...

Page 230: ...P846 EN MT D Maintenance MiCOM P846 MT...

Page 231: ...rs 3 1 2 3 Output relays 3 1 2 4 Measurement accuracy 3 1 3 Method of repair 4 1 3 1 MiCOM P846 relay 4 1 3 1 1 Replacing the complete relay 4 1 3 1 2 Replacing a PCB 5 1 4 Re calibration 5 1 4 1 P846...

Page 232: ...P846 EN MT D Maintenance MT 11 2 MiCOM P846 MT...

Page 233: ...fety and Technical Data sections and the ratings on the equipment s rating label 1 2 1 Alarms The alarm status LED should first be checked to identify if any alarm conditions exist If so press the rea...

Page 234: ...e been designed to facilitate removal of the complete relay should replacement or repair become necessary without having to disconnect the scheme wiring Before working at the rear of the relay isolate...

Page 235: ...ormer connections and trip circuit are isolated Alstom Grid Automation Support teams are available world wide and it is strongly recommended that any repairs be entrusted to those trained personnel Fo...

Page 236: ...re isolated to prevent any chance of an electric shock lvents or abrasive cleaners is not recommended as they may damage the ry is securely held in its socket and that the battery terminals are ith th...

Page 237: ...Troubleshooting P846 EN TS D MiCOM P846 TS TROUBLESHOOTING Date June 2011 Hardware Suffix J Software Version 30L Connection Diagrams 10P846xx xx 01 to 07...

Page 238: ...P846 EN TS D Troubleshooting MiCOM P846 TS...

Page 239: ...T OF SERVICE LED ILLUMINATED ON POWER UP 6 6 ERROR CODE DURING OPERATION 7 7 MAL OPERATION OF THE RELAY DURING TESTING 8 7 1 Failure of output contacts 8 7 2 Failure of opto isolated inputs 8 7 3 Inco...

Page 240: ...P846 EN TS D Troubleshooting TS 12 2 MiCOM P846 TS...

Page 241: ...s of the problem Symptom Refer To Relay fails to power up Section 4 Relay powers up but indicates error and halts during power up sequence Section 5 Relay Powers up but Out of Service LED is illuminat...

Page 242: ...g the error code and relay information If the same code is displayed proceed to test 3 Error code Identification Following text messages in English will be displayed if a fundamental problem is detect...

Page 243: ...ogic error due to excessive execution time Restore default settings by performing a power up with and keys depressed confirm restoration of defaults at prompt using key If relay powers up successfully...

Page 244: ...dicates the causes of the failure using bit fields Bit Meaning 0 The application type field in the model number does not match the software ID 1 The application field in the model number does not matc...

Page 245: ...ere are also two cases where a maintenance record will be logged due to a detected error where the relay will not reset These are detection of a failure of either the field voltage or the lithium batt...

Page 246: ...his purpose If the output relay does operate then the problem must be in the external wiring to the relay If the output relay does not operate this could indicate a failure of the output relay contact...

Page 247: ...elay and or the type of connection Modem configuration is not valid Changes may be necessary when using a modem The connection cable is not wired correctly or broken See MiCOM S1 connection configurat...

Page 248: ...ry and invoice addresses Contact details 3 Send RMA form to your local contact 4 Receive from local service contact the information required to ship the product Your local service contact will provide...

Page 249: ...y delays in return will occur if not completed Model No Part No M Manufacturer Reference M Serial No M Software Version Quantity Site Name Project Commissioning Date Under Warranty Yes No Additional I...

Page 250: ...elephone No Fax No E mail Contact Name Telephone No Fax No E mail REPAIR TERMS 1 Please ensure that a copy of the import invoice is attached with the returned unit together with the airway bill docume...

Page 251: ...SCADA Communications P846 EN SC D MiCOM P846 SC SCADA COMMUNICATIONS Date June 2011 Hardware Suffix J Software Version 30L Connection Diagrams 10P846xx xx 01 to 07...

Page 252: ...P846 EN SC D SCADA Communications MiCOM P846 SC...

Page 253: ...FACE 11 2 1 Courier protocol 11 2 2 Supported command set 11 2 3 Relay courier database 12 2 4 Setting changes 12 2 4 1 Setting transfer mode 13 2 5 Event extraction 13 2 5 1 Automatic event extractio...

Page 254: ...IGURES Figure 1 EIA RS 485 bus connection arrangements 4 ments le 1 Figure 2 Remote communication connection arrange 5 Figure 3 Second rear port K Bus application 9 Figure 4 Second rear port EIA RS 48...

Page 255: ...e rear port the two signal connections are not polarity conscious however for MODBUS IEC60870 5 103 and DNP3 0 care must be taken to observe the correct polarity The protocol provided by the relay is...

Page 256: ...transmit Jabber causes the receiving device s to miss the first bits of the first character in the packet which results in the slave rejecting the message and consequentially not responding Symptoms...

Page 257: ...t is available from Alstom Grid A typical connection arrangement is shown in Figure 2 For more detailed information on other possible connection arrangements refer to the manual for the Courier master...

Page 258: ...tes Note that protection and disturbance recorder settings that are modified using an on line editor such as PAS T must be confirmed with a write to the Save changes cell of the Configuration column O...

Page 259: ...d The time sync can be set to either enabled or disabled If enabled it allows the DNP 3 0 master to synchronize the time 1 3 Fiber optic converter An optional fiber optic card is available in this pro...

Page 260: ...Figure 2 it is y to have a unique address so that messages from the master control e master station to communicate with the relay The default value is 255 and must be changed in the range 0 to The nex...

Page 261: ...Master 3 K Bus port 3 POWER SUPPLY CENTRAL PROCESSOR R T U To SCADA K Bus st nd KITZ102 Note 1 RP could be any chosen protocol 2 RP is always Courier Figure 3 Second rear port K Bus application EIA R...

Page 262: ...m PC local front rear access 2nd RP EIA232 modem m EIA RS 232 Application example Master 1 Master 2 SC odem EIA232 EIA232 EIA232 EIA232 POWER SUPPLY CENTRAL PROCESSOR R T U Note 1st RP could be any ch...

Page 263: ...Bus is based on EIA RS 485 voltage levels it is a synchronous HDLC protocol using FM0 encoding It is not possible to use a standard EIA RS 232 to EIA RS 485 converter to convert IEC60870 5 FT1 2 fram...

Page 264: ...tting Group Change Device Address Set Real Time Note Commands indicated with a are not supporte port Relay courier database The Courier database is a two dimensional structure with each cell in the da...

Page 265: ...ct state of opto input e Type 3 Courier Event 2 5 3 lts in the following fields being returned by the relay Setting transfer mode If it is necessary to transfer communication system data c mode are st...

Page 266: ...ort does not support automatic extraction although disturbance record data can be extracted manually from this port The menu database P indicates how the co maintenance records will return a Courier T...

Page 267: ...the relay using the block transfer Guide The following cells a B204 Domain Used to select either PSL settings Upload or download or PSL configuration data Upload only B208 Sub Domain Used to select th...

Page 268: ...None Odd Even Parity setting Time Sync Enabled Disabled Enables or disables the relay requesting time sync from the master via IIN bit 4 word 1 3 3 Object 1 binary inputs Object 1 binary inputs conta...

Page 269: ...elay s measurements co point values although they are store oint format The co iffers for the various t ersion to fixed point format require pes of data within caling factor hase a data types supp pe...

Page 270: ...porting by the user when a poll for all points i Object 20 The running counter value of object 20 points can be configured to be in or out of class 0 Any running counter that is in class 0 can have it...

Page 271: ...Symbols and Glossary P846 EN SG D MiCOM P846 SG SYMBOLS AND GLOSSARY Date June 2011 Hardware Suffix J Software Version 30L Connection Diagrams 10P846xx xx 01 to 07...

Page 272: ...P846 EN SG D Symbols and Glossary MiCOM P846 SG...

Page 273: ...cate a time constant often associated with thermal characteristics BU Backup Typically a back up protection element C O A changeover contact having normally closed and normally open connections Often...

Page 274: ...L1 red phase or other in customer terminology IB yellow phase or other in customer terminology Phase B current Might be phase L2 IC blue phase or other in customer terminology Phase C current Might be...

Page 275: ...SL figuration that can be modified by the user using the Programmable scheme logic The part of the relay s logic con graphical editor within S1 software Rev flow in the reverse direction Indicates an...

Page 276: ...Might be phase L3 blue phase or other in customer terminology Vk IEC knee point voltage of a current transformer Vn The rated nominal voltage of the relay To match the line VT input VT Voltage transf...

Page 277: ...INPUT OUTPUT INPUT OUTPUT t t 0 Delay on drop off timer t t t INPUT OUTPUT INPUT OUTPUT 0 t Delay on pick up drop off timer t1 t2 t1 t2 INPUT OUTPUT INPUT OUTPUT t1 t2 t Pulse timer t t INPUT OUTPUT I...

Page 278: ...Symbols and Glossary SG 14 6 MiCOM P846 Logic Symbols Explanation Time Chart Dwell timer INPUT OUTPUT INPUT OUTPUT t Timer Dwell t Straight non latching Hold value until input reset signal INPUT OUTPU...

Page 279: ...Truth Table IN 1 1 0 1 0 1 0 1 1 0 0 0 A B Y OUT IN 1 1 1 1 0 0 0 1 0 0 0 1 A B Y OUT IN 1 1 1 1 0 0 0 1 0 0 0 1 A B Y OUT EXCLUSIVE OR GATE XOR A B Y XOR A B Y XOR A B Y Symbol Truth Table Symbol Tru...

Page 280: ...P846 EN SG D Symbols and Glossary SG 14 8 MiCOM P846 SG...

Page 281: ...Installation P846 EN IN D MiCOM P846 IN INSTALLATION Date June 2011 Hardware Suffix J Software Version 30L Connection Diagrams 10P846xx xx 01 to 07...

Page 282: ...P846 EN IN D Installation MiCOM P846 IN...

Page 283: ...connections 8 6 2 EIA RS 485 port 9 6 3 IRIG B connections if applicable 9 6 4 EIA RS 232 front port 9 6 5 Download monitor port 9 6 6 Earth connection 9 7 P846 CASE DIMENSIONS 11 8 P846 EXTERNAL CONN...

Page 284: ...P846 EN IN D Installation IN 15 2 MiCOM P846 IN...

Page 285: ...ard ensure that you are at the same electrostatic potential as the equipment by touching the case Handle analog input modules by the front panel frame or edges of the circuit boards Printed circuit bo...

Page 286: ...and the de humidifier crystals will lose their efficiency Prior to installation relays should be stored at a temperature of between 25 C to 70 C 13 F to 158 F 4 UNPACKING Care must be taken when unpa...

Page 287: ...s necessary to test correct relay operation during the installation the battery isolation strip can be removed but should be replaced if commissioning of the scheme is not imminent The red tab of the...

Page 288: ...enables schemes using products from the MiCOM and MiDOS product ranges to be pre wired together prior to mounting Where the case size summation is less than 80TE on any tier or space is to be left for...

Page 289: ...ection or projection mounted a range of collars are available Where several relays are to mounted in a single cutout in the panel it is advised that they are mechanically grouped together horizontally...

Page 290: ...lation requirements for safety an insulating sleeve should be fitted over the ring terminal after crimping The following minimum wire sizes are recommended Current Transformers 2 5mm2 Auxiliary Supply...

Page 291: ...tance of 2500pF The cable should be terminated at the relay end with a 9 way metal shelled D type male plug The pin allocations are detailed in section 1 8 of Getting Started P846 EN GS 6 5 Download m...

Page 292: ...7 8 are Normally Open Normally Closed standard contact Relay outputs 9 14 are Normally Open standard contact Relay outputs 15 16 are Normally Open Normally Closed standard contact Relay outputs 17 22...

Page 293: ...Installation P846 EN IN D MiCOM P846 IN 15 11 7 P846 CASE DIMENSIONS Figure 3 Case dimensions IN...

Page 294: ...P846 EN IN D Installation IN 15 12 MiCOM P846 8 P846 EXTERNAL CONNECTION DIAGRAMS P1755ENb NOT CONNECTED IN Figure 4 Model A with 8 output contacts and 8 digital inputs...

Page 295: ...Installation P846 EN IN D MiCOM P846 IN 15 13 P1756ENa IN Figure 5 Model B with 32 output contacts and 24 digital inputs...

Page 296: ...P846 EN IN D Installation IN 15 14 MiCOM P846 IN...

Page 297: ......

Page 298: ...ided for information only Neither ALSTOM its officers or employees accept responsibility for or should be taken as making any representation or warranty whether express or implied as to the accuracy o...

Reviews: