


Chapter 8 Basic Setting
XGS4600 Series User’s Guide
104
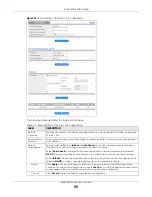
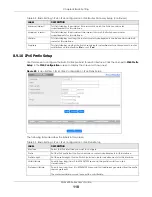
8.9.4 IPv6 Global Setup
Use this screen to configure the global IPv6 settings. Click the link next to
IPv6 Global Setup
in the
IPv6
Configuration
screen to display the screen as shown next.
Figure 79
Basic Setting > IPv6 > IPv6 Configuration > IPv6 Global Setup
The following table describes the labels in this screen.
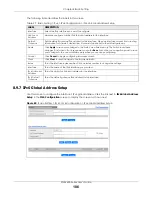
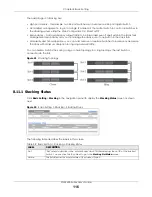
8.9.5 IPv6 Interface Setup
Use this screen to turn on or off an IPv6 interface. Click the link next to
IPv6 Interface Setup
in the
IPv6
Configuration
screen to display the screen as shown next.
IPv6 Neighbor Setup
Click the link to go to a screen where you can create a static IPv6 neighbor entry in the
Switch’s IPv6 neighbor table.
DHCPv6 Client Setup Click the link to go to a screen where you can configure the Switch DHCPv6 client settings.
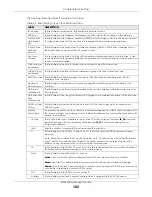
Table 26 Basic Setting > IPv6 > IPv6 Configuration (continued)
LABEL
DESCRIPTION
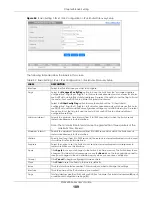
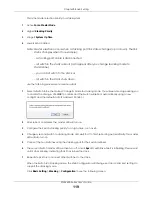
Table 27 Basic Setting > IPv6 > IPv6 Configuration > IPv6 Global Setup
LABEL
DESCRIPTION
IPv6 Hop Limit
Specify the maximum number of hops (from 1 to 255) in router advertisements. This is the
maximum number of hops on which an IPv6 packet is allowed to transmit before it is discarded by
an IPv6 router, which is similar to the TTL field in IPv4.
ICMPv6 Rate
Limit Bucket
Size
Specify the maximum number of ICMPv6 error messages (from 1 to 200) which are allowed to
transmit in a given time interval. If the bucket is full, subsequent error messages are suppressed.
ICMPv6 Rate
Limit Error
Interval
Specify the time period (from 0 to 2147483647 milliseconds) during which ICMPv6 error messages
of up to the bucket size can be transmitted. 0 means no limit.
Apply
Click
Apply
to save your changes to the Switch’s run-time memory. The Switch loses these
changes if it is turned off or loses power, so use the
Save
link on the top navigation panel to save
your changes to the non-volatile memory when you are done configuring.
Cancel
Click
Cancel
to begin configuring this screen afresh.
Clear
Click
Clear
to reset the fields to the factory defaults.
Содержание XGS4600 Series
Страница 24: ...24 PART I User s Guide ...
Страница 44: ...44 PART II Technical Reference ...
Страница 180: ...Chapter 13 Spanning Tree Protocol XGS4600 Series User s Guide 180 Figure 145 MSTP and Legacy RSTP Network Example ...
Страница 189: ...Chapter 16 Mirroring XGS4600 Series User s Guide 189 Figure 150 Advanced Application Mirroring Standalone Mode ...
Страница 244: ...Chapter 22 Policy Rule XGS4600 Series User s Guide 244 Figure 189 Policy Example EXAMPLE ...
Страница 277: ...Chapter 25 Multicast XGS4600 Series User s Guide 277 Figure 215 Advanced Application Multicast MVR Standalone Mode ...
Страница 559: ...Chapter 59 Access Control XGS4600 Series User s Guide 559 Figure 460 Example Lock Denoting a Secure Connection EXAMPLE ...
Страница 586: ...Chapter 69 Configure Clone XGS4600 Series User s Guide 586 Figure 479 Management Configure Clone Standalone Mode ...
Страница 587: ...Chapter 69 Configure Clone XGS4600 Series User s Guide 587 Figure 480 Management Configure Clone Stacking Mode ...
Страница 594: ...Chapter 71 Port Status XGS4600 Series User s Guide 594 Figure 485 Management Port Status Port Details Standalone Mode ...
Страница 604: ...604 PART III Troubleshooting and Appendices ...


