Voice Creator—Custom Voice Edit
Reference
99
Tyros2 Owner’s Manual
14
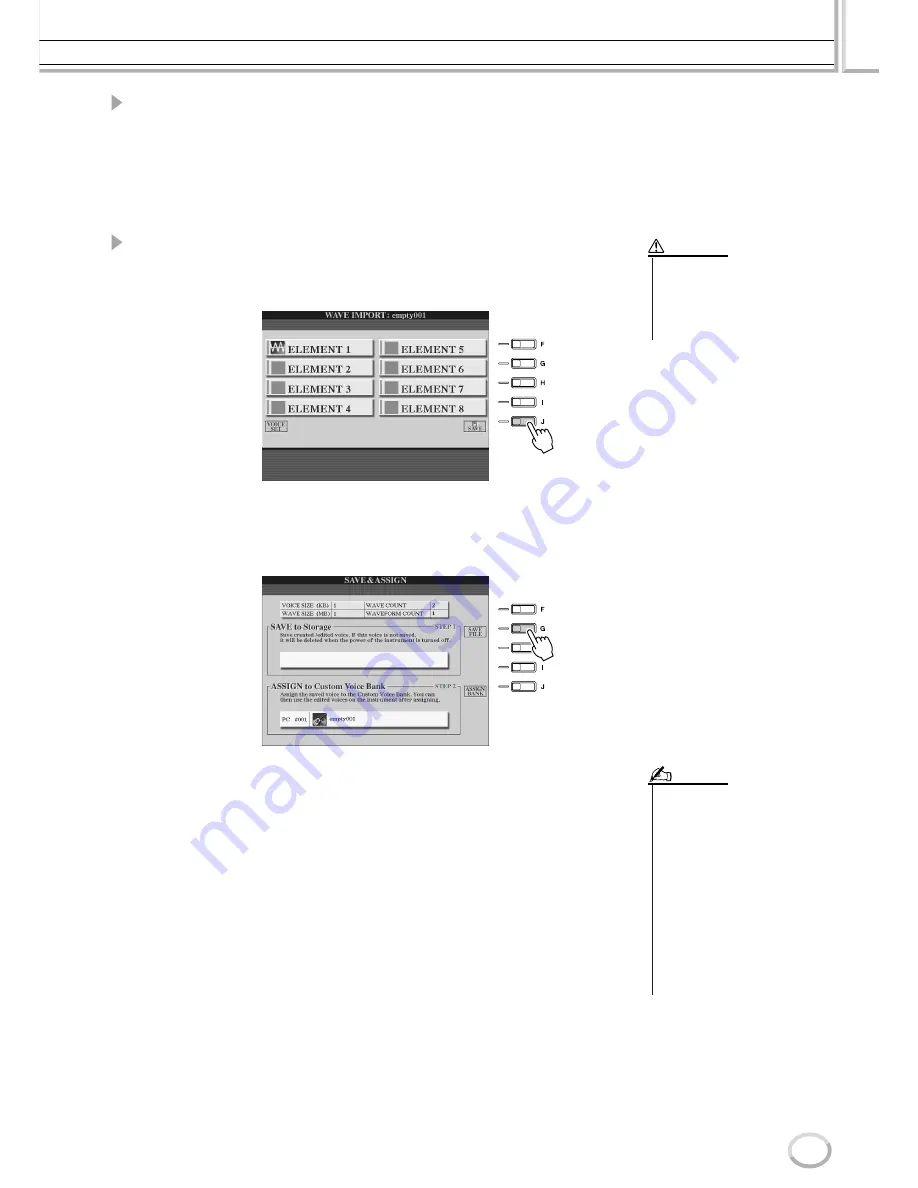
Edit the voice by using the Voice Set parameters.
Before saving, edit the parameters of your new voice.
1) Press the [EXIT] button to show the WAVE IMPORT display.
2) Press the [VOICE SET] LCD button ([E] button).
For details on the Voice Set parameters, refer to the section “Editing a Voice” on
page 91.
3) Press the [EXIT] button to show the WAVE IMPORT display again.
15
Save and assign the newly created voice.
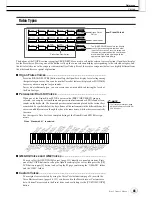
Press the [SAVE] LCD button ([J] button). The Save operation is actually a two-step
process:
Step 1—Save the voice to a storage device
This step ensures that the data will be available, even in the event of a power failure
or accidental shut down.
1) Press the [SAVE FILE] LCD button ([G] button).
2) Select the location and folder, using the [TAB] buttons and LCD buttons. Create
a folder if necessary by pressing the [FOLDER] LCD button (lower [7] button).
3) Press the [SAVE] LCD button (lower [6] button).
4) Enter a name for the voice. (See page 76.)
5) Press the [OK] LCD button (upper [8] button).
• The created voice will be lost if
you change to another voice or
you turn the power off without
executing the save operation.
Make sure to execute the save
operation.
CAUTION
• Each time you add a Wave to the
Element (or add an Element to the
voice), you should save the voice.
Simply keep the same name for
the voice, and overwrite the data
each time. (At the confirmation
prompt, select [YES] with the [F]
button.)
• Saving the voice to the USER
drive is not recommended since
the USER drive does not have
much memory space—only about
3 MB.
• Do not use any special characters
(umlaut, accent, etc.) in the voice
name.
NOTE
Содержание 2
Страница 1: ...Owner s Manual EN ...
Страница 236: ...Tyros2 Owner s Manual ...


