background image

Recording Audio with the Hard Disk Recorder

Reference

148

Tyros2 Owner’s Manual

4

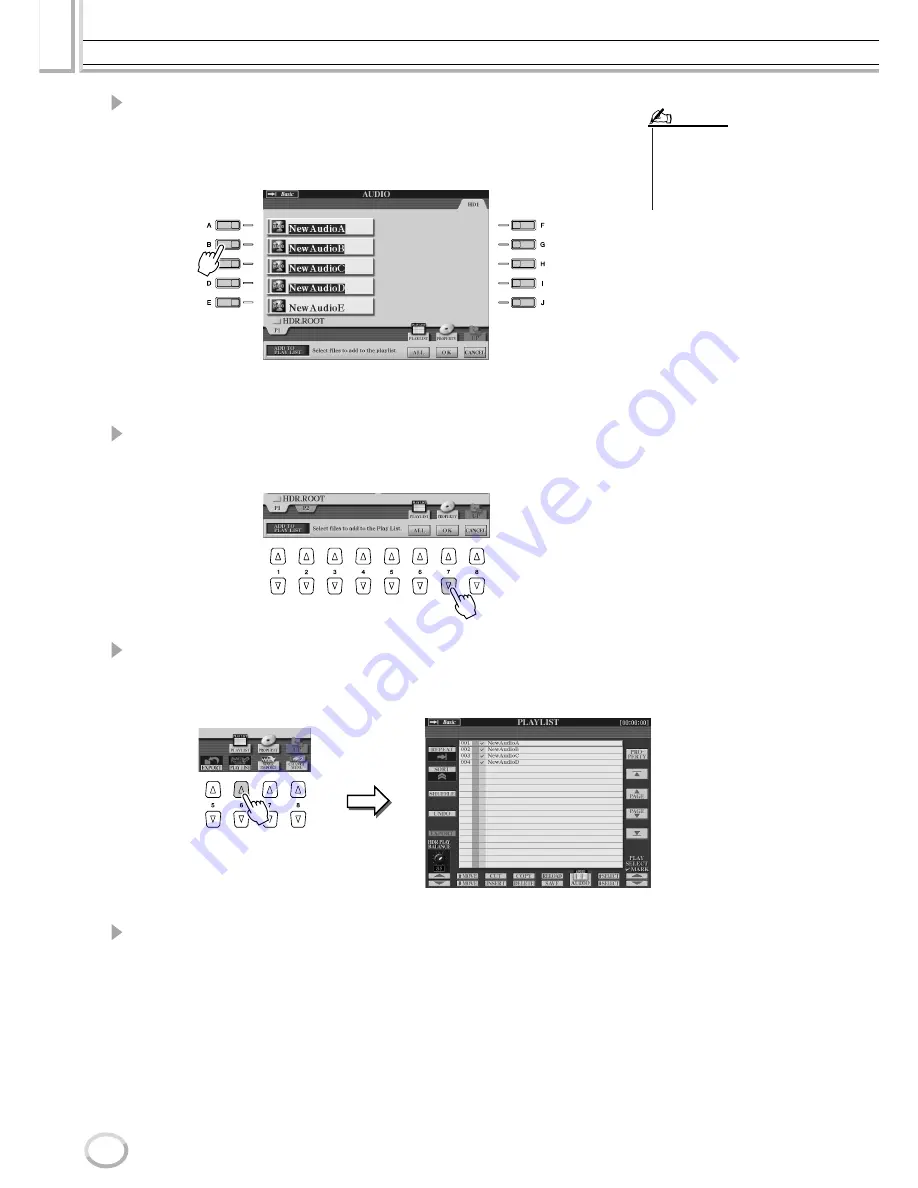
Select the desired audio file(s) by using the [A]–[J] buttons.

The selected file name is highlighted. You can continue to select additional files here, as 
many as desired. If multiple pages (tabs) are shown at the bottom, you can select files 
from these displays, too.

To select all the files in the current folder, press the [ALL] LCD button (lower [6] but-
ton).

5

Press the [OK] LCD button (lower [7] button).

To cancel the operation, press the [CANCEL] LCD button (lower [8] button).

6

Check the Playlist to confirm that the files have been added.

If the Playlist already has audio files, additional files are automatically put at the end of 
the list. Added files are also automatically selected (checkmarked) for playback.

7

Save the Playlist.

Press the [SAVE] LCD button (lower [5] button). The Playlist cannot be saved except 
to the installed hard disk drive, and only one Playlist can be saved to the drive.

•  If you want to select all but a few 

of the files in the folder, a quick 
method is to use the [ALL] LCD 
button to select all of the files, then 
use the [A]–[J] buttons to de-
select specific files.

NOTE

Содержание 2

Страница 1: ...Owner s Manual EN ...

Страница 2: ...entally friendly We sincerely believe that our products and the pro duction methods used to produce them meet these goals In keeping with both the letter and the spirit of the law we want you to be aware of the following Battery Notice This product MAY contain a small non rechargable battery which if applicable is soldered in place The average life span of this type of battery is approx imately fi...

Страница 3: ...ors heat registers and other devices that pro duce heat should be avoided 8 This product was NOT designed for use in wet damp loca tions and should not be used near water or exposed to rain Exam ples of wet damp locations are near a swimming pool spa tub sink or wet basement 9 This product should be used only with the components supplied or a cart rack or stand that is recommended by the man ufact...

Страница 4: ...cautions listed below to avoid the possibility of physical injury to you or others or damage to the instrument or other property These precautions include but are not limited to the following When removing the electric plug from the instrument or an outlet always hold the plug itself and not the cord Pulling by the cord can damage it Remove the electric plug from the outlet when the instrument is ...

Страница 5: ...ces for the song pre installed in this instrument Beauty And The Beast from Walt Disney s BEAUTY AND THE BEAST Lyrics by Howard Ashman Music by Alan Menken 1991 Walt Disney Music Company and Wonderland Music Company Inc All Rights Reserved Used by Permission Can t Help Falling In Love from the Paramount Picture BLUE HAWAII Words and Music by George David Weiss Hugo Peretti and Luigi Creatore Copyr...

Страница 6: ... Inc registered in the U S and other countries The company names and product names in this Owner s Manual are the trademarks or registered trademarks of their respective companies The illustrations and LCD screens as shown in this owner s manual are for instructional purposes only and may appear somewhat different from those on your instrument Note that all display examples shown in this manual ar...

Страница 7: ...u easily see the relationship of the various functions and quickly locate desired information Reference page 84 Once you re familiar with everything above lightly go over this comprehensive guide to all functions You won t need or want to read everything at once but it is there for you to refer to when you need information about a certain feature or function Troubleshooting page 225 If the Tyros2 ...

Страница 8: ...nce between the Song and the Keyboard 46 Turning Song Parts On Off 46 Singing with a Connected Microphone 47 Connecting a microphone 47 Singing Along with Lyrics 47 Applying harmony to your voice 48 Keyboard and Vocal Practice using the Guide function 49 Selecting a Guide menu 49 Keyboard Practice using Follow Lights 50 Vocal Practice using Vocal Cue Time 51 Saving and Recalling Custom Panel Setup...

Страница 9: ...ettings 157 Split Point 158 Style Creator Digital Recording 159 Basic Settings and Realtime Recording for each part channel 161 Step Recording for Notes using the Event List 162 Assembling a Style from Existing Pattern Data 163 Groove and Dynamics 163 Editing Data for each Channel 165 Making Style File Format Settings 165 Custom Style Recording via an External Sequence Recorder 167 The Multi Pads ...

Страница 10: ...aying the drum percussion voices Page 85 Playing the Super Articulation voices Page 86 Understanding Initial touch and Aftertouch Pages 87 191 Setting the touch sensitivity of the keyboard Page 191 Turning Initial Touch on or off for each keyboard part RIGHT 1 2 3 LEFT Page 191 Turning Aftertouch on or off for each keyboard part RIGHT 1 2 3 LEFT Page 191 Setting the Modulation wheel for each keybo...

Страница 11: ...ices Voice Set Page 91 Voice Creator Page 94 Creating your original Organ Flutes voices Voice Set Page 89 Creating your original styles Style Creator Page 159 Assembling a custom style from existing patterns Page 163 Recording a rhythm pattern Page 161 Memorize panel settings to the One Touch Setting contained in the style Page 155 Creating your original songs Recording your keyboard performance S...

Страница 12: ...the Lyrics or text on a separate monitor Page 116 Singing with the Guide functions and song playback Page 51 Using the Talk Setting function Page 177 Matching the Song Transpose setting to a comfortable singing pitch Page 180 Matching the Keyboard Transpose setting to a comfortable singing pitch Page 180 Live performance tips and techniques Assigning specific panel operations functions for foot co...

Страница 13: ...uter applications What you can do with MIDI using a computer and the Tyros2 Page 66 Connecting a computer to the Tyros2 using a USB cable Page 66 Using the Voice Editor software Page 67 111 Using the installed hard disk drive as a drive for your computer Page 67 Other Tips Registering your name to the Tyros2 Page 195 Importing a favorite pitcure for the Main display background Page 195 Importing a...

Страница 14: ...ton Page 154 3 TEMPO buttons Page 154 4 TRANSPOSE buttons Page 88 5 MULTI PAD CONTROL buttons Pages 38 169 6 BALANCE button Pages 36 46 7 MIXING CONSOLE button Page 179 8 CHANNEL ON OFF button Pages 37 46 q e w 1 2 r u i t y 0 1 2 3 4 6 8 7 9 5 o PHONES Music Rest The Tyros2 is supplied with a music rest that can be attached to the instrument as shown Keyboard The keyboard of the Tyros2 is equippe...

Страница 15: ...Page 88 2 MODULATION wheel Page 88 1 2 0 3 4 9 0 6 7 8 5 USB TO DEVICE terminal By connecting the instrument to a USB storage device you can save data you ve created to the device as well as read data from it You can also connect a USB type LAN adaptor to directly access special Internet websites for this instrument An additional USB TO DEVICE terminal is provided at the rear of this instrument Do...

Страница 16: ...UT display to NTSC page 188 IMPORTANT One or two optionalYamaha FC4 or FC5 footswitches connected to one of these jacks can be used to control sustain enable an effect on a Super Articulation voice and control a range of other important functions An optionalYamaha FC7 Foot Controller connected to one of these jacks can be used to control volume and a range of other important functions See page 189...

Страница 17: ...in a stereo input See pages 47 175 These jacks can be used either as AUX OUT or LOOP SEND and can be selected from the Function menu page 193 The sound is output at a fixed level regardless of the MASTER VOLUME control setting Use the AUX OUT jacks to output the Tyros2 sound through an external audio system or to record the sound with an external audio recorder Connect the AUX OUT jacks of the Tyr...

Страница 18: ...tage supplied in the area in which it is to be used as listed on the rear panel Con necting the unit to the wrong AC supply can cause serious damage to the internal cir cuitry and may even pose a shock hazard WARNING Use only the AC power cord supplied with the Tyros2 If the supplied cord is lost or damaged and needs to be replaced contact your Yamaha dealer The use of an inappro priate replacemen...

Страница 19: ...st brackets and one music rest shown below are included before following the instructions below 1 Attach the two music rest brackets to the rear panel of the Tyros2 2 Attach the music rest to the brackets Supplied with the Tyros2 Music rest brackets 2 Music rest Use the inside slots as shown ...

Страница 20: ...r MIDI instruments audio equipment micro phone etc to the Tyros2 Turn on all connected external devices and auxiliary equipment If necessary save any data you ve created using the connected external devices to the appropriate media Turn off the optional TRS MS02 speaker system Turn off all connected external devices and auxiliary equipment See page 75 If necessary save any data you ve created usin...

Страница 21: ...he back of the display panel Then lift the panel and tilt it toward you The panel will click as you tilt it back these clicks are the four latched positions Once you ve reached a satisfactory position release the panel It will gently fall back to the nearest latched position Closing the Display Panel To return the panel to its closed and locked position gently pull it back toward you until the pos...

Страница 22: ...layed only when Registration Sequence Enable is set to on Page 173 r Audio song title selected in the Hard Disk Recorder function The Basic Playlist indicator status depends on the active mode Basic or Playlist Page 147 t Song Page 43 y Current position bar beat tempo in song playback or style playback Pages 31 43 u Style and chord root type Page 31 i Internet Direct Connection Page 197 o Multi Pa...

Страница 23: ... languages English German French Spanish and Italian Text is used for the Demos page 24 and the display messages page 69 Select the desired language by following the instructions below 1 Press the FUNCTION button 2 Press the I button to select UTILITY 3 Use the TAB buttons to select the OWNER tab 4 Use the 4 5 buttons to select the desired language ...

Страница 24: ... how to use the instrument and showing what it can do for you 1 Press the DEMO button to start repeated playback of the Demo s Overview menu displays The demo song plays back repeatedly calling up the various displays in sequence 2 Use the 7 8 buttons to select specific Demo topics from the Overview menu displays 3 Press any of the LCD buttons to call up the display of the corre sponding function ...

Страница 25: ...e each VOICE button on the panel or refer ring to the voice list in the separate Data List booklet If necessary use the TAB buttons to call up the PRESET page The voice selection display shown here is called the Open Save display for the voice The Open Save display actually has two dif ferent display modes 1 a direct selection display shown at left and 2 a numeric input display that lets you selec...

Страница 26: ...e corresponding information window see page 25 Category Voice Name PIANO Live GrandPiano E PIANO Cool SparkleStack Cool SuitcaseEP ORGAN S Articulation JazzRotary Cool CurvedBars STRINGS S Articulation ConcertStrings Live Spiccato Sweet Violin CHOIR Live GospelVoices DreamHeaven BRASS S Articulation BigBandBrass S Articulation BrassFalls f TRUMPET S Articulation Trumpet S Articulation GoldenTrumpe...

Страница 27: ...ound one voice while the notes you play with your right sound a different voice or voices Voices RIGHT 1 3 are meant to be played with the right hand Voice LEFT is played with the left hand Adjusting the Octave Setting The UPPER OCTAVE button allows the RIGHT 1 RIGHT 2 and RIGHT 3 parts to be simul taneously transposed up or down by one octave Split Point Voice RIGHT 1 2 3 UPPER Voice LEFT LOWER T...

Страница 28: ...vari ous parameters of the Organ Flutes voice Use the LCD 1 8 but tons to adjust the footage settings 4 Try out some of the other Organ Flutes voices CAUTION You can select the desired footage 16 or 5 1 3 with the D but ton Use LCD 1 but ton to adjust the 16 or 5 1 3 footage Use these to select the desired page of parameters The footage settings determine the basic sound of the organ flutes The te...

Страница 29: ...display From this type of display you can select open various files such as voices pages 25 28 styles page 31 songs page 43 and Reg istration Memory banks page 53 as well as save the various files to the User drive USB drive and Hard Disk drive 1 Press the USER DRIVE button to call up the Voice selection Open Save display for the User drive In this case any keyboard part RIGHT 1 3 can be selected ...

Страница 30: ...en as necessary until all your favorite voices are contained in this display Also try copying preset voice s to the external device in the same way as explained here Press the COPY LCD button lower 3 button Press the OK LCD button lower 7 button The Voice located in the PRESET drive is copied to the USER drive Select the folder created in step 2 Press the TAB button Select the voice s to be copied...

Страница 31: ...r music will auto matically play along instantly following the chords you play With the auto accompaniment style playback function even a solo performer can enjoy playing with the backing of an entire band or orchestra TheTyros2 features a variety of accompaniment styles rhythm patterns in a variety of different musical genres Try out the different styles on your own checking the style category na...

Страница 32: ... off the New Mega Tenor Sax and Mega Brass Listen to both Intro II and Intro III Country EasyCountry Country music covers many different sound fields and styles With EasyCountry you can hear a very typical laid back singer song writer image Great for many standards CountryShuffle A typical sing a long country feel with a very high quality production Listen to Intro III to hear a straight to point ...

Страница 33: ...tings shown here are Music Finder Records You can choose additional settings by using the Music Finder feature page 41 Stop Accompaniment function When auto accompaniment is turned on and Synchro Start is off you can play chords in the left hand accompaniment section of the keyboard with the style stopped and still hear the accompaniment chord In this condition called Stop Accompaniment any valid ...

Страница 34: ... into the selected main section A B C D There are four variations for the fill in sections each spe cially programmed to match the selected main section Even when AUTO FILL is turned off pressing the same button of the currently playing section automatically plays a fill in before returning to the same main section BREAK This lets you add dynamic breaks in the rhythm of the accompaniment to make y...

Страница 35: ...e style right away after an Ending simply press the INTRO button while the Ending section is playing If you press one of the MAIN button while the ending is playing a fill in will immediately start playing when the AUTO FILL IN is turned on continuing with the main section If you press the SYNC START button while a style is playing style playback will stop and Synchro Start will be set to on You c...

Страница 36: ...d the style starts 4 Try out other One Touch Setting setups 5 Stop style playback by pressing the STYLE START STOP button or any of the ENDING buttons You can also create your own One Touch Setting setups For details refer to page 155 Adjusting the Volume Balance between the Style and the Keyboard Press the BALANCE button so that the mixer window pop up appears at the bottom of the LCD display You...

Страница 37: ...splay which lets you select and change the voice of the corresponding part channel Try replacing the default voice with different voices of your own selection Pressing the CHANNEL ON OFF button repeat edly switches among the style parts channels and song channels Press the corresponding LCD button To listen to only one instrument by itself hold down the appropriate button for the channel to set th...

Страница 38: ...u do with your left hand While a style is playing back and ACMP is on simply play a chord with your left hand and press any of the Multi Pads Chord Match changes the pitch to match the chords you play You can also use this with the style stopped with the Stop Accompaniment function page 33 Keep in mind that some Multi Pads are not affected by Chord Match BANK 01 The Multi Pads can be used to play ...

Страница 39: ... start the style page 32 and play some notes in the right hand range of the keyboard You can also use the Harmony effect with the style stopped with the Stop Accompaniment function page 33 Simply hold down a chord with your left hand and play a melody with your right Try out Harmony Echo with some of the voices below Many of the voices have been automatically set to play certain Harmony Echo types...

Страница 40: ...d 2 Select the desired Record in the list Rotate the DATA ENTRY dial to move the cursor on the Record list Once the desired song name or music genre is highlighted press the ENTER button to call up the cor responding Music Finder setup Keep in mind that the panel setup actually called up is the one pre programmed as the One Touch Setting 3 Play the styles If you want to play in a certain genre of ...

Страница 41: ... this display Press this button to call up the Style selection display After selecting the desired style press the EXIT button to return back to this display This convenient function lets you find all songs that use a certain accompaniment style Press this button to specify the time signature for the search Pressing the button alternates anong the selections Selecting Any searches through all reco...

Страница 42: ...item above Shows the number of records of the currently dis played page Press this button to create a new record by editing the currently selected one Page 171 These sets of buttons are used when the Record list is sorted by STYLE When sorting records by style name use the up or down but ton to skip up or down through the style categories Simultaneously press the up and down buttons to move the cu...

Страница 43: ...disk drive FDD and floppy disks on page 231 IMPORTANT If necessary use the TAB buttons to call up the USB page The song selection display shown here is called the Open Save display for the song The Open Save display actually has two dif ferent display modes 1 a direct selection display shown at left and 2 a numeric input display that lets you select the voice by input ting the song number For deta...

Страница 44: ...the file names The indications and relevant restrictions are detailed below Note for Prot 2 Orig and Prot 2 Edit Song file operation Make sure to save the Prot 2 Edit Song to the same folder containing its original Prot 2 Orig Song Otherwise the Prot 2 Edit Song cannot be played back Also if you move a Prot 2 Edit Song be sure to move its original Prot 2 Orig Song to the same location folder at th...

Страница 45: ...continues past the SP2 point and on to SP3 The SP2 button changes from green to red after the SP2 point is passed Jumping to a marker then starting playback Jumping to a marker during playback In this example song playback starts from the top of the measure assigned to the SP1 button in step 2 above In this example song playback continues to the end of the current measure then jumps to the selecte...

Страница 46: ...dow pop up appears at the bottom of the LCD display page 36 You can adjust the volume balance between song playback and your right hand keyboard performance by using LCD buttons 1 5 6 7 and 8 Turning Song Parts On Off Press the CHANNEL ON OFF button so that the pop up window appears at the bottom of the LCD display You can turn each part channel on or off by using the lower LCD 1 8 buttons during ...

Страница 47: ...ongs applying various DSP effects to your voice as you sing with the auto accompaniment or song playback To avoid possible feedback or other interference separate the microphone from the speakers as much as possible NOTE Since the L L R MIC jack is highly sensitive it may pick up and produce noise when noth ing is connected To avoid this always set the INPUT VOLUME to minimum when nothing is conne...

Страница 48: ...section of the keyboard CHORDAL Chords specified in the Upper part RIGHT 1 3 section of the keyboard VOCODER Chords specified in the Lower part LEFT section of the keyboard VOCODER Chord data contained in an XF song CHORDAL Detected chords based on notes contained in the song data CHORDAL VOCODER The lyrics inidicated on the LCD display can be output via the RGB OUT VIDEO OUT termi nal You can hav...

Страница 49: ...und Guide menu for sing along Karao Key This function lets you control the song and accompaniment playback with just one finger while you sing along Simply play a key on the keyboard in time with music any key is fine and the accompaniment parts of the song follow your playing For this function the notes of the keyboard do not sound Vocal Cue Time With this function song playback pauses waiting fo...

Страница 50: ...procedure described on the previous page and select Follow Lights If nec essary specify the channel settings 3 Call up the Song Score display by pressing the SCORE button 4 Turn the GUIDE button on 5 Start song playback 6 Song playback automatically pauses indicating that you should play a certain melody note Look at the notation in the LCD to see which note to play 7 To stop the practice session ...

Страница 51: ...d on page 49 and select Vocal Cue TIME If necessary specify the channel settings 4 Call up the Song Score display by pressing the SCORE button 5 Turn the GUIDE button on 6 Start song playback 7 Song playback automatically pauses indicating that you should sing a certain melody note Look at the notation in the LCD to see which note to sing 8 To stop the practice session in the middle of the song st...

Страница 52: ...e but ton For a list of Registration Memory setup parameters refer to the separate Data List NOTE You can determine whether the settings are to be memorized on or not off for each parameter group Enter checkmarks only to those parameter groups you want to be memorized Moves the cursor to the parameter group You can move the cursor by using the DATA ENTRY dial Cancels the regis tration and returns ...

Страница 53: ...o memorize settings for all eight buttons If a button has no memo rized data it is unlit 2 Press both REGIST BANK buttons simultaneously to call up the Registration Memory Bank selection Open Save display 3 If desired call up the Registration Edit display and make other set tings for Registration Memory such as naming Bank 04 Bank 03 Bank 01 Bank 02 Tyros2 panel settings Memorize User drive USB dr...

Страница 54: ...t to switch voices or effect settings while keeping the same accompaniment style This is where the Freeze function comes in handy It lets you maintain the settings of certain parameter groups and leave them unchanged even when selecting other Registration Memory buttons 1 Select the parameter group you want left unchanged or frozen page 173 2 Turn the FREEZE button on 3 Change the Registration Mem...

Страница 55: ... page 54 The powerful and easy to use Song Creator feature lets you record your own keyboard performances to the user drive optional external devices or the optionally installed hard disk With multiple channels for recording comprehensive editing features plus the use of the style and the Multi Pads you can record complex fully orchestrated pieces of music in any music style or arrangement from so...

Страница 56: ...ayback and recording start simultaneously as soon as you press any of the Multi Pads 5 Press the REC button to stop recording 6 Listen to your newly recorded performance Press the STOP button so that the song playback position returns back to the top and press the SONG CONTROL PLAY PAUSE button 7 If necessary re record a specific section of the recorded song or record an additional section to the ...

Страница 57: ...ecording When record ing a new song All channels are automat ically assigned for re cording with each channel assigned a spe cific part See chart at left Channels to be recorded must be enabled for record ing manually However parts are automatically as signed to MIDI channels as shown in the chart at left When re re cording an al readyrecorded song The channel part assign ments made in the origi n...

Страница 58: ...w song by recording The following features of the Song Creator function allow you to re record or edit the already recorded song Re recording a specific section of the already recorded song Punch In Out Page 121 Editing the recorded data for each channel Quantizing or aligning the timing Page 123 Deleting the data of the specified channel Page 123 Mixing Merging the data of the specified two chann...

Страница 59: ... sample rate 16 bit resolution Recording the Sound of the Tyros2 In this section you ll play the keyboard and record the sound of the Tyros2 to the Hard Disk Recorder You can record a maximum of 80 minutes to one audio song 1 Select a voice for the RIGHT 1 part For instructions on selecting a voice see page 25 2 Press the HARD DISK RECORDER SETTING button to call up the Audio Setting display If th...

Страница 60: ...le For instructions on naming see page 76 6 Press the OK LCD button upper 8 button 7 Press the REC button to enable recording To cancel recording press the REC button again 8 Now you re ready to record Press the PLAY PAUSE button to start recording Play the keyboard and record your performance 9 When finished recording press the STOP button These buttons are also marked NEW AUDIO since they let yo...

Страница 61: ...data with the original or replace a certain range of the data page 141 Do not connect or disconnect the USB storage device during audio song playback or recording Doing so may cause incorrect playback of the song NOTE Keep in mind that even if you neglect to save the recorded data in this step a file with the name specified in Step 5 above will still remain on the hard disk drive In other words th...

Страница 62: ...cting and setting up a microphone see page 47 2 Select a style and enable auto accompaniment For instructions on selecting a style and using auto accompaniment see page 31 3 Select a voice for the RIGHT 1 part For instructions on selecting a voice see page 25 4 Press the HARD DISK RECORDER REC and STOP buttons simultaneously This creates an audio file for recording 5 Enter a name for the new file ...

Страница 63: ...w recording press the PLAY PAUSE button 12 Save the new recording Since the recorded data will be erased if another file is selected or the power is turned off you ll need to save the recording to the hard disk drive To do this press the SAVE LCD button I button then at the prompt press the OK LCD button G button Keep in mind that even if you neglect to save the recorded data in this step a file w...

Страница 64: ...nplug the USB cable do NOT remove the media from the device and do NOT turn the power off to either device Doing so may corrupt the data on either or both devices CAUTION You can also use the USB TO DEVICE terminal to connect a USB type LAN adaptor to access special Internet websites page 197 NOTE Even with a computer connected to the USB TO HOST terminal and a USB storage device connected to the ...

Страница 65: ...ith each storage device or media If you are saving data to the USB storage device make sure to disable write protect Formatting USB storage media When a message appears prompting you to format the device media execute the Format operation page 194 The tabs indicating the connected USB devices USB 1 USB 2 etc may be displayed up to USB 17 for each device or partition The num bers are not fixed and ...

Страница 66: ...o manage files in the USER USB HD optional drive A type B type USB cable Precautions when using the USB TO HOST terminal When connecting the computer to the USB TO HOST terminal make sure to observe the following points Failing to do so risks freezing the computer and corrupting or losing data If the computer or the instrument freezes turn the power to the instrument off and restart the computer B...

Страница 67: ...INDER button 3 Manage files folders in the hard disk drive installed to the Tyros2 by using the computer 4 Press the EXIT button to exit the USB storage mode and call up the Main display Windows versions prior to Windows98 SE are not compatible with this USB storage mode NOTE Execute the following before turning the USB Stor age mode on off Close all application programs If the USB Storage mode is...

Страница 68: ... to select the menus P1 UP in the upper row and the lower LCD 1 8 buttons can be used to select the menus NAME DEMO in the lower row DATA ENTRY dial and ENTER button Depending on the selected LCD display the DATA ENTRY dial can be used in the following two ways Entering the values For parameters indicated at the bottom of the Main display such as the slider controls in the mixer window page 36 you...

Страница 69: ...t have tabs at the top such as the Open Save display page 72 EXIT button No matter where you are in the Tyros2 display hierarchy the EXIT button will return you to the next highest level or to the previously indicated display Since the Tyros2 has so many different displays you may occasionally find yourself con fused as to which operation s display is currently shown If this happens you can return...

Страница 70: ...for a list of the displays that can be called up with the Direct Access function Basic Structure of File Folder and Memory Drives The Tyros2 utilizes a variety of data types including voices styles songs and registration memory settings Much of this data is already programmed and contained in the Tyros2 you can also create and edit your own data with some of the functions on the instrument All thi...

Страница 71: ...ch In the case of voices the same type of instrument sounds are stored together as files in their own folders such as Piano Strings and Trumpet The similarly organized buttons on the panel can be considered folders as well for the various voices and styles Memory Drives to which folders files are saved Folders and files described above are saved to the following memory drives PRESET drive The file...

Страница 72: ...s see below Panel buttons Main display Multi Pad Bank Other displays MIDI template etc Voice Song Style Voice Registration Memory Bank The Voice Open Save display is shown here For creating a new folder Page 73 Song Style For selecting the next highest directory folder For saving a file Page 75 For deleting folders files Page 75 For copying folders files Copy and Paste Page 74 For moving files Cut...

Страница 73: ...s by using the LCD letter buttons or by using the DATA ENTRY dial On the User drive folder directo ries can contain up to four levels The maximum total number of files and folders which can be stored is 2 960 but this may differ depending on the length of the file names On the User USB HD the maxi mum number of files and folders which can be stored in a folder will be 500 NOTE 1 1 2 2 3 3 How to s...

Страница 74: ...g you release or cancel the selection 4 Press the OK LCD button lower 7 button to return to the Open Save display 5 Call up the destination display The Preset drive cannot be selected as the destination Create a new folder page 73 at the destination page path as needed 6 Press the PASTE LCD button lower 4 button The folders files copied from the source page path appear on the display Moving Files ...

Страница 75: ...screen instructions Saving Files This operation lets you save your original custom data such as songs and voices you ve created to the User optional USB storage devices or optional Hard Disk drives Note that if you re saving the currently open file step 1 is not necessary 1 After you ve created a song or voice in the relevant display press the SAVE LCD button The corresponding Open Save display ap...

Страница 76: ...g the upper 1 button CASE capital letters numbers marks case lowercase letters numbers marks Move the cursor to the desired position by using the DATA ENTRY dial Press the OK LCD button upper 8 button to actually enter the new name and return to the original display Press the appropriate button corresponding to the character you wish to enter Several different characters are assigned to each butto...

Страница 77: ...see below Since the Tyros2 has many files spread out over several pages Number Input may be quicker and more convenient providing you know the number of the file Number Input type Entering numbers To select voice number 128 for example press the 1 2 and 8 buttons in sequence as shown below and press the ENTER button Entering one or two digit numbers is done in the same way When you select the next...

Страница 78: ... instantly call up a specific file no matter how deeply hidden with a single button press In the example instructions below the Open Save display for songs is used 1 First select the Number Input type then call up the path to be memorized to the button and press the MEMORY LCD button E button 2 Press the desired button in the SONG section for songs to which the path selected in step 1 above is to ...

Страница 79: ...tus of the button function as described here Off No data is currently assigned to the button Green Data has been assigned to the button Red Data has been assigned to the button and the button is active or playing back For details about each button see below Off Green Red REGISTRATION MEMORY buttons No panel settings are memorized to the button Panel settings are memorized to the button Panel setti...

Страница 80: ... a key chord in the Chord section of the keyboard Playing in any other section does not start the style Synchro Start Song Playback To turn Synchro Start on or off simultaneously hold down the STOP button and press the PLAY PAUSE button in the SONG CONTROL section When Synchro Start is on the song starts from the current position as soon as you play the keyboard VOICE RIGHT 1 Playing a single voic...

Страница 81: ... function on or off 50 P A T button Turning the Performance Assistant Technology on or off 120 SP1 SP4 buttons Entering Song Position Markers to the selected song and executing jumps among the Markers 44 117 LOOP button Turning looped playback between Markers on or off 45 117 REC button Pop up window Recording a song 55 STOP button Stopping playback or recording of the selected song 43 PLAY PAUSE ...

Страница 82: ...ack related parameters such as Guide function set tings 118 STYLE SETTING SPLIT POINT CHORD FINGERING STYLE SETTING Setting the style playback related parameters 157 SPLIT POINT Setting the split points 158 CHORD FINGERING Selecting the way in which chords are played with your left hand 152 CONTROLLER FOOT PEDAL Assigning the foot pedal function 189 KEYBOARD PANEL Setting the keyboard related para...

Страница 83: ...ing a Multi Pad 169 EDIT Recording MIDI events for each pad using the Event List 170 4 HARD DISK RECORDER buttons SELECT button AUDIO Open Save display for audio songs 59 135 SETTING button AUDIO SETTING VOLUME Adjusting the volume of the audio song 142 REC MODE Setting the audio song recording related parameters such as punch in out recording 141 143 REC button Recording an audio song 59 135 STOP...

Страница 84: ...st right key to C6 Left Hold This function causes the LEFT part voice to be held even when the keys are released Non decaying voices such as strings are held continuously while decay type voices such as piano decay more slowly as if the sustain pedal has been pressed This function is especially effective when used with style playback For example if you play and release a chord in the Chord section...

Страница 85: ...er and the GM2 folder Custom Voices Your original voices created by using the Voice Creator function page 94 or with the Voice Editor software pages 66 111 can be saved to the Preset drive as Custom voice data CustomVoices saved to the Preset drive can be called up via the CUSTOMVOICE button The USER DRIVE button lets you directly access those voices saved to drives other than the Preset drive Pre...

Страница 86: ...ampling and Dynamic sampling They give you a broader and more versatile range of Latin percussion than the normal drum Voices Custom Custom voices which you have created by using the Custom voice function CustomWA Custom voices which contain Wave data Notes for MegaVoices Unexpected or undesired sounds may result depending on the settings or conditions below Initial Touch setting in the FUNCTION C...

Страница 87: ... feature is ON all notes played on the upper section of the keyboard RIGHT 1 3 parts have a longer sustain The Sustain level for each voice can be adjusted via the Voice Set function page 91 and can be saved as a User voice Poly Mono This determines whether the part s voice is played monophonically only one note at a time or polyphoni cally When the lamp of the MONO button is on the Portamento eff...

Страница 88: ...uttons to change the value Keyboard Transpose The TRANSPOSE buttons affect the pitch of the keyboard sound the style playback pitch and the pitch of the Multi Pads for which Chord Match has been set to on Note that the transposition is applied from the next note or style chord played after one of the TRANSPOSE buttons has been pressed Song Transpose The TRANSPOSE buttons affect only song playback ...

Страница 89: ...ee levels 1 low 2 mid or 3 high 16 1 Footage These LCD buttons determine the basic sound of the organ flutes The term footage is a reference to the sound generation of traditional pipe organs in which the sound is produced by pipes of different lengths in feet The longer the pipe the lower the pitch of the sound Hence the 16 setting determines the lowest pitched component of the voice while the 1 ...

Страница 90: ... 3 and 2 controls increase or reduce the volume of attack sound at the corresponding footages The longer the graphic bar the greater the attack sound volume LENG Length Affects the attack portion of the sound producing a longer or shorter decay immediately after the initial attack The longer the graphic bar the longer the decay REVERB DEPTH See Effect on page 181 CHORUS DEPTH See Effect on page 18...

Страница 91: ...3 parameter is available when the edited voice is used as the LEFT part the LEFT parameter is available MONO POLY Determines whether the edited voice is played monophonically or polyphonically page 87 PORTAMENTO TIME Sets the portamento time when the edited voice is set to MONO above Basic Procedure 1 3 2 4 CAUTION Select the desired voice other than an Organ Flutes voice Press the VOICE SET LCD b...

Страница 92: ...D Determines the degree to which the Modulation Wheel modulates the pitch or the vibrato effect LFO FMOD Determines the degree to which the Modulation Wheel modulates the Filter modu lation or the wah effect LFO AMOD Determines the degree to which the Modulation Wheel modulates the amplitude or the tremolo effect FILTER Determines the degree to which Aftertouch modulates the Filter Cutoff Frequenc...

Страница 93: ...TACK Determines how quickly the sound reaches its maximum level after the key is played The higher the value the slower the attack DECAY Determines how quickly the sound reaches its sustain level a slightly lower level than max imum The higher the value the slower the decay RELEASE Determines how quickly the sound decays to silence after the key is released The higher the value the slower the rele...

Страница 94: ... waveform of an instrument sound a recording of a voice sung or spoken or a rhythm loop As long as the data is stored in WAV or AIFF format you can import it to the Tyros2 In the Voice Creator Wave refers to both WAV and AIFF format data You can use a USB storage device such as a USB flash mem ory to store the audio data and import it to the Tyros2 or you can record transfer the audio to an instal...

Страница 95: ...y voices that can be used for this purpose Select the PRESET tab then select the desired voice number 3 Press the VOICE CREATOR button to call up the Voice Creator 4 Call up the WAVE IMPORT menu by pressing the A button 5 Select the desired Element If you did not select a voice in step 2 a prompt appears letting you know an empty voice will be cre ated Select OK to create a new voice When the new ...

Страница 96: ... the Voice Cre ator can be of any sample rate or bit resolution However all audio data of a resolution other than 16 bit is automatically converted to 16 bit resolution after being loaded Voice Creator supports and recog nizes loops in the audio data let ting you use up to one loop in each audio file Some sample libraries have loops already pro grammed into the data you can also use audio editing ...

Страница 97: ... the NO LCD button G button Double clicking on the corre sponding LCD button here selects the file for import allowing you to skip Steps 9 and 10 below The maximum number of Wave files that can be imported is 4 096 mono files or 2 048 stereo files You can check the total number from the Property display page 103 Only import Wave data having the following frequencies 96000 Hz 88000 Hz 48000 Hz 4410...

Страница 98: ... set at Center Key below CENTER KEY This determines the key to which the original pitch of the sound is assigned When Fixed Pitch above is set to OFF keys below the Center Key play the sound progressively lower in pitch while keys above play the sound progressively higher Normally you ll want to make sure that this is the same as the original sound for example if the original pitch of the audio wa...

Страница 99: ...ss the SAVE FILE LCD button G button 2 Select the location and folder using the TAB buttons and LCD buttons Create a folder if necessary by pressing the FOLDER LCD button lower 7 button 3 Press the SAVE LCD button lower 6 button 4 Enter a name for the voice See page 76 5 Press the OK LCD button upper 8 button The created voice will be lost if you change to another voice or you turn the power off w...

Страница 100: ...utomatic loading may not be possible because of the time needed to recognize the device If this happens copy the voice to another device and try it again 16 Add waves to the selected element if necessary Press the EXIT button to return to the WAVE IMPORT display and repeat steps 6 15 Make sure to save your voice data each time you make changes to it When the available memory space has been taken u...

Страница 101: ...eady for playing 1 Select a Custom voice Press the CUSTOM VOICE button and select the desired voice 2 Press the VOICE SET LCD button upper 5 button and use the Voice Set controls to edit the voice For details on using Voice Set see page 91 If you have a computer you can also use the Voice Editor software to edit Custom voices For details see page 111 NOTE If you save the data after setting the Voi...

Страница 102: ...ntains the voices which are used in playing back styles You cannot create the DRUM voices by editing the Wave data you can only create them by editing the drum voices in the PRESET drive You can use the DRUM voices by replacing them in styles from the CHANNEL ON OFF display page 37 4 Use the controls in the display to rename and reorganize the voices in the bank as desired When you reorganize voic...

Страница 103: ...le ments or wave data will greatly decrease this amount This memory cannot be expanded A maximum of 1 024 KB is available WAVE COUNT Total number of the wave files A maximum of 4 096 mono files or 2 048 stereo files is available WAVEFORM COUNT Total number of Waveforms The term Waveform refers to a set of wave assignment information A maximum of 512 waveforms is avail able NAME Name of the file PA...

Страница 104: ...p the INDIVIDUAL LOAD menu by pressing the C button 3 Select the location or device containing the desired Custom voice by using the TAB buttons If for example you have a hard disk drive installed and a USB storage device connected to the Tyros2 there will be three choices USER HD1 and USB1 4 Select the desired Custom voice by pressing the corresponding LCD button All available Custom voices at th...

Страница 105: ...ter a name for the voice if desired If a Custom voice with the same name already exists in the bank you ll need to enter a new name for the voice For specific instructions on naming see page 76 8 Press the OK LCD button upper 8 button To cancel press the CANCEL LCD button lower 8 button 9 When you press the CUSTOM VOICE button the newly loaded Custom voice will be available File loading may take a...

Страница 106: ...the Tyros2 1 Press the VOICE CREATOR button to call up the Voice Creator 2 Call up the LIBRARY LOAD menu by pressing the D button 3 Select the location or device containing the desired Custom voice Library by using the TAB buttons If for example you have a hard disk drive installed and a USB storage device connected to the Tyros2 there will be three choices USER HD1 and USB1 4 Select the desired L...

Страница 107: ...will be available YES Current Custom voices are replaced with the ones in the library file one by one YES ALL Current Custom voices are replaced with all of the voices in the library file You can use this after replacing some voices one by one by using YES and replace all the rest NO The displayed voice in the prompt will not be replaced CANCEL Cancels loading the library file File loading may tak...

Страница 108: ... used in playing back styles You cannot create the DRUM voices by editing the Wave data you can only create them by editing the drum voices in the PRESET drive You can use the DRUM voices by replacing them in styles from the CHANNEL ON OFF display page 37 4 Select the desired Custom voice All available Custom voices will be shown Use the LCD buttons to select the desired page if necessary The sele...

Страница 109: ...ibrary file and press the OK LCD button upper 8 button For specific instructions on naming see page 76 Even though the User drive can be selected here there is not enough memory space in the drive for storing Voice Creator data Make sure to use one of the other destinations NOTE Checking the storage capacity Before attempting to store data to the selected storage destination you may want to check ...

Страница 110: ...ed from the Library file Moving the library file however does not affect the recalling of voices NOTE When you save the library file using ALL DATA you should make a new folder to save the library because the Custom voices are mixed with the existing voices in the destination drive NOTE USB HD HD A B C D E F G H I J C F I Library Save with the ALL DATA selection Custom voice files Open Save displa...

Страница 111: ...lling the software edit voices by following the steps below 1 Turn the computer s power on then turn the Tyros2 s power on 2 Start Voice Editor on the computer The Custom Voice Edit Mode display is shown in the instrument If this display does not appear press the VOICE CREATOR button and select Custom Voice Edit via PC to show this display The Voice Editor can only be used when this display is sho...

Страница 112: ...xed with the song as it plays With the sophisticated Guide features you can let the Tyros2 teach you how to play the song properly and even how to sing it with the correct pitches Basic Procedure Score 3 2 4 1 5 Select a song Press the SCORE button As the song plays back a red ball bounces along through the score indicating the cur rent position Set the parameters of the view type as required Set ...

Страница 113: ...ermines which MIDI channel in the song data is used for the left hand right hand part This setting returns to AUTO when a different song is selected AUTO The MIDI channels in the song data for the right and left hand parts are as signed automatically setting the parts to the same channel as the channel which is specified in the FUNCTION SONG SETTING display page 118 1 16 Assigns the specified MIDI...

Страница 114: ...e Open Save display for selecting a text file After setting press the EXIT button to return back to the Lyrics display For more on the Text display see Displaying Text on page 115 BACKGROUND This lets you change the background picture of the Lyrics display The Open Save display is called up letting you select a picture file via this parameter After making the setting press the EXIT button to retur...

Страница 115: ...onal and font size Fixed is suitable for displaying lyrics with chord names since the positions of chord names are fixed to the corresponding lyrics Proportional is suitable for displaying lyrics without chord names or explanatory notes The numbers 16 28 indicate font sizes BACKGROUND Allows changing of the background picture of the text display as in the Lyrics display described above The backgro...

Страница 116: ... OUT jack of theTyros2 page 16 2 Turn on the monitor and the Tyros2 3 Set the MONITOR TYPE and SCREEN CONTENT from the FUNCTION SCREEN OUT display page 188 4 Play the song by following the Basic Procedure Lyrics Text on pages 114 and 115 About Text Data You can use the following text data in this instrument Simple text files with the extension txt Maximum size is 60 KB Line feed and page breaks ca...

Страница 117: ...d any number of letters is OK are handled as Loop End Markers Since the Event List in the Song Creator function does not let you freely name Markers the instructions above are recommended for creating new Markers However with sequence software on a computer you can create new Markers and assign appropriate names to them By naming Markers in this way you can easily distinguish between Loop End Mark...

Страница 118: ...Open Save display Simply enter the number of the song you want to hear next and it will be put in the rotation Here the settings on the FUNCTION SONG SETTING display and the Open Save display for songs are explained together with the points above Song Setting Basic Procedure 3 2 1 Press the FUNCTION button Press the SONG SETTING LCD button Set the desired parameters next page Selects one of the Gu...

Страница 119: ... page 117 LEFT CH This parameter is available when the AUTO CH SET below is set to OFF This parameter determines which MIDI channel in the song data is assigned to the Left hand part of the Guide function and the Song Score function RIGHT CH This parameter is available when the AUTO CH SET below is set to OFF This parameter determines which MIDI channel in the song data is assigned to the Right ha...

Страница 120: ...erent ways below 5 Press the SONG CONTROL STOP button to stop playback 6 Press the P A T button again to turn the feature off Before using performance assis tant technology To use the performance assistant technology the Song must contain chord data If the Song contains this data the current chord name will be displayed in the Main display during Song playback letting you easily check whether the ...

Страница 121: ...ncluding global events for the entire song and specific events for each channel The MIDI Event List is a useful Song Creator tool that arranges all events in a song in chronological order in measures beats clocks and allows you to make detailed changes to those events Among the events included are Chord Section These style playback events let you enter Chords and Sections Intro Main Ending and so ...

Страница 122: ...sure set with the corresponding LCD button REPLACE ALL This deletes all data following the point at which recording is stopped PUNCH OUT The song position at which recording is stopped is regarded as the Punch Out point This setting maintains all data following the point at which recording is stopped PUNCH OUT AT Actual overwrite recording continues until the specified Punch Out measure set with t...

Страница 123: ...specified amount Ap plying less than 100 quantization lets you preserve some of the human feel in the recording 1 3 2 4 CAUTION Executes the operation for the dis played page After the operation with the exception of the SETUP page is completed this button changes to UNDO letting you restore the original data if you are not satisfied with the Operation results The Undo function only has one level ...

Страница 124: ...tion channel DESTINATION Determines the channel into which the mix or copy results will be placed SONG Records the tempo setting and all settings made from the Mixing Console KEYBOARD VOICE Records the current panel settings including the voice of the keyboard played parts RIGHT 1 2 3 and LEFT and their on off status Panel settings recorded here are same as the ones memorized to the One Touch Sett...

Страница 125: ...ords as shown at right 001 1 0000 The song position at which you edit or input the event is indicated by the following three values This sets the size of the next Chord Section event to be entered in step recording and deter mines to what position the pointer will advance after the event has been entered Use the CHORD display if you wish to edit the already recorded Chord events one by one Use the...

Страница 126: ... C Select this resolution and play chords as shown at right 002 3 000 Dm7 002 4 000 G7 CM7 Dm7 Em7 Dm7 G7 C MAIN D FILL IN C MAIN C Select this resolution and play chords as shown at right 003 1 000 C 004 1 000 C The MAIN C section is auto matically selected You can also move the song position to the top of the song by using this LCD button The chord progression can be played back only from this S...

Страница 127: ...le playback and the melody explained here separately Press this to convert the recorded chord and section entries into song data You ll need to execute the Expand operation to properly play back the data you entered in the STEP RECORD page described on the previous page Chord and Section data recorded with Realtime Recording cannot be indicated and edited on this display NOTE 001 1 1440 The song p...

Страница 128: ... from the recorded MIDI data it may not appear exactly the same as shown here NOTE Determines the velocity loudness of the note to be entered Here we ll select mf as specified in the example Value Actual recorded velocity Kbd Vel fff ff f mf mp p pp ppp Actual playing strength 127 111 95 79 63 47 31 15 Sets the Gate Time or the length of the note as a percent age Here we ll select Tenuto as specif...

Страница 129: ...ere NOTE Determines the velocity loudness of the note to be entered Here we ll select mp as specified in the example Sets the Gate Time or the length of the note as a percentage Here we ll select Ten as specified in the example Use these buttons to set the resolution of the next note s Here we ll set the resolution to a half note as specified in the example While holding F on the keyboard press th...

Страница 130: ...he Song Open Save display for saving your data then save the data in the Open Save display page 75 Determines the velocity loudness of the note to be entered Here we ll select f as specified in the example Sets the Gate Time or the length of the note as a percentage Here we ll select Ten as specified in the example Use these buttons to set the resolution of the next note Here we ll set the resolut...

Страница 131: ...o be entered Here we ll select ff as specified in the example Sets the Gate Time or the length of the note as a percentage Here we ll select Normal as speci fied in the example Use these buttons to set the resolution of the next note Here we ll set the resolution to an 1 8 note as specified in the example Do not release C3 yet Keep holding the note as you execute the following steps While holding ...

Страница 132: ...ding the keys C3 E3 G3 and C4 press the 1 8 note LCD button then press the half note LCD button All notes in the example have now been entered and you can release the keys The recorded data will be lost if you select another file or turn the power to the instrument off without executing the Save operation CAUTION Determines the channel for the MIDI event edited here or entered to the STEP RECORD d...

Страница 133: ...ermines the key as well as the major minor setting This setting is used for displaying the notation Song Score function XG Prm XG parameters Allows you to make various detailed changes to the data For more information on XG parameters refer to the separate Data List booklet MIDI Data Format SYS EX System Exclusive Displays the System Exclusive data in the song Keep in mind that you cannot create n...

Страница 134: ...e desired Filter category from the three below then checkmark the items you want to be shown in the Event List displays MAIN Displays all main types of events CTRL CHG Displays all specific Control Change message events STYLE Displays all types of style playback related events Enters removes the checkmark for the selected event type The checked event types can be shown on the Event List displays S...

Страница 135: ...rder is set to the Basic mode playback of a single file or recording your performance or the Playlist mode automatic playback of multiple files This lets you keep the Playlist active in the background ready to play the listed files when you want For details on the Playlist mode see page 147 NOTE See pages 73 76 This switches to the second Open Save menu display see below This selects the next high...

Страница 136: ...ates the location and path of the file SAMPLE RATE Indicates the sample rate of the recorded audio SAMPLE SIZE Indicates the bit size or resolution of the recorded audio CHANNEL Indicates the configuration of the audio TIME Indicates the time between Start and End points of the audio in hours minutes seconds milliseconds Exits from the Property display Calls up the Start End Setting menu Page 146 ...

Страница 137: ...o to the Tyros2 Export a recording made on the Tyros2 to a computer based audio editor giving you more comprehensive editing features and greater editing convenience then import the audio back to the Tyros2 See Exporting an Audio File on page 139 Files which can be imported must have these characteristics Stereo Wave data 44 1 kHz sample rate 16 bit resolution A length of less than or equal to 80 ...

Страница 138: ...multiple pages tabs are shown at the bottom you can select files from these displays too After that press the OK LCD button lower 7 button 7 At the prompt press the YES LCD button F button To cancel press the NO LCD button Importing may take as little as a couple of seconds or as long as a few minutes depend ing on the file size as well as the number of files you are importing To confirm the impor...

Страница 139: ...GE MENU LCD button lower 8 button if neces sary then call up the Export function by pressing the EXPORT LCD button lower 5 button 4 If necessary select the desired folder by using the A J buttons The selected folder will open If there are ten or more folders in the device use the upper LCD buttons 1 8 to navigate through the folders 5 Select the desired audio file by using the A J buttons The sele...

Страница 140: ...ng may take as little as a couple of seconds or as long as a few minutes depend ing on the file size as well as the number of files you are exporting The audio file is exported to the device in stereo Wave format 44 1 kHz sample rate and 16 bit resolution and can now be transferred to a computer for editing Do not disconnect the device while the READ WRITE lamp is on or flashing Doing so may resul...

Страница 141: ... data Keep in mind that the Hard Disk Recorder in this instrument is a simple stereo recorder After stopping recording the data will be erased from the stop point 1 Press the HARD DISK RECORDER SELECT button and select the recorded file to be re recorded from the AUDIO Open Save display 2 Press the HARD DISK RECORDER SETTING button then use the TAB buttons to select the REC MODE tab 3 Use the A B ...

Страница 142: ...ge 143 9 Save the recording For details on the Save operation see page 75 HDR PLAY BALANCE This determines the playback level of the recorded file It does not affect the level of the record ing Simultaneously pressing both 1 buttons restores the default value HDR TRACK PLAY This determines the level of the playback track for recording purposes Use this with Rec Mon itor below to adjust the relativ...

Страница 143: ...ormalization is calculated for the loudest signal found in either channel of the stereo recording and the same gain is applied to both channels 1 Make sure that the Volume page is selected 2 Press the NORMALIZE LCD button G button 3 At the prompt press the OK LCD button G button to start Normalizing the file To cancel the operation press the CANCEL LCD button H button Normalize can only be applied...

Страница 144: ...desired punch in out position while listening to the playback 500 milliseconds loop playback before after the specified point The DATA ENTRY dial lets you adjust the point in seconds and the PREV NEXT buttons lets you adjust in milliseconds 2 3 Press the MODE LCD button 7 button to select After Before After repeats 500 milliseconds after the Nudge Data Position and Before repeats 500 milliseconds ...

Страница 145: ...en press and hold the footswitch The point at which you press the footswitch is the punch in point and the point at which you release the pedal is the punch out point Auto Press the HARD DISK RECORDER REC button and press the PLAY PAUSE button Recording automatically starts and stops at the specified point in Specify the recording range in AUTO mode above The audio song playback automatically stop...

Страница 146: ...ay 2 Press the PROPERTY LCD button upper 7 button 3 Press the START END POINT LCD button H button 4 Specify the Start End point The operation of specifying the Start End points is same as specifying the punch in out points For instructions see Specify the recording range in AUTO mode on page 144 5 Press the OK LCD button F button to enter the new settings to the file To cancel the operation press ...

Страница 147: ...e automatic playback of multiple files Creating a Playlist Once you have a number of recorded or imported audio files on the installed hard disk drive you can assign those files to the Playlist The files can be put in any order and can be entered any number of times in other words a single file can have multiple instances in a Playlist The Playlist cannot be saved except to the installed hard disk...

Страница 148: ... cancel the operation press the CANCEL LCD button lower 8 button 6 Check the Playlist to confirm that the files have been added If the Playlist already has audio files additional files are automatically put at the end of the list Added files are also automatically selected checkmarked for playback 7 Save the Playlist Press the SAVE LCD button lower 5 button The Playlist cannot be saved except to t...

Страница 149: ...beginning of the Playlist select the first file A check mark indicates the file is enabled for playback a minus sign indicates the file will be skipped and an exclamation mark indicates the file does not contain data The Playlist mode will be active when you select a file in the Playlist Note that the indicator at the top left of the display now shows Playlist While the Playlist mode is active the...

Страница 150: ...k Recorder Reference 150 Tyros2 Owner s Manual 4 Press the HARD DISK RECORDER STOP button to stop playback To disengage the Playlist mode press the AUDIO LCD button 6 buttons to show the AUDIO Open Save display and select an audio song ...

Страница 151: ...n lower 3 button Copy and Insert 1 Press the COPY LCD button upper 4 button and select the desired file entry by using the DATA ENTRY dial and SELECT LCD button lower 5 button The entry is copied 2 Move the cursor to the desired location in the list with the SELECT buttons and press the INSERT LCD button lower 3 button Delete Deletes files from the Playlist Keep in mind that this does not affect t...

Страница 152: ... make certain chords Press FUNCTION CHORD FINGERING The explanations here show how to specify chords Call up the FUNCTION CHORD FINGERING display and follow the instructions below Pro These styles provide professional and exciting arrangements combined with per fect playability The resulting accompaniment exactly follows the chords of the play er As a result your chord changes and colorful harmoni...

Страница 153: ...out specifying the style chords Although the AI Full Keyboard type is designed to work with many songs some arrangements may not be suitable for use with this feature This type is similar to FULL KEYBOARD with the exception that less than three notes can be played to indicate the chords based on the previously played chord etc 9th 11th and 13th chords cannot be played This type is effective only w...

Страница 154: ...standard tempo however this can be changed to any value between 5 and 500 beats per minute by using the TEMPO button This can be done either before the style playback is started or while it is playing You can deter mine whether the current tempo is maintained or is reset to the default tempo of a newly selected style while a style is being played back by using the Style Change Behavior Tempo Hold ...

Страница 155: ... a particular style first you select a style for your performance then you press a ONE TOUCH SETTING button to match the panel settings to that style OTS Link The convenient OTS One Touch Setting Link function lets you automatically have One Touch Settings change when you select a different Main section A D The Main sec tions A B C and D correspond to One Touch Settings 1 2 3 and 4 respectively Th...

Страница 156: ...le no matter how deeply hidden with a single button press 1 Call up the Open Save display for styles with the Number Input Type page 77 2 First select the style to be memorized by calling up the appropriate path then press the MEMORY LCD button 3 Check that the path set in step 2 above has been properly memorized First call up a different path for example the Open Save display for voices then sele...

Страница 157: ...chord played in the chord section will sound via the certain voice regardless of the selected style OTS Link Timing This applies to the OTS Link function page 155 This parameter determines the timing in which the One Touch Settings change with the MAIN VARIATION A D change The OTS LINK button must be on Real Time One Touch Setting is immediately called up when you press a MAIN VARIATION button Nex...

Страница 158: ...e two sections for playing voices LEFT and RIGHT 1 3 Split Point R separates the two sections for playing the Right voices Right 1 2 Right 3 To set the split point use the corresponding 1 6 LCD buttons along with the data dial if desired or use the F I buttons to select the desired part S L lets you adjust both Style and Left together then rotate the DATA ENTRY dial or press the desired key on the...

Страница 159: ... example INTRO I and MAIN A are created by recording the new data to all the parts and MAIN B is cre ated by assembling the pattern data for all parts from the other styles INTRO III and ENDINGA C are created by keeping and using the original data MAIN C and FILL INA are created via three ways Recording Assembly and using the origi nal data Style Data Structure Creating Styles Part Section RHYTHM ...

Страница 160: ...ype specified in the chord section of the keyboard The Style Creator lets you set the parameters that determine how the note is transposed and set the parameters that determine how notes held through chord changes will be handled The Style File Format SFF combines all of Yamaha s auto accompaniment style playback know how into a single unified format By using the Style Creator you can take advanta...

Страница 161: ... 75 Execute Realtime recording Execute Assembly page 163 Edit the already recorded parts channels Execute Step Recording using the Event List Set the desired part channel to REC by pressing the corresponding lower LCD button while holding the REC CH button Only one part channel can be recorded at a time Press the upper button to call up the Open Save display for voices to change the voice of the s...

Страница 162: ...s you make during your performance The chord which forms the basis for thios note conversion is called the Source Chord and is set by default to CM7 as in the example illustration above You can change the Source Chord its root and type fromthe PARAMETER display on page 165 Keep in mind that when you change the Source Chord from the default CM7 to another chord the chord notes and recommended notes...

Страница 163: ... sections and channels to be copied Determines the playback setting for each channel You can assemble the accompa niment style while the style section and channel that will be copied are playing SOLO Mutes all but the selected channel Any parts channels set to ON in the RECORD pop up window on the BASIC page are played back simultaneously ON Plays back the selected part channel Any parts channels ...

Страница 164: ...ORIGINAL BEAT value is 8 Beat the Swing parameter will selectively delay the 2nd 4th 6th and 8th beats of each measure to create a swing feel The settings A through E produce different degrees of swing with A being the most subtle and E being the most pronounced FINE Selects a variety of Groove templates to be applied to the selected section The PUSH settings cause certain beats to be played early...

Страница 165: ...l 1 4 2 3 5 Use these to select the desired edit operation Set the parameters for executing the data edit Executes the selected operation on the respective page After the opera tion is completed you can hear the result and this button changes to UNDO letting you restore the origi nal data if you re not satisfied with the result of each operation The Undo function only has one level only the previo...

Страница 166: ...DIC MINOR 5th Var In addition to the Melodic Minor transposition above augmented and diminished chords affect the 5th note of the Source Pattern HARMONIC MINOR When the played chord changes from a major to a minor chord this table lowers the third and sixth intervals in the scale by a semitone When the chord changes from a minor to a major chord the minor third and flatted sixth intervals are rais...

Страница 167: ...mpatible tone generator for optimum results Record the sections in the order listed below with a Marker Meta event at the top of each section Enter the Marker Meta events exactly as indicated in the chart on the next page including upper lower case characters and spaces Also include an SFF1 Marker Meta event SInt Marker Meta event and style name Meta event at 1 1 000 the top of the sequence track ...

Страница 168: ...rs Intro Pattern up to 255 bars Corresponds to INTRO III 22 1 000 23 4 479 Ending C 2 bars Intro Pattern up to 255 bars Corresponds to ENDING III 24 1 000 25 4 479 Main D 2 bars Main Pattern up to 255 bars Corresponds to MAIN D 26 1 000 26 4 479 Fill In DD 1 bar Fill In Pattern Corresponds to FILL IN D Initial Setup Source Pattern Section Length Intro 255 measures max Main 255 measures max Fill In...

Страница 169: ... displays such as voices songs and styles These operations can be used on each individual pad just as with the banks on the display at left Settings here can be saved to User drive or external devices as a bank file on the Open Save display You can use these operations to collect your favorite Multi Pads and save custom Multi Pad Banks to the User drive or external devices Basic Procedure Multi Pa...

Страница 170: ...ince Multi Pads contain data for only a single channel In the Multi Pad Creator only the channel events and System Exclusive messages can be entered Chord and Lyrics events are not available You can switch between the two types of Event Lists by pressing the F button 1 5 3 4 2 6 C R C C R C Select a particular Multi Pad for recording If you want to create the Multi Pad data from scratch press the ...

Страница 171: ...current record belongs Creates a new genre for inclusion of the current record and lets you enter a genre name Press this LCD button to add the currently edited record to the Music Finder as a new record Press this to store the settings here to the current record on Flash ROM and return back to the MUSIC FINDER display Selects the section that will automatically be called up set when the record is...

Страница 172: ...inder file from the User drive or external devices All Music Finder records can be stored together as a single file When selecting a stored file a message appears prompt ing you to replace or append the records as desired REPLACE All Music Finder records currently in the instrument are deleted and replaced with the records of the selected file APPEND The records called up are added to the vacant r...

Страница 173: ...re correct or not by chang ing the Registration Memory number Registration Sequence As convenient as the Registration Memory buttons are there may be times during a performance when you want to quickly switch between settings without having to take your hands from the keyboard The convenient Registration Sequence function lets you call up the presets in any order you specify by simply using the TA...

Страница 174: ... Memory banks or when turning the power off unless you ve saved it with the Registration Memory bank file Indicates the file name of the selected Registration Memory bank Determines which pedal is used to advance increment through the sequence Determines which pedal is used to reverse decrement through the sequence Indicates the Registration Mem ory preset numbers in the order of the current Regis...

Страница 175: ... set to CHORDAL Make sure to adjust the INPUTVOLUME so that the SIGNAL lamp lights but the OVER lamp does not This turns the Vocal Harmony effect on or off If you connect a microphone to the Tyros2 you can sing along with the song or style and have vocal harmony parts added automatically This calls up the Microphone setting display and lets you adjust the level of the microphone and vocal harmony ...

Страница 176: ...DER DEPTH Adjusts the degree of gender change applied to harmony notes higher than the UPPER GENDER THRESHOLD The higher the value the more feminine the harmony voice becomes The lower the value the more masculine the voice LOWER GENDER DEPTH Adjusts the degree of gender change applied to harmony notes lower than the LOWER GENDER THRESHOLD The higher the value the more feminine the harmony voice b...

Страница 177: ... sound CHORUS DEPTH These set the depth of the chorus effects applied to the microphone sound TOTAL VOLUME ATTENUATOR This determines the amount of attenuation to be applied to the overall sound excepting the microphone input allowing you to effectively adjust the balance between your voice and the overall instrument sound DSP MIC ON OFF This turns the DSP effect applied to the microphone sound ON...

Страница 178: ...RD The following parameters determine which data in a recorded song is used for chord detection Vocal Range Set this to obtain the most natural vocal harmony depending on your voice MIC LINE IN Microphone The following parameters determine how the microphone sound is controlled SONG CHANNEL MUTE PLAY OFF 1 16 When set to MUTE the channel selected below is muted turned off during keyboard perfor ma...

Страница 179: ...he EXECUTE LCD button on this display to reflect the settings to the song data on RAM then save the song to the User drive or external devices page 56 Parts making up the Tyros2 sound Keyboard parts Consists of RIGHT 1 RIGHT 2 RIGHT 3 LEFT Split Point page 158 Multi Pad parts Consists of Multi Pads 1 2 3 and 4 Microphone sound part Style parts Consists of Rhythm 1 2 Bass Chord1 2 Pad Phrase 1 2 So...

Страница 180: ...E button TUNING Determines the pitch of each keyboard part TRANSPOSE Allows the pitch to be transposed up or down in semitone increments Setting this to MASTER transposes the overall sound of the instru ment while SONG transposes song playback and KEYBOARD transposes the keyboard pitch as well as that of style playback and the Multi Pads since these are also affected by keyboard play in the left h...

Страница 181: ...art all channels Song part all channels In addition to the Reverb and Chorus types the Tyros2 has special DSP effects that in clude additional effects usually used for a spe cific part such as distortion and tremolo System Insertion 3 DSP2 DSP3 DSP4 DSP5 RIGHT 1 RIGHT 2 RIGHT 3 LEFT Song part all channels Any unused DSP blocks are automatically as signed to the appropriate parts channels as needed...

Страница 182: ... About DSP 1 In most cases the DSP 1 effect block is available for either the song or style part For songs and styles the effect block is applied to only the last selected or played part For example when selecting or starting a song during style playback the DSP 1 effect applied to the style part is cancelled and is applied instead to the song part Particularly if the style data originally is proc...

Страница 183: ...ect type Enter the desired name and press the OK LCD button to save the edited effect to the location specified at left Select an Effect category type to be edited Select a parameter to be edited Parameters displayed differ depending on the selected Effect type Refer to the separate Data List booklet for details When the edited effect block is a System Effect the Effect Return Level parameter page...

Страница 184: ... adjusting the frequency bands and save the settings to one of two User Master EQ types Along with the five Preset EQ settings these can be called up as needed from the MIXING CONSOLE EQ display 0 Master EQ type selection and Part EQ adjusting Select a Master EQ type Master EQ type editing Selecting a Master EQ type automatically set the parameters displayed at the bottom of this display Whenever ...

Страница 185: ...nsive built in effects and other Part controls of the Tyros2 provide all you need for processing and mixing complex multi Part songs However there may be times when you want to sweeten or process a certain Voice or sound with a favorite outboard effect unit or record a Part to a separate track of a tape recorder The Line Out settings are designed just for these kinds of applications Master Compres...

Страница 186: ...cussion sound will be output in stereo 1 left 2 right When the SUB1 SUB2 box is checkmarked the part channel or percussion sound will be output in mono respectively Line Out settings for each part or channel Select the desired part Line Out settings for each instrument key Set the output configuration for the selected part by checkmarking or un checkmarking the appropriate column jack Set the outp...

Страница 187: ...strument This function allows each individual note of the octave to be tuned in cents 1 cent 1 100th of a semitone for each part especially useful for playing period pieces to match the tuning system used during specific musical eras Basic Procedure Function 1 2 3 Press the FUNCTION button Select the desired menu by pressing the corresponding LCD button Page 187 Page 118 Pages 152 and 157 Page 189...

Страница 188: ... Pythagorean scales The main fea ture of this scale is that each key has its own unique character The scale was used extensively during the time of Bach and Beethoven and even now it is often used when performing period music on the harpsichord ARABIC1 2 Use these tunings when playing Arabic music Use these to select the desired part These determine whether the cor responding voice related setting...

Страница 189: ...s up is raised or down is lowered RANGE determines the range of the pitch change in semitones ON SPEED determines the speed of the pitch change when the pedal is pressed OFF SPEED determines the speed of the pitch change when the pedal is released LEFT RIGHT 1 2 3 turns this pedal function on or off for each keyboard part PORTAMENTO The portamento effect a smooth slide between notes can be produce...

Страница 190: ...TAP TEMPO Same as the TAP TEMPO button SYNCHRO START Same as the SYNC START button SYNCHRO STOP Same as the SYNC STOP button INTRO 1 Same as the INTRO I button INTRO 2 Same as the INTRO II button INTRO 3 Same as the INTRO III button MAIN A Same as the MAIN A button MAIN B Same as the MAIN B button MAIN C Same as the MAIN C button MAIN D Same as the MAIN D button FILL DOWN A fill in plays automatic...

Страница 191: ...g to produce high volume Best for players with a heavy touch HARD 1 Requires moderately strong playing for higher volume NORMAL Standard touch response SOFT 1 Produces high volume with moderate playing strength SOFT 2 Produces relatively high volume even with light playing strength Best for players with a light touch TOUCH OFF LEVEL Determines the fixed volume level when Touch is set to OFF TOUCH ...

Страница 192: ...his parameter is only available when Echo Tremolo or Trill is selected in Type above ASSIGN This lets you determine the keyboard part via which the harmony echo notes will be sounded This parameter is available for all types with the exception of Multi Assign CHORD NOTE ONLY When this is set to ON the Harmony effect is applied only to the note that belongs to a chord played in the chord section of...

Страница 193: ...tegory Button Options Determines how the voice Open Save display is opened when one of the voice buttons is pressed Display Voice Number Determines whether or not the voice bank and number are shown in theVoice selection display Open Save display This is useful when you want to check the proper bank select MSB LSB values and program number to specify when selecting the voice from an external MIDI ...

Страница 194: ...hibited except for your own personal use Some music soft ware is purposely copy protected and cannot be copied NOTE The optionally installed hard disk unit will go into a sleep mode after a specified time of inactivity both to maximize the lifetime of the hard disk and to minimize unnecessary mechanical noise This parameter determines the sleep time Checking remaining memory on the media see below...

Страница 195: ...own pictures Even though a variety of pictures are available on the preset drive you can load your own favorite picture data to the Tyros2 for use as background Keep in mind the following points and limitations when using your own picture data Only bitmap files BMP can be used for the background of the MAIN dis play Make sure to use images no larger than 640 x 480 pixels Smaller images are automat...

Страница 196: ...play are handled as a single System Setup file Refer to the separate Data List booklet for details about which parameters belong to the System Setup MIDI SETUP FILES The MIDI settings including the MIDI templates on the User drive are handled as a single file USER EFFECT FILES The User Effect settings including the user effect types user master EQ types user compressor types and user vocal harmony...

Страница 197: ...onnecting by cable using a modem with router Connection example 3 Wireless connection Use a computer to connect to the Internet and get online before connecting the instrument since no modem or router settings can be made from the instrument itself The special Tyros2 website can be opened when directly connecting the Tyros2 to the Internet NOTE Depending on the Internet con nection you may not be ...

Страница 198: ...press the EXIT button Operations in the Special Tyros2 Website Scrolling the Display When the size of the web page is too large to be shown at one time in the browser display of the instrument a scroll bar appears at the right side of the display Use the DATA ENTRY dial to scroll through the display and view those parts of the page that are not shown Returning to the Main display You can convenien...

Страница 199: ... are aligned on the right left side of the display use the A J buttons Entering Characters This section explains how to enter characters within the website for inputting a password or searching for data etc 1 With the cursor at a field for character entry such as a password box or other field see Following Links above press the ENTER LCD button uppper 8 button to call up the character input displa...

Страница 200: ... to the desired position Use the same operation as in step 1 of Deleting Characters above 2 Use the s t LCD buttons to move the red highlight to the desired character 3 Press the ENTER LCD button upper 8 button to enter the character Entering a Space 1 Move the cursor to the desired position Use the same operation as in step 1 of Deleting Characters above 2 Press the SPACE LCD button lower 5 butto...

Страница 201: ... select the downloaded data To return to the Internet display select NO When the Open Save display is open press the UP LCD button upper 8 button to call up the next highest level folder The downloaded data is saved in the MyDownloads folder in the drive To close the folder and call up the next highest level folder press the UP LCD button upper 8 button in the Open Save display SSL SSL Secure Sock...

Страница 202: ...n upper 6 button The Bookmark display appears showing a list of the currently saved bookmarks The title of the currently selected web page is shown below the list 2 Call up the display for registering bookmarks by pressing the ADD LCD button 3 button 3 Select the position of the new bookmark by pressing the UP DOWN LCD button 1 button 4 To save the bookmark press the EXECUTE LCD button 7 button or...

Страница 203: ... Opens the web page of the selected bookmark Add Used when saving a bookmark page 202 Changing names Changes the name of the selected bookmark Pressing the CHANGE LCD button 4 button calls up the display for enter ing characters For details on entering characters see page 199 Delete Deletes the selected bookmark from the Bookmark list Move Changes the order of the bookmarks 1 Select the bookmark y...

Страница 204: ...be the Home page 1 Open the page you wish to set as your new Home page 2 Press the SETTING LCD button lower 5 button to call up the Internet Setting display 3 Press the TAB button to select the BROWSER tab 4 Press the DOWN LCD button lower 1 button to select the setting Set this page as Home 5 Use the EDIT LCD buttons 2 3 buttons to actually set the selected page as your new Home page 6 To return ...

Страница 205: ...ct the desired display 3 Select the desired item by pressing the UP DOWN LCD button 1 but ton 4 To call up the relevant Edit display press the EDIT LCD buttons 2 3 buttons For some items the Edit display may not be shown but the setting or change may be executed 5 Press the UP DOWN LCD button 2 button to select the setting or change the value This can also be done by using the DATA ENTRY dial 6 To...

Страница 206: ...y keys This setting lets you select the character order of the virtual keyboard for entering char acters When this is set to Alphabetical the keys are in alphabetical order When this is set to ASCII the keys are arranged as a conventional QWERTY keyboard Time zone This determines the time setting for the browser Use DHCP Determines whether or not DHCP is used If your router is compatible with DHCP...

Страница 207: ...e WEP key length WEP key These settings are available only when Encryption above is enabled These set the type and length of the encryption key Proxy server Proxy port Non proxy server Determines the proxy server name port number and the host name for the non proxy server The settings here are only necessary when using a proxy server When using a non proxy server enter a separator comma between ea...

Страница 208: ...tings displays except for the cookies and bookmarks including those related to Internet connection 1 Press the SETTING LCD button lower 5 button to call up the Internet Settings display 2 Press the TAB button to select the OTHERS tab 3 Press the UP DOWN LCD button 1 button to select Initialize 4 Use the EDIT LCD buttons 2 3 buttons to initialize the Internet set tings Delete cookies bookmarks Cook...

Страница 209: ...ial cable Link A highlighted word button or icon within a web page that when clicked opens another web page Modem A device which connects and allows data transfer between a conventional telephone line and a computer It converts the digital signals from the computer to analog audio for sending over the phone line and vice versa NTP Short for Network Time Protocol a standard for setting the internal...

Страница 210: ... and various other types of MIDI data or messages The Tyros2 can control a MIDI device by transmitting note related data and various types of controller data The Tyros2 can be controlled by the incoming MIDI messages which automatically determine tone generator mode select MIDI channels voices and effects change param eter values and of course play the voices specified for the various parts MIDI m...

Страница 211: ...tted or received via two sets of MIDI terminals MIDI A IN OUT MIDI B IN OUT or the USB connector MIDI IN Receives MIDI data from another MIDI device Two ports A B are provided and each can receive MIDI messages of 16 channels MIDI OUT Transmits the Tyros2 s keyboard information as MIDI data to another MIDI device Two ports A B are provided and each can transmit MIDI messages of 16 channels USB Tra...

Страница 212: ...tomatic accompaniment based on a wide range of chord types The Tyros2 uses the SFF internally reads optional SFF style disks and creates SFF styles using the Style Creator function Voice allocation format With MIDI voices are assigned to specific numbers called program numbers The numbering standard order of voice allocation is referred to as the voice allocation format Voices may not play back as...

Страница 213: ...d etc synchronizes with an external MIDI clock instead of the Tyros2 s internal clock This template is called up when you wish to set the tempo on the MIDI device connected to the Tyros2 Playback or Recording of the Tyros2 synchronizes with an external clock received via MIDI A MIDI Accord1 MIDI accordions allow you to transmit MIDI data and play connected tone generators from the keyboard and bas...

Страница 214: ...ess the EXIT button to return to the MIDI template display As desired set the MIDI parameters Press the EDIT LCD button to call up the display for setting the MIDI parameters Here you can see and edit the detailed settings that correspond to the MIDI template selected in step 3 Setting the Chord Type for Style Playback via MIDI receive page 217 Setting the Chord Root for Style Playback via MIDI re...

Страница 215: ...ng FA start and FC stop messages affect song or style playback Message Switch SYS EX The Tx setting turns MIDI transmission of MIDI system exclusive messages on or off The Rx setting turns MIDI reception and recognition of MIDI system exclusive messages generated by external equipment on or off CHORD SYS EX The Tx setting turns MIDI transmission of MIDI chord exclusive data chord detect root and t...

Страница 216: ...low see page 179 for details about the parts KEYBOARD The received note messages control the Tyros2 s key board performance EXTRA PART1 4 There are four parts specially reserved for receiving and playing MIDI data Normally these parts are not used by the instrument itself The Tyros2 can be used as a 32 channel multi timbral tone generator by using these four parts in addition to the parts except f...

Страница 217: ... basically the same as that of the BASS display above MFC10 Settings The explanations here apply when you call up the MFC10 page in step 5 of the Basic Procedure on page 214 By connecting an optional MFC10 MIDI Foot Controller to the Tyros2 you can conveniently control a wide range of operations and functions by using your feet perfect for changing settings and controlling the sound while you perf...

Страница 218: ...ines the MIDI port which is to be used when communicating with the MFC10 Here the USB port USB1 USB2 can be selected even though the MFC10 does not have the USB connector This is because the computer can be used instead of the MFC10 The computer can transmit the data equiv alent to the data the MFC10 transmits to the Tyros2 For details see the bottom of this page Select FOOT SWITCH or FOOT CONTROL...

Страница 219: ...he speakers to the respective outputs on the Tyros2 Satellite speakers 2 Subwoofer speaker 1 Speaker brackets 2 RCA pin cables 2 RCA pin 8 pin combination cable 1 Use the out side slots as shown Either bracket can be fastened to either location NOTE Place the speaker on the bracket Adjust the direction of the speaker as desired then fasten it securely to the bracket Either speaker can be placed on...

Страница 220: ...of theTyros2 and the subwoofer to an appropriate AC outlet 7 First set the volume controls MASTER VOLUME on the Tyros2 and BASS on the sub woofer to minimum Finally turn on the power of the subwoofer then the Tyros2 8 Adjust the volume controls MASTER VOLUME on the Tyros2 and BASS on the sub woofer to appropriate levels Tyros2 Sub Woofer BASS 10 0 Turn the subwoofer on from the rear panel Turn the...

Страница 221: ...ts may result in a faulty contact Be careful not to misplace any of the screws since all of them are used Do not use any screws other than what are installed on the instrument and included Before beginning installation switch off the power to theTyros2 and con nected peripherals and unplug them from the power outlet Then remove all cables connecting the Tyros2 to other devices Leaving the power co...

Страница 222: ... plan to install select holes A or holes B to attach the hard disk drive Holes A are used in this illustration Make sure not to bend the pins These four pins are unused If the HD drive tab appears on the Open Save display the hard disk is OK If the drive has multiple parti tions these will be shown as different HD drive tabs in the display If you have installed the hard disk that was once used for...

Страница 223: ...he steps below make sure you have appropriate DIMMs and a Phillips screwdriver 1 Turn the Tyros2 s power off and disconnect the AC power cord Also make sure to disconnect the keyboard from any other external devices 2 Turn the Tyros2 face down on a blanket or some soft surface giving you direct access to the bottom of the instrument 3 Remove the four screws from the cover Do not touch the exposed ...

Страница 224: ...function page 103 If the DIMMs have been installed properly the appropriate available memory size is indicated in the display Removing DIMMs 168 pin DIMMs Notch for alignment Ejector lever Location for DIMM installation DIMM sockets Installing the DIMM modules to the sockets Make sure that the DIMM module is aligned correctly before you install it Insert the DIMM vertically in the socket aligning ...

Страница 225: ...LAY PAUSE button Make sure the MIDI clock is set to INTERNAL page 215 The Multi Pads do not play back even when one of the MULTI PAD buttons is pressed The style does not start even when Synchro Start is in standby condition and a key is pressed You may be trying to start style by playing a key in the right hand range of the key board To start the style with Synchro Start make sure to play a key i...

Страница 226: ...Are you sure you re playing on the left hand section of the keyboard You may be using single finger type fingering page 153 The displayed disk free area value does not coincide with the actual value The displayed value is an approximate value Appropriate harmony notes are not pro duced by the Vocal Harmony feature Make sure you are using the appropriate method to specify the harmony notes for the ...

Страница 227: ...armony Echo Initial Touch Sustain and Poly Mono Event List A useful Song Style Multi Pad Creator tool that arranges all events in a song in chronological order in measures beats clocks and allows you to make detailed changes to those events F Factory Reset Refers to the original factory programmed settings of User drive memory loaded to the instrument before it is shipped Flash ROM ROM that can be...

Страница 228: ...pends on the size of the room or space and the materials and furnishings in the room Reverb Effect types use digital signal processing to simulate these characteristics Right hand section of the keyboard The section of keys to the right of the split point used to play the RIGHT 1 3 voices Revoice A function that changes the voice for each part or channel of the selected style or song to one of the...

Страница 229: ...oices 39 voices Sparkle Stack Curved Bars Slide Solid Clean Guitar Jazz Guitar Power Lead etc Organ Flutes 10 presets Super Articulation Voices 42 voices Concert Strings Tremolo Bowing 1 2 Big Band Brass Brass Fall f mf Trumpet Trumpet Shake1 2 Saxophone Concert Guitar Flamenco Guitar Steel Guitar Warm Solid Guitar Hero Feedbacker Magic Bell etc Orchestration Upper Right 1 3 Lower Left Split Left ...

Страница 230: ...prox 300 KB Multi Pad Preset 120 Control Pad 1 4 Stop Select Tempo 5 500 Tap Tempo Transpose 12 0 12 Assignable Keyboard Song Master Tuning 414 8 440 466 8 Hz Internet Direct Connection External Adapter via USB to DEVICE Memory Device Internal Flash Memory for user drive 3 2 MB Hard Disk Drive Internal 2 5 inch IDE Optional Storage devices via USB to DEVICE USB Flash Memory USB Hard Disk Drive etc...

Страница 231: ...automatically accessed since the instrument checks whether the disk has data Be sure to remove the floppy disk from the disk drive before turning off the power A floppy disk left in the drive for extended periods can easily pick up dust and dirt that can cause data read and write errors Cleaning the disk drive read write head Clean the read write head regularly This instrument employs a precision ...

Страница 232: ...ol Change 132 210 CONTROLLER 82 Controls 14 15 Cool voices 86 Copy 74 Current 119 Cursor 79 Custom Voice 85 94 196 Custom Voice Bank Edit 83 Custom Voice Edit via PC 83 Custom voices 86 CustomWA voices 86 Cut 74 Cutoff Frequency 92 D DATA ENTRY 68 Decay 93 Delay 93 Delete 75 123 DEMO 24 81 Depth 93 Destination 124 DIGITAL RECORDING 83 121 159 161 169 DIMM Installation 223 Direct Access 70 Disk 231...

Страница 233: ...oard Transpose 88 Keyword 41 L Language 23 119 195 LCD 68 188 LCD buttons 68 LCD contrast 21 LEFT 27 80 190 Left Hold 84 Length 90 LFO 92 LIBRARY LOAD 83 106 LIBRARY SAVE 83 108 LINE IN 17 LINE OUT 17 82 185 Live voices 86 Live Drums voices 86 Live SFX voices 86 Local Control 215 LOOP 43 44 81 Loop End Marker 117 Loop Recording 160 LOOP RETURN 17 LOOP SEND 17 Lower 215 LYRICS 83 114 188 Lyrics Bac...

Страница 234: ...Pitch Bend 210 Pitch Bend Range 180 PITCH BEND wheel 83 88 PLAY PAUSE 83 Playlist 147 Poly 87 91 Poly Mono 87 Polyphony 86 PORTAMENTO 189 Portamento 87 Portamento Time 91 180 POWER ON OFF 20 22 81 Preset drive 29 71 Program Change 132 210 Property 65 77 136 PUNCH IN AT 122 Punch In Out 121 PUNCH OUT AT 122 PURE MAJOR 188 PURE MINOR 188 PYTHAGORIAN 188 Q Quantize 123 Quick Recording 55 Quick Start ...

Страница 235: ... 210 System Message 210 SYSTEM RESET 82 196 System Setup 71 196 T TAB 69 TALK 81 190 Talk Setting 177 Tap 35 154 TAP TEMPO 81 154 190 TEMPO 81 133 154 158 Terminals 16 17 Text 115 TEXT PAGE 190 Time Signature 133 TO DEVICE 16 TO HOST 16 TO LEFT SPEAKER 17 TO RIGHT SPEAKER 16 TO SUB WOOFER 17 TOUCH LIMIT 192 Touch Sense 91 TRANSMIT 82 215 TRANSMIT CLOCK 215 TRANSPOSE 81 88 180 TRANSPOSE ASSIGN 191 ...

Страница 236: ...Tyros2 Owner s Manual ...

Страница 237: ...You may also contact Yamaha directly at the address provided below 2 Deliver the unit to be serviced under warranty to the retailer selling the product an authorized service center or toYamaha with an explanation of the problem Please be prepared to provide proof purchase date sales receipt credit card copy etc when requesting service and or parts under warranty 3 Shipping and or insurance costs a...

Страница 238: ...gethorpe Ave Buena Park CA90620 The above statements apply ONLY to those products distributed by Yamaha Corporation of America or its subsidiaries FCC INFORMATION U S A IMPORTANT NOTICE FOR THE UNITED KINGDOM Connecting the Plug and Cord IMPORTANT The wires in this mains lead are coloured in accordance with the following code BLUE NEUTRAL BROWN LIVE As the colours of the wires in the mains lead of...

Страница 239: ...hou Street 112 55 Athens Greece Tel 01 228 2160 SWEDEN Yamaha Scandinavia AB J A Wettergrens Gata 1 Box 30053 S 400 43 Göteborg Sweden Tel 031 89 34 00 DENMARK YS Copenhagen Liaison Office Generatorvej 6A DK 2730 Herlev Denmark Tel 44 92 49 00 FINLAND F Musiikki Oy Kluuvikatu 6 P O Box 260 SF 00101 Helsinki Finland Tel 09 618511 NORWAY Norsk filial av Yamaha Scandinavia AB Grini Næringspark 1 N 13...

Страница 240: ... Corporation 2005 Yamaha Corporation WE86550 602POCP4 3 03C0 Printed in Japan Yamaha Home Keyboards Home Page English Only http music yamaha com homekeyboard Yamaha Manual Library http www yamaha co jp manual This document is printed on chlorine free ECF paper ...

Отзывы: