


25
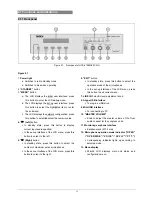
8. “LINE IN 2 Volume Setting”
Adjust LINE IN 2 input volume, range: mute, -30 dB - 0
dB.
a). Press the “
Õ
/
Ö
” button to adjust volume;
b). Press the “MENU” button to save and return to the
upper level menu.
9. “Microphone Gain Setting”
“Microphone gain setting” includes two submenus:
“Set All Mics”
“Set Active”
1
st
step
: power on all units
2
nd
step:
switch on any microphone (only one at a time)
as the first one and make a voice test. Keep the
acoustic impression in mind. Switch off the microphone
and switch on the next microphone and make the voice
test again. Continue until the last microphone has been
tested. If your final impression is that the sound level is
not appropriate, increase or decrease the gain in “Set
All Mics” in the CMU. Otherwise keep it unchanged.
“Set All Mics”
a). Press the “
Õ
/
Ö
” button to adjust the gain of all
microphones (press and hold the “
Õ
/
Ö
” button will
adjust numeric value quickly), range: -15 dB - +15
dB;
b). Press the “MENU” button to save and return to the
upper level menu.
3
rd
step:
Now redo the test again as “Set All Mics” setting from
the 2
nd
step does. Switch on any microphone as the
first and check the sound result again.
If it is ok, then switch off the microphone and switch on
the next microphone.
If it is not ok then keep the microphone switched on
and got to “Set Active” setting in the CMU and increase
or decrease the microphone gain.
Continue with the next microphone.
“Set Active”
a). Press the “
Õ
/
Ö
” button to adjust the gain of the
active microphones (press and hold the “
Õ
/
Ö
”
button will adjust numeric value quickly), range:
-15 dB - +15 dB;
b). Press the “MENU” button to save and return to the
upper level menu.
10. “Microphone Lowcut Setting”
Select activating high-pass filter (low-cut switch) to cut
low frequency elements from the microphone audio or
not.
a). Press the “
Õ
/
Ö
” button to select “Set All Mics” or
“Set Active”;
b). Press the “MENU” button to go to the next step;
c). Press the “
Õ
/
Ö
” button to select “Yes” or “No”;
d). Press the “MENU” button to save and return to the
upper level menu.
11. “Mic. Phantom Power Setting”
There are two menu items for phantom power setting of
handheld microphone interface on Multi-function
Connector HCS-4340A/50P. This submenu is
inaccessible if no phantom unit is connected.
“Set All Mics”
“Single”
Содержание HCS-4100/50 Series
Страница 46: ...33 Figure 2 10 Floor mode setting Normal Mode Figure 2 11 Floor mode setting Insert Mode...
Страница 47: ...34 Figure 2 12 Floor mode setting Sync Line Out1 Mixer...
Страница 58: ...45 3 2 2 Installation 3 2 2 1 Cutout Figure 3 3 Cutout of HCS 48U7 series flush mounted congress unit unit mm...
Страница 59: ...46 Figure 3 4 Cutout of HCS 48U8 series flush mounted congress unit unit mm...
Страница 60: ...47 Figure 3 5 Cutout of HCS 48U9 series flush mounted congress unit unit mm except HCS 48U9DFFF...
Страница 61: ...48 Figure 3 6 Cutout of HCS 48U9DFFF flush mounted congress unit unit mm...
Страница 62: ...49 3 2 2 2 Installation Figure 3 7 Installation of HCS 48U7 series flush mounted congress unit...
Страница 63: ...50 Figure 3 8 Installation of HCS 48U8 series and HCS 48U9 series flush mounted congress unit...
Страница 65: ...52 Figure 3 11 Disassembly caution of HCS 48U8 and HCS 48U9 series flush mounted congress unit...
Страница 130: ...117 Figure 3 43 Installation of HCS 4325U 50 congress unit unit mm...
Страница 143: ...130 Figure 3 57 Multi function connector connected to the HCS 4341 50 series congress unit...
Страница 155: ...141 Figure 3 72 Multi function connector connected to HCS 4841 42 43 series congress units...
Страница 168: ...154 3 12 3 Connection Figure 3 83 Connection of HCS 1030U Electronic Nameplate with HCS 48U8 series congress unit...
Страница 170: ...156 4 1 Functions and indications Front Side Bottom Figure 4 1 HCS 4385U 50 Interpreter unit...
Страница 223: ...www taiden com TAIDEN INDUSTRIAL CO LTD Copyright by TAIDEN Last Revision 06 2013...