18
A) Starting initialization
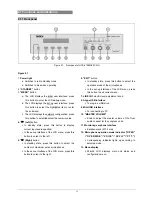
Switch on and press the “STANDBY” button,
HCS-4100M/50 CMU will start initialization:
B) Initial interface on LCD
When the initialization is finished, the initial interface
will be displayed on the LCD:
“Menu”
“Mic’s”
“Mode”
Select and press the corresponding button below the
item and go to the next operation:
Press the “MENU” button to enter the main menu
;
Press the “
Ö
“ button to select the maximal number
of microphones that can be turned on at the same
time: 1, 2, 3 or 4;
Press the “EXIT” button to select the microphone
mode “Open”, “Override”, “Voice”, “Apply” or
“PTT”.
“Open”:
If the maximal number of active microphones,
previously fixed, has been reached, delegates
requesting to speak join a request-to-speak list
with a capacity of 6. The first unit joining the list will
become active when the active unit gets off.
“Override”:
If the maximal number of active microphones has
been reached and if another delegate unit is
activated, the delegate unit switched on first will be
switched off first automatically (first in / first out).
The microphone limit set remains unchanged.
“Voice”:
The delegates’ microphone is activated when
spoken into. After 1-15 seconds (adjustable)
without speaking, the microphone switches off
automatically.
“Apply”:
When the delegate presses his/her microphone
ON/OFF button to request to speak, the chairman
unit can approve or reject his/her request.
“PTT” (push-to-talk):
When the delegate presses and holds the
microphone ON/OFF button, the microphone will
be activated; when the button is released, the
microphone will be deactivated.
C) Access main menu
Pressing the “MENU” button under initial user interface
will go to the main menu, which includes nine menu
items:
“Network”
“Simultaneous Interpretation”
“System Status”
“Test”
“System Setting”
“Operation Language Setting”
“Parameters Backup/Restore”
“Machine Rename”
“About”
Press the “MENU” button to go to the
corresponding submenu;
Use the “
Õ
/
Ö
” button to switch from term to term;
Use the “EXIT” button to exit current menu and
return to the upper level menu.
Содержание HCS-4100/50 Series
Страница 46: ...33 Figure 2 10 Floor mode setting Normal Mode Figure 2 11 Floor mode setting Insert Mode...
Страница 47: ...34 Figure 2 12 Floor mode setting Sync Line Out1 Mixer...
Страница 58: ...45 3 2 2 Installation 3 2 2 1 Cutout Figure 3 3 Cutout of HCS 48U7 series flush mounted congress unit unit mm...
Страница 59: ...46 Figure 3 4 Cutout of HCS 48U8 series flush mounted congress unit unit mm...
Страница 60: ...47 Figure 3 5 Cutout of HCS 48U9 series flush mounted congress unit unit mm except HCS 48U9DFFF...
Страница 61: ...48 Figure 3 6 Cutout of HCS 48U9DFFF flush mounted congress unit unit mm...
Страница 62: ...49 3 2 2 2 Installation Figure 3 7 Installation of HCS 48U7 series flush mounted congress unit...
Страница 63: ...50 Figure 3 8 Installation of HCS 48U8 series and HCS 48U9 series flush mounted congress unit...
Страница 65: ...52 Figure 3 11 Disassembly caution of HCS 48U8 and HCS 48U9 series flush mounted congress unit...
Страница 130: ...117 Figure 3 43 Installation of HCS 4325U 50 congress unit unit mm...
Страница 143: ...130 Figure 3 57 Multi function connector connected to the HCS 4341 50 series congress unit...
Страница 155: ...141 Figure 3 72 Multi function connector connected to HCS 4841 42 43 series congress units...
Страница 168: ...154 3 12 3 Connection Figure 3 83 Connection of HCS 1030U Electronic Nameplate with HCS 48U8 series congress unit...
Страница 170: ...156 4 1 Functions and indications Front Side Bottom Figure 4 1 HCS 4385U 50 Interpreter unit...
Страница 223: ...www taiden com TAIDEN INDUSTRIAL CO LTD Copyright by TAIDEN Last Revision 06 2013...


