Chapter 12: Service Menu
12-2
Veterinary 3 Parameter Advisor
®
Operation Manual
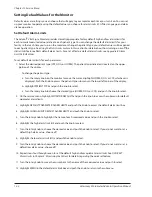
Setting Default Values for the Monitor
Default values are settings you can choose that will apply to your monitor each time you turn it on. You can set
up your monitor to operate using the default values you choose for alarm limits, ECG filter, language, and alarm
silence operation.
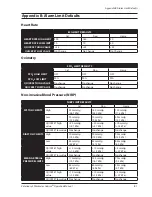
Set Default Alarm Limits
The Advisor
®
Vital Signs Monitor provides clinically appropriate factory default high and low alarm limits for
each numeric measured value, relative to each patient type. You can change the default alarm limits for your
facility so that each time you turn on the monitor or change the patient type, your default values will be applied
to each patient type. See
Using the Static Limits Feature
in this section for details about how turning on or off the
static limits feature affects default alarm limits. For a list of factory default alarm limits, see
Appendix B: Alarm
Limit Default Values
.
To set default alarm limits for each parameter:
Select the desired patient type (CAT, DOG, or HORSE). The patient type indicator is located on the upper
1.
portion of the display.
To change the patient type:
•
Turn the rotary knob on the monitor to move the cursor. Highlight HORSE, DOG, or CAT, whichever is
a.
displayed. Push the knob to access the patient type submenu in the lower left corner of the display.
Highlight PATIENT TYPE and push the knob to select.
b.
Turn the rotary knob to choose the desired type (HORSE, DOG, or CAT) and push the knob to select.
c.
On the service menu, highlight MONITOR DEFAULTS and push the knob to access the submenu for default
2.
parameter alarm limits.
Highlight DEFAULT PARAMETER ALARM LIMITS and push the knob to access the default alarm limit box.
3.
Highlight CHANGE UNIT DEFAULT ALARM LIMITS and push the knob to select.
4.
Turn the rotary knob to highlight the name of each measured value and push the knob to select.
5.
Highlight the high alarm limit (HI) and push the knob to select.
6.
Turn the rotary knob to choose the desired value and push the knob to select. If you do not want to set a
7.
default high alarm value, choose off.
Highlight the low alarm limit (LO) and push the knob to select.
8.
Turn the rotary knob to choose the desired value and push the knob to select. If you do not want to set a
9.
default low alarm value, choose off.
Repeat steps four through seven to set the default high and low quickset alarm limits. See
10.
QUICKSET
Alarm Limits
in
Chapter 5: Monitoring the Patient
for details regarding the quickset feature.
Turn the rotary knob to move the cursor back to the name of the measured value and push to select.
11.
Highlight MENU in the default alarm limit box and push the knob to return to the submenu.
12.
Содержание SurgiVet Advisor WWV9230
Страница 2: ......
Страница 10: ...Table of Contents viii Veterinary 3 Parameter Advisor Operation Manual This page is intentionally left blank ...
Страница 68: ...Chapter 7 ECG 7 14 Veterinary 3 Parameter Advisor Operation Manual This page is intentionally left blank ...
Страница 80: ...Chapter 8 Oximetry 8 12 Veterinary 3 Parameter Advisor Operation Manual This page is intentionally left blank ...
Страница 106: ...Chapter 12 Service Menu 12 8 Veterinary 3 Parameter Advisor Operation Manual This page is intentionally left blank ...
Страница 120: ...Appendix D Revision History D 2 Veterinary 3 Parameter Advisor Operation Manual This page is intentionally left blank ...
Страница 121: ......


