background image


34

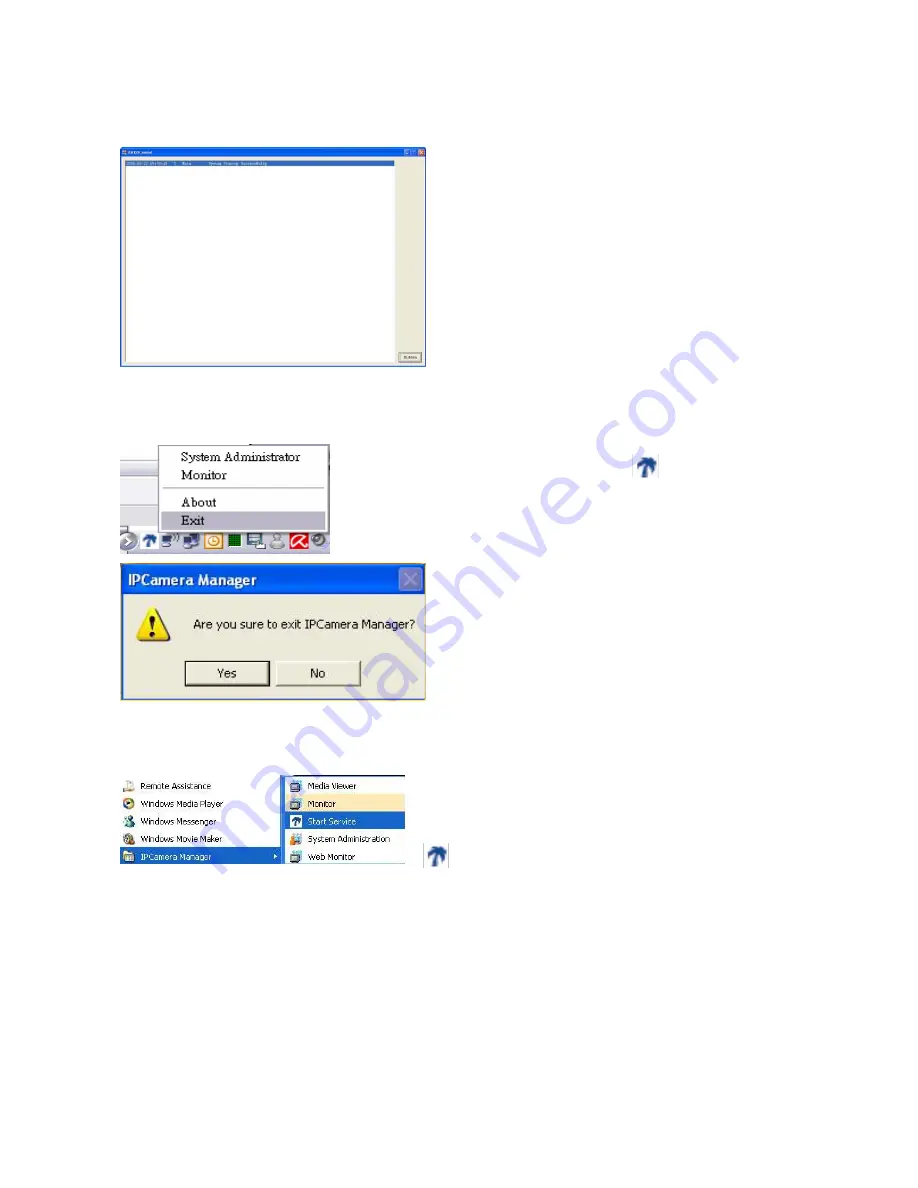
C. Start Service Program 


C.1. Automatically starts upon system boot up 


Only one IPCamera Manager Server’s 
control program can be running at a time. 
The computer with the running control 
program will become IPCamera Manager 
Server. After installation, the program can 
be found in the windows start menu at Start 

Æ

 Programs 

Æ

 IPCamera Manager 

Æ


Start Service. The Start Service program 
will hide itself automatically after start up 
and be displayed as an icon in the system 
tray. 


C. 2. Shutting Down the Control Program 


STEP 1: 

Find the 

  icon in the 

system tray and click it. 
The service menu will 
appear. 


STEP 2: 

Click the


Exit in the menu.   

You will be asked with a 
dialog “Are you sure you to 
exit the system?” 
Click “Yes” to exit the 
program. 


C.3. Start the Startup Service program manually 


Navigate to Start 

Æ

 Program

Æ

 IPCamera 

Manager 

Æ

 Start Service. 

This will start the control program and its icon 

  will appear on the system tray.


Содержание EZ Connect Vision SMCWIPCFN-G

Страница 1: ...USER GUIDE SMCWIPCFN G EZ Connect VisionTM Wireless Night Vision IP Camera...

Страница 2: ...icense is granted by implication or otherwise under any patent or patent rights of SMC SMC reserves the right to change specifications at any time without notice Copyright 2008 by SMC Networks Inc 20...

Страница 3: ...corporates these newer technologies At that point the obsolete product is discontinued and is no longer an Active SMC product A list of discontinued products with their respective dates of discontinua...

Страница 4: ...E LIGHTNING OR OTHER HAZARD LIMITATION OF LIABILITY IN NO EVENT WHETHER BASED IN CONTRACT OR TORT INCLUDING NEGLIGENCE SHALL SMC BE LIABLE FOR INCIDENTAL CONSEQUENTIAL INDIRECT SPECIAL OR PUNITIVE DAM...

Страница 5: ...n outlet on a circuit different from that to which the receiver is connected Consult the dealer or an experienced radio TV technician for help This device complies with Part 15 of the FCC Rules Operat...

Страница 6: ...ibited per regulations of Industry Canada The required antenna impedance is 50 ohms To reduce potential radio interference to other users the antenna type and its gain should be so chosen that the EIR...

Страница 7: ...as described in this document This device may be operated indoors or outdoors in all countries of European Community using the 2 4GHz band Channel 1 13 Declaration of Conformity in Languages of the Eu...

Страница 8: ...alle altre disposizioni pertinenti stabilite dalla direttiva 1999 5 CE La Dichiarazione di conformit CE ufficiale disponibile nella sezione dedicata al rispettivo prodotto sul sito Web http www smc c...

Страница 9: ...nos SMC Networks t mto vyhlasuje e toto zariadenie Radio LAN sp a z kladn po iadavky a al ie pr slu n ustanovenia smernice 1999 5 ES Ofici lne prehl senie ES o zhode je uveden v sekcii pr slu n ho pr...

Страница 10: ...it locale ou SMC Networks pour plus de d tails quant aux restrictions actuelles concernant l utilisation en ext rieur Dutch Dit toestel is een 2 4 Ghz draadloze Lan transceiver bestemd voor gebruik bi...

Страница 11: ...na licenci nebo provoz v povolen ch kan lech O omezen venkovn ho pou it se informujte u m stn ch regul tor nebo u spole nosti SMC Networks Danish Enheden er en 2 4 GHz tr dl s LAN transceiver beregne...

Страница 12: ...bvalst s Atbilsto i radioiek rtu un telekomunik ciju gala iek rtu direkt vas 1999 5 EK 6 4 pantam pazi ot s EK EBTA valstis ir Austrija Be ija D nija Somija Francija V cija It lija Luksemburga N derl...

Страница 13: ...at s ghoz vagy az SMC Networksh z Polish Niniejsze urz dzenie to urz dzenie do odbierania i przesy ania sygna u transceiver w bezprzewodowej sieci LAN o cz stotliwo ci 2 4 GHz przeznaczone do u ytku w...

Страница 14: ...dzku v exteri roch vz ahuj ur it po iadavky napr klad po iadavky na licenciu alebo po iadavky na prev dzkov kan ly Podrobn inform cie o aktu lnych obmedzeniach pri prev dzke v exteri roch v m poskytn...

Страница 15: ...llatte brukskanaler gjelder i noen land Ta kontakt med din lokale regulerende myndighet eller SMC Networks for detaljert informasjon om gjeldende begrensninger for utend rs bruk Safety Compliance Unde...

Страница 16: ...Sie es vom Stromnetz trennen Somit wird im Falle einer berspannung eine Besch digung vermieden 12 Durch die L ftungs ffnungen d rfen niemals Gegenst nde oder Fl ssigkeiten in das Ger t gelangen Dies...

Страница 17: ...with the R TTE Directive 1999 5 EC EN 55022 2006 Class B EN61000 3 2 2006 EN61000 3 3 2005 EN 55024 2003 EN61000 4 2 2001 EN61000 4 3 2006 EN61000 4 4 2004 EN61000 4 5 2006 EN61000 4 6 2001 EN61000 4...

Страница 18: ...17 MPEG4 Wireless Day Night IP camera User Manual SMCWIPCFN G Version 1 0 March 2008...

Страница 19: ...n Program 35 D 2 System Administration Program Interface Overview 36 D 3 System Configuration Overview 37 D 3 1 Email Setting 37 D 3 2 Holiday Setting 37 D 3 3 Storage 38 D 3 4 System Alarm 40 D 3 5 R...

Страница 20: ...larm On Off 65 E 2 8 Exit 65 F Web Monitor Program 66 G Media Viewer Program 67 H Other Settings 68 H 1 Configuring Basic Settings 70 H 1 1 Configuring System settings 70 H 1 1 1 Status Settings 70 H...

Страница 21: ...ut notice Introduction This section covers unpacking your new IP camera its key features and basic technical information about the product Refer to later chapters for information on setting up and con...

Страница 22: ...the following If anything is missing or appears damaged please contact your dealer immediately IP camera module Stand Mounting bracket RJ 45 cable Mounting screws AC power adaptor Quick Install Guide...

Страница 23: ...WLAN Night Vision IR LEDs x 6 auto Button Reboot Restore factory default Input Switch Power Adaptor 100 240VAC 50 60Hz 260mA Output 5V 2A 12VA MAX Software Function System Setting Status Log Time Firm...

Страница 24: ...Front View Power LED Light Sensor Focus Adjust Lens Assembly Back View Restore Button LAN LED WLAN LED Night Vision IR LEDs 6 Microphone Stand mount Press and hold the Restore button for three second...

Страница 25: ...d an IP address Microsoft Windows 2000 2003 XP or Vista operating system Microsoft Internet Explorer 6 x or later IPCamera Manager Software consists of SERVER and CLIENT versions SERVER version limits...

Страница 26: ...Requirement CLIENT version CPU Intel P4 2 8GHz RAM 256 MB or above Operating System Windows 2000 Pro Windows 2000 Server Windows 2003 Windows XP Home Windows XP Professional Windows Vista Home Basic W...

Страница 27: ...s provided to fix the stand bracket to a wall ceiling or other stable and convenient fixing point The stand can be adjusted manually to allow the camera a full 360 of rotation and a pan and tilt actio...

Страница 28: ...switch using a standard cable You can also connect the camera directly to a computer using the supplied cable Connecting Power Connect the power adapter to the DC IN socket on the camera as shown War...

Страница 29: ...ct a language STEP 3 The Installshield Wizard will verify if Internet Information Service IIS is installed on your system If not you can continue installing the application but you will not be able to...

Страница 30: ...tinue Select a setup type and Choose Destination Location or click Next to continue STEP 6 Specify the Destination Folder you may click Browse to select a folder other than the default one Click Next...

Страница 31: ...l need to be installed to support the Web Component STEP 8 Select folder locations to store video recordings and input the size of the storage needed Please make sure to have enough free storage avail...

Страница 32: ...art in 1 to 3 minutes IPCamera Manager icon should appear lower right corner of the taskbar Note If the application does not start automatically please restart your computer Congratulations You ve suc...

Страница 33: ...rams STEP 1 Select Change Remove to remove IPCamera Manager from your system STEP 2 Select Remove Remove Confirmation STEP 3 Select OK to remove IPCamera Manager from your system Uninstall process sta...

Страница 34: ...33 STEP 4 Click OK to continue the uninstall process Uninstall Complete STEP 5 Click Finish to exit the window...

Страница 35: ...Start Service program will hide itself automatically after start up and be displayed as an icon in the system tray C 2 Shutting Down the Control Program STEP 1 Find the icon in the system tray and cl...

Страница 36: ...zUser name If this is the first time you logon use Administrator as default user name and leave the password blank then click OK to log into the system zPassword There is no password for Administrator...

Страница 37: ...solution is set at least 1024 x 768 and that the font size is Windows system default The system does not support font sizes larger than the Windows system default Note The buttons that appear in the M...

Страница 38: ...recorded file respectively System Alarm Set alarm actions respond to the selected system alarm Rotation Set the interval for image rotation in Monitor split screen Motion Rectangle Set the area size o...

Страница 39: ...le to that server and use Import to update holiday setting accordingly z Add Input a description in the Remark field and click Add to add the date to the list box at left z Modify You can select a hol...

Страница 40: ...be no less than 1 6 GB Browse You may change the default path z Directory please do not choose the directory where the operation system is located Generally C is designated to windows operation syste...

Страница 41: ...Alarm Action from three system events 1 Storage Threshold Reached 2 Device Disconnected 3 Database Error Ring Settings there are 4 sound effects available Buzzer Phone ring Short Sound and Long Sound...

Страница 42: ...elect 16CH Tab then select one of the screens chosen screen will be identified by color orange Move camera from Unselected Column to Selected Column by clicking button STEP 3 Set Rotation Sequence You...

Страница 43: ...erentiate their privilege by designating them to different groups Button Use To Add User Delete User Edit User D 4 1 1 Add User Add User STEP 1 Select User icon in the System Setup area then click the...

Страница 44: ...2 Delete User Select Delete User button from the Menu Bar and a warning message box will appear Click OK to delete the user D 4 1 3 Edit User STEP 1 Select User icon in the System Setup area the User...

Страница 45: ...roup for viewing monitor program only Button Use To Add Group Delete Group Edit Group D 4 2 1 Add Group STEP 1 Select the User icon in the System Setup area then click Add Group button in the Menu Bar...

Страница 46: ...con in the System Setup area the User Group Table display in eMap Interface area STEP 2 Then select the icon from the User Group Table the User Group Setting button will display in the Menu Bar accord...

Страница 47: ...view Icon used under the eMap tree structure Icon Representing Area icon The first level of the eMap hierarchy the place to add a device Camera icon Depending on the device model Video icon The image...

Страница 48: ...ssword This button allows you to change the User Name or Password of selected camera from IPCamera Manager or to sync with the direct change in device When you select the Video icon Menu Bar will disp...

Страница 49: ...Bar An Area Setting window will pop up Enter the name to the Area Name textbox STEP 3 Click Create to save setting and a newly created area will be created and displayed as below Before Add Area After...

Страница 50: ...l pop up STEP 2 Click Browse to navigate the image file representing the area that you wish to secure and then click Upload button Note Supported image file formats jpg gif bmp wmf emf ico C 5 2 4 Ref...

Страница 51: ...lly Manual Auto Discovery STEP 2a The system will search all cameras that are located within the same subnet in a LAN environment The system will place all found cameras at the default map called My M...

Страница 52: ...ification Enter information in the textbox Model Device model IP address IP address of your chosen device you wish to connect to Port No The default port number is 80 which can be edited to match with...

Страница 53: ...and save to both IPCamera Manager and Web configuration of selected device Click OK to save the setting D 5 4 Video Selecting Video icon you can edit video delete video set image alarm set image motio...

Страница 54: ...n is enabled Schedule a Weekly Setting Click the Schedule Setting button A Weekly Setting table will pop up Select the time period for which you wish to schedule a recording The activated block will t...

Страница 55: ...g setting which automatically applies to the following week with each block being equal to 1 hour If an error message pops up please check if any related device is unable to connect due to the informa...

Страница 56: ...oliday to activate alarm action for the full day during the holiday regardless of the set scheduled time in previous setting The holiday is also user definable Please refer to Section D 3 2 Holiday Se...

Страница 57: ...th gimbal and Preset specifies which preset position the gimbal should turn to Recording The alarm recording of breached camera it is set by number of seconds Alarm Breach Scenario Set alarm triggered...

Страница 58: ...eselect a specified area Any motion within the detected area over the threshold of sensitivity will trigger a motion detection alarm STEP 3 Sensitivity and Frequency setting Sensitivity refers to the...

Страница 59: ...lower compression rate will increase the image quality D 5 5 Tools in Menu Bar of eMap Interface The tools of eMap interface can be used to control the eMap background 1 Map Cursor to drag the device...

Страница 60: ...TEP 1 Select Start All Programs IPCamera Manager Monitor STEP 2 System Log on window If this is your first time logging in use Administrator as default user name and leave the password blank then clic...

Страница 61: ...isplay Area Video display area displays video of a single camera or split screen of multiple cameras When you want to control a camera in your monitor program you can click the split ed screen and it...

Страница 62: ...rt message will appear in this box when an alarm occurs to warn the user The most up to date alarm is logged in the Alarm notification log Depending on your alarm setting a live video of the device ma...

Страница 63: ...ecording This function is also used to export video files to the AVI format and taking snapshots STEP 1 Click Playback button STEP 2 Open the window Query Video File via criteria setting of Schedule r...

Страница 64: ...avigate the page of the spreadsheet and print the selected page Home Page Up Page Down End STEP 4 You can print out the query by clicking the Print or Export button STEP 5 Select an alarm log and doub...

Страница 65: ...cording at local PC This function also provides additional functions for exporting video files to the AVI format and taking snapshots STEP 1 Open the Playback Manual Recording window STEP 2 Browse a f...

Страница 66: ...e Live Image Click the pause button the live video will be paused and the button changed to play button Click play button to re enable live video feed E 2 7 8 Alarm On Off You can click the Alarm On O...

Страница 67: ...ent by clicking Modify Password button Please note the system requirements for browsing this website is IE5 5 SP1 or above version screen display resolution of at least 1024x768 Microsoft DirectX8 1 o...

Страница 68: ...the recording file to playback Record AVI Media Viewer supports converting recording to AVI format and save to a selected folder To convert the recording file to AVI format stop the playback and click...

Страница 69: ...earn how to configure the IP Camera by using the settings menus To access the settings menus click Open Web Interface icon while you are adding a new camera auto search manually or entering device set...

Страница 70: ...g Then enter User name and Password The default User name and Password are set to admin A login prompt appears Then the setting page will appear There are two sub menus in the menu sidebar Basic and A...

Страница 71: ...Status Log Time and Firmware H 1 1 1 Status Settings Click the Status tab on the top to access the system status screen System status screen displays Camera Information Ethernet Status and Wireless St...

Страница 72: ...ze with computer time or Set manually If you select Synchronize with Time Server check the checkbox then choose your time zone and enter NTP server details Click the button to save your settings and b...

Страница 73: ...t all settings to original factory default settings Warning Do not upgrade the firmware version unless you are certain it will improve your system performance Any unnecessary firmware upgrade may resu...

Страница 74: ...Configuration and DNS Configuration you can enter the settings manually or select the Obtain IP address via DHCP and Obtain DNS server address via DHCP radio button to obtain the address via DHCP Clic...

Страница 75: ...c Country Region FCC USA IC Canada ETSI Europe SPAIN FRANCE MKK JAPAN MKK1 TELEC or ISRAEL Channel Select from 1 11 channels USA only SSID ESSID Enter the public name of your wireless network Ad Hoc T...

Страница 76: ...ia PPPoE check the Enable PPPoE checkbox and enter your User Name and Password Check the Send Email when IP changes checkbox if you wish to be notified of any IP changes via email Click button to save...

Страница 77: ...The IP camera supports DDNS and meets the Dynamic Network Service Inc standards Select the DDNS server type Disabled DynDNS or PeanutHull Click to save your settings Click button to clear all fields...

Страница 78: ...iewer to grant users who do not have login access to the system Click to confirm this setting Under User List you can create and remove users To create a new user click button The Add New User fields...

Страница 79: ...to change the password H 4 Configuring Video Settings The Video submenu enables you to configure video and audio settings There are two main screens accessible via the tabs at the top of the screen Vi...

Страница 80: ...heck to flip the display image vertically Horizontal Flip Check to flip the display image horizontally Show Camera Name Check to display the camera name in the viewing window Show Time Label Check to...

Страница 81: ...clips to playable video format Click button to locate the file you wish to play Click and buttons to start and stop playback Click button to convert the open video clip from av to avi format The file...

Страница 82: ...le Transfer Protocol settings When FTP alerting is enabled the camera sends a still image to the ftp server every time the alert is triggered see Configuring Breach Manager Settings on page 36 for det...

Страница 83: ...nds a still image to a specified email address every time the alert is triggered Enter your mail server address mail sender address and mail receiver address Check the radio buttons to enable notifica...

Страница 84: ...ng the Enable checkboxes next to each device Enable motion detection The system will automatically enable motion detection when the device is triggered Select the notification method from the list of...

Страница 85: ...nect to the IP camera view images and hear audio To connect to the IP camera using an Internet Explorer Launch System Administration of the IPCamera Manager program as instructed previously then click...

Страница 86: ...amera in the network When the scanning is completed the camera information on the network will be displayed Click Create button to complete the process Please take note of the IP address of the camera...

Страница 87: ...IIS for Windows Vista version please do the followings STEP 1 Click Continue STEP 2 Start Control Panel Program and Features Click Turn Windows features on or off The Windows Features dialog box open...

Страница 88: ...then select the IIS 6 Management Console IIS 6 Scripting Tools IIS 6 WMI Compatibility IIS Metabase and IIS 6 Configuration Compatibility check box STEP 5 Double click or expand World Wide Web Service...

Страница 89: ...ique sur www smc com Portugu s Informa es sobre Suporte T cnico em www smc com Italiano Le informazioni di supporto tecnico sono disponibili su www smc com Svenska Information om Teknisk Support finns...

Отзывы: