background image

2-29

2

Ba

sic O
pe

ra

tio

n

6

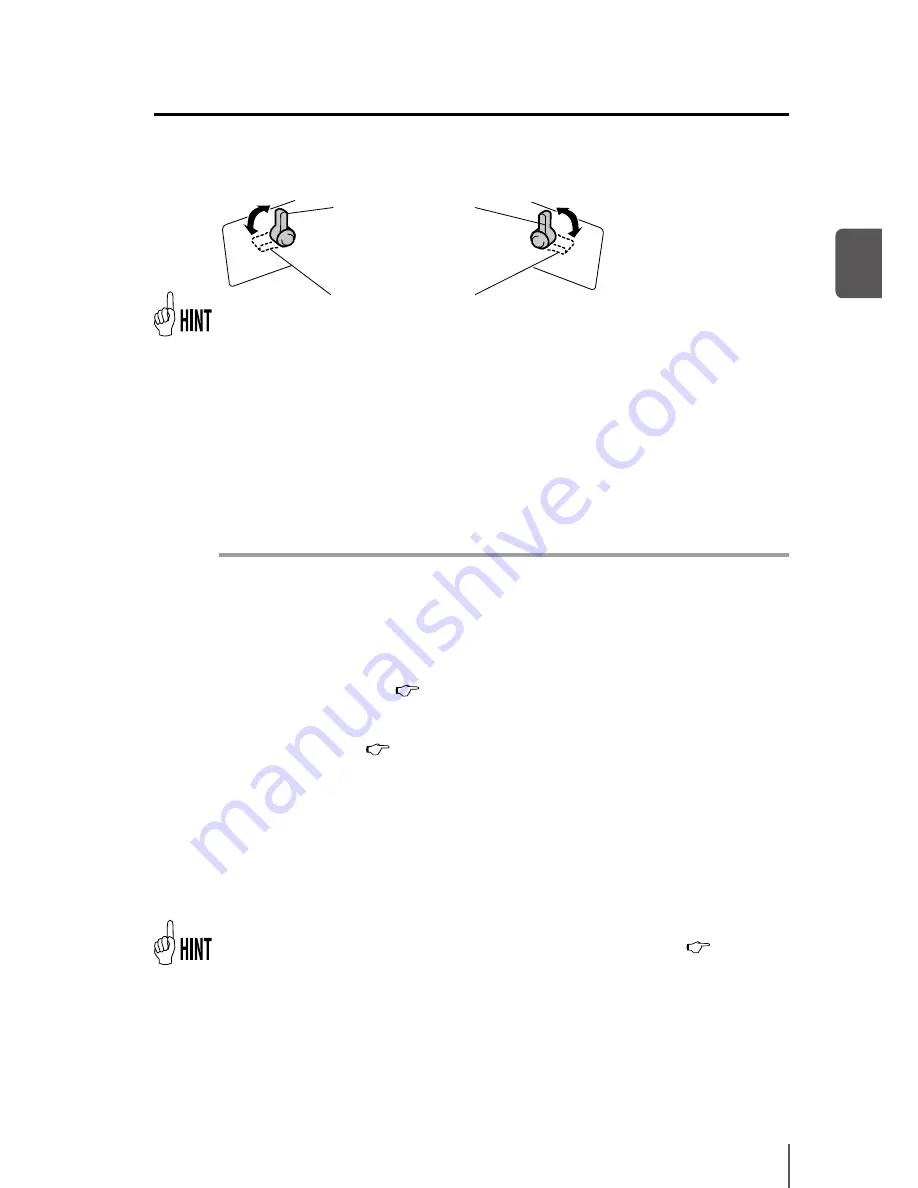
  Switch the height of print head with the head up down mechanism.

¯

 [High] is 0.5 mm higher than [Normal].

Generally, [Normal] is used for glossy and matte vinyl chloride, and [High] is used 
for tarpaulin and FF. If the media thickness exceeds 0.5 mm, [High] should be used 
regardless of the media type. Use also [High] even with thin media if it is severely 
wrinkled or contains irregularities that may touch the print head.

7

  Tighten the two (2) fixing screws.


Note

- Do not move the head up down mechanism with the head securing screws 

tightened. The head up down mechanism may be broken.

- When changing the height of the print head, tighten the head securing screws 

while pushing lightly the carriage downward.

- When changing the height of the print head, change [PH HEIGHT VAL] in the 

MEDIA REG MENU also. (

 P.3-31 [(18) PH HEIGHT VAL]

- A print shift may occur during bi-directional printing after changing the height of 

the print head. In this case, adjust the bidirectional position in [BIDIR ADJ] of the 
MEDIA REG MENU. (

 P.3-32 [(27) BIDIR ADJ1 L] to [(32)BIDIR ADJ3 R]

- As the gap between the side plate of the printer and the carriage is narrow, if it is 

hard to reach the head up down mechanism and head securing screws, move the 
carriage to the right (or the left) with your hands.

- Confirm that the right and left head securing screws are tightened. If carriage 

moves with the head securing screws loosened, they may strike the media or edge 
guard, causing poor image quality and damage to the printer.

- Always operate the two head up down mechanisms at the same time and be sure 

that they are set to the same position.

-  During adjustment of the head height, the warning beep will be heard. (

P.3-56 [(5) 

BEEP]

)

High (for thick media)

Normal (for thin (normal 
thickness) media)

Содержание IP-5520

Страница 1: ...User s Guide U00122912802 Seiko I Infotech Inc Read this User s Guide before operating the printer Keep this manual for future reference Solvent Ink Color Inkjet Printer IP 5620 5520 ...

Страница 2: ...uite C Escondido CA 92029 USA Phone 1 760 781 5200 Fax 1 760 745 1195 Seiko I Infotech Inc 8 Nakase 1 chome Mihama ku Chiba shi Chiba 261 8507 Japan Phone 81 43 211 1363 Fax 81 43 211 8709 This guide acknowledges the following trademarks is a trademark of Seiko Instruments Inc All other trademarks are the properties of their respective companies This equipment has been tested and found to comply w...

Страница 3: ...0 IP 5520 conforms the EMC directive 2004 108 EC and low voltage directive 2006 95 EC Inquiry of CE mark Seiko Instruments GmbH French branch 20 rue Jean Rostand 91400 Orsay France Phone 33 1 60 19 35 41 Fax 33 1 60 19 35 17 Seiko Instruments USA Inc Infotech Division 2067 Wineridge Place Suite C Escondido CA 92029 USA Phone 1 760 781 5200 Fax 1 760 745 1195 Seiko I Infotech Inc 8 Nakase 1 chome M...

Страница 4: ......

Страница 5: ...nd IX ink This guide provides explanations for the IP 5620 6 color specifications model However individual information is given when necessary This guide the IP 5620 IP 5520 Solvent Ink Color Inkjet Printer User s Guide describes the features and functions of the printer and the printing proce dure In addition troubleshooting is also included Read the sections suitable for your purpose The followi...

Страница 6: ......

Страница 7: ...d Therefore all of the ink may not be used for printing Some components may not be included or available depending on the purchase area Basic configuration item Supplied Accessories USB 2 0 cable 1 piece Wiper sponge 1 piece Power cord 1 piece The following components are delivered with the product If any item is missing or damaged contact the dealer where the printer was pur chased or the nearest...

Страница 8: ... cartridge 6 pieces Storage liquid cartridge set IP5 293 for both GX ink and IX ink 1 set Storage liquid cartridge 6 pieces Cap cleaning liquid set IP5 292 for both GX ink and IX ink 1 set Wipercleaningliquidset IP5 291orIP5 297 1 set Wipercleaningliquid 200ml 3bottles Cleaning swab IP6 147 300 pieces Options Consumables Waste ink bottle IP5 299 1 piece Wiper blade IP5 122 2 pieces Ink cartridge f...

Страница 9: ...afetyprecautions The following symbols are used in this manual to ensure proper use of the printer and to prevent the printer from being damaged Follow the instructions marked with these symbols Failure to follow the guidelines marked with this symbol could result in minor personal injury or product and or peripheral damage Failure to follow the guidelines marked with this symbol could result in s...

Страница 10: ...personal injury DO NOT allow metal or liquids to touch the internal parts of the printer Doing so may cause fire electric shock or personal injury DO NOT disconnect or connect the power cable with wet hands Doing so may lead to electric shock Power off the printer unplug the power cable from the power outlet and ask a service center for repair in any of the following cases Using the printer in the...

Страница 11: ...jury To prevent falling lock the casters The heater becomes very hot Be careful not to touch it as it may lead to burn injuries Since the media rolls are heavy handle them with care using a dolly or the like If dropped personal injury may result Always operate the printer in a well ventilated area Strong ink odor is gener ated that may cause discomfort for the user Always hold the power cord or th...

Страница 12: ...nter Handle it with care Do not do anything that will result in impact to the printer 2 When opening or closing the cover hold the center of the cover with both hands and open or close it gently 3 Before connecting or disconnecting the USB 2 0 cable turn the printer off 4 Do not clean the surface of the cover with benzene or paint thinner The coating may come off or deteriorate Wipe the cover clea...

Страница 13: ...ridge into a plastic bag and dispose of it as industrial waste Observe local regulations for disposal 3 Do not get ink on your skin or clothes Wash off any ink immediately with soapy water 4 The level in the waste ink bottle must be periodically checked by visual inspec tion to prevent overflow 5 When the waste ink bottle is installed or removed place a sheet below so as not to stain the floor wit...

Страница 14: ...describe points of caution for avoiding injury to yourself or damage to the printer Note They explain the important items and cautions that should be kept in mind when operating the printer To avoid troubles to the printer or prevent dam ages or wrong operation be sure to read them Hint mark The hint symbol describes operations that make using or handling the printer easier Reference mark This mar...

Страница 15: ...function menu with key Shows the key on the operation panel Shows the LCD on the operation panel Key LCD notations Shows the key to be used for selection Example h key hINK MEDIA REGi fMEDIA M ADVg hREWIND FORM FEEDi fPH REC PH MAINg Example2 TransitionofLCDstateinasentenceandthekeyoperation Shows that the LCD menu switches with key operation INITIALIZING PLEASE WAIT hINK MEDIA REGi fMEDIA M ADVg ...

Страница 16: ...Head height Print mode Starting out Starting out Connect to a computer Turn on the power Replace the ink cartridge Load the roll media Replace the media Register the media Turn off the power P 2 2 P 2 3 P 2 30 P 2 12 P 2 3 P 2 7 P 2 15 ...

Страница 17: ... Maintenance Regular Inspection Maintenance Clean the capping unit Check the Waste ink bottle Perform a nozzle print Check the wiper cleaning liquid Check stains on the wiper blade Perform a print head cleaning NORMAL P 4 6 P 4 3 P 4 4 P 4 3 P 4 19 P 4 8 ...

Страница 18: ...ter temperature during printing Print on a thick media Switch off the printer for a long period of time Clean the printer Print on the margin of the media Print on the cut media sheet When you want to When you want to P 2 17 P 2 23 P 4 31 P 2 27 P 2 28 P 4 10 P 4 14 ...

Страница 19: ... media the printer needs to be adjusted When replacing with a new media Media advance value setting Adjust the advance amount of the media Adjustment of the print head bidirection position Adjust the ink target position during bidirectional printing P 4 27 P 4 33 ...

Страница 20: ...message is displayed The heater does not warm up The media is not straight Smears or stripes appear on the print The panel operation is not possible Wiper blade Waste ink bottle P 6 13 to P 6 15 to P 4 25 P 5 25 P 4 23 P 4 21 P 2 40 P 6 13 P 6 6 P 2 7 P 2 17 P 2 18 P 2 25 Replacement and trouble Replacement and trouble ...

Страница 21: ...int head 1 6 Capping unit 1 6 Heater 1 7 Operation panel 1 8 CP_Manager 1 9 Options 1 10 Exhaust attachment IP 265 1 10 2 inch flange IP5 261 1 10 Blower unit IP 182 1 10 Take up reel unit 64 IP 153 1 11 Take up reel unit 54 IP5 260 1 11 Cutter unit 64 IP5 262 1 11 Cutter unit 54 IP5 263 1 11 6 color change kit IP5 264 1 11 Consumables 1 12 Media 1 12 Ink 1 14 Waste ink bottle 1 15 Daily maintenan...

Страница 22: ...moval procedure 2 17 When using 2 inch core rolls 2 18 How to use the media edge guards 2 19 How to switch the pressure 2 20 Feeding the media Feed 2 21 Rewind the media Back Feed 2 22 How to use the origin setting function 2 23 Changing temperature using the heater control menu 2 25 Change the Print head height 2 28 Ink cartridge replacement 2 30 Ink cartridge replacement procedure 2 30 When the ...

Страница 23: ...3 52 ADJUST MENU 3 53 SETUP MENU 3 57 HEATER MENU 3 62 Maintenance and Adjustment Replacement Periodic maintenance 4 2 Periodic inspection and maintenance guide 4 2 Cleaning 4 14 Print head cleaning 4 19 Operating procedure of print head cleaning 4 19 Wiper blade replacement 4 21 Wiper cleaning liquid replacement 4 23 Wiper sponge replacement 4 25 Media advance value setting 4 27 Media advance val...

Страница 24: ...ment during operation 5 20 How to use the blower unit option 5 22 Normal utilization 5 22 Handling the media 5 23 Cut the media 5 24 Media cutter blade replacement 5 25 Troubleshooting When encountering a problem 6 2 How to clear media jams 6 6 When an error message is displayed 6 7 Service call error 6 7 Operator call error 6 8 When a warning message is displayed 6 13 How to get good image qualit...

Страница 25: ...e printer basic knowledge After reading this section proceed to section 2 Overview Operating conditions 1 2 Appearance Name and function of each part 1 4 CP_Manager 1 9 Options 1 10 Consumables 1 12 LCD display and state of printer 1 20 Content in this section 1 ...

Страница 26: ...rinter for normal operations including consumables replacement print processing blower unit shifting and ventilation as well as parts replacement for repairing Be sure to secure the space indicated in the picture below Installation and maintenance space Height direction 1750 Unit mm 400mm 16 inches 400mm 16 inches 2000mm 80 inches 1000mm 40 inches Front side ...

Страница 27: ...egraded and or print may be stopped It takes time for the printer to adapt to the operating environment temperature and humidity To get good printed image quality it is recommended to keep the room temperature 20 to 25 C 68 to 77 F and use the printer after at least 1 hour Places where the printer must not be installed Do not install the printer in the following places Places exposed to direct sun...

Страница 28: ...e Media clip option After cutting the media clip it to not let it fall Pressure roller When lowering the pressure roller up down lever it pinches the media Platen It is the media path To prevent the media from floating a suction fan is built in it as well as a heater to fix the ink Media edge guard It protects the print head from curls and irregularities at both edges of a media Paper ejection sen...

Страница 29: ...on Exhaust attachment option installation location Media holder To be installed at both ends of the roll media Flange holder Place the media with flange on the flange holder Caster Set the lock to OFF when moving the printer and set the lock to ON when locking the printer Ink cartridge slot Set the ink cartridges in these slots Power inlet Connect the power cable to the power inlet USB connector C...

Страница 30: ... up down mechanism By lowering the lever the print head position rises by 0 5mm Wiper blade It removes foreign matters on the surface of the nozzles of the print head Capping unit It prevents the nozzles of the print head from drying ...

Страница 31: ...rolled independently P 2 41 Changing temperature using the heater control menu Front Rear q Appearance Name and function of each part Preheater Preheats the media Print heater Make the ink penetrate into the media to fuse the ink After heater Dries ink to stabilize print quality Media feed direction Media Carriage Paper guide rear Print head ...

Страница 32: ...w Near expiration date of ink in use OFF No ink Media LED Green It indicates the presence absence of a media ON Media is present either roll media or cut media is loaded Blinking Take up time out OFF No media neither roll media nor cut media ONLINE LED It indicates the online offline state of the printer ON Online Blinking Print pause mode OFF Offline Buzzer Sounds at an error occurrence warns an ...

Страница 33: ...us Create media preset input adjustment values Execute nozzle printing adjustment patterns printing Maintenance time notice maintenance operation Display operation guidance Display the instruction manual PDF Install CP_Manager using the CD ROM supplied with the Printer Panel operations Additional functions Computer USB interface Printer Printer status display Media preset CP_Manager display exampl...

Страница 34: ...ment IP 265 An optional unit to attach an exhaust duct to the printer 2 inch flange IP5 261 This flange is used to load the roll media of 2 inch core Blower unit IP 182 Blower unit This unit dries ink by sending air to the media ...

Страница 35: ...nit is used to reel in the printed media For IP 5520 Cutter unit 64 IP5 262 This unit is used to cut the printed media manually For IP 5620 Cutter unit 54 IP5 263 This unit is used to cut the printed media manually For IP 5520 6 color change kit IP5 264 This kit is used to upgrade a 4 color specifications printer to 6 color specifications ...

Страница 36: ...chloride Tarpaulin Precautions for storing media Avoid direct sunlight and water regardless of before and after opening the package Put media in plastic to prevent exposure to dust and store media in a dry cool and dark place Avoid rapid change of temperature and humidity and store media in a place with no condensation Do not store media in standing position to prevent unraveling of media and dama...

Страница 37: ...tions for handling prints Do not touch the print surface before the ink dries Handle by the edges of the media Attention must be paid during the first 24 hours Rubbing print surface causes color fading or color transfer To prevent color transfer do not stack prints Do not stack printed media on printouts from copier or laser printer This may damage the prints Do not rub scratch or fold the printed...

Страница 38: ...ity or a printer malfunction In this condition proper operation of the printer cannot be guaranteed The GX ink expiration date is 14 months from the date of production The IX ink expiration date is 12 months from the date of production Using an ink cartridge after the expiration date may lead to a deterioration of the print quality or a printer malfunction Store ink cartridges in cool and dark pla...

Страница 39: ...ecautions for ink storage and processing Note Put a used ink cartridge into a plastic bag and dispose of it as industrial waste Observe local regulations for disposal Waste ink bottle Use the recommended waste ink bottle listed below Type Content Quantity IP5 299 Waste ink bottle 1 piece WARNING Never put the waste ink bottle near open flames Doing so may cause a fire hazard Do not swallow waste i...

Страница 40: ...cleaning liquid 300 ml Wiper cleaning liquid for GX ink 200 ml Wiper cleaning liquid for IX ink 200 ml Cleaning swab 10 pieces Cleaning swab 10 pieces Cleaning stick 1 piece Cleaning stick 1 piece Cleaning roller 30 pieces Cleaning roller 30 pieces Wiper blade 1 piece Wiper blade 1 piece Tweezers 1 piece Tweezers 1 piece WARNING Do not swallow cleaning liquid and avoid contact with eyes It will ca...

Страница 41: ...cleaning liquid close to open flames Doing so will create a fire hazard Wiper cleaning liquid set Use the following wiper cleaning liquid specified by Seiko I Infotech Type Content Quantity IP5 291 Wiper cleaning liquid for GX ink 200 ml 3 pieces IP5 297 Wiper cleaning liquid for IX ink 200 ml 3 pieces WARNING Do not swallow wiper cleaning liquid and avoid contact with eyes It will cause respirato...

Страница 42: ... the cleaning swab specified by Seiko I Infotech Type Content Quantity IP6 147 Cleaning swab for both GX and IX inks 300 pieces Wiper blade Use the following wiper blade specified by Seiko I Infotech Type Content Quantity IP5 122 Wiper blade for both GX and IX inks 2 pieces Media cutter blade Use the following media cutter blade specified by Seiko I Infotech Type Content Quantity IP5 124 Media cut...

Страница 43: ...tent Quantity IP5 293 Storage liquid cartridge for both GX and IX inks 6 pieces Cleaning liquid cartridge set Use the following cleaning liquid cartridge specified by Seiko I Infotech Type Content Quantity IP5 294 Cleaning liquid cartridge for GX ink 6 pieces IP5 298 Cleaning liquid cartridge for IX ink 6 pieces q Consumables ...

Страница 44: ...splay and the state of the printer How to read LCD 1 Initialization display Shows the initialization of the printer when the start up is being processed When the printer starts up normally it automatically enters the idle online mode Booting up INITIALIZING PLEASE WAIT PRINTER READY ROLL 1625 PAPER Media name PAPER Media of 1625mm 64 width In case of the set roll media PRINTING NORMAL L ND BI Prin...

Страница 45: ...PRINTING NORMAL L ND BI The online LED blinks PRINTER PAUSED ROLL 1625 PAPER PRINTER READY ROLL 1625 PAPER By pressing the PH RECOVERY key during pause in the state of online LED blinking cleaning of the print heads can be executed Whencancelingprintingduringpause PRINTER PAUSED ROLL 1625 PAPER CANCELING PLEASE WAIT The online LED blinks PRINTER PAUSED ROLL 1625 PAPER PRINTING NORMAL L ND BI The o...

Страница 46: ...XX K INK LEVELXXX Every 3 second interval or REMAINING MEDIA xxxm YY INK LEVELLOW is displayed when the remaining ink becomes low When the daily maintenance is not performed or the life and replacement time of consumable parts approaches the following messages appear The display next returns to the online state Every 3 second interval or PERFORM DAILY MAINTENANCE NOW REPLACE WIPER BLADE When the d...

Страница 47: ...line state menu mode display Shows that the menu operations are available in the offline state P 3 2 Basic menu operation in offline mode denotes the access key to each menu SHUTTING DOWN PLEASE WAIT hINK MEDIA REGi fMEDIA M ADVg hPRINTER SETUPi fADJUST HEATERg hREWIND FORM FEEDi fPH REC PH MAINg LCD display and state of printer ...

Страница 48: ...1 24 ...

Страница 49: ... How to use the media edge guards 2 19 How to switch the pressure 2 20 Feeding the media Feed 2 21 Rewind the media Back Feed 2 22 How to use the origin setting function 2 23 Changingtemperatureusingtheheatercontrolmenu 2 25 Change the Print head height 2 28 Ink cartridge replacement 2 30 Reloadable cartridge replacement 2 32 Waste ink bottle replacement 2 40 The media was skewed 2 43 Content of t...

Страница 50: ...ector at the rear of the printer Printer Computer USB interface USB 2 0 cable B type connector Note Use a USB 2 0 cable When using a USB hub use a product that supports UBS 2 0 For the cable and hub used for USB connection to the system use USB IF approved products When connecting the non approved USB cable hub and equipment the printer may not function properly The maximum length of one cable is ...

Страница 51: ... Use the power switch on the operation panel of the printer to turn the power on or off Note When the printer and a computer are connected turn on the power of the printer first and turn off the power of the printer last when powering them down ...

Страница 52: ...r the printer performs the power on self diagnostic test and displays the following messages on the operation panel Note When the printer is performing INITIALIZING or CLEANING if the power is turned off unnecessarily ink may drip or the print head may be damaged Power switch Power inlet Example of the set roll media of 1625 mm PRINTER READY ROLL 1625 PAPER INITIALIZING PLEASE WAIT Booting up ...

Страница 53: ...ements of AC power in your local area If the LED on the operation panel does not light when the power switch on the opera tion panel is turn on the power supply is defective When a problem is detected in the power on self diagnostic test an error message is displayed on the LCD Refer to Section 6 Troubleshooting for more information q Power ON OFF procedure ...

Страница 54: ...tate that the cap is filled with ink is performed To quickly turn off the power press the power switch while holding the key to skip the fill cap opera tion and turn off the power However generally executing the fill cap operation is recommended Note After turning the power off wait at least 5 seconds before turning it back on To keep the print heads in good condition the printer perform automatic...

Страница 55: ...oll this adhesive may stick to the paper guide or the platen In this case always clean up the adhesive before using the media If a blower unit is used move it to a place where it will not disturb the operation 2 Put the left side media holder in position and fix it temporarily by turning the screw Mediareplacement This section describes the roll media installation removal procedure The two situati...

Страница 56: ... media holder fixed on the left side Note When inserting the roll media in the media holder be careful not to cause the media to shift on the roll or damage the end surface of roll media Make sure that the core is securely fixed to the roll holder by inserting it completely 5 Set the roll media to the right side media holder In case of roll media with print side outside Print side Print side In ca...

Страница 57: ...ance of 200 mm When the leading edge of the media comes out of the front cover a confirmation beep sounds Note Depending on the environment the media may stick to the paper guide and may be hard to advance In this case advance the media while raising it from the paper guide by holding both edges with hands If the leading edge of a media is curled up or curled down the media may be caught in the pr...

Страница 58: ...ill occur Adjust the load position by moving the media and the media holders together 9 Secure the positions of the right and left media holders by turning the screws 10 Hold the center of media with your hand and turn back the flange to eliminate the slack Note Do not forcibly align the edge of media to the indication line Set the media straight with regard to the roll Set so that the end surface...

Страница 59: ...ends of the media Then close the front cover Check that the media edge guards do not go under the media and that thick media is not stuck between them After visually confirming that the media edge guards are properly set press the key 13 Select either the roll media or the cut media sheet Either roll or sheet can be selected with key or key Here select roll and press the key To return to the media...

Страница 60: ...or wrinkles To register a new media 14 Select the type of media Select the type of media registered with the and keys and press the key P 3 20 MEDIA REG MENU REMAINING MEDIA XXXm PREPARING MEDIA PLEASE WAIT NEW MEDIA ENTRY is displayed at the end of media registration Press the key to enter MEDIA REG MENU The media registration procedure is the same as the registration from the registration menu P...

Страница 61: ... of the media do not rewind it at once but execute the operation slowly while eliminating the slack by rotating the media by hand Correct installation Make sure that the media is stretched tight as shown in the figure below In case of roll media with print side outside In case of roll media with print side inside Rear paper guide Feeding pipes Roll media Rear paper guide Feeding pipes Roll media q...

Страница 62: ...arts are sectional views of the paper feed mechanism The slack is in gray in the perspective views and in dashed line in the sectional views Example 1 Example 2 In case of roll media with print side outside In case of roll media with print side outside In case of roll media with print side inside In case of roll media with print side inside Slack within 15 cm Slack within 15 cm Slack within 15 cm ...

Страница 63: ...e media 3 Loosen the screw of the media holder to the right and while moving this media holder slightly to the right remove the roll media from the media holder Note When removing the roll media from the media holder be careful no to let it fall as it may lead to personal injuries Pressure roller up down lever q Media replacement ...

Страница 64: ... it If printing continues in this condition the printer may be stained or damaged Visually check the remaining media 1 The message appears on the LCD screen 2 Replace the media according to the media installation and media removal procedures When replacing the roll media due to jamming Refer to Section 6 Troubleshooting How to clear media jams NO MEDIA LOADED LOAD MEDIA 4 Pull the roll media out o...

Страница 65: ... leading edge of the media comes out of the front cover 4 Move the media so that both ends of media are evenly applied to the pressure roller 5 Lower the pressure roller up down lever After this follow the instructions on LCD screen Note Select SHEET for SELECT MEDIA When selecting SHEET the remaining media cannot be entered Cut media removal procedure 1 Raise the pressure roller up down lever and...

Страница 66: ...the procedure to install the 2 inch flange 1 Remove the R pin from the 3 inch flange then remove the flange 2 Install the 2 inch flange Note Make sure that the pins match the grooves A new flange may be hard to insert Make sure to insert it all the way in Be careful not to lose the R pin and the pins 3 Replace the R pin Pin R pin ...

Страница 67: ... MEDIA REG MENU The widths of right and left margins of the media change P 3 29 8 EDGE GUARD Clean the media edge guards when they get dirty The media edge guards will not prevent curl effects from all media As it causes print defects eliminate waves and folds beforehand The media edge guards cannot be used with thick media Do not insert it forcibly The right and left margins of the print area bec...

Страница 68: ...The pressure force is switched using the pressure roller up down lever See figure below No pressure top When loading the media raise the lever This the normal UP position Rear Front Normal Pressure bottom When the media is loaded lower the lever It is the normal DOWN posi tion Weak in the center The pressure becomes weak No pressure top When loading the media raise the lever This the normal UP pos...

Страница 69: ...key While pressing key the roll media is fed When cut sheet media is used the paper is ejected 4 When releasing the key feeding stops and the printer returns to the offline state menu mode When the online state idle mode is displayed if key is pressed the media can be fed without entering the FORM FEED MENU hINK MEDIA REGi fMEDIA M ADVg hREWIND FORM FEEDi fPH REC PH MAINg hREWIND FORM FEEDi fPH RE...

Страница 70: ...lled to the front paper guide If the media covers the paper ejection sensor the media can be fed back When you keep pressing key the media can be fed back at a maximum distance of 14 cm from the paper ejection sensor When the online state idle mode is displayed if key is pressed the media can be fed back without entering in the REWIND MENU Note When rewinding high basis weight media the weight of ...

Страница 71: ...e origin of print is called Origin setting function Procedure to use the origin setting function 1 Return the media by operating Back Feed P 2 22 Rewind the media Back Feed Note Return the media only after the printed image completely dries The first printed image will be damaged if this function is used before it is sufficiently dry 2 Press and hold the key for 1 5 seconds in the online state idl...

Страница 72: ...ready to print online state idle mode display To cancel the set origin press and hold the key for 1 5 seconds in the idle mode or raise the pressure roller up down lever When canceled the display returns from NEST to ROLL or SHEET NEST ORIGIN SETTING CARRIAGE MOVING NEST ORIGIN SETTING OK NEST ORIGIN SETTING PLEASE WAIT PRINTER READY NEST 1625 PAPER PRINTER READY ROLL 1625 PAPER Display when cance...

Страница 73: ...isplay is closed Even if heater temperatures are changed in the heater control menu the initial tempera ture value of each heater stored in MEDIA REG MENU remains unchanged When the temperature unit in SETUP MENU is set to Fahrenheit every temperature is displayed in Fahrenheit To finish displaying the heater control menu Press the key to display the heater control menu and keys Select a heater fo...

Страница 74: ...face matte Adjust the heater temperature according to the media type and ambient temperature When the print heater is set to a high temperature the printer lowers the printing speed automatically in some cases to maintain stable print quality Set the preheater and after heater temperatures so that they are nearly 5 C higher than the print heater temperature Bad temperature balance between preheate...

Страница 75: ...ng before the temperature lowers Temperature control is performed continuously after printing starts to maintain the heaters to their set temperatures 4 The heater temperature can vary during printing by changing the set temperature in the heater control menu Even after printing is completed the set temperature changed in the heater control menu remains as set temperature However the initial tempe...

Страница 76: ... to display PH MAIN MENU 3 Press key and then key to display PH HEIGHT ADJ 4 Press key 5 Open the front cover and the maintenance cover and loosen the two 2 head securing screws Head securing screw Head securing screw Head up down mechanism Head up down mechanism PH HEIGHT ADJ hINK MEDIA REGi fMEDIA M ADVg hREWIND FORM FEEDi fPH REC PH MAINg PH HEIGHT ADJ OK CARRIAGE MOVING PLEASE WAIT OPEN COVER ...

Страница 77: ...GHT VAL in the MEDIA REG MENU also P 3 31 18 PH HEIGHT VAL A print shift may occur during bi directional printing after changing the height of the print head In this case adjust the bidirectional position in BIDIR ADJ of the MEDIA REG MENU P 3 32 27 BIDIR ADJ1 L to 32 BIDIR ADJ3 R As the gap between the side plate of the printer and the carriage is narrow if it is hard to reach the head up down me...

Страница 78: ...dge print defects occur in the color of the replaced cartridge perform the cleaning normal after plugging the cartridge in and out 2 or 3 times P 4 19 Ink cartridge replacement procedure 1 Pull the ink cartridge out of the printer 2 Insert the new ink cartridge in the correct color slot Insert the ink cartridge as far as it goes The location of ink cartridge installation is determined by its color...

Страница 79: ...ing message is displayed 2 Re install the ink cartridge following the ink cartridge replacement procedure Note A ink cartridge that cannot be recognized cannot be used If the message appears again after re installing the ink cartridge contact your dealer or a service representative XX Ink name K Black Lm Light magenta Lc Light cyan C Cyan M Magenta Y Yellow REPLACE XX INK CARTRIDGE INSTALL XX INK ...

Страница 80: ... the board s color identification label are the same Usually a small quantity of ink remains in the used ink cartridge removed from the cartridge holder This is normal Always replace the board together with the used ink cartridge Consumables Cartridge assembly Board protective sheet Spout Upper plate Cartridge holder Color identification label ink cartridge back Color identification label Tail sec...

Страница 81: ...ng claws open by moving them to the outside arrows 1 direction pull the cartridge holder cover toward the top arrow 2 direction Remove the cartridge holder cover in the arrow 3 direction 3 Remove the board from the cartridge holder cover 4 Remove the tail section fixing plate While keeping the two claws securing the plate open by moving them to the outside pull the tail section fixing plate toward...

Страница 82: ...cartridge holder 7 Referring to the locations on the cartridge holder shown in the figure slide the four protrusions of the ink cartridge lower plate in the arrow direction and remove the ink cartridge from the cartridge holder Note Be careful not to take the silver plate off the cartridge holder when removing the used ink cartridge ...

Страница 83: ... the tail section in the hole shown by the shaded area in the figure to the right Note Do not hold the ink cartridge by the upper plate only as it may be taken off Hold the cartridge by both the upper and lower plates or from the bottom to insert it Tail section fixing plate Spout Upper plate Upper plate Tail section Lower plate ...

Страница 84: ...own in the figure insert the four protrusions of the ink cartridge lower plate and slide them under the plate guide following the arrow direction 3 Insert the ink cartridge spout in the cartridge holder Note Do not install the ink cartridge with the spout tilted ...

Страница 85: ... until you install the reloadable cartridge to the printer This sheet prevents contact failure 5 Pull softly the tail section of the ink cartridge 6 Install the cartridge holder cover Insert the three protrusions of the cartridge holder cover in the cartridge holder holes Hook the cartridge holder cover to the claws to secure it Note Make sure that the board protective sheet does not get between t...

Страница 86: ...n excessive force as the ink cartridge holes may be deformed 8 Hook the tail section fixing plate to the cartridge holder claws 9 Remove the board protective sheet Note Be sure to remove the board protective sheet Installing the ink cartridge to the printer without removing the board protective sheet may cause a malfunction ...

Страница 87: ...sert the reloadable ink cartridge into the slot Note Check that the color on the ink cartridge tail section label and the color on the ink box label are the same Do not push strongly the tail section fixing plate toward the inside ...

Страница 88: ... is described below Note Do not replace the waste ink bottle during printer operation When replacing the bottle use caution not to spill the ink Use protective paper to prevent soiling Waste ink bottle replacement procedure 1 Remove the bottle from the waste ink spout tube by slightly tilting the full waste ink bottle 2 Put the cap on the bottle and remove the bottle 3 Wipe off any ink stains arou...

Страница 89: ...d displays the message prompting replacement of the waste ink bottle when the waste ink bottle is full As there is no sensor for the waste ink level this calculation is just an estimate Therefore if the waste ink counter is reset set to YES and the bottle is not empty the waste ink may overflow 6 Select BOTTLE EMPTY YES and press key BOTTLE EMPTY YES BOTTLE EMPTY NO ...

Страница 90: ...ent steps 1 to 4 3 The following message is displayed to reset clear the waste ink counter 4 Select BOTTLE EMPTY YES and press key Note Select YES when installing a new empty waste ink bottle If the waste ink bottle is removed only to visually check the level in the waste ink bottle select NO BOTTLE EMPTY YES BOTTLE EMPTY NO BOTTLE OUT INSTALL BOTTLE ...

Страница 91: ...n MEDIA REG MENU is set to ON During printing PRINTING NORMAL L ND BI The Printer checks for media skew Media skew was detected MEDIA MISALIGNED OK CANCEL Continue printing with the key Stop printing with the key PRINTING NORMAL L ND BI NO MEDIA LOADED LOAD MEDIA CANCEL is recommended If you select OK to continue the print the rest of the suspended printing job is started However the media may be ...

Страница 92: ...2 44 ...

Страница 93: ... This section explains the basic operations and structure of the operation panel menu and the operations in each menu Basic menu operation in offline mode 3 2 Explanation of each menu operation 3 17 Content of this section 3 ...

Страница 94: ...perations hINK MEDIA REGi fMEDIA M ADVg hPRINTER SETUPi fADJUST HEATERg hREWIND FORM FEEDi fPH REC PH MAINg Note If key is pressed the printer goes into offline state even if an error message is displayed However depending on the error type and the solu tion being processed the offline state may not be available In this case solve the error before going to the offline state ...

Страница 95: ...p displayed first Several menus may exist on the lower layer Second layer menu This menu group is under the first layer Third layer menu This menu group is under the second layer Parameter This selection is used to select or enter items of the selected menu Inputs include numerical values characters selection and execution ...

Страница 96: ...Ymm ZZZZmm NEST PAPER YYYYmm hINK MEDIA REGi fMEDIA M ADVg P 3 18 P 3 18 PRINT DIRECTION 01 BIDIR DENSITY 01 NORMAL SMART PASS 01 LOW PRINT MODE 01 NORMAL RENAME MEDIA 01 PAPER FLATTEN TIME 01 NONE SELECT MEDIA 01 PAPER P 3 19 P 3 24 P 3 24 P 3 24 P 3 25 P 3 26 P 3 27 P 3 28 REMAINING MEDIA ZZZm REMAINING MEDIA ZZZm Toggle display Toggle display ...

Страница 97: ...1 C PRE HEATER T 01 C PRINT MODE PREF 01 SOFTWARE COLOR STRIPE 01 ON PH CLEANING 01 ON ADVANCE PREF 01 SOFTWARE 1 2 P 3 33 q Basic menu operation in offline mode TUR MODE 01 LOOSE USE EDGE GUARD 01 YES MEDIA ADV MODE 01 FWD ONLY P 3 29 P 3 29 P 3 29 P 3 32 PH HEIGHT VAL 01 NORMAL P 3 33 PH REST PERIOD 01 0000CYCLES HEATER PREF 01 SOFTWARE P 3 34 SKEW CHECK 01 ON P 3 29 ...

Страница 98: ...PY MEDIA 01 BIDIR ADJ2 L YY 01 00 BIDIR ADJ2 R YY 01 00 BIDIR ADJ3 L YY 01 00 BIDIR ADJ3 R YY 01 00 P 3 36 P 3 36 P 3 36 P 3 37 BIDIR ADJ1 R YY 01 00 P 3 35 P 3 35 P 3 35 MEDIA ADV VALUE 01 100 00 BIDIR ADJ1 L YY 01 00 P 3 34 REMAINING MEDIA 01 YYYm PH REST TIME 01 10sec P 3 34 ...

Страница 99: ...DE PH HEIGHT ADJ WASH PRINTHEADS INK SYSTEM OPT STORE INK SYS CAP CLEANING FEEDING MEDIA REWINDING MEDIA RESEAT PRINTHEAD REPLACE WIPE SPONGE P 3 46 P 3 49 P 3 48 P 3 47 P 3 50 P 3 50 P 3 51 P 3 50 P 3 49 1 P 3 50 q Basic menu operation in offline mode P 3 51 P 3 41 P 3 44 P 3 42 P 3 44 M ADV MENU P 3 40 SING ADV EXECUTE AUTO BIDIR ADJUST EXECUTE MULTI ADV EXECUTE MANUAL BIDIR ADJUST EXECUTE 2 ...

Страница 100: ...NGUAGE ENGLISH CONFIG PRINT HISTORY PRINT ERROR LOG PRINT NOZZLE POS ADJ EXECUTE PRINT HEAD ADJUST EXECUTE NOZZLE PRINT EXECUTE EDGE SENSOR ADJUST EXECUTE P 3 56 TUR ADJ PRINT EXECUTE P 3 57 TIME ZONE GMT YY MM DD HH MM xx P 3 58 LENGTH UNITS MILLIMETER P 3 58 TEMPERATURE UNITS CENTIGRADE P 3 58 BEEP ON P 3 59 BOOT VERSION X XX P 3 59 PRINTER FW VER X XX_YY ...

Страница 101: ...0 P 3 60 P 3 60 P 3 61 P 3 61 P 3 61 P 3 62 P 3 62 q Basic menu operation in offline mode Note The parameter units displayed in each menu are as specified in the SETUP MENU Length LENGTH UNITS meter system inch system in the SETUP MENU Temperature TEMPERATURE UNITS centigrade fahrenheit in the SETUP MENU 7 P 3 59 P 3 59 P 3 59 BTC VER X X CARRIAGE PCA XXXXX MAIN PCA VER XXXXX ATG VER X X P 3 60 ...

Страница 102: ...he same layer key The printer returns to the higher menu group key The menu is selected and parameters can be changed 4 Set or change the parameters keys Parameters are changed with these keys numerical values are in creased or decreased with these keys keys Digits are selected with these keys when entering numerical values 5 Confirming or canceling the set parameter key This key completes the par...

Страница 103: ...s select the lower layer menu of MEDIA REG MENU Here select PRINT MODE Press the key to return to the state in step 1 3 To change the parameter press key 4 With keys select the parameter for the menu Here select HIGH QUALITY 5 Press key The parameter change is saved and the printer returns to the state in step 2 hINK MEDIA REGi fMEDIA M ADVg PRINT MODE 01 NORMAL PRINT MODE 01 NORMAL PRINT MODE 01 ...

Страница 104: ...re select MEDIA ADV VALUE Press the key to return to the state in step 1 3 To change the parameter press key 4 With keys move to the digit to be changed 5 Press keys to correct the numeral 6 Press the key The parameter change is executed and the printer returns to the state in step 2 hINK MEDIA REGi fMEDIA M ADVg MEDIA ADV VALUE 01 100 00 MEDIA ADV VALUE 01 100 00 MEDIA ADV VALUE 01 100 00 MEDIA A...

Страница 105: ...R MENU 2 With keys select the lower layer menu of printer menu Select CONFIG PRINT Press the key to return to the state in step 1 3 Press key 4 To execute press key To return to the state in step 2 without ex ecuting press key 5 After finishing the execution the printer returns to the state in step 2 hPRINTER SETUPi fADJUST HEATERg CONFIG PRINT EXECUTING CONFIG PRINT OK CONFIG PRINT q Basic menu o...

Страница 106: ...oup With key select the setup menu 2 With keys select the lower layer menu of setup menu When BOOT VERSION is selected the con tent is displayed 3 With keys other lower layer menu in SETUP MENU can be selected Press the key to return to the state in step 1 X BOOT version hPRINTER SETUPi fADJUST HEATERg BOOT VERSION X XX PRINTER FW VER X XX_YY ...

Страница 107: ...t RENAME MEDIA 3 To change the parameter press key 4 With keys or keys change the character code group With key or key change the character Refer to P3 16 Character Selection Table 5 With keys move to the digit to be changed and change the character 6 To confirm the setting press key SELECT MEDIA 02 ABCD02 SELECT MEDIA 02 AYPE02 SELECT MEDIA 02 TYPE02 RENAME MEDIA 02 TYPE02 hINK MEDIA REGi fMEDIA ...

Страница 108: ... Symbols space Numerals 0 to 9 Alphabet Capital letter A to Z Alphabet Small letter a to z Special characters a ä b Backward key Forward key Character code group Character Character Selection Table key key ...

Страница 109: ...k colors is Y g M g C g K g Lm g Lc 1 INK LEVEL shows the remaining ink DATE shows the production date of ink cartridges 2 By pressing key the display proceeds to the next color without resting for 3 seconds 3 When pressing key or key the printer returns to the offline state menu mode display 4 To move to the online state idle mode display press key Note YY INK LEVELLOW is displayed when the remai...

Страница 110: ...length key The display is switched at 3 seconds interval ZZZ Remaining media SHEET XXXXXX YYYYmm ZZZZmm REMAINING MEDIA ZZZm ROLL XXXXXX YYYYmm hINK MEDIA REGi fMEDIA M ADVg For roll media For cut media sheet In case of display in mm In case of display in inch In case of display in mm In case of display in inch In case of display in mm In case of display in inch The remaining media is not displaye...

Страница 111: ...g length is not shown 2 Press key and key to return to the offline state menu mode 3 Press key to move to the online state idle mode In case of nest the print origin is set with the origin setting function ZZZZft The display is switched at 3 seconds interval ZZZ Remaining media REMAINING MEDIA ZZZm In case of display in mm In case of display in inch In case of display in mm In case of display in i...

Страница 112: ...EMAINING MEDIA 26 MEDIA ADV VALUE 27 BIDIR ADJ1 L 28 BIDIR ADJ1 R 29 BIDIR ADJ12 L 30 BIDIR ADJ2 R 31 BIDIR ADJ3 L 32 BIDIR ADJ3 R MEDIA REG MENU Set the parameters used for printing To set the parameter press key SELECT MEDIA XX YYYYYY key XX Media number YY Media name hINK MEDIA REGi fMEDIA M ADVg The function to delete a registered media is also available P 3 37 33 DELETE MEDIA The function to ...

Страница 113: ...s 3 To change the parameter press key 4 Select the media number you want to register with keys 5 Press key The media number is set and the printer returns to the state in step 2 hINK MEDIA REGi fMEDIA M ADVg SELECT MEDIA 02 TYPE02 SELECT MEDIA 02 TYPE02 SELECT MEDIA 01 PAPER SELECT MEDIA 01 PAPER When the media is already regis tered mark is displayed ...

Страница 114: ...Y TUR MODE LOOSE LOOSE LOOSE LOOSE LOOSE LEADING EDGE NORMAL NORMAL NORMAL NORMAL NORMAL SUCTION FAN LEVEL NORMAL NORMAL NORMAL NORMAL NORMAL AFTER HEATER T OFF 45 C 45 C 45 C 45 C PRINT HEATER T OFF 40 C 40 C 40 C 40 C PREHEATER T OFF 45 C 45 C 45 C 45 C COLOR STRIPE ON ON ON ON ON PH HEIGHT VAL NORMAL NORMAL NORMAL NORMAL NORMAL PH CLEANING ON ON ON ON ON ADVANCE PREF SOFTWARE SOFTWARE SOFTWARE ...

Страница 115: ...ce value P 4 27 3 Press key The following message is displayed This message is displayed only for new registrations 4 Register to the media number 02 with key A asterisk indicates a registered media is appended to the end of media on the LCD screen and the printer returns to the state in step 1 To cancel press key The new registration stops and the printer returns to the state in step 1 MEDIA ADV ...

Страница 116: ...igits of charac ter or symbol can be entered for the media name For character string symbols and alpha numerals can be used Parameter character input 6 digit character input symbol alpha numeral and other P 3 16 3 PRINT MODE Select the print resolution A high resolution means a good print quality for an output which looks less granular Parameter selection NORMAL HIGH QUALITY MAX QUALITY HIGH SPEED...

Страница 117: ... print speed is 1 5 times faster than with normal mode Note The recommended print mode is NORMAL Use other modes for increased productivity or picture quality depending on customer requirements The better the resolution the slower the print speed 4 SMART PASS Select the intensity for the auto correction function which ameliorates the print quality Three parameters low medium and high are available...

Страница 118: ...ty 720 720 dpi 6 8 4 5 3 4 Max Quality 900 900dpi 4 4 3 0 2 2 1 This table shows the maximum speed for each mode The actual print speed may be slower depending on the media width or other conditions 2 When the settings are PRINT MODE HIGH SPEED and SMART PASS LOW the SMART PASS setting will auto matically change to HIGH if the environment temperature is lower than 20 C 5 Density Select the print d...

Страница 119: ...DENSITY is set to HIGH DENSITY SMART PASS is set to LOW and The environment temperature is lower than 20 C Note A large amount of ink is used with HIGH DENSITY so color blurs or ink dry ing problems may occur In these cases slow down the print speed 6 PRINT DIRECTION Select the print direction of a media Parameter selection BIDIR Printing is performed in two directions UNIDIR Printing is performed...

Страница 120: ...p reel unit the power is shut down without flattening Parameter selection NONE This operation is not performed When printing continuously or when using a wrinkle free media select this setting But when the printer rests a long time in standby the media could be wrinkled leading to print defects 30 min After 30 minutes passe this operation is performed Even be fore 30 minutes every time a print sta...

Страница 121: ...ks are not performed during printing 10 MEDIA ADV MODE Select a media advance mode Parameter selection FWD ONLY Media is fed in the normal media advance sequence BACK FWD Media is fed in a media adhesion prevention sequence The media is slightly wiggled forward and backward while being fed The print speed is slower than with FWD ONLY 11 Take up TUR MODE Select the take up TUR mode when winding the...

Страница 122: ...take care of the followings Cut the edge of the media so that the edge of the media is parallel to the platen and set it to the printer If the edge of the media is not parallel it may cause print defects on the leading edge of the media the platen to be stained by ink and media jams Set the media after checking that there is no tape or glue on the edge of the media Using such media may cause media...

Страница 123: ...ater temperature However when is set the preheater does not work Parameter numeral input 15 C to 55 C Centigrade temperature setting range 59 F to 131 F Fahrenheit temperature setting range Switching the display between Centigrade temperature and Fahrenheit temperature is performed with 4 Temperature Units in SETUP MENU P 3 58 AFTER HEATER T 01 086 F AFTER HEATER T XX 30 C When temperature unit is...

Страница 124: ...ipe is added in the various adjustment patterns in the offline mode With the color stripe to ON the print region becomes narrower by about 20 mm 18 PH HEIGHT VAL Select the head height with regard to the initial height and the thickness of the media Parameter selection NORMAL Use this setting in normal operation HIGH Use this setting when the print head is set to the HIGH posi tion Note Select whe...

Страница 125: ...of the printer has the priority 21 PRINT MODE PREF Select the print mode print mode smart pass density priority Parameter selection SOFTWARE Data print mode smart pass density sent from RIPof the computer has the priority FRONT PANEL The print mode smart pass and density set in the MEDIA REG MENU of the printer have the priority 22 HEATER PREF Select the heater temperature setting priority Paramet...

Страница 126: ...t print misses Set it to 10 sec as a general rule Parameter numeral input 1 to 99 seconds 25 REMAINING MEDIA Set the remaining media length By setting the remaining media in advance the amount of the remaining media after printing becomes available in the MEDIA MENU Enter to disable the remaining media control Parameter numeral input 0 to 999 m The input unit in the meter unit system is meter m 0 ...

Страница 127: ...ets the value for the left side Display order Y g M g C g K g Lm g Lc Parameter numeral input 15 to 15 Note For the method to determine the adjustment value refer to Section 4 Head position adjustment P 4 32 28 BIDIR ADJ1 R Sets the adjustment value for the right side for HIGH SPEED and NORMAL print modes Display order Y g M g C g K g Lm g Lc Parameter numeral input 15 to 15 Note For the method to...

Страница 128: ...Lm g Lc Parameter numeral input 15 to 15 Note For the method to determine the adjustment value refer to Section 4 Head position adjustment P 4 32 31 BIDIR ADJ3 L ADJ3 sets the adjustment value for MAX QUAL ITY print mode This parameter sets the value for the left side Display order Y g M g C g K g Lm g Lc Parameter numeral input 15 to 15 Note For the method to determine the adjustment value refer ...

Страница 129: ...d cannot be deleted Also the media cur rently set in the printer cannot be deleted To delete a media press key when the confirmation screen appears 34 COPY MEDIA Select the media number to copy It is used to copy the media information pa rameters of one registered media to another media Set the copy destination in 35 PASTE MEDIA Note When the media number designated as the copy source is deleted t...

Страница 130: ... destination to copy the media parameters The copied parameters are the contents of the settings 2 to 35 in the MEDIA REG MENU With the function to copy the information of registered media the parameters can be copied using 34 COPY MEDIA and 35 PASTE MEDIA as a set For details refer to the parameters copy procedure on the next page PASTE MEDIA XXgYY XX Copy source media number YY Copy destination ...

Страница 131: ...A 13 g 01 PASTE MEDIA 13 g 20 PASTE MEDIA 13 g 20 OK PASTE MEDIA 13 g 20 2 Select the copy destination On the display the number 13 on the left hand side is the media number of the copy source and the number on the right hand side is the media number of the copy desti nation Select the media number with keys The copy destination numbers 01 to 20 are displayed When the copy destination is already r...

Страница 132: ...t the adjustment pattern read the adjustment value form the print pattern then set the value to the printer There are two types of adjustment patterns SING ADV and MULTI ADV Both can be used With SING ADV printing is performed with the current MEDIA ADV VALUE one pattern With MULTI ADV printing is performed with the current MEDIA ADV VALUE 0 2 the current MEDIA ADV VALUE and the current MEDIA ADV ...

Страница 133: ...o print in normal mode HIGH QUALITY Select to print in high quality mode MAX QUALITY Select to print in max quality mode Lower layer menu Smart pass Select the smart pass to print the adjustment pattern Parameter selection LOW Select to print with the low setting MEDIUM Select to print with the medium setting HIGH Select to print with the high setting Lower layer menu ADJVALUE Enter the media adva...

Страница 134: ...al mode HIGH QUALITY Select to print in high quality mode MAX QUALITY Select to print in max quality mode Lower layer menu Smart pass Select the smart pass to print the adjustment pattern Parameter selection LOW Select to print with the low setting MEDIUM Select to print with the medium setting HIGH Select to print with the high setting Lower layer menu ADJVALUE Enter the media advance adjustment ...

Страница 135: ...J2 and ADJ3 must be set for a bidirectional adjustment There are two types of bidirectional adjustment patterns AUTO BIDIR ADJUST and MANUAL BIDIR ADJUST With AUTO BIDIR ADJUST one adjustment pattern ADJ1 is printed Nor mally use this adjustment pattern With MANUAL BIDIR ADJUST several adjustment patterns ADJ1 ADJ2 ADJ3 are printed to enable a more detailed adjustment AUTO BIDIR ADJUST is used to ...

Страница 136: ...the adjustment value after pressing OK key even when the value is 0 If OK key is not pressed the results automatically calculated from the adjustment value are not applied Lower layer menu ADJ R Enter the bidirectional adjustment value for the right side Parameter numeral input Range 15to 15 After entering this adjustment value parameters for each print mode are automatically calculated and set to...

Страница 137: ...ct the print mode to print the bidirectional adjustment pattern Parameter selection ADJ1 Select to print in high speed and normal modes ADJ2 Select to print in high quality mode ADJ3 Select to print in max quality mode Lower layer menu ADJ XX Enter the bidirectional adjustment value Parameter numeral input Range 15to 15 When performing MANUAL BIDIR ADJUST ADJ 1L ADJ 1R ADJ 2L ADJ 2R ADJ 3L and ADJ...

Страница 138: ...6 REWIND MENU While you keep pressing key the media is being rewound Release key to stop the media The printer returns to the offline state menu mode key hREWIND FORM FEEDi fPH REC PH MAINg REWINDING MEDIA ...

Страница 139: ...t head cleaning Press key to enter the PH REC MENU Parameter selection NORMAL Recover clogged nozzles STRONG Recover clogged nozzles when not fixed with NORMAL For details about the cleaning operation refer to Section 4 Print head clean ing P 4 19 PH RECOVERY NORMAL key hREWIND FORM FEEDi fPH REC PH MAINg ...

Страница 140: ...ressing key the printer keeps feeding the media In case of a sheet media the paper is ejected Release key to stop the media The printer returns to the offline state menu mode FEEDING MEDIA key hREWIND FORM FEEDi fPH REC PH MAINg ...

Страница 141: ...ter can be left for a long period of time CLEAN INK SYS When using the printer after has been switched off for a long period of time after a service clean clean the print head and ink circuit with cleaning liquid CHARGE INK SYS Used this when filling the printer with the ink after performing a print head cleaning PURGE INK SYS Used to purge the ink PH MAIN MENU This menu is used to perform mainten...

Страница 142: ...ged nozzles are cleared Leave the printer 1 to 2 hours and check the condition again Use this function if a print misses problem is not solved even after several cleaning Parameter execution NONE Note Always perform a cleaning normal before printing after executing the fill cap If the print misses clogged nozzles problem is not solved after leaving the printer for 24 hours execute the smart nozzle...

Страница 143: ...on 7 PH HEIGHT ADJ Used to adjust the print head height P 2 26 Change the print head height 8 RESEAT PRINT HEAD Used to check the print head connection Check any poor contact with the connector following the message instructions PH HEIGHT ADJ RESEAT PRINTHEAD ...

Страница 144: ...d panel setting information Parameter execution NONE 2 Error log print This function prints the error log information saved in the printer Parameter execution NONE 3 History print This function prints the ink system cleaning status and the log of print head replacement Parameter execution NONE hPRINTER SETUPi fADJUST HEATERg key HISTORY PRINT ERROR LOG PRINT CONFIG PRINT CONFIG PRINT ...

Страница 145: ...Prints the nozzle check pattern without clean ing Use it for daily inspection EXECUTE perform the nozzle print Parameter execution NONE Set the number of the clogged nozzles Nozzle map Enter the number of the clogged nozzles Parameter numeral input Range 0to254 Refer to P 4 9 to confirm the number of the clogged nozzles key NOZZLE PRINT EXECUTE hPRINTER SETUPi fADJUST HEATERg NOZZLE PRINT EXECUTE ...

Страница 146: ...UST print Note The K color print head is used a reference Therefore there is no adjustment value for K POS ADJ Enter the head position adjustment value Parameter numeral input 15 to 15 Adjusts the application position of right and left nozzles for each print head Enter the adjustment value based on the result of PRINT HEAD ADJUST print R L ADJ Enter the head position adjustment value Parameter num...

Страница 147: ...ue for the media advance direction top direction Parameter numeral input 5 0 to 5 0mm Note The entered value is in millimeter regardless of the LENGTH UNITS setting in the SETUP MENU Adjust the position of the printed drawing on the media Enter an adjustment value based on the result of EDGE SENSOR ADJUST pattern print SIDE ADJ Enter the adjustment value for the media width direction side directio...

Страница 148: ...3 56 5 TUR ADJ PRINT Prints the take up reel unit adjustment pattern EXECUTE Prints theTUR adjustment pattern Parameter execution NONE TUR ADJ PRINT EXECUTE ...

Страница 149: ...alian GERMAN The LCD messages are displayed in German SPANISH The LCD messages are displayed in Spanish PORTUGUESE The LCD messages are displayed in Portuguese 2 Time Zone Select the time zone When changing the time zone the local time displayed is updated Parameter selection 12 to 12 Selection input of a total of 25 stages for every hour TIME ZONE GMT YY MM DD HH MM 00 key LANGUAGE ENGLISH LANGUA...

Страница 150: ...NHEIT Displays the temperature in fahrenheit 5 BEEP This function sets whether or not the warning beep sounds in the condition below When the print heads are outside the cap during daily maintenance or height adjustment Print heads cannot be capped due to media jam dur ing printing When confirming the print heads are checked When the nest origin is being set Parameter selection ON The beep sounds ...

Страница 151: ...rsion of system F W Parameter execution NONE 8 LEE version Displays the version of the LEE board Parameter execution NONE 9 LEC version Displays the version of the LEC board Parameter execution NONE 10 BTC version Displays the BTC version Parameter execution NONE BOOT VERSION X XX MAIN PCA VER X XX PRINTER FW VER X XX_YY CARRIAGE PCA X XX BTC version XXX ...

Страница 152: ...ion NONE 12 RSM version Displays the RSM version Parameter execution NONE 13 PTG version Displays the PTG version Parameter execution NONE 14 USB address Displays the USB address Parameter execution NONE ATG version XXX PTG version XXX RSM version XXX USB ADDRESS ...

Страница 153: ...lays the current connection state In this menu the transfer speed cannot be selected 16 Initial setting Sets all of the parameters to their initial default settings Parameter execution NONE Note The printer must be rebooted after setting the initial setting 17 Update Use to update the firmware Parameter execution NONE Note The printer must be rebooted after the firmware update FACTORY DEFAULT USB ...

Страница 154: ...ing is com pleted Transition time to the standby tem perature is included P 2 25 Parameter selection NONE Does not maintain the standby temperature 30 min Maintains the standby temperature for 30 minutes 60 min Maintains the standby temperature for 1 hour 90 min Maintains the standby temperature for 1 hour and a half 120 min Maintains the standby temperature for 2 hours CONTINUOUS Continues to mai...

Страница 155: ...mables For replacement of ink cartridge waste ink bottle and media refer to Section 2 Basic Operation Periodic maintenance 4 2 Print head cleaning 4 19 Wiper blade replacement 4 21 Wiper cleaning liquid replacement 4 23 Wiper sponge replacement 4 25 Media advance value setting 4 27 Head position adjustment 4 32 Content of this section 4 ...

Страница 156: ...rvice clean P 4 10 1 Head wash P 4 11 2 Ink filling P 4 11 1 Check the waste ink bottle P 4 3 2 Check the remaining wiper cleaning liquid P 4 3 3 Check stains on the wiper blade P 4 4 4 Clean the capping unit P 4 6 5 Clean the print head normal P 4 7 6 Execute a the nozzle print P 4 8 When the printer has been left switched off for an extended period less than 2 weeks 1 Head wash P 4 12 2 Ink fill...

Страница 157: ...d period Only use the cleaning liquid cleaning stick cleaning roller and cleaning swab specified by Seiko I Infotech 1 Check the waste ink bottle Check that the waste ink bottle is not full When the waste ink is filled to the FULL label replace the waste ink bottle with a new empty one P 2 40 Waste ink bottle replacement 2 Check the remaining wiper cleaning liquid Open the front cover and the cap ...

Страница 158: ...H MAIN MENU 2 Press key to enter the PH MAIN MENU The cap cleaning menu is displayed 3 Select REPLACE WIPER BLADE with key and press key 4 When the confirmation menu appears press key The position of the wiper blade changes 5 Open the front cover and the cap cover 2 1 OPEN COVER REPLACE WIPER BLADE CAP CLEANING REPLACE WIPER BLADE REPLACE WIPER BLADE OK WIPER MOVING PLEASE WAIT hREWIND FORM FEEDi ...

Страница 159: ...in the wiper cleaning liquid bottle If it is low replace the wiper cleaning liquid P 4 23 Wiper cleaning liquid replacement 7 Close the cap cover and the front cover 8 Select NO and press key to finish Note The printer automatically calculates the wiper blade usage time and displays the message prompting to replace the wiper blade when necessary If a new wiper blade is installed and YES is set the...

Страница 160: ...MAIN MENU The cap cleaning menu is displayed 4 Press key When the confirmation menu appears press key again The carriage moves When the carriage moves the warning beep sounds P 3 58 5 BEEP 5 Open the front cover and then the cap cover 2 1 OPEN COVER CAP CLEANING CAP CLEANING CAP CLEANING OK CARRIAGE MOVING PLEASE WAIT 1 2 hREWIND FORM FEEDi fPH REC PH MAINg CAP CLEANING ...

Страница 161: ...e to be cleaned 8 Close the cap cover and the front cover The carriage automatically returns to the original position Note Do not expose the print heads for an unnecessarily long time when taking them out of the capping unit The print heads may dry and cause malfunction After cleaning if print defects still occur remove foreign matters and ink stains on the cap with the cleaning swab soaked with c...

Страница 162: ... day or after cleaning the caps run the nozzle print to verify the print head performance 1 Set the printer to offline Press key 2 Press key twice to display ADJUST MENU 3 Press key to display the nozzle print 4 Press key 5 Press key 6 Press key 7 When pressing key after performing the warm up the adjustment pattern shown in the next page is printed hINK MEDIA REGi fMEDIA M ADVg hPRINTER SETUPi fA...

Страница 163: ...are uneven spaces between lines some lines may be bent Media advance direction q Periodic Maintenance Confirm that all nozzles are operating correctly If print defects are found on the nozzle print perform 5 Print head cleaning NORMAL again If print defects still occur after several print head cleanings perform settings for NOZZLE MAP P 3 53 1 Nozzle print Note Do not expose the print heads for an...

Страница 164: ...et IP5 293 A storage liquid cartridge is fully used for one service cleaning 1 Service clean Select PH MAIN MENU from the operation panel and then STORE INK SYS After finishing the service clean turn off the power of the printer while the cartridges of storage liquid are inserted in the ink cartridge slots Then leave the printer When re using the printer after performing the service clean a head w...

Страница 165: ...ular intervals Refrain from opening or closing the front cover or moving the lever while executing the service clean or head wash The operation may need to be started from the beginning and ink and the cleaning liquid will be wasted 2 Filling with ink after the head wash After performing the head wash the printer needs to be filled with all the inks Select PH MAIN MENU from the operation panel and...

Страница 166: ... leaving the printer for a long time after switching it off the maintenance differs depending on the period In case of more than 2 weeks the printer is left after being filled with storage liquid In case of less than 2 weeks leave the printer filled with inks 2 Filling with ink after the head wash After performing the head wash the printer needs to be filled with all the inks Select PH MAIN MENU f...

Страница 167: ...ean has been performed a service call error is displayed Contact your dealer or a service representative Note To protect the print head and the ink circuit do not leave the ink container of the printer empty without filling it with ink or storage liquid When leaving the printer for more than 1month consult your dealer or a service representative in advance ...

Страница 168: ...e printer is soiled with paper particles or dust remove them using a vacuum cleaner If the printer is stained with ink wipe out the ink stains with a soft cloth moistened with neutral detergent Note When cleaning be sure to turn off the power of the printer Do not blow out paper particles If paper particles or dust get inside the printer it may cause malfunction or affect the print quality When us...

Страница 169: ...up the ink on the platen with a piece of waste media 2 Wipe the ink stains off the platen with a soft cloth moistened with a neutral detergent 3 If the ink penetrates into the vacuum hole on the platen wipe out the ink stuck in the hole with a commercially available cotton swab Then moisten the cotton swab with neutral detergent and wipe out once more Use a cotton swab with a tip of 3 mm diameter ...

Страница 170: ...enu appears press key The carriage moves 5 Open the front cover and then the maintenance cover 6 Wipe clean the carriage base with a soft cloth After finishing the cleaning close the maintenance cover and the front cover The carriage automatically returns to its original position Note Do not expose the print heads for an unnecessarily long time when taking them out of the capping unit The print he...

Страница 171: ...key to display PH MAIN MENU 2 Press key to enter the PH MAIN MENU The cap cleaning menu is displayed 3 Select RESEAT PRINTHEAD with key and then press key 4 When the confirmation menu appears press key The carriage moves 5 Open the front cover and then the maintenance cover hREWIND FORM FEEDi fPH REC PH MAINg CAP CLEANING RESEAT PRINTHEAD RESEAT PRINTHEAD OK CARRIAGE MOVING PLEASE WAIT OPEN COVER ...

Страница 172: ...n the cap cleaning liquid bottle The cap cleaning liquid will get dirty 7 Wipe out stains with a soft cloth After finishing the cleaning close the maintenance cover and the front cover The carriage automatically returns to its original position Note Do not expose the print heads for an unnecessarily long time when taking them out of the capping unit The print heads may dry and cause malfunction He...

Страница 173: ...zzles when not fixed with NORMAL Operating procedure of print head cleaning 1 Set the printer to offline Press key 2 Press key to display PH REC MENU 3 Press key to enter in the head cleaning menu 4 To set the parameter press key 5 Select the option for cleaning with keys hINK MEDIA REGi fMEDIA M ADVg hINK MEDIA REGi fMEDIA M ADVg hREWIND FORM FEEDi fPH REC PH MAINg PH RECOVERY NORMAL PH RECOVERY ...

Страница 174: ... starts a timer is displayed The time decreases every 10seconds 8 When the print head cleaning finishes the menu returns to the state in step 3 9 Press key to return to the offline state menu mode display XXX The time is counted down every 10 seconds PH RECOVERY CLEANING XXX PH RECOVERY NORMAL PH RECOVERY BOTTLE OK hREWIND FORM FEEDi fPH REC PH MAINg ...

Страница 175: ...play PH MAIN MENU 2 Press key to enter the PH MAIN MENU The cap cleaning menu is displayed 3 Select REPLACE WIPER BLADE with key and press key 4 When the confirmation menu appears press key The position of the wiper blade changes 5 Open the front cover and the cap cover 6 Pinch the lower edge of the wiper blade with the tweezers and pull out the plastic protrusion Wiperbladereplacement hREWIND FOR...

Страница 176: ...tly the print head do not touch it with hands or pinch it with the tweezers when handling 9 Close the cap cover and the front cover 10 Select YES with key and press key to finish Note The printer automatically calculates the wiper blade usage time and displays the message prompting to replace the wiper blade when necessary If a new wiper blade is installed and YES is set the counted value is reset...

Страница 177: ... needs replacement about once a month as a general rule 1 Set the printer to offline Press key to display PH MAIN MENU 2 Press key to enter the PH MAIN MENU The cap cleaning menu is displayed 3 Select REPLACE WIPE LIQUID with key and press key 4 When the confirmation menu appears press key 5 Open the front cover and the cap cover Wipercleaningliquidreplacement hREWIND FORM FEEDi fPH REC PH MAINg C...

Страница 178: ...topper of the printer set cap by pressing the top 9 Close the cap cover and the front cover 10 Select YES with key and press key to finish Note The printer automatically calculates the wiper cleaning liquid usage and displays the message prompting to replace the wiper cleaning liquid bottle when necessary If a new wiper cleaning liquid bottle is installed and YES is set the counted value is reset ...

Страница 179: ... cap cleaning menu is displayed 3 Select REPLACE WIPE SPONGE with key and press key 4 When the confirmation menu appears press key 5 Open the front cover and the cap cover 6 Raise up the wiper cleaning liquid bottle a little and pull out the bottle after making sure that all the liquid has flowed into the printer Note Visually check that the waste ink bottle is not full before removing Wipersponge...

Страница 180: ...g liquid bottle P 4 23 Wiper cleaning liquid replacement 10 Close the cap cover and the front over 11 Select YES with key and press key to finish Note The printer automatically calculates the wiper sponge usage time and displays the message prompting to replace the wiper sponge when necessary If a new wiper sponge is installed and YES is set the counted value is reset Reset the count only when nec...

Страница 181: ...procedure 1 Set media wider than A1 size in width and longer than 1 m in length The media advance value can be determine using both the single and the multi advance adjustment patterns With SING ADV printing is performed with the current ADJ VALUE one pattern With MULTI ADV printing is performed with the current ADJ VALUE 0 2 the current ADJ VALUE and the with the current ADJ VALUE 0 2 3 patterns ...

Страница 182: ...th and keys then press key 8 Press key to display the confirmation screen 9 Press key 10 Check the print result If the adjustment value does not seem appropriate repeat the steps 6 to 9 to determine the correct value SING ADV 100 00 EXECUTE SING ADV PRINT MO NORMAL SING ADV 100 00 ADJ VALUE 100 20 The current adjustment value is dis played on the top and the value being changed on the bottom SING ...

Страница 183: ...the selected print mode and smart pass 6 Press key to input the adjustment value Set the adjustment value with and keys then press key 7 Press key to display the confirmation screen 8 Press key MULTI ADV 100 00 EXECUTE hINK MEDIA REGi fMEDIA M ADVg MULTI ADV EXECUTE MULTI ADV 100 00 EXECUTE MULTI ADV 100 00 ADJ VALUE 100 20 The current adjustment value is dis played on the top and the value being ...

Страница 184: ...mage enter the media advance value specific to that color If the appropriate media advance value differs at the right and left of media enter the average value If the appropriate media advance value at the right side of media is different from that at the left side it may be caused by media inclination Check that the media is set straight 9 Check the print result If an adjustment value seems more ...

Страница 185: ...sing key or key during printing the currently used media advance value is displayed Second row on the display The value at the beginning of printing is displayed on the first row on the display and remains unchanged until printing is finished The value increases or decreases by 0 01 when pressing or keys When the value is changed it is reflected on printing immediately If no key is operated for 3 ...

Страница 186: ...or BIDIR ADJ R 2 Adjustment of media advance value P 4 28 Media advance value setting Print the adjustment pattern SING MULTI ADV Based on the result of the adjustment pattern print enter the value in MEDIA ADV VALUE Print the adjustment pattern NOZZLE POS ADJ Based on the result of the adjustment pattern print enter the value in NOZZLE POS VAL Print the adjustment pattern PRINT HEAD ADJUST Based ...

Страница 187: ... STEP 1 How to print the adjustment pattern AUTO BIDIR ADJUST 1 Set the printer to offline Press key 2 Press key to enter M ADV MENU 3 Press key to select AUTO BIDIR ADJUST and press key 4 Presskey The adjustment pattern shown in the figure below is printed AUTO BIDIR ADJUST EXECUTING AUTO BIDIR ADJUST EXECUTE SING ADV EXECUTE hINK MEDIA REGi fMEDIA M ADVg 15 15 14 13 12 11 Media advance direction...

Страница 188: ...two lines of each color print head are aligned in one Select the digit with keys and change the value with keys 9 Press key 10 Adjust ADJ R using the same method 11 Adjust other colors using the same method Enter the number of the pattern where the two lines are the closest For example when setting the M color print head in 12 in the figure to the right the two lines are separated and in 8 the two...

Страница 189: ...offline Press key 2 Press key to enter M ADV MENU 3 Press key to select MANUAL BIDIR ADJUST and press key 4 Press key to select PATTERN 5 Press key to change the print pattern 6 Press and keys to select the pattern to print Press key to confirm 7 Press key to select EXECUTE MANUAL BIDIR ADJUST EXECUTE MANUAL BIDIR ADJUST PATTERN ADJUST 1 MANUAL BIDIR ADJUST PATTERN ADJUST 2 MANUAL BIDIR ADJUST PAT...

Страница 190: ...UE to enter This is an example of ADJ 2 L adjustment for the M magenta color print head 11 Press key to confirm the head color to be corrected and make it ready for entering the parameter 12 In the MANUAL BIDIR ADJUST pattern enter the number of the pattern where the two lines of each color print head are aligned in one Select the digit with keys and change the value with keys q Head position adju...

Страница 191: ...he other ADJ VALUE using the same method MANUAL BIDIR ADJUST M ADJ 2 L M 08 Enter the number of the pattern where the two lines are the closest For example when setting the M color print head in 12 in the figure to the right the two lines are separated and in 8 the two lines are aligned So 8 is the correct value MANUAL BIDIR ADJUST M ADJ 2 L M 08 M M 12 8 ...

Страница 192: ...tern PRINT HEAD ADJUST 1 Set the printer to offline Press key 2 Press key twice to display ADJUST MENU 3 Presskey to enter ADJUST MENU 4 Press key select PRINT HEAD ADJUST and press key 5 Press key The adjustment pattern shown in the figure below is printed PRINT HEAD ADJUST EXECUTING PRINT HEAD ADJUST EXECUTE NOZZLE PRINT EXECUTE hPRINTER SETUPi fADJUST HEATERg hINK MEDIA REGi fMEDIA M ADVg 15 14...

Страница 193: ...r of the pattern with the line of the print head to be set the closest to the lines of the reference K print head Select the digit with keys and change the value with keys 10 Press key 11 Adjust other colors using the same method For the correction value enter the number of the pattern with the line matching the lines of the K color print head For example when setting the Lc color print head in 12...

Страница 194: ...tern enter the number of the pattern where the two lines of each color print head are aligned in one Select the digit with keys and change the value with keys 10 Press key 11 Adjust other colors using the same method Enter the number of the pattern where the two lines are the closest For example when setting the M color print head in 5 in the figure to the right the two lines are separated and in ...

Страница 195: ...rblade Note Cut the edge of the media straight so that it is parallel to the platen Without doing so proper adjustment cannot be conducted Do not use curled media as it may cause media jam STEP 2 How to print the adjustment pattern EDGE SENSOR ADJUST 1 Set the printer to offline Press key 2 Press key twice to display ADJUST MENU 3 Presskey to enter ADJUST MENU 4 Press key to select EDGE SENSOR ADJ...

Страница 196: ... method Measure the distance margin between the adjustment pattern and the cut edge of the media SIDE ADJ measurement method Adjustment value determination method Measure the distance margin between the adjustment pattern and the side of the media Take 15mm as a reference value to determine the adjustment value after measuring the margin Example With a 14mm margin The adjustment value is 1 0mm Wit...

Страница 197: ... ADJUST Press key to move the cursor and and keys to select the TOP ADJ 8 Press key to make it possible to enter the parameter 9 Enter the adjustment value Select the digit with keys and change the value with keys For the method to determine the adjustment value see P 4 42 10 Press key 11 Press key to select SIDE ADJ 12 Press key to make it possible to enter the parameter EDGE SENSOR ADJUST TOP AD...

Страница 198: ...e adjustment value Select the digit with keys and change the value with keys For the method to determine the adjustment value see P 4 42 14 Press key EDGE SENSOR ADJUST SIDE ADJ 0 0mm EDGE SENSOR ADJUST SIDE ADJ 1 0mm ...

Страница 199: ...cribes how to operate the option units How to use the take up reel unit 5 2 Adjustment of the take up reel unit 5 18 How to use the blower unit option 5 22 Cut the media 5 24 Media cutter blade replacement 5 25 Content of this section 5 ...

Страница 200: ...e media is not straight against the paper tube it will cause skew The width of paper tube for winding in the take up reel unit should be the same as that of the roll media for printing If a wider one is used take up shift may occur If a blower unit is used move it to a place where it will not disturb the operation 2 Move the tension roller in the top position About 1m Tension roller Tension roller...

Страница 201: ... right side flange it is used in the fixed position However when aligning with the roller media in stallation position to the printer adjust the position of the right side flange 4 Slide the left side flange movable side to insert it in the paper tube 5 Tighten the knob at the left side firmly to secure the flange Paper tube Left side flange Right side flange Fixing knob Paper tube ...

Страница 202: ...lever and install the roll media for printing to the printer For media installation procedure refer to P 2 7 Media replacement 8 By operating the FORM FEED menu on the operation panel advance the media until it reaches the waste paper 9 Join the roll media and waste paper Affix at three locations right left and center with adhesive tape Tension roller bottom position Pressure roller up down lever ...

Страница 203: ... it again to restart winding 11 Make sure that the media will travel above the take up sensor If not re install the media Take up sensor Take up sensor The media is above the take up sensor The media goes under the take up sensor Media Media Media Take up sensor Flange In case of outer take up When used in inner take up posi tion rotate the flange in the reverse direction of the arrow to eliminate...

Страница 204: ...adhesive the loose method is preferred With tarpaulin and other media that does not slide well use the tension configu ration is take up shifts occur ø Tension take up configuration ø Loose take up configuration SELECT MEDIA XX YYYYYY Operation panel LCD display TUR MODE XX LOOSE Tension take up configuration Loose take up configuration setting procedure In TUR MODE of MEDIA REG MENU set the tensi...

Страница 205: ... the take up the leading edge of the media or the printed surface may touch the take up sensor This could affect the quality of the print Handle the printed surface with care Take up switch setting For the take up direction the outer take up print side out or inner take up print side in can be selected When take up is not used set the take up switch to OFF Set the switch to the proper mode based o...

Страница 206: ...e removed attachment into the left and right plates to keep them for later use See the figure at the right hand side Insert the 3 inch adapter in the slits holes of the left and right plates and turn clock wise in the arrow direction When installing the 3 inch adapter to the flange again push the hook projection of the 3 inch adapter in the slits holes of the flange Turn the adapter clockwise in t...

Страница 207: ...the loose take up Do not use them for the tension take up Do not grab the outer edge of the loose take up flanges too strongly The flanges may turn and injure your hand Loose take up flanges are necessary When the media cannot be taken up fully by the loose take up despite the media weigh ing under24kg In this section the following parts are used The parts are included in the take up reel unit pac...

Страница 208: ... to the left side movable side 1 Remove the 3 inch adapter Use the supplied attachment to remove the adapter 2 Install the 3 inch adapter to the loose take up flange Install it to the surface where the sponge is not attached 3 Install the 3 inch adapter with the loose take up flange Sponge 3 inch adapter Loose take up flange Right side flange fixed side 3 inch adapter ...

Страница 209: ...ment is necessary 1 Advance the media leading edge to the flange position 2 Shift the fixed side unit so that the gap between the right edge of the media and the loose take up flange falls within 0to2 mm Note To slide the flanges to the right or left hold the side plate without touching the loose take up flanges 3 Tighten the knob at the right side fixed side firmly to secure the flange Media edge...

Страница 210: ...ation 1 When the paper tube is shorter than the roll media apply paper tube spacers and confirm that the difference in length is within 9 mm Install one or two paper tube spacers 4 5 mm thickness for each OK OK NG The paper tube is shorter than the roll media by 9 mm at maximum The paper tube has the same length as the roll media The paper tube is longer than the roll media Paper tube end Paper tu...

Страница 211: ...acer the paper tube end exceeds the media end The difference is within 4 5 mm With two paper tube spacers the paper tube end exceeds the media end The difference is within 9 mm Even with two paper tube spacers the paper tube end does not exceed the media end The difference is 9 mm or more q How to use the take up reel unit Paper tube spacer Paper tube spacer Paper tube spacer ...

Страница 212: ...ube spacer checked in the procedure 2 3 to the left side flange movable side 3 Slide the left side flange movable side so that the paper tube is pressed against the paper tube spacer Loose take up flange Paper tube spacer The paper tube is pressed against the paper tube spacer Paper tube Paper tube spacer Left side flange Loose take up flange Loose take up flange Right side flange Paper tube ...

Страница 213: ...5 4 Tighten the knob at the left side movable side firmly to secure the flange 5 Pull out the paper tube spacer Remove the flange spacer set in the procedure 2 1 Fixing knob Paper tube spacer q How to use the take up reel unit ...

Страница 214: ...e remove it with adhesive tape or using cap cleaning liquid Procedure using cap cleaning liquid 1 Remove the loose take up flange from the take up reel unit 2 After placing the loose take up flange on an even surface remove the glue on it with a soft cloth moistened with cap cleaning liquid Note Do not use too much cap cleaning liquid as the loose take up flange sponge may also be taken off 3 When...

Страница 215: ...elastic media the media may become loose and cause take up problems When using this kind of media try to not interrupt the take up operation for a long time If the take up operation happens to stop assist the operation manually as indicated above Winding deviation in the media facilitates the formation of a slack and may cause take up problems Install the media perpendicularly to the paper tube In...

Страница 216: ...ed up the adjust ment pattern TUR ADJ PRINT is printed hINK MEDIA REGi fMEDIA M ADVg Initial adjustment Note When executing the initial adjustment set the take up switch to OFF P 5 7 Take up switch setting 1 Print the adjustment pattern TUR ADJ PRINT Step 1 Before printing take up Initial adjustment Step 2 Problem during take up Adjustment during operation Operation panel LCD display If a blower u...

Страница 217: ...he plate left to move up or down so that the gap is within the allowable range about 1 mm 2 1 2 3 2 2 Groove of the tension roller Horizontal line of the adjustment pattern The horizontal line is aligned with the groove Normal The horizontal line is not aligned with the groove The adjustment is necessary Counterclockwise The position of left side of the tension roller is lowered Clockwise The posi...

Страница 218: ...he position of the tension roller Adjustment example The media is wound in the right direction Media Media Turn the adjustment screw counterclockwise The right side of the tension roller is lowered Clockwise The left side of the tension roller is raised Counterclockwise The left side of the tension roller is lowered Duringtake up themediashiftsintheleft direction whenviewedfromtheprinterfront Note...

Страница 219: ...e end of media with the end of paper tube End surface of the media End surface of the media End surface of the paper tube End surface of the paper tube The end surface of the media is not aligned with the end surface of the paper tube The adjustment is necessary The end surface of the media is aligned with the end surface of the paper tube Normal ...

Страница 220: ...ink processed by the printer Normal utilization 1 Place the blower unit in front of the printer 1 Install the blower unit stand to the out side of the printer stand Align the right side for the IP 5520 2 Push the blower unit until the bar touches the printer stand Printer stand Blower unit stand Blower unit bar Printer stand Printer stand Blower unit stand ...

Страница 221: ...m mended The ink may not dry sufficiently on some media In this case set the paper scanning wait time P 3 34 from the operation panel of the printer Handling the media Move the blower unit to a place where it does not disturb operations before installing the media to the printer P 2 7 installing the media on the take up reel unit P 5 2 or cutting the media P 5 24 Blower unit Printer ...

Страница 222: ... of the media cutter blade and pull it out while releasing the hooks 2 Invert the media cutter blade so that the left side comes to the right side and then install it Note If the media cutter gets stuck while cutting return the cutter blade to the side remove curls and other causes of the problem and cut the media by slowly moving the media cutter blade Do not forcibly cut a media Doing so may dam...

Страница 223: ...edure 1 Hold the side of the media cutter blade and pull it out while releasing the hooks 2 Insert a new media cutter blade in the printer Note If you drop the media cutter blade the blade may be damaged resulting in poor cutting performance Handle it with care Mediacutterbladereplacement ...

Страница 224: ...5 26 ...

Страница 225: ...dures do not solve the problem contact your dealer or a service representative When encountering a problem 6 2 How to clear media jams 6 6 When an error message is displayed 6 7 When a warning message is displayed 6 13 How to get good image quality 6 15 Abnormal sound 6 23 Content of this section 6 ...

Страница 226: ... heater control menu Print an image or set the heater to ON to see if the paper guide is heated P 2 25 Changing temperature using the heater control menu Computer RIP setting The heater temperature can also be set by the RIP of the computer With HEATER PREF set to SOFTWARE on the printer the heater operation will depend on the print data sent from the computer Check the computer setting Heater con...

Страница 227: ...se the room temperature Recommended temperature 20 to 25ºC Head warming up is conducted when the room temperature temperature inside the printer is low Recommended room temperature is 20 to 25 C When the low room temperature is raised to 20 to 25 C it takes time before the tem perature of the printer increases Idle the printer for more than 1 hour before restarting printing Avoid sharp temperature...

Страница 228: ...data to make sure that it is not blank Media jams are frequent Symptom Possible Problem Resolution Type of media Confirm that the type of media in the setting matches the media loaded P 2 7 Media replacement State of loaded media Correctly load the media P 2 7 Media replacement An obstacle is caught in the carriage path Remove any foreign object in the printer P 6 6 How to clear media jams An obst...

Страница 229: ...mperature environment When the temperature in the printer is high higher than 40 C the printing speed is slowed down Set the environment temperature to the recommended temperature 20 to 25 C idle the printer for more than 1 hour before restarting printing USB transfer speed Confirm the transfer speed of USB In case of full speed connection change the connection environment with the computer to ach...

Страница 230: ...arriage path and the media path then close the front cover Note With roll media rewind the media once completely 4 Refer to Roll media installation removal procedure to set the media P 2 7 Note Due to the media jam the print head may scrape against the media and cause print defects In this case perform the cleaning of print head P 4 19 Print head cleaning P 5 7 When an error message is displayed X...

Страница 231: ...ve information about the displayed error code Whenanerrormessageisdisplayed When the error LED lights first confirm the message displayed on the LCD The error messages are classified into two shown below Service call error This error indicates hardware and software troubles that an operator customer cannot resolve Contact a service representative Operator call error This error indicates a problem ...

Страница 232: ...e is empty Resolution Follow the message instructions P 2 30 Ink cartridge replacement Meaning A problem occurs with the ink cartridge Resolution Follow the message instructions P 2 30 Ink cartridge replacement Meaning No ink cartridge is installed Resolution Follow the message instructions When this message appears with an ink cartridge installed suspect an improper installation Check that the in...

Страница 233: ...ructions If the media jam 1 message continues to appear when there is actually no media jam and no obstacle on the car riage path contact a service representative P 6 6 How to clear media jams Meaning The media jam 2 occurs when the media is not correctly detected This may be caused by a wrong roll media or cut media selection or when using cut media of a non specified size length Resolution Follo...

Страница 234: ...pending on the importance of the skew ink may drop on the platen In this case wipe off the ink on the platen P 2 7 Media replacement P 4 15 Cleaning the platen Meaning The pressure roller up down lever is raised Resolution Set the media again following the message instructions Meaning Media skew was detected during printing Resolution Continue to print or stop printing NO MEDIA LOADED LOAD MEDIA M...

Страница 235: ... temperature Use the printer only when the temperature reaches the operating tempera ture Meaning An error has been detected in the head temperature Resolution Contact your dealer or the nearest service representative Meaning A no head error has been detected Resolution Contact your dealer or the nearest service representative PH TEMP ERROR PLEASE WAIT XX PH INFO ERROR CHECK PRINTHEAD XX PH DETECT...

Страница 236: ... TEMP Other Meaning The cover is open Resolution Follow the message instructions Meaning The ambient temperature is out of the printer operating temperature range Resolution Use the printer within the printer operating temperature 15 C to 30 C ...

Страница 237: ...e wiper blade is near to expire Resolution Execute REPLACE WIPER BLADE in PH MAIN MENU to replace the wiper blade P 4 21 Wiper blade replacement Meaning This message is displayed when the life of the wiper sponge is near to expire Resolution Execute REPLACE WIPE SPONGE in PH MAIN MENU to replace the wiper sponge P 4 25 Wiper sponge replacement Meaning This message is displayed when the wiper clean...

Страница 238: ...ex ists the following warning message is displayed and the ERROR LED blinks Perform the appropriate actions based on the error message The ink LED blinks Meaning This message indicates that the remaining ink is low Resolution Prepare a new ink cartridge P 2 30 Ink cartridge replacement ...

Страница 239: ...The operating environment is out of the printer specifications Raise the room temperature to higher than 15 C recommended temperature 20 to 25 C so that the printer sufficiently warms up The media selection does not matched Confirm that the selection of the media in use is correct P 3 21 White lines on the print Cause The media advance is not properly adjusted Reference When the color stripe is pr...

Страница 240: ...egular maintenance P 4 3 3 Perform a print head cleaning NORMAL P 4 19 After this run the nozzle print and confirm that the print miss problem is solved P 4 8 4 Clean the surface of the print heads P 6 23 After this run the nozzle print and confirm that the print miss problem is solved P 4 8 By adding the color stripe when printing the incidence of print miss is reduced P 3 32 The media is not wel...

Страница 241: ...ng the pressure roller up down lever P 2 20 4 Print the media advance adjustment pattern again and adjust the media advance value P 4 27 5 Print in the unidirectional print mode P 3 27 3 Print with print mode set to HIGH QUALITY or MAX QUALITY P 3 24 The ink dries slowly 1 Raise the heater temperature P 2 25 2 Print in the unidirectional print mode P 3 27 3 Print with print mode set to HIGH QUALIT...

Страница 242: ... good performance Ink dropping 1 Check that there are no wrinkles or rising on the media or that the media is set straight Adjust the media position P 2 7 2 Check the height of the print head and put it in the high position if necessary P 2 28 3 Perform a print head cleaning NORMAL P 4 19 4 Perform the regular maintenance P 4 3 5 Clean the print heads surface P 4 19 Print head scratched the media ...

Страница 243: ...t mode set to HIGH QUALITY or MAX QUALITY P 3 24 4 If the print density was set to HIGH DENSITY change it to NORMAL P 3 26 5 If the print was performed in bidirectional mode change to unidirectional print mode P 3 27 Shift in the print head position Shift in the print head bidirectional position 1 Adjust the print head position P 4 38 2 Adjust the bidirection position of the print head P 4 33 Prin...

Страница 244: ...r a vacuum hole on the platen P 2 7 Media Cause When the left edge of the media under the edge guard is near a vacuum hole on the platen Cause When the right edge of the media under the edge guard is near a vacuum hole on the platen Basic image Media Platen Media edge guard Vacuum hole Example of media position when vertical lines appear Example 1 of the shift of the media position when the vertic...

Страница 245: ... Printer 1 Check that the media on the roll is straight If is not replace it 2 Check that the media is set straight to the printer If not adjust the position of the flange holder or shift the media right or left by raising the pressure roller up down lever to set the media vertically In addition when using the take up reel unit adjust the position of the flange on the take up side or re set the me...

Страница 246: ...rect media advance value will be P 3 24 The appropriate media advance value is different for each color print head Normally it is recommended to set the average value of all colors However depending on the print data you may set the value of the most important color The correct media advance value differs between the right and left sides of the media Normally it is recommended to set the average o...

Страница 247: ...6 23 Troubleshooting 6 Abnormalsound If you hear an abnormal operating sound compared to the normal ones contact your dealer or a service representative ...

Страница 248: ......

Страница 249: ...This section contains basic specifications and options and consumables information for the printer Appendix Basic specifications A 2 Options Consumables A 3 Content of this section ...

Страница 250: ...a Area excluding top bottom margins 5 mm and right and left margins 5 mm when using the paper edge guards right and left margins are 10 mm Power supply voltage 100 127 V AC 220 240 V AC Frequency 50 60 Hz 1Hz Power consumption 1350 W or less during printer operating External dimensions 2830 mm W 830 mm D 1255 mm H 2576 mm W 830 mm D 1255 mm H Weight About 228 kg With the take up reel unit 64 insta...

Страница 251: ...ks Ink cartridge Yellow GX ink IP5 301 1 carton 500 ml for the cartridge holder Ink cartridge Magenta GX ink IP5 302 1 carton 500 ml for the cartridge holder Ink cartridge Cyan GX ink IP5 303 1 carton 500 ml for the cartridge holder Ink cartridge Black GX ink IP5 304 1 carton 500 ml for the cartridge holder Ink cartridge Light cyan GX ink IP5 305 1 carton 500 ml for the cartridge holder Ink cartri...

Страница 252: ...cleaning liquid set IP5 292 1 bottle 300 ml bottle Wiper cleaning liquid set for GX ink IP5 291 3 bottles 200 ml bottle Wiper cleaning liquid set for IX ink IP5 297 3 bottles 200 ml bottle Cleaning stick IP5 120 1 with a cleaning roller Cleaning roller set IP5 147 30 pieces Cleaning swab IP6 147 300 Wiper blade IP5 122 2 Wiper sponge IP5 123 1 Media cutter blade IP5 124 1 for the optional cutter u...

Отзывы: