FO-4400U
FO-CS1
3 – 1
CHAPTER 3. MECHANICAL DESCRIPTION
[1] Mechanical description
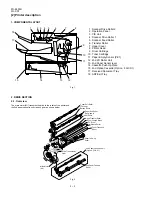
1. Facsimile block
1-1. Document feed block and diagram
Fig. 1
2. Document feed operation
1) As shown in Fig.1, the document set in the hopper (the front sensor
is on) is fed with the let out roller and paper feed roller which rotate
together with the pulse motor.
2) When a specified number of pulses are received from the document
sensor after the document lead edge is sensed, scanning will be
started.
3) When a specified number of pulses are received from the document
sensor after the document rear edge is sensed, scanning will be ended
to discharge the document to the tray.
4) If the front sensor is on (the document is set up in the hopper), the
next document is supplied and fed nearly when the last document is
completely read and discharged. If the front sensor is off (no docu-
ment is set up in the hopper), the drive will be stopped when the
document is discharged to the tray.
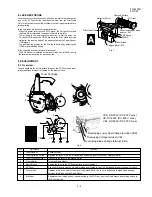
3. Hopper mechanism
3-1. General view
Fig. 2
The hopper is used to align documents with the document guides
adjusted to the paper width.
NOTE: Adjust the document guides before and after inserting the docu-
ment.
3-2. Automatic document feed
1) The structure with secure paper feed of the transfer roller and secure
separation of the separation rubber plate system is employed. The
transfer roller is semicircular as to be rotated only when the paper
feed roller is driven with the 2-step paper feed clutch mechanism.
Moreover, the separation securely done by running the paper feed
and transfer rollers more slowly than the feed roller.
2) Document separation system:
Fr speed reduction ratio + roller backlash separation system
Fig. 3
3-3. Loading the documents
1) Make sure that the documents are of suitable size and thickness,
and free from creases, folds, curls, wet glue, wet ink, clips, staples
and pins.
2) Place documents face down in the hopper.
• Adjust the document guides to the document width.
• Align the top edge of documents and gently place them into the
hopper. The first page under the stack will be taken up by the
feed roller to get ready for transmission.
NOTE: 1) Curled edge of documents, if any, must be straighten out.
2) Do not load the documents of different sizes and/or
thicknesses together.
3-4. Documents applicable for automatic feed
NOTE: Double-side coated documents and documents on facsimile re-
cording paper should be inserted manually.
Documents corresponding to a paper weight heavier than 90kg and lighter
than 135kg are acceptable for manual feed.
Documents heavier than 135kg in terms of the paper weight must be
duplicated on a copier to make it operative in the facsimile.
Scanner drive roller(1)
CIS unit
Scanner drive roller(2)
Scanner feed roller
Transfer roller
Document
Document
Transfer plate
Front sensor
Separate rubber
Back guide
Document sensor
Scanner feed roller
Transfer roller
First page of document
Separate rubber
Transfer plate
Last page of document
Document
Product specifications
Indication
Lower Limit
Upper Limit
Weight
Japanese indication 45kg paper
70kg paper
indication
Size 4
×
6
Metric system
52g/m
2
80g/m
2
indication
American indication 14 LB
20 LB
LB system indication
Thickness Metric system
0.06mm
0.1mm
indication
indication
Inch system indication 0.0024"
0.0035"
Document Document size
(148mm
×
128mm) ~
size
Range
W letter (279.4mm
×
432mm)
A4 (210mm
×
297mm)
Letter (216mm
×
279mm)
Number of Document size
B6 ~ Letter/A4 size
50 sheets
ADF sheets Weight
B4 size/Legal
20 sheets
W letter size
1 sheet
90 kg (104g/m
2
) or more
135 kg (157g/m
2
) or less 1 sheet
Paper
Kind
Paper of fine quality/bond paper/
quality
Kent paper
Содержание FO 4400 - B/W Laser - All-in-One
Страница 125: ...FO 4400U FO CS1 Control PWB parts layout Top side 6 16 ...
Страница 126: ...FO 4400U FO CS1 Control PWB parts layout Bottom side 6 17 ...
Страница 128: ...FO 4400U FO CS1 LIU PWB parts layout Top side 6 19 ...
Страница 129: ...FO 4400U FO CS1 LIU PWB parts layout Bottom side 6 20 ...
Страница 132: ...FO 4400U FO CS1 Printer PWB parts layout Top side 6 23 ...
Страница 133: ...FO 4400U FO CS1 Printer PWB parts layout Bottom side 6 24 ...
Страница 135: ...FO 4400U FO CS1 Power Supply PWB parts layout 6 26 The Power supply PWB of this model employs lead free solder ...
Страница 143: ...FO 4400U FO CS1 M E M O 6 34 ...


