


FO-4400U
FO-CS1
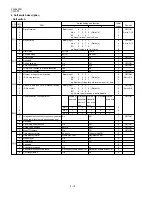
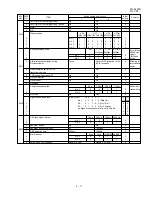
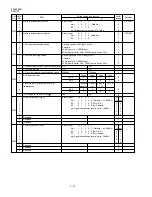
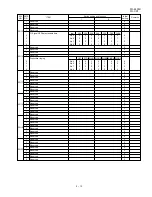
[2] Diagnostics and service soft switches
1. Operating procedure
Two kinds of diagnoses are supported.
1-1. Fax diagnosis
This diagnosis is concerned with the main body of fax which is used for
production and service support.
Entering the diagnostic mode
1-2. Print diagnosis
This diagnosis is concerned with the print which is used for production
and service support.
Entering the diagnostic mode
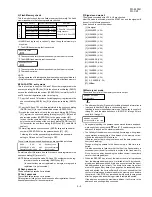
Memory clear when power is turned on
Pressing the START and STOP keys, turn on the main power, and the
following message will be displayed.
1 = All the data will be deleted including initially registered data.
2 = Delete the image file to be used in transmission. This will delete all
the data related to communication such as reserved transmission or
intercepting. However, the data initially registered will not be de-
leted.
3 = Memory will not be cleared and the machine enters stand-by mode.
Press
, and the following
display will appear.
MENU
9
8
6
PCU ROM VER.:
(Diag
•
specifications)
MENU
9
8
6
START
01
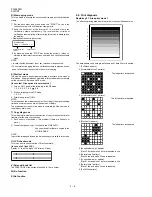
AREA PRINT MODE 1
START
02
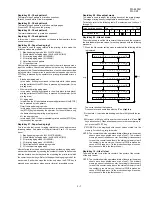
CHECK PATTERN 1
START
03
CHECK PATTERN 2
START
04
CHECK PATTERN 3
START
05
CHECK PATTERN 4
START
06
PAPER FEED AGING 1
START
07
PAPER FEED AGING 2
START
START
08
BIAS ADJUST MODE2
START
09
LIFE SET MODE
START
START
Then press the
key. Select the desired item with
the
key and the
key or select with the rapid key.
Enter the mode with the
key.
START
10
LIFE ALL CLEAR
START
11
LIFE ENTRY MODE
PCU ROM Ver.:
START
12
LIFE CLEAR MODE
MEMORY CLEAR ?
1 = ALL , 2 = IMAGE , 3 = NO
MENU
9
8
7
START
A
SOFT SWITCH MODE
START
B
PRINT AREA
START
C
ROM & RAM CHECK
START
D
AUTO FEEDER MODE
START
E
AGING MODE
START
F
PANEL CHECK MODE
START
G
OPTICAL ADJUST MODE
START
H
PRODUCT CHECK
START
I
SIGNAL SEND MODE
START
J
COMM. CHECK MODE
START
K
MEMORY CLEAR MODE
START
L
FLASH MEMORY CHECK
START
M
ALL FAX/TEL. ENTRY MODE
START
START
N
O
CONF. PASSCODE
START
P
SIGNAL SEND MODE 2
START
Q
TA68
START
DEPT. PASSCODE
MENU
9
8
7
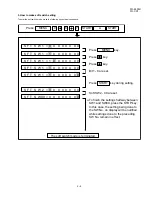
Press
, and the following
display will appear.
MAIN: TA68
START
Then press the
key. Select the desired item with the
key
and the
key or select with the rapid key.
Enter the mode with the
START
key.
(Diag
•
specifications)
MEMORY SET MODE
START
R
STAMP AGING MODE
START
S
DIAL TEST MODE
START
T
U
COPY DIAG MODE
LCD CHECK MODE
V
PERSONAL BOOK LIST
START
W
NO FUNCTION
START
START
X
NO FUNCTION
START
2 – 2
Содержание FO 4400 - B/W Laser - All-in-One
Страница 125: ...FO 4400U FO CS1 Control PWB parts layout Top side 6 16 ...
Страница 126: ...FO 4400U FO CS1 Control PWB parts layout Bottom side 6 17 ...
Страница 128: ...FO 4400U FO CS1 LIU PWB parts layout Top side 6 19 ...
Страница 129: ...FO 4400U FO CS1 LIU PWB parts layout Bottom side 6 20 ...
Страница 132: ...FO 4400U FO CS1 Printer PWB parts layout Top side 6 23 ...
Страница 133: ...FO 4400U FO CS1 Printer PWB parts layout Bottom side 6 24 ...
Страница 135: ...FO 4400U FO CS1 Power Supply PWB parts layout 6 26 The Power supply PWB of this model employs lead free solder ...
Страница 143: ...FO 4400U FO CS1 M E M O 6 34 ...


