FO-4400U
FO-CS1
3 – 33
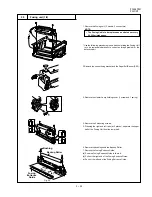
[4] How to install the verification stamp
(FO-45VS)
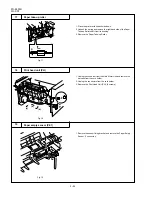
1. Open the operation panel unit.
2. Remove the screw (A1) x 1 pc. and open the
operation panel more widely.
3. Remove the screws (B1) x 5 pcs., to remove
document guide under.
4. Remove CIS unit
Carefully bend 2 hooks and remove CIS cable.
5. Install the verification stamp (FO-45VS) with the
screw (B2) x 1pc.
Operation panel unit
Document
guide stopper
Screw (A1) x 1
Open
Hook
Hook
Scanner frame unit
Stamp cable
to Control PWB
Document
guide under
Screw (B1) x 5
Screw (B2) x 1
CIS cable
CIS unit
FO-45VS
Содержание FO 4400 - B/W Laser - All-in-One
Страница 125: ...FO 4400U FO CS1 Control PWB parts layout Top side 6 16 ...
Страница 126: ...FO 4400U FO CS1 Control PWB parts layout Bottom side 6 17 ...
Страница 128: ...FO 4400U FO CS1 LIU PWB parts layout Top side 6 19 ...
Страница 129: ...FO 4400U FO CS1 LIU PWB parts layout Bottom side 6 20 ...
Страница 132: ...FO 4400U FO CS1 Printer PWB parts layout Top side 6 23 ...
Страница 133: ...FO 4400U FO CS1 Printer PWB parts layout Bottom side 6 24 ...
Страница 135: ...FO 4400U FO CS1 Power Supply PWB parts layout 6 26 The Power supply PWB of this model employs lead free solder ...
Страница 143: ...FO 4400U FO CS1 M E M O 6 34 ...

