background image

1

.14

Installing Smart Soft

SmartJet Printer Driver

Before you can use any type of printer with your computer, you must
install a printer driver. The printer driver tells the computer what kind of a
printer you are using. The printer driver also controls the various settings,
such as print quality and paper type. You define these settings within the
printer driver, and the printer driver then communicates the settings to
both the computer and the printer.

To use the SmartJet as your printer, you must install the SmartJet Printer
Driver in your computer. After installing the printer driver, make sure the
SmartJet is selected as a default printer to use SmartJet as your printer.

SmartJet Scanner Driver

Scanner driver allows you to scan images from any graphics or OCR
(optical character recognition) applications programme that supports the
TWAIN standard (e.g. Presto! PageManager, Adobe Photoshop). To use the
SmartJet as your scanner, you must install the SmartJet Scanner Driver in
your computer.

Presto! PageManager

With 

Presto! PageManager

, you can easily scan documents and photographs

into your computer and maintain them as electronic documents. You can
also use 

Presto! PageManager

to quickly transmit scanned documents by fax

or electronic mail, or to print a copy on your printer.

To use 

Presto! PageManager

as your scanning application, you must install

the 

Presto! PageManager

in your computer.

SmartFAX RCP Utility

The SmartFAX Remote Control Programme (RCP) utility enables you to
make a copy or send a fax through your SmartJet machine even when an
extension phone is not connected with your SmartJet. If you install the RCP
utility, the SmartFAX program is installed on your computer. The SmartFAX
allows you to dial a fax number and set up advanced fax options. The
display window on the SmartFAX shows the current status, and
information messages and prompts.

The SmartFAX is installed on LPT1. You can change the LPT port, if
necessary. See page 1.22.

03-Install  2/5/99  10:28 AM  Page 2

Содержание SF-4300

Страница 1: ...SmartJet Printer Scanner Fax Copier User s Guide Setup and Operation 00 Cover 2 5 99 10 38 AM Page 1 ...

Страница 2: ...S Visit us at http samsungelectronics com If you have access to this online service you can download the UserÕs Guide and drivers from Samsung Electronics P N JG68 60792A Rev 3 00 00 Cover 2 5 99 10 38 AM Page 2 ...

Страница 3: ...mes and trademarks mentioned in this manual are trademarks of their respective holders Thank you for purchasing the SmartJetÑthe multifunction office product for your home office and the whole family We are sure that your SmartJet will provide all you need in one machine The SmartJet combines these office machine Colour inkjet printer Scanner Plain paper fax PC fax Copier Enjoy your new SmartJet 0...

Страница 4: ...g Smart Soft 1 13 SmartJet Printer Driver 1 14 SmartJet Scanner Driver 1 14 Presto PageManager 1 14 SmartFAX RCP Utility 1 15 SmartJet Fax Driver 1 15 System Requirement 1 16 Install Procedure 1 17 Printer Driver Scanner Driver Fax Driver Fax RCP Driver in Windows 95 98 1 17 Printer Driver Scanner Driver Fax Driver Fax RCP Driver in Windows 3 x 1 19 Presto PageManager 1 21 Changing SmartFAX RCP Po...

Страница 5: ...ality Colour Printing 2 14 For Monochrome Printing 2 14 Setting Other Utilities Using the SmartJet Control Program 2 15 Starting the SmartJet Control Program 2 15 SmartJet Control Program Window 2 16 Using the Status Tab 2 17 Using the Options Tab 2 17 Using the Cartridge Tab 2 18 Scanning 2 19 Overview 2 19 Scanning a Document or Photograph 2 20 Faxing and Copying 2 25 SmartFAX 2 25 Starting the ...

Страница 6: ...rtridge 3 20 Cleaning a White Sheet 3 23 Chapter 3 Troubleshooting Appendix Making a Copy 2 30 On the SmartFAX 2 30 On the SmartJet Keypad 2 32 Sending a Fax 2 34 Sending from the SmartFAX 2 34 Dialling from a Telephone Connected to the SmartJet 2 36 Receiving a Fax 2 38 Receiving a Fax Automatically FAX mode 2 38 Receiving a Fax Manually TEL mode 2 39 Using Phonebook 2 40 Storing Numbers into and...

Страница 7: ...1 1 Getting Started 1 02 Setup 2 5 99 10 31 AM Page 1 ...

Страница 8: ...Guide WinFax LITE UserÕs Guide Unpacking Set Up Your SmartJet If you are experiencing problems with the SmartJet software contained on this CD ROM or if you donÕt have a CD ROM drive and require the SmartJet software on 3 5Ó diskette please call either BITS Tel 01189 409500 or FLS TEL 01268 888895 or FLS FAX 01268 888899 The shape of power and telephone line cord plugs may differ depending on your...

Страница 9: ...velope Front Cover Manual Tray Allows you to load your original document for scanning faxing and copying Also use to feed paper manually one at a time Document Guide Adjust this guide to the paper width of the document to be faxed copied or scanned Automatic Paper Feeder Holds 100 sheets of plain paper Print cartridge and carrier inside Buttons and Lamps See page 2 2 Ext Tel Jack Printer Cable Con...

Страница 10: ... your workstation Leave enough space to allow for easy paper loading and front cover open Do not place your SmartJet In direct sunlight Near heat sources or air conditioners In dusty or dirty environments Setting Up Your SmartJet Remove the Shipping Tapes 1 Remove all pieces of shipping tape from the machine 02 Setup 2 5 99 10 31 AM Page 4 ...

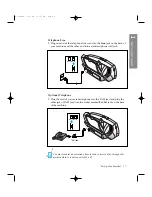
Страница 11: ...ck Ext Tel Line Optional Telephone 3 Plug the cord of your extension phone into the TAM lead and plug the other jack of TAM lead into the socket marked Ext Tel jack on the back of the machine Ext Tel Line You must connect an extension phone to send or receive a fax through this machine when it is not connected to a PC TAM lead 1 Getting Started 02 Setup 2 5 99 10 31 AM Page 5 ...

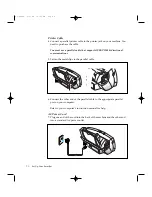
Страница 12: ...IEEE P1284 bidirectional communications 5 Fasten the metal clips to the parallel cable 6 Connect the other end of the parallel cable to the appropriate parallel port on your computer Refer to your computerÕs instruction manual for help AC Power Cord 7 Plug one end of the cord into the back of the machine and the other end into a standard AC power outlet 02 Setup 2 5 99 10 31 AM Page 6 ...

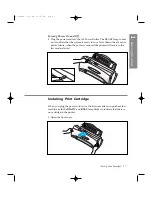
Страница 13: ...e event of a power failure when the power is restored the printer will revert to the last mode selected READY Installing Print Cartridge When you plug the power cord in for the first time after you purchase this machine both the READY and BUSY lamp flicker to indicate that there is no cartridge in the printer 1 Open the front cover 1 Getting Started 02 Setup 2 5 99 10 31 AM Page 7 ...

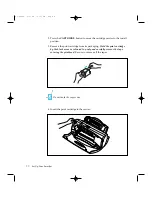
Страница 14: ...s the CARTRIDGE button to move the cartridge carrier to the install position 3 Remove the print cartridge from its packaging Hold the print cartridge by the black areas or coloured top only and carefully remove the tape covering the printhead Be sure to remove all the tapes 02 Setup 2 5 99 10 31 AM Page 8 ...

Страница 15: ...p Your SmartJet 5 Push the cartridge firmly in the direction of the arrow until it clicks into place 6 After installing the print cartridge close the front cover 1 Getting Started 02 Setup 2 5 99 10 31 AM Page 9 ...

Страница 16: ... an activity such as copying or printing By pressing the CARTRIDGE button while your printer is active the machine will temporarily stop Printing will resume after the print cartridge has been replaced Storing a Print Cartridge in the Storage Unit The print cartridge storage unit provides a convenient place to store an extra print cartridge and prevents an opened cartridge from drying out 1 Holdin...

Страница 17: ...the right to match the width of the paper Loading Paper When no paper is loaded the BUSY lamp flickers and the SCAN FAX lamp glows red You can load approximately 100 sheets of paper in the automatic paper feeder 1 Pull the paper extension on the automatic paper feeder all the way up If you fail to fan the paper or adjust the paper guide it may cause multi paper feeding Paper extension 1 Getting St...

Страница 18: ...inter mechanism is functioning properly See the pattern sample below Sample of Test Pattern Running Printer Test Each time you install a new print cartridge run the printer test to check if the printer mechanism is functioning properly 1 Press the READY button to turn the system off 2 Press the CARTRIDGE button first and the READY button next then hold down both of them for approximately 1 second ...

Страница 19: ...nager SmartFAX RCP Utility SmartJet FAX Driver For details on the drivers refer to each driverÕs description If you are experiencing problems with the SmartJet software contained on this CD ROM or if you donÕt have a CD ROM drive and require the SmartJet software on 3 5Ó diskette please call either BITS Tel 01189 409500 or FLS TEL 01268 888895 or FLS FAX 01268 888899 1 13 Installing Smart Soft Ins...

Страница 20: ...shop To use the SmartJet as your scanner you must install the SmartJet Scanner Driver in your computer Presto PageManager With Presto PageManager you can easily scan documents and photographs into your computer and maintain them as electronic documents You can also use Presto PageManager to quickly transmit scanned documents by fax or electronic mail or to print a copy on your printer To use Prest...

Страница 21: ...de to terminate the Fax Driver then all current and future SmartJet usage will be terminated until you restart the SmartJet Fax Driver or restart Windows You can also restart the SmartJet Fax Driver from the Control Panel menu at any time You can change the Fax Driver COM port which should be consistent with the COM port used by PC FAX application Its default COM port is COM3 1 Getting Started You...

Страница 22: ...patible with 486SX 33MHz or higher processor Free disk space of at least 3MB More than 8MB or higher RAM Windows 95 98 Windows 3 x CD ROM drive Presto PageManager IBM or compatible with 486SX 33MHz or higher processor Free disk space of at least 28MB Windows 95 98 or 8MB Windows 3 x More than 8MB or higher RAM Windows 95 98 Windows 3 x CD ROM drive SmartFAX RCP Utility IBM or compatible with 486SX...

Страница 23: ...e sure your computer meets or exceeds the system requirement for the driver and application programme you want to install See page 1 16 Printer Driver Scanner Driver Fax Driver Fax RCP Driver in Windows 95 98 1 Make sure the SmartJet is plugged in and connected to your computer 2 Turn on the SmartJet and the computer 3 Start your Windows You see a screen similar to this 1 Getting Started 4 Select ...

Страница 24: ... the initial screen select the desired language on the screen 7 From the Installation screen select Install the Samsung software on your PC The Continue dialogue box appears 8 Click Start Install and follow the instructions on the screen Printer Driver Scanner Driver Fax Driver Fax RCP Driver Presto PageManager 03 Install 2 5 99 10 28 AM Page 6 ...

Страница 25: ... Turn on the SmartJet and the computer 3 Start your Windows 4 Insert the Smart Soft CD ROM into your CD ROM drive 5 From the Program Manager select Run from the File menu The Run dialogue box appears 6 Type d or e autorun on the command line then click OK The CD ROM starts automatically and the initial screen appears 1 Getting Started 03 Install 2 5 99 10 28 AM Page 7 ...

Страница 26: ...on screen select Install the Samsung software on your PC The Continue dialogue box appears 9 Click Start Install and follow the instructions on the screen 1 20 Installing Smart Soft Printer Driver Scanner Driver Fax Driver Fax RCP Driver Presto PageManager 03 Install 2 5 99 10 28 AM Page 8 ...

Страница 27: ...rs type d or e Autorun on the command line then click OK The CD ROM starts and the initial screen appears 2 From the initial screen select the desired language on the screen 3 From the Installation screen select Install bonus software on your PC The Continue dialogue box appears 4 Click Start Install and follow the instructions on the screen 1 21 Installing Smart Soft 1 Getting Started Printer Dri...

Страница 28: ...elect SAMSUNG SmartJet SmartFAX on the Programs menu and select Change Fax Port from the SAMSUNG SmartJet SmartFAX menu The Change Fax Port window appears 4 Select the desired port and click OK In Windows 3 x 1 Start Windows 2 From the Program Manager double click the SAMSUNG SmartJet SmartFAX icon The SAMSUNG SmartJet SmartFAX window appears 3 Double click the Change Fax Port icon The Change Fax ...

Страница 29: ... PageManager 4 Choose the Uninstall The Uninstall dialogue box appears Follow the instructions on the screen to complete uninstallation In Windows 3 x 1 Start Windows if not already started 2 From the Program Manager double click the driver or application icon you want to remove SAMSUNG SmartJet Printer SAMSUNG SmartJet Scanner SAMSUNG SmartJet SmartFAX SAMSUNG SmartJet FAX Driver Presto PageManag...

Страница 30: ...1 24 Installing Smart Soft Memo 03 Install 2 5 99 10 28 AM Page 12 ...

Страница 31: ...2 1 Operation 2 04 Print 2 5 99 10 05 AM Page 1 ...

Страница 32: ...cription Ready for use Standby mode FAX mode is chosen to receive a fax automatically If you change the receive mode to TEL manual receiving through the SmartFAX see page 2 43 the SCAN FAX lamp is off in Standby mode Prints data Uploads the scanned data to the computer Or sends or receives a fax Waits the next document to be inserted Or there is no document It also indicates the document jam see p...

Страница 33: ... create the document and open the document you want to print 2 Choose Print or Print Setup from the File menu 3 Make sure the SmartJet printer is selected as your default printer 4 Click on the Properties or Setup button if you want to make any adjustments as appropriate for printing your document See ÔPrinter SettingsÕ on page 2 4 5 Select OK to close the Properties dialogue box 6 After making an...

Страница 34: ... your software application does not include them It also includes all settings that determine how your printer will operate Accessing Print Settings In Windows 95 From within any Windows application you can select the Print or Print Setup command From the Printers folder you can select the printer and then select the Properties command from the File menu From the Printers folder you can select the...

Страница 35: ...rinting Natural Color Produces photo realistic natural colour printing Black Only Optimizes B W printing Color Sort Sorts colour and B W pages then prints either one of them according to the type of cartridge installed and prints another after you change the cartridge Selects the paper source to use When you load paper in the manual tray choose Manual For automatic paper feeder choose Automatic Re...

Страница 36: ... cursor over one of the printing options a help message appears at the bottom of the tab Selects the style of halftoning to use Line Art Screen Generally the best choice for printed text or pen and ink drawings Fine Screen Produces fine quality printing Air Brush Produces air brush image printing What is Halftone Grey scale objects such as photographs whose grey dots have been converted to a patte...

Страница 37: ...d edges Coated Paper The coated paper has been developed for high quality printing with minimal or no smearing or running when in contact with water or damp surfaces making it a good choice for damp or rainy environments Glossy Photo Paper Glossy photo paper is a high gloss thicker paper that produces the look and feel of a photograph Use this paper to produce photo realistic prints from your prin...

Страница 38: ...ended even if you place the sheets of film in a clear file or plastic holder Do not leave the film in the paper tray for long periods of time Dust and dirt may accumulate on the film resulting in spotty printing To avoid smudging caused by fingerprints use a pair of thin cloth gloves while loading and handling the film To avoid fading do not expose the printed film to prolonged sunlight Store unus...

Страница 39: ...ng you into the manual tray Manual tray 2 Align the edge of the paper with the right edge of the tray Squeeze the left guide and move it to the right to match the width of the paper 2 9 Printing 3 Insert the paper fully until it stops To print properly on the paper loaded in the manual tray you must select ÔManualÕ from the Paper Source menu in the print settings See page 2 5 2 Operation 04 Print ...

Страница 40: ... use the banner guide provided with your SmartJet To install the banner guide do as follows 1 Push down the paper extension until it stops 2 Insert two tabs on the bottom of the banner guide into the slots as shown 2 10 Printing 04 Print 2 5 99 10 05 AM Page 10 ...

Страница 41: ...3 Insert the paper into the manual tray You must select ÔBanner A4Õ or ÔBanner LetterÕ for Paper Size menu in the print setting See page 2 5 2 11 Printing 2 Operation 04 Print 2 5 99 10 05 AM Page 11 ...

Страница 42: ...ter Envelopes with windows holes perforations cutouts and double flaps Envelopes made with special coated paper or deeply embossed paper Envelopes using peel off sealing strips Envelopes in which letters have been enclosed When you are ready to print on envelopes follow these steps to feed an envelope in the paper feeder 1 Turn the envelope guide upright Envelope Guide 2 12 Printing 04 Print 2 5 9...

Страница 43: ...ht edge of the envelope must align with the raised edge of the envelope guide 3 Squeeze the left paper guide and move it to the right to match the width of the envelope Paper guide You must change the Paper Size menu in the print settings to the envelope size you loaded See page 2 5 2 13 Printing 2 Operation 04 Print 2 5 99 10 05 AM Page 13 ...

Страница 44: ...ctions allow the printer driver to interpret and translate 256 colours which will increase your printing speed However your print quality will not be optimized Paper Type Plain Paper Print Quality Fast Draft For High Quality Colour Printing For the SmartJet select the print options shown below to allow the printer driver to interpret and translate up to 16 7 million colours Keep in mind that your ...

Страница 45: ...Set up options Cartridge Installs clean or align the cartridge About Displays the programme version Starting the SmartJet Control Program In Windows 95 98 1 Click the Start button and choose Programs 2 Choose the SAMSUNG SmartJet Printer from the Programs menu 3 Choose the Control Program on LPT1 4 The SmartJet Control Program on LPT1 window appears 2 15 Printing 2 Operation 04 Print 2 5 99 10 05 ...

Страница 46: ... the SmartJet Control Program on LPT1 window appears click the appropriate tab for the options you want to display On the appropriate tab specify your changes 3 The SmartJet Control Program on LPT1 window appears Displays the printer status and the ink level Control programme options Installs or clean the cartridge Displays information on the programme version 2 16 Printing 04 Print 2 5 99 10 05 A...

Страница 47: ... setup options Displays the status monitor as a button Windows 95 or icon Windows 3 x on the Windows desktop Disables bidirectional communication Check this box for network printer Closes the status monitor automatically at the end of job Enables sound effect Enables buffer mode 2 17 Printing 2 Operation 04 Print 2 5 99 10 05 AM Page 17 ...

Страница 48: ...our SmarJet is equipped with a print head cleaning function If you notice some degradation in the print quality click the Clean Print Nozzles tab to perform the print nozzle cleaning Repeat cleaning if necessary Displays the ink level Use to install or replace the cartridge Allows you to clean the print nozzles Aligns the cartridge 2 18 Printing 04 Print 2 5 99 10 05 AM Page 18 ...

Страница 49: ...t scanned documents by fax or electronic mail or to print a copy on your printer Before scanning documents or photographs make sure that the Presto PageManager software and the image scan programme MyScan provided with your SmartJet Scanner have been installed in your computer See page 1 21 This section gives a basic description of scanning using MyScan the SAMSUNG SmartJet Scanner and Presto Page...

Страница 50: ...dy started 3 Start the Presto PageManager For Windows 95 select Programs from the Start menu Then select Presto PageManager For Windows 3 x double click the Presto PageManager from the Program Manager Then select Presto PageManager Then Presto PageManager DeskTop window will appear 2 20 Scanning 05 Scan 2 5 99 10 00 AM Page 2 ...

Страница 51: ...on the latest version of MyScan from the Source dialogue box If you wish to use another scan driver select the appropriate driver You may want to use the carrier sheet provided to protect fragile or damaged original documents or photos for scanning Insert the document Adjust the guide to match the width of the document Make sure that the left top of the document is placed under this arrow indicato...

Страница 52: ... W Lineart B W Resolution You can determine the amount of information the scanner will capture in a resulting scanned image Scaling Factor You can enlarge or reduce an image as it is scanned Descreen Lets you minimize the appearance of unsightly interference patterns which may occur in your image file when scanning graphic images which are printed for publication Filter You can soften or sharpen e...

Страница 53: ...lose the MyScan window click the Exit button Image Enhancement Tools Use to adjust the highlight shadow and gamma setting Frame Tool Defines the boundaries of the area to be included in your final scan Zoom Tool Allows you to zoom in or out on an image Highlight and Shadow Tools Allows you to make comparisons with different areas of the image Flip Rotate Flips and rotates an image Invert Inverts a...

Страница 54: ...nter icon after you choosing the desired item 14 The Print dialogue box will appear Select the appropriate options 15 After choosing options click OK button Presto PageManager will send the file to your printer For information on how to use the Presto PageManager refer to the UserÕs Guide for Presto PageManager MyScan Application bar Gives you a quick access to applications by using drag and drop ...

Страница 55: ...e page 1 21 for information on SmartFAX installation The SmartFAX enables you to set up fax options and dial a number using the function keys on your computer screen The display window on the SmartFAX shows the current status and information messages and prompts Faxing and Copying 2 Operation 06 Copy Fax 2 5 99 9 44 AM Page 1 ...

Страница 56: ... on the Programs menu and select SmartFAX from the SAMSUNG SmartJet SmartFax menu The SmartFAX window appears In Windows 3 x 1 Starts your Windows 2 From the Program Manager double click the SAMSUNG SmartJet SmartFAX icon The SAMSUNG SmartJet SmartFAX window appears 3 Double click the SmartFAX icon The SmartFAX window appears 2 26 Faxing and Copying 06 Copy Fax 2 5 99 9 44 AM Page 2 ...

Страница 57: ...ick the left mouse button on the SmartFAX icon or button Menu Access menu mode MEM TX Activates memory transmission COPY Opens the Copy dialogue box REFRESH Refreshes SmartFAX screen and displays the current status of the SmartFAX SEND START Activates direct transmission Receiving mode FAX TEL Resolution STANDARD FINE SUPER FINE Contrast NORMAL LIGHTER LIGHTEST DARKEST DARKER Document type TEXT PH...

Страница 58: ...e sure any glue ink or correction fluid on the paper is completely dry before feeding the document Make a photocopy of any document that will not feed into the SmartJet You can then feed the copy Do not feed documents with pages that are different sizes or of different thicknesses Using Carrier Sheet You may want to use the carrier sheet provided to protect fragile or damaged original documents or...

Страница 59: ...e the document guide and move it to the right to adjust for the width of the document Loading the Document You must load a single sheet at a time If you have more than one page insert the next page after one page is scanned and the machine beeps waiting for the next page 2 29 Faxing and Copying 2 Operation 06 Copy Fax 2 5 99 9 44 AM Page 5 ...

Страница 60: ...he printed side facing you until it is gripped by the machine 2 Start the SmartFAX if not already started The SmartFAX window will appear Press to open the Copy dialogue box 2 30 Faxing and Copying If you want to make a copy in colour please use ÔPresto CopierÕ under ÔPresto PageManager Õ To start Presto PageManager select Programs from the Start menu for Windows 95 06 Copy Fax 2 5 99 9 44 AM Page...

Страница 61: ... start 3 Click the COPY button The Copy dialogue box will appear You can change any of these copy settings before beginning to copy If you want to reduce the document specify the reduction rate 50 100 Select the original document mode If you want your copies to be darker or lighter than your original select the desired brightness Enter the number of copies 1 99 To cancel a copy in progress click t...

Страница 62: ...d in your SmartJet machine 1 Insert your document into the manual tray with the printed side facing you until it is gripped by the machine 2 Press the START COPY button Both the SCAN FAX and BUSY lamp light up The machine scans the document into memory CARTRIDGE FF STOP START COPY 2 32 Faxing and Copying 06 Copy Fax 2 5 99 9 44 AM Page 8 ...

Страница 63: ...next page into the manual tray while the machine beeps and the SCAN FAX lamp flickers BUSY C 4 Copying will start If the memory gets full while scanning the document the scan will be automatically canceled and the document will be fed out To cancel a copy in progress press the FF STOP button 2 33 Faxing and Copying 2 Operation 06 Copy Fax 2 5 99 9 44 AM Page 9 ...

Страница 64: ...artFAX 1 Insert your document into the manual tray with the printed side facing you until it is gripped by the machine You must load one page at time 2 Start the SmartFAX if not already started The SmartFAX window will appear 3 Select the fax options if necessary The options affect sending speed Resolution Change the resolution to increase sharpness and clarity FINE is good for documents containin...

Страница 65: ...number using the number keypad or click the desired phonebook number if you have already stored a fax number into the phonebook memory See page 2 40 The number appears in the display Click the desired phonebook number to use the fax number stored into the phone book memory Click the MEM TX button to send after scanning all documents into memory Click the SEND START button to send immediately Displ...

Страница 66: ...tored in memory and the SmartJet immediately ejects the original freeing the document tray After one page is scanned the machine beeps Insert the next page while the machine beeps Repeat as necessary Sending begins after all the documents are scanned into memory If you want to send a document directly from the tray without scanning it into memory use the SEND START button Sending begins immediatel...

Страница 67: ...RIDGE FF STOP START COPY 4 After the unit finishes sending one page the machine beeps for about 3 5 seconds If you want to send two or more pages insert the next sheet into the manual tray while the machine beeps To stop operation press the FF STOP button Transmission will be canceled and the document will be fed out 2 37 Faxing and Copying 2 Operation 06 Copy Fax 2 5 99 9 44 AM Page 13 ...

Страница 68: ... you have a phone connected to your SmartJet If memory gets full while receiving a fax the reception is automatically canceled If something went wrong during your fax reception the SCAN FAX lamp turns on red for 3 or 5 seconds and the machine returns to Standby mode You can change some receiving features for example ring count automatic reduction and discard setting through the SmartFAX programme ...

Страница 69: ...martJet machine 1 Make sure that TEL is selected in the SmartFAX window 2 When the telephone connected to the SmartJet rings pick up the handset and answer it 3 If you hear a fax tone or if the person on the other end asks you to receive a fax press the START COPY button on the SmartJet Both the SCAN FAX and BUSY lamp light up Hang up the phone CARTRIDGE FF STOP START COPY 2 39 Faxing and Copying ...

Страница 70: ... already started The SmartFAX window will appear 2 Click the BOOK button The Phonebook dialogue box will appear Phonebook number keys Closes the Phonebook dialogue box You can delete all information in the selected phonebook number The selected number will be displayed in the SmartFAX window Use the number to send a fax Access edit mode You can store or edit the selected phonebook number Access Ph...

Страница 71: ...u finish click the Close button The phonebook keys in which fax numbers are stored appear in blue on the SmartFAX Dialling Phonebook Numbers Click the desired phonebook key in the SmartFAX or select the desired number from the Phonebook dialogue box The number stored into the selected Phonebook key appears in the display window on the SmartFAX If you click the Delete button on the Phonebook dialog...

Страница 72: ...n select the paper size to use for printing a received fax or copy Select A4 Letter or Legal TX Confirmation Report This report shows whether the transmission was successful or not how many pages were sent etc Select On to print the report automatically each time you send a fax Select Off The report will not print out automatically Select On Error to print only when an error occurs and the transmi...

Страница 73: ... number from 1 to 7 ECM This mode compensates for poor line quality and ensures accurate error free transmission with any other ECM equipped facsimile machine If the line quality is poor transmission time may be increased when ECM is enabled ECM mode will be activated when you send a fax using the MEM TX button To turn this feature on select On To turn this feature off select Off Auto Reduction Wh...

Страница 74: ...nd select Settings from the menu The Settings dialogue box will appear 3 Specify the options as you need 4 Click the OK button to save the information you currently entered If you click the Default button all the settings returns to the factory default status 2 44 Faxing and Copying 06 Copy Fax 2 5 99 9 45 AM Page 20 ...

Страница 75: ...ntly stored in the phonebook memory Settings This list shows the status of the user selectable options To monitor and print the list do as follows 1 Start the SmartFAX if not already started The SmartFAX window will appear 2 Click the MENU button and select List Out from the menu The List Out dialogue box will appear 3 Select the desired list and click the OK button 4 The selected list dialogue bo...

Страница 76: ...ection There is no document loaded Load document before sending or copying There is no cartridge installed or the cartridge is not properly installed Make sure the cartridge is installed properly The cartridge is used up Replace it with a new cartridge There is no paper loaded Load paper Memory is full Print out any documents that are stored in memory then start the operation again 2 46 Faxing and...

Страница 77: ...3 1 Troubleshooting 3 07 Troubleshooting 2 5 99 9 42 AM Page 1 ...

Страница 78: ...mputer Make sure the printer cable is firmly connected to the printer and the computer Make sure that the printer cable is IEEE 1284 compliant bi directional parallel interface cable Bad printer cable or computer port Try another cable Make sure that your application has the SmartJet selected as the default printer Make sure that there is paper in the automatic paper feeder Check Print Manager Try...

Страница 79: ...ter cable may not be correct type Check the printer cable The print head may need cleaning See ÔPrint Cartridge Nozzle TestÕ on page 3 15 You may be using ÔHighÕ print quality Change the ÔPrint QualityÕ setting to ÔFast Draft Õ See page 2 5 Graphics print more slowly than text Colour prints more slowly than black Special media prints more slowly than plain paper Another application currently open ...

Страница 80: ...e of paper Try another type of paper Make sure that the paper is straight and unwrinkled Let ink dry before handling the paper You can use ÔDry Time DelayÕ check box in the print setting See page 2 5 Change the ÔPrint QualityÕ setting to ÔFast Draft Õ See page 2 5 The print head may need cleaning See ÔPrint Cartridge Nozzle TestÕ on page 3 15 The print cartridge may be running out of ink Replace t...

Страница 81: ... 3 15 The print settings may be incorrect Check ÔDocument TypeÕ setting in the SmartJet Document Quality dialogue box See page 2 5 The black print cartridge may be installed Replace with a colour cartridge See page 3 20 Make sure that you are using the correct type of paper Try another type of paper Make sure that the ÔPaper TypeÕ setting is appropriate for the paper you loaded See page 2 5 Change...

Страница 82: ...nt of the SmartJet 3 Replace paper Make sure that there is not too much paper in the automatic paper feeder Depending on the thickness of your paper the automatic feeder can hold up to 100 sheets of paper Make sure that you are using the correct type of paper Remove paper from the automatic paper feeder and flex or fan the paper Humid conditions may cause some paper to stick together Make sure tha...

Страница 83: ...ic paper feeder can hold up to 100 sheets of paper Make sure that the paper guide does not cause the paper to bow in the automatic sheet feed Make sure that you are using the correct type of paper When loading paper do not force the paper down into the printer Make sure that the right side of the paper is aligned with the right edge of the feeder and the left paper guide is set against the left si...

Страница 84: ...tone or pulse See page 2 42 The remote fax machine may be turned off out of recording paper or unable to answer incoming calls Speak with the remote operator and ask for the problem to be rectified Make sure that you have installed a black print cartridge Your SmartJet cannot print out the received fax with a colour cartridge installed Make sure that your unit is set up for automatic receiving FAX...

Страница 85: ... a specified time expecting the next sheet will be in Make sure that the SCAN FAX lamp is lit when the unit scans the document If the SCAN FAX lamp is not lit contact the nearest service representative The white sheet may need cleaning See ÔCleaning a White SheetÕ on page 3 23 3 9 Troubleshooting 3 Troubleshooting Symptom PC FAX application such as WinFAX LITE does not work properly Cause and Solu...

Страница 86: ...remote machine answers you can delete the documents by pressing FF STOP button Graphics are scanned more slowly than text Communication speed becomes slow in scan mode because a lot of memory is required to analyze and reproduce the scan image Set your computer to ECP mode through the BIOS setting It will help to increase the speed For details on how to set BIOS refer to the documentation of your ...

Страница 87: ...have the same the problem file setting required for I O may not be proper Follow the instructions below 1 Start your Windows 2 In Windows 95 select Run from Start menu Windows 3 x users should select Run from File menu under Program Manager 3 Type ÔsyseditÕ then click OK 4 Select SYSTEM INI file and set the file as shown below 386 Enh device vecp 386 LPT1TurnAroundDelay 50 5 Restart your Windows I...

Страница 88: ...led Restart your scanner and try againÕ message appears on the screen Cause and Solution There is not enough memory to save the scan image Exit all applications currently open if not required in order to save memory Scan error occurs Turn the printer off and back on If you still have the same problem restart your computer 3 12 Troubleshooting 07 Troubleshooting 2 5 99 9 42 AM Page 12 ...

Страница 89: ...t loaded Document is jammed in the manual feed To clear jam see page 3 6 The print cartridge is not installed or installed improperly The cartridge type is not correct For example you have installed a colour cartridge when you receive a fax or make a copy The colour of the SCAN FAX lamp is red The print cartridge runs out of ink The colour of the SCAN FAX lamp is red The SmartJet memory is full RE...

Страница 90: ... replace it clean it or switch between colour and black Immediately replace the print cartridge or store it in the storage unit The print cartridge will not print correctly if removed from the printer and left exposed for an extended period When switching between colour and black print cartridges store the unused cartridge in the print cartridge storage unit If you have an opened print cartridge y...

Страница 91: ...you suspect the nozzles are clogged When characters are not printing completely To run the nozzle test 1 Load paper in the automatic paper feeder 2 From the Programs menu select the SAMSUNG SmartJet Printer For Windows 3 x double click the SAMSUNG SmartJet Printer icon from the Program Manager 3 Select Control Program on LPT1 The SAMSUNG SmartJet Control Program on LPT1 dialogue box will appear 4 ...

Страница 92: ... the diagonal line A broken line shows any clogged nozzles If the bottom line shows improvement rerun this test If improvement continues rerun the test If all nozzles are not printing after running the test three times continue with step 7 7 If print quality does not improve remove and reinstall the print cartridge Repeat the nozzle test 8 If the line is still broken wipe the nozzles and contacts ...

Страница 93: ...lean the entire copper coloured area including the nozzles and contacts To dissolve any dried ink hold the damp cloth against the nozzles for about three seconds Gently blot and wipe dry If you are cleaning a colour print cartridge be especially careful to wipe the nozzles in only one direction so the colours do not mix 3 Allow the copper coloured area to dry 4 Reinstall the print cartridge and re...

Страница 94: ...LEAN DRY CLOTH to clean the print cartridge carrier contacts inside the SmartJet 5 Plug the power cord into an electrical outlet 6 Press the CARTRIDGE button 7 Install the print cartridge 8 See ÒReplacing the Print CartridgeÓ on page 3 20 9 Test the print cartridge See ÒPrint Cartridge Nozzle TestÓ on page 3 15 If print quality has not improved after this cleaning process replace your print cartri...

Страница 95: ...r 2 From the Programs menu select the SAMSUNG SmartJet Printer For Windows 3 x double click the SAMSUNG SmartJet Printer icon from the Program Manager 3 Select Control Program on LPT1 The SAMSUNG SmartJet Control Program on LPT1 dialogue box will appear 4 Click the Cartridge tab then click the Align Cartridge 5 The printer feeds a sheet of paper and prints the alignment test pattern 3 Troubleshoot...

Страница 96: ...n alignment is complete click Cancel Replacing the Print Cartridge When you notice the print becoming light check if the print cartridge is low on ink in the Status monitor and replace with a new cartridge 1 Open the front cover 2 Press the CARTRIDGE button to move the cartridge carrier to the install position 1 2 3 4 5 A Draft Mode Alignment 1 2 3 4 5 B Normal Mode Alignment 3 20 Maintenance 08 M...

Страница 97: ...k 4 Remove the print cartridge 5 Remove the replacement print cartridge from its packaging and carefully remove the tape covering the printhead Hold the print cartridge by the coloured top or black areas only Do not touch the copper area 3 Troubleshooting 08 Maintenance 2 5 99 9 37 AM Page 7 ...

Страница 98: ...e ink counter If you are installing the same print cartridge or another used cartridge press and release the CARTRIDGE button The carrier moves to the home position and is ready to print You can install the cartridge using the SmartJet Control Program in Windows When you start installing the cartridge using the Control Program you have to complete the installation in the Control Program 3 22 Maint...

Страница 99: ... the scanned or copied image quality is degraded 1 Press READY button to turn the printer off and unplug the power cord 2 Open the front cover 3 Clean the white sheet as shown in the figure using a clean dry cloth 3 Troubleshooting 08 Maintenance 2 5 99 9 37 AM Page 9 ...

Страница 100: ...3 24 Maintenance Memo 08 Maintenance 2 5 99 9 37 AM Page 10 ...

Страница 101: ...4 1 Appendix 09 Appendix 2 5 99 9 33 AM Page 1 ...

Страница 102: ...d thermal inkjet printing Print speed Black 7 ppm Draft 5 ppm LQ Colour 3 ppm Draft 2 ppm LQ Printing resolution Draft 300 x 600 dpi Normal 600 x 600 dpi High 1200 x 1200 dpi Interface IEEE 1284 compatible bi directional parallel interface Printer memory 512 kbyte of built in RAM 6 3mm 0 25 Inch 6 3mm 0 25 Inch 3 4mm 0 13 Inch 12 7mm 0 5 Inch Feeding 6 3mm 0 25 Inch 6 3mm 0 25 Inch 3 4mm 0 13 Inch...

Страница 103: ...00 mm x 148 mm 3 94 Inch x 5 83 Inch Index card 101 6 mm x 152 4 mm 4 00 Inch x 6 00 Inch 6 3 4 envelope 92 1 mm x 165 1 mm 3 63 Inch x 6 50 Inch 7 3 4 envelope 98 6 mm x 190 5 mm 3 88 Inch x 7 50 Inch 9 envelope 98 6 mm x 225 6 mm 3 88 Inch x 8 88 Inch 10 envelope 104 8 mm x 241 3 mm 4 13 Inch x 9 50 Inch DL envelope 110 mm x 220 mm 4 33 Inch x 8 66 Inch C5 envelope 162 mm x 229 mm 6 38 Inch x 9 ...

Страница 104: ...terface Communication method ECP Nibble mode IEEE 1284 recommend Facsimile Applicable line Public switched telephone network PABX Compatibility G3 Effective scanning width 203 mm Modem speed 9600 7200 4800 2400 bps Reception memory Up to 80 pages Data compression system MH MR MMR ECM 4 4 Appendix 09 Appendix 2 5 99 9 33 AM Page 4 ...

Страница 105: ...Weight Approx 4 0 kg 88 Ibs Environmental conditions Temperature 15 35 o C 10 40 o C Humidity 10 70 RH 8 80 RH Print cartridge life Approximately 200 colour pages at 15 coverage Approximately 600 black pages at 5 coverage Print head nozzle 208 nozzles for black 64 nozzles for each colour cyan magenta yellow 4 5 Appendix Appendix 09 Appendix 2 5 99 9 33 AM Page 5 ...

Страница 106: ...front 1 3 copy making 2 30 problems 3 9 D default printer 1 14 1 18 discard 2 43 2 44 driver install 1 17 document guide 1 3 jam 3 6 loading 2 29 preparing 2 28 type setting 2 5 E ECM 2 43 2 44 envelope guide 1 3 2 12 loading 2 12 size 2 5 4 3 error lamp 3 13 extension phone setup 1 5 F fax auto reduction 2 43 2 44 discard size 2 43 2 44 ECM 2 43 2 44 mode selection 2 38 2 44 number dial 2 35 pape...

Страница 107: ...ize setting 2 5 4 3 source setting 2 5 special 2 7 type setting 2 5 parallel printer cable 1 6 phonebook editing 2 40 deleting 2 40 dialling 2 41 storing 2 40 power cord connection 1 6 turn on off 1 7 Presto PageManager 1 14 print cartridge alignment 2 18 3 19 carrier 1 3 cleaning 2 18 3 17 installing 1 7 2 18 nozzle test 2 18 3 15 replacing 3 20 storing 1 10 print quality problems 3 4 setting 2 5...

Страница 108: ...2 34 canceling 2 37 Smart Soft installing 1 13 SmartFAX 2 25 port changing 1 22 RCP install 1 21 starting 2 26 window 2 27 SmartJet control program 2 15 2 17 printer driver 1 14 1 17 scanner driver 1 14 1 21 FAX driver 1 21 setup 1 4 START COPY button 2 2 status printer 2 17 system requirement 1 16 T TAM lead 1 5 telephone line connection 1 5 terminal ID 2 42 transparency 2 7 TWAIN compliant 1 14 ...

Страница 109: ...quivalence number REN 1 0 The REN is a guide for you to show you the maximum number of items you can connect on one line If you add together the RENÕs of each of the electrical items it should not be more than four The REN value of a BT phone is normally one unless it is marked differently If you mix different types of machines your fax machine may not work 6 Make sure you have plugged in the mach...

Страница 110: ...t up 11 Control of fax from application software When writing application to drive the SmartJet the requirements of DTI designation 95 031S NTR3 and ETS 300 001 NET4 must be adhered to Failure to do so will result in the invalidation of Approval against the standards for which approval has been granted 12 If you are connected to a Private Branch Exchange you normally have to press a digit to get a...

Страница 111: ...you cut off the moulded plug get rid of it straight away You cannot rewire the plug or you would get an electric shock if you put it into a socket Important warning You must earth this machine The wires in the mains lead have the following colour code Green and Yellow Earth Blue Neutral Brown Live If the wires in the mains lead do not match the colours marked in your plug do the following You must...

Страница 112: ...horized repairs using the machine to make a project and damage that occurs when the machine is being transported The guarantee does not cover the machineÕs appearance lamps and glass Any changes to the machine which are explained in the guide to using your Samsung fax are not covered under the terms of the guarantee This guarantee will not apply if your machine does not have a serial number or the...

Отзывы: