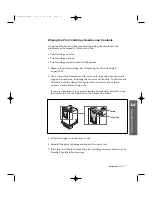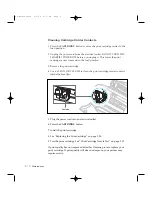
Cleaning Cartridge Carrier Contacts
1. Press the
CARTRIDGE
button to move the print cartridge carrier to the
load position.
2. Unplug the power cord from the electrical outlet. DO NOT TURN THE
SMARTJET POWER OFF before you unplug it. This forces the print
cartridge carrier to remain in the load position.
3. Remove the print cartridge.
4. Use a CLEAN, DRY CLOTH to clean the print cartridge carrier contacts
inside the SmartJet.
5. Plug the power cord into an electrical outlet.
6. Press the
CARTRIDGE
button.
7. Install the print cartridge.
8. See ÒReplacing the Print CartridgeÓ on page 3.20.
9. Test the print cartridge. See ÒPrint Cartridge Nozzle TestÓ on page 3.15.
If print quality has not improved after this cleaning process, replace your
print cartridge. If print quality still does not improve, your printer may
require service.
Contacts
3
.18
Maintenance
08-Maintenance 2/5/99 9:37 AM Page 4
Содержание SF-4300
Страница 1: ...SmartJet Printer Scanner Fax Copier User s Guide Setup and Operation 00 Cover 2 5 99 10 38 AM Page 1 ...
Страница 7: ...1 1 Getting Started 1 02 Setup 2 5 99 10 31 AM Page 1 ...
Страница 30: ...1 24 Installing Smart Soft Memo 03 Install 2 5 99 10 28 AM Page 12 ...
Страница 31: ...2 1 Operation 2 04 Print 2 5 99 10 05 AM Page 1 ...
Страница 77: ...3 1 Troubleshooting 3 07 Troubleshooting 2 5 99 9 42 AM Page 1 ...
Страница 100: ...3 24 Maintenance Memo 08 Maintenance 2 5 99 9 37 AM Page 10 ...
Страница 101: ...4 1 Appendix 09 Appendix 2 5 99 9 33 AM Page 1 ...

