2A3/4
3-3-46
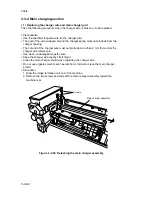
3. Remove the two screws holding the main charger assembly and then the assembly.
Screws
Main charger assembly
Figure 3-3-53 Detaching the main charger assembly
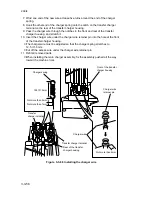
4. Loosen the cleaning blade pin. Move the cleaning blade lever in the direction of the
arrow so that the cleaning blade is kept away from the drum and then tighten the
cleaning blade pin.
5. Remove the two screws and open the upper cleaning cover on the left of the drum.
6. Remove the two screws and open the image formation rail in the direction of the
arrow.
Screw
Image formation rail
Cleaning blade lever
Cleaning blade pin
Upper cleaning cover
Screw
Screw
Screw
Figure 3-3-54
Содержание Ri 4230
Страница 1: ...4230 5230 S M MCA SERVICE MANUAL Published in June 00 2A370941 Revision 1 Ri 4230 5230 Ri 4230 5230 ...
Страница 3: ...SERVICE MANUAL Ri 4230 5230 ...
Страница 13: ...4230 5230 S M MCA THEORY AND CONSTRUCTION SECTION I I Theory and Construction Section ...
Страница 14: ...1 1 5 2A3 4 CONTENTS 1 1 Specifications 1 1 1 Specifications 1 1 1 ...
Страница 21: ...1 1 7 2A3 4 CONTENTS 1 2 Handling Precautions 1 2 1 Drum 1 2 1 1 2 2 Developer and toner 1 2 1 ...
Страница 100: ...4230 5230 S M MCA ELECTRICAL SECTION II II Electrical Section ...
Страница 119: ......
Страница 138: ......
Страница 159: ...4230 5230 S M MCA III Set Up and Adjustment Section III SET UP AND ADJUSTMENT SECTION ...
Страница 419: ...1 1 25 2A3 4 CONTENTS 3 5 Self Diagnosis 3 5 1 Self diagnosis 3 5 1 1 Self diagnostic function 3 5 1 ...
Страница 448: ...2A3 4 3 6 3 25 Toner scatters at the leading edge of the image See page 3 6 17 ...


