background image

3-1-16

2A3/4

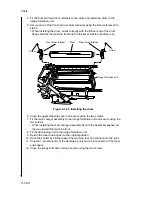
  3. While pressing the image formation unit release button, pull the image formation

unit out.

Image formation unit

Image formation unit release button

* Illustration shows a 42 ppm.

Figure  3-1-16

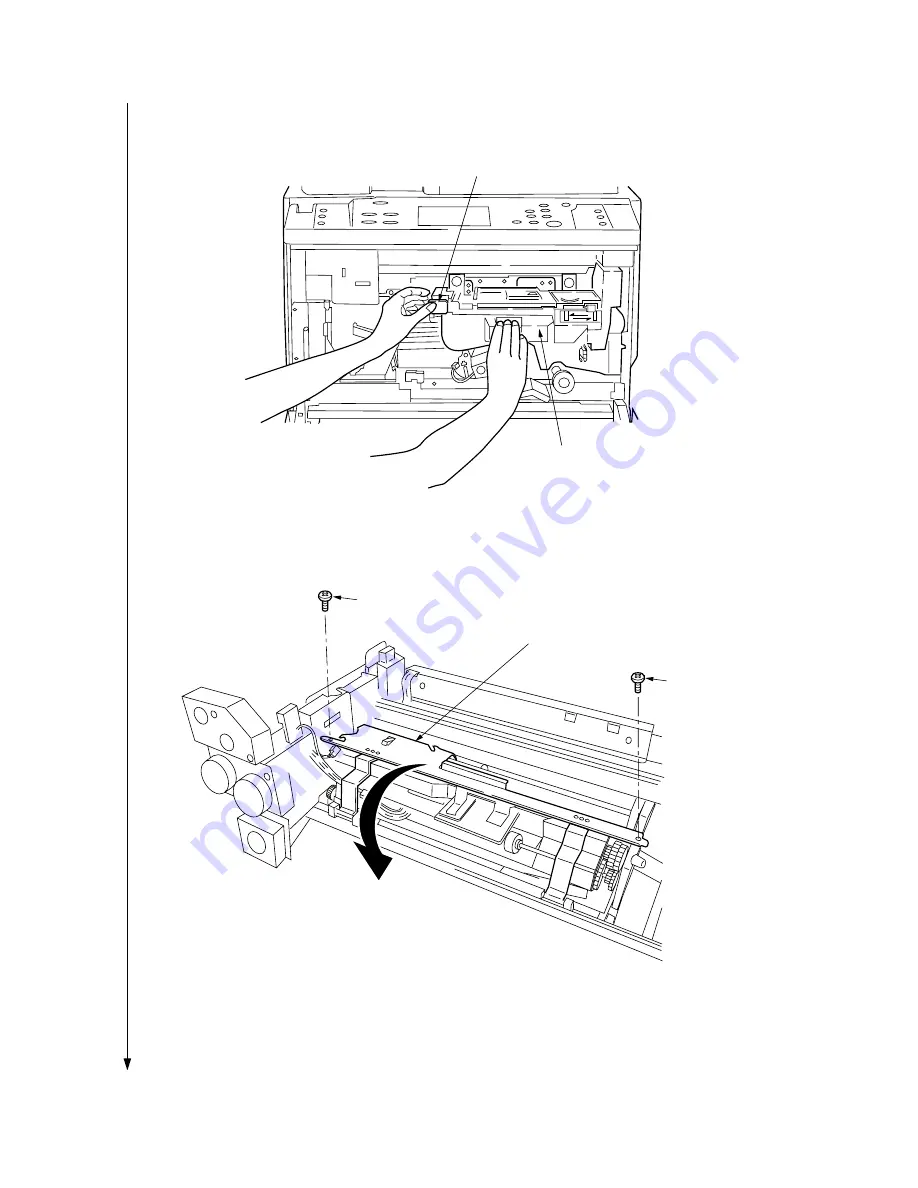
  4. Remove the two screws and open the image formation rail.

Screw

Screw

Image formation rail

Figure  3-1-17

Содержание Ri 4230

Страница 1: ...4230 5230 S M MCA SERVICE MANUAL Published in June 00 2A370941 Revision 1 Ri 4230 5230 Ri 4230 5230 ...

Страница 2: ...URER DISPOSE OF USED BATTERIES ACCORDING TO THE MANUFAC TURER S INSTRUCTIONS ATTENTION IL Y A DANGER D EXPLOSION S IL Y A REMPLACEMENT IN CORRECT DE LA BATTERIE REMPLACER UNIQUEMENT AVEC UNE BATTERIE DU MÊME TYPE OU D UN TYPE REC OMMANDÉ PAR LE CONSTRUCTEUR METTRE AU RÉBUT LES BATTERIES USAGÉES CONFORMÉMENT AUX INSTRUC TIONS DU FABRICANT ...

Страница 3: ...SERVICE MANUAL Ri 4230 5230 ...

Страница 4: ...rsonnel to ensure the safety of their customers their machines as well as themselves during maintenance activities Service personnel are advised to read this booklet carefully to familiarize themselves with the warnings and precautions described here before engaging in maintenance activities ...

Страница 5: ...y result from insufficient attention to or incorrect compliance with warning messages using this symbol CAUTION Bodily injury or damage to property may result from insufficient attention to or incorrect compliance with warning messages using this symbol Symbols The triangle symbol indicates a warning including danger and caution The specific point of attention is shown inside the symbol General wa...

Страница 6: ... the earth wire to an object not approved for the purpose may cause explosion or electric shock Never connect the ground cable to any of the following gas pipes lightning rods ground cables for telephone lines and water pipes or faucets not approved by the proper authorities CAUTION Do not place the copier on an infirm or angled surface the copier may tip over causing injury Do not install the cop...

Страница 7: ... 2 Precautions for Maintenance WARNING Always remove the power plug from the wall outlet before starting machine disassembly Always follow the procedures for maintenance described in the service manual and other related brochures Under no circumstances attempt to bypass or disable safety features including safety mechanisms and protective circuits Always use parts having the correct specifications...

Страница 8: ... machine Keep away from chains and belts Handle the fixing section with care to avoid burns as it can be extremely hot Check that the fixing unit thermistor heat and press rollers are clean Dirt on them can cause abnormally high temperatures Do not remove the ozone filter if any from the copier except for routine replacement Do not pull on the AC power cord or connector wires on high voltage compo...

Страница 9: ... only a small amount of solvent at a time being careful not to spill Wipe spills off completely Ventilate the room well while using grease or solvents Allow applied solvents to evaporate completely before refitting the covers or turning the main switch on Always wash hands afterwards Never dispose of toner or toner bottles in fire Toner may cause sparks when exposed directly to fire in a furnace e...

Страница 10: ... 2 3 1 2 3 2 Engine PCB 2 3 3 2 3 3 Main PCB 2 3 4 2 3 4 Memory copy PCB 2 3 6 2 3 5 Scanner motor PCB 2 3 8 2 3 6 CCD PCB 2 3 9 2 3 7 DF driver PCB 2 3 11 2 3 8 Operation unit main PCB operation unit right PCB and operation unit left PCB 2 3 12 2 3 9 Deck main PCB 42 ppm optional 52 ppm standard 2 3 16 III SET UP AND ADJUSTMENT SECTION 3 1 Installation 3 1 1 Unpacking and installation 3 1 1 3 1 2...

Страница 11: ...n PCB 3 4 1 3 4 2 Replacing the main PCB ROMs 3 4 2 3 4 3 Adjustment free variable resisters VR 3 4 3 3 5 Self Diagnosis 3 5 1 Self diagnosis 3 5 1 3 6 Troubleshooting 3 6 1 Image formation problems 3 6 1 3 6 2 Paper misfeeds 3 6 18 3 6 3 PCB terminal voltages 3 6 33 3 6 4 Electrical problems 3 6 73 3 6 5 Mechanical problems 3 6 97 3 7 Appendixes Timing chart No 1 3 7 1 Timing chart No 2 3 7 2 Tim...

Страница 12: ...ory copy PCB 9 12 3 7 34 Memory copy PCB 10 12 3 7 35 Memory copy PCB 11 12 3 7 36 Memory copy PCB 12 12 3 7 37 Scanner motor PCB 3 7 38 CCD PCB 3 7 39 DF driver PCB 3 7 40 Operation unit main PCB 1 2 3 7 41 Operation unit main PCB 2 2 3 7 42 Operation unit right PCB 3 7 43 Operation unit left PCB 3 7 44 Deck main PCB 3 7 45 Interface PCB 3 7 46 SRDF connection diagram 3 7 47 General connection di...

Страница 13: ...4230 5230 S M MCA THEORY AND CONSTRUCTION SECTION I I Theory and Construction Section ...

Страница 14: ...1 1 5 2A3 4 CONTENTS 1 1 Specifications 1 1 1 Specifications 1 1 1 ...

Страница 15: ...tric 1 1 0 1 1 4 00 1 2 00 1 1 41 1 1 06 1 0 75 1 0 70 1 0 50 1 0 25 Inch 1 1 0 1 1 4 00 1 2 00 1 1 29 1 1 21 1 0 78 1 0 64 1 0 50 1 0 25 Copy speed At 100 magnification in memory copy mode A4 11 81 2 42 copies min A4R 81 2 11 32 copies min A3 11 17 24 copies min B5 42 copies min B5R 36 copies min B4 257 364 81 2 14 28 copies min When the SRDF is used at 100 magnification A4 11 81 2 42 copies min ...

Страница 16: ...canning system Flat bed scanning by CCD image sensor Bit map memory 12 MB standard Image storage memory 32 MB standard Resolution 600 600 dpi Light source Inert gas lamp 12 W Dimensions 627 W 748 D 841 H mm 2411 16 W 297 16 D 331 8 H Weight 129 kg 283 8 lbs Floor requirements 1287 mm W 748 D mm 505 16 W 297 16 D Functions 1 Self diagnostics 2 Preheat 3 Automatic copy density control 4 Original siz...

Страница 17: ...ower source 120 V AC 60 Hz 10 5 A 220 240 V AC 50 or 60 Hz 4 9 A Power consumption 1300 W for 120 V specifications 1200 W for 220 240 V specifications Options Paper feed desk large paper deck finisher key counter printer unit memory copy board additional memory 16 MB 32 MB booklet stitcher and copy tray for 120 V specifications only ...

Страница 18: ... Inch 1 1 0 1 1 4 00 1 2 00 1 1 29 1 1 21 1 0 78 1 0 64 1 0 50 1 0 25 Copy speed At 100 magnification in memory copy mode A4 11 81 2 52 copies min A4R 81 2 11 35 copies min A3 11 17 26 copies min B5 52 copies min B5R 42 copies min B4 257 364 81 2 14 31 copies min When the SRDF is used at 100 magnification A4 11 81 2 52 copies min First copy time 4 5 s or less A4 11 81 2 100 magnification upper dra...

Страница 19: ...e storage memory 32 MB standard Resolution 600 600 dpi Light source Inert gas lamp 12 W Dimensions 627 W 748 D 1131 H mm 2411 16 W 297 16 D 449 16 H Weight 160 kg 352 lbs Floor requirements 1287 mm W 748 D mm 505 16 W 297 16 D Functions 1 Self diagnostics 2 Preheat 3 Automatic copy density control 4 Original size detection 5 Automatic paper selection 6 Automatic magnification selection 7 Enlargeme...

Страница 20: ...riginal weights Single sided original mode 35 160 g m2 Double sided original mode 50 120 g m2 Original paper Plain paper thermal paper art paper colored paper Original sizes A3 A5R folio 11 17 81 2 51 2 No of originals Up to 50 sheets A3 B4 folio 11 17 81 2 14 Up to 70 sheets up to A4 11 81 2 Up to 50 sheets in the auto selection mode Art or thermal paper must be fed individually Power source Elec...

Страница 21: ...1 1 7 2A3 4 CONTENTS 1 2 Handling Precautions 1 2 1 Drum 1 2 1 1 2 2 Developer and toner 1 2 1 ...

Страница 22: ...oid abrupt changes in temperature and humidity Avoid exposure to any substance which is harmful to or may affect the quality of the drum Do not touch the drum surface with any object Should it be touched by hands or stained with oil clean it If the machine is left open for more than 5 minutes for maintenance remove the drum and store it in the drum storage bag Part No 78369020 1 2 2 Developer and ...

Страница 23: ...ration section 1 3 36 Charger wire cleaning 1 3 38 6 Cleaning section 1 3 40 7 Charge erasing section 1 3 41 8 Fixing section 1 3 43 Heating the heat roller and detecting temperature 1 3 45 Fixing temperature control 1 3 46 Paper separation 1 3 48 9 Feedshift and eject section 1 3 49 10 Duplex section 1 3 51 Duplex copying operation timing 1 3 54 11 SRDF 1 3 57 11 1 Original feed section 1 3 57 Or...

Страница 24: ... Width guide tab Lower drawer DF original reversing cover Original set indicator Original insertion guides Original table DF opening closing lever Original ejection cover Paper ejection guide Main switch Left cover fi Copy tray 1 fl Toner cartridge Toner cartridge release lever 28 Image formation unit release button Image formation unit handle Paper transfer unit release lever Œ Paper feed section k...

Страница 25: ... original reversing cover Original set indicator Original insertion guides Original table DF opening closing lever Original ejection cover fi Paper ejection guide fl Main switch Left cover 28 Copy tray Toner cartridge Toner cartridge release lever Œ Image formation unit release button Image formation unit handle Paper transfer unit release lever Paper feed section knob ˇ Duplex unit Á Re feeding sec...

Страница 26: ...r mode key 6 Sort mode indicator 7 Group mode indicator 8 Brightness adjustment control 9 Data indicator 0 Program key Manual key Add job key Copier printer switching key Touch panel Numeric keys Stop clear key Print key Print indicator Reset key Auto selection key Auto selection indicator Energy saver key Energy saver indicator Interrupt key fi Interrupt indicator Metric Inch 1 3 3 ...

Страница 27: ...tion page 1 3 16 3 Optical section page 1 3 19 4 Developing section page 1 3 25 5 Transfer and separation section page 1 3 36 6 Cleaning section page 1 3 40 7 Charge erasing section page 1 3 41 8 Fixing section page 1 3 43 9 Feedshift and eject section page 1 3 49 0 Duplex section page 1 3 51 SRDF page 1 3 57 Figure 1 3 4 Machine cross section Large paper deck 42 ppm optional 52 ppm standard Paper...

Страница 28: ...Idle pulley 31 42 Ó Feed clutch 2 gear Ô Upper paper feed clutch gear 48 Upper paper feed pulley gear Ò Gear 21 Ú Forwarding pulley gear Gear16 Lower paper feed pulley gear Ç Paper feed tension pulley 54 Idle pulley 31 42 ı Lower paper feed clutch gear Upper paper feed pulley gear  Gear 21 Forwarding pulley gear Gear 16 Lower paper feed pulley gear Feed clutch 3 gear Feed roller 3 pulley Feed dri...

Страница 29: ...chine 1 Original feed motor pulley 0 DF registration pulley 28 18 2 Pulley 35 22 22 Idle gear 15 3 Idle gear 26 Idle gear 20 4 Original feed clutch gear Switchback gear 18 5 DF original feed pulley 28 DF registration drive belt 6 DF forwarding pulley 20 Gear 22 35 7 Tension pulley Original conveying motor pulley 8 Original feed drive belt Gear 28 9 DF forwarding belt Original conveying drive belt ...

Страница 30: ... fi Paper deck motor gear fl Pulley 16 1 Belt 180 6 2 Paper feed clutch 1 3 Paper feed clutch 2 4 Paper conveying clutch 5 Gear 20 6 Gear 26 7 Gear 50 20 8 Gear 35 1 20 9 Pulley 18 0 Gear 43 20 Pulley S2M 18 Gear 16 Roller 0 8 20 As viewed from machine front 1 0 6 5 7 8 fl 2 6 5 5 9 3 5 5 fi 4 fi Figure 1 3 9 Drive system Large paper deck 42 ppm optional 52 ppm standard ...

Страница 31: ...aper from the upper drawer lower drawer or bypass table to the upper and lower registration rollers at which point secondary feed takes place and the paper travels to the transfer section in sync with the printing timing 1 1 Paper feed from the drawers 1 3 Œ Í Å Î 9 8 3 2 1 0 fl Á fi ˇ ˆ Ø 4 6 5 7 2 Figure 1 3 10 Drawer paper feed and secondary paper feed sections ...

Страница 32: ...eration plate Upper paper feed clutch PFCL U Lower paper feed clutch PFCL L Feed clutch 1 FCL1 fi Feed clutch 2 FCL2 fl Feed clutch 3 FCL3 Feed clutch 4 FCL4 Feed clutch 5 FCL5 Registration clutch RCL Upper paper switch PSW U Œ Lower paper switch PSW L Upper lift limit switch LICSW U Lower lift limit switch LICSW L Paper feed switch 1 PFSW1 ˇ Paper feed switch 2 PFSW2 Á Paper feed switch 3 PFSW3 Pap...

Страница 33: ...paper feed pulley The lower paper feed pulley prevents multiple sheets from being fed at one time via the torque limiter CN13 4 CN13 13 CN13 7 CN13 10 CN8 B11 CN8 B2 CN13 1 CN12 A2 CN8 B9 CN12 A4 CN12 A8 CN15 3 CN15 9 CN12 A10 CN15 4 CN15 10 CN15 14 EPCB CN15 13 RCL RSW FSW PFSW1 FCL5 FCL4 FCL1 FCL2 PFSW2 PFCL U PFSW3 PFSW4 LICSW U PSW U PFCL L LICSW L PSW L FCL3 Figure 1 3 11 Drawer paper feed se...

Страница 34: ...ms 80 ms Print key Image ready FCL4 FSW RSW FCL5 RCL PFM DM PFCL U FCL2 PFSW2 FCL1 PFSW1 A BC D E F G H J K 250 ms 163 ms 28 ms 58 ms Auto copy density control copy paper A4 11 81 2 magnification ratio 100 Timing chart 1 3 1 Paper feed from the upper drawer ...

Страница 35: ... edge of the paper turns paper feed switch 1 PFSW1 on feed clutch 4 FCL4 turns on and the lower feed roller rotates at high speed to create slack in the paper before registration G 58 ms after the trailing edge of the paper turns paper feed switch 2 PFSW2 turns off feed clutch 2 FCL2 turns off H 35 ms after the leading edge of the paper turns the registration switch RSW on feed clutches 1 and 4 FC...

Страница 36: ...primary paper feed The bypass lower paper feed pulley rotates opposite to the paper feed direction so that the torque limiter prevents multiple sheets from being fed at one time 1 2 Paper feed from the bypass table 1 0 9 7 8 4 3 6 5 2 Figure 1 3 12 Bypass paper feed section 1 Bypass table 2 Bypass upper guide 3 Bypass lower guide 4 Bypass stopper 5 Bypass friction plate 6 Bypass forwarding pulley ...

Страница 37: ...Figure 1 3 13 Bypass paper feed section block diagram Print key Image ready FSW RSW FCL5 RCL PFM DM BYPSOL BYPPFCL AB C D E G H I J F 115 ms 100 ms 65 ms 250 ms 100 ms 300 ms 74 ms 80 ms 200 ms 90 ms Auto copy density control copy paper A5R 51 2 81 2 magnification ratio 25 Timing chart 1 3 2 Paper feed from the bypass table ...

Страница 38: ...eed roller rotates at low speed to create slack in the paper before registration E 200 ms after the feed switch FSW turns on the bypass paper feed clutch BYPPFCL turns off F 90 ms after feed clutch 5 FCL5 turns on the bypass solenoid BYPSOL turns off G 65 ms after the leading edge of the paper turns the registration switch RSW on feed clutch 5 FCL 5 turns off H 74 ms after the image ready signal t...

Страница 39: ... drum and the main charger assembly The main charger assembly charges the drum so that a latent image is formed on the surface the charger grid ensuring the charge is applied uniformly Drum Main charger assembly Main charger grid Tungsten wire Figure 1 3 14 Main charging section ...

Страница 40: ...ger front lid 4 Main charger rear lid 5 Main charger shield 6 Tungsten wire 7 Charger spring 8 Charger terminal 9 Charger pin 0 Main charger grid Grid tension plate CN5 B13 CN5 B11 CN5 B12 CN5 B1 MC REM 24 V DC MC ALM GRID CONT HVTPCB MC EPCB CN1 1 CN1 13 CN1 3 TB CN1 2 Grid Drum Figure 1 3 16 Main charging section block diagram ...

Страница 41: ...ol copy paper A4 11 81 2 magnification ratio 100 Timing chart1 3 3 Main charging A When the print key is pressed the paper feed motor PFM turns on B 520 ms after the paper feed motor PFM turns on main charging MC REM starts C 300 ms after cooling fan motor 1 CFM1 turns off main charging MC REM is completed ...

Страница 42: ...anning and the laser scanner unit for printing 0 1 2 5 3 8 6 7 4 9 Figure 1 3 17 Optical section 1 Scanner 2 Mirror frame 3 Mirror 1 4 Mirror 2 5 Mirror 3 6 Exposure lamp EL 7 Reflector 8 Image scanning unit 9 Lens 0 Optical rail Laser scanner unit LSU CCD PCB CCDPCB Scanner motor SM Scanner home position switch SHPSW ...

Страница 43: ...and rear of the machine to scan from side to side The speed of the mirror frame is half the speed of the scanner When the SRDF is used the scanner and mirror frame stop at the DF original scanning position to start scanning CN1 1 CN2 1 CN4 2 CN2 6 CN2 1 CN2 4 CN1 140 CN7 1 CN7 2 CN5 1 CN5 16 CN11 1 CN11 11 CN12 1 CN12 7 CN9 1 CN9 4 CN8 1 CN8 5 CN7 1 CN7 13 CN1 1 CN1 16 CN1 1 CN1 140 CN3 6 CN3 1 CN...

Страница 44: ...n the print key is pressed the scanner motor SM reverses for 410 pulses and then rotates forward B 414 pulses after the scanner motor rotates forward the FVSYNC signal turns on for 9921 pulses for scanning C The scanner motor SM reverses to return the scanner to the home position D 110 pulses after the scanner home position switch SHPSW turns on the scanner motor SM turns off and the scanner stops...

Страница 45: ... LSU By repeatedly turning the laser on and off the laser scanner unit forms a latent image on the drum surface Laser scanner unit Oject mirror Lens 4 Cylindrical correcting lens BD sensor Motor drive PCB Polygon motor PM Polygon mirror Lens 2 Lens 3 Lens 1 Beam spritter Collimator lenses Laser diodes LD LD control PCB BD sensor mirror Figure 1 3 19 Laser scanner unit 1 ...

Страница 46: ...of the beams across the drum forms one scan line 5 Lenses 1 2 3 and 4 Maintain scanning speed across the drum and beam diameters constant These lenses also correct the vertical alignment of the polygon mirror so that the focal plane of the laser beams are always on the drum 6 Object mirror Reflects the laser beams onto the drum surface 7 BD sensor mirror Directs a laser beam to the BD sensor to ge...

Страница 47: ... rotating drum forming a static latent image on the drum The static latent image of the letter A for example is formed on the drum surface as shown in Figure 1 3 22 Electrical charge is dissipated on the area of the drum surface irradiated by the laser The focal point of the laser beam is moved line by line and adjacent lines slightly overlap each other Main scanning direction Auxilary scanning di...

Страница 48: ... a magnetic brush is formed the doctor blade and the developing spirals that agitate the developer The toner recycling assembly consists of the toner main and sub hoppers In t he main hopper new toner from the toner cartridge is mixed with residual toner recovered from the cleaning section The mixture is conveyed by the sub hopper to the developing unit The toner level detection sensor TLDS checks...

Страница 49: ...ddle A Toner level sensor Toner hopper lockup sensor Toner recycle paddle B Toner recycle spiral Cleaning unit Cleaning spiral Toner feed motor Main hopper spiral Toner sub hopper Developing unit Toner main hopper Toner recycle motor Sub hopper spiral Toner flow Figure 1 3 24 Toner recycling ...

Страница 50: ...e magnet roller and the position of the doctor blade A developing bias voltage generated by the high voltage transformer HVTPCB is applied to the developing roller to provide image contrast 7 6 4 1 5 2 3 A S2 N3 S1 N1 N2 43 5 59 85 5 74 5 Magnetic poles on the developing roller Figure 1 3 25 Forming a magnetic brush A Distances beteen the doctor blade and developing roller 0 53 0 05 mm N1 830 10 4...

Страница 51: ...e sensor section of the toner sensor detects the ratio of toner to carrier in the developer near it and converts it into a voltage As more toner is used the ratio of toner to carrier decreases increasing the toner sensor output voltage When the ratio drops below the specified value the increase in toner sensor output voltage triggers toner replenishing When toner is added and the ratio of toner to...

Страница 52: ...the toner sensor output voltage drops below the toner feed stop level and replenishing stops C Both the toner feed motor TFM and toner recycle motor TRM operate intermittently on for 0 5 s and off for 0 5 s to replenish toner until the toner sensor output voltage reaches the toner empty reset level after exceeding the toner feed start level D The toner feed motor TFM and toner recycle motor TRM op...

Страница 53: ...ed stop level and replenishing stops H After the toner cartridge is replaced both the toner feed motor TFM and toner recycle motor TRM operate intermittently on for 1 5 s and off for 0 5 s to replenish toner I Whenthetonersensoroutputvoltagedropstothetonerfeedstoplevel thetonerrequest message disappears Both the toner feed motor TFM and toner recycle motor TRM then operate intermittently on for 1 ...

Страница 54: ...en maintenance item U130 is carried out for initial developer setting the toner sensor control voltage CONTROL is set so that the toner sensor outputs 2 01 V when the absolute humidity is 10 8 g m3 B When the absolute humidity is between 0 and 10 8 g m3 the toner feed start level is decreased with the absolute humidity so that the toner sensor output voltage drops C When the absolute humidity is b...

Страница 55: ...humidity detected by the humidity sensing element into a voltage and sends it to the engine PCB EPCB The main PCB MPCB computes the absolute humidity based on this EHUMSENS signal and the temperature ETTH signal detected by the external temperature thermistor ETTH HUMPCB EPCB EHUMSENS 2 EHUMSENS 1 5 V CN5 A1 CN5 A2 CN5 A3 CN5 A4 4 3 ETTH ETTH GND Humidity sensing element Figure 1 3 29 Absolute hum...

Страница 56: ...me A When maintenance item U130 is carried out for initial developer setting the total drive motor time is cleared and the correction for the toner feed start level is reset to 0 B When the total drive time reaches 10 hours the toner feed start level is corrected with a constant value of 0 24 V C When the total drive time reaches 30 hours the toner feed start level is corrected with a constant val...

Страница 57: ...toner level detection sensor TLDS output voltage drops below 0 5 V while the toner feed motor TFM is on the toner motor drive time starts to be counted B If the toner level detection sensor TLDS output voltage remains below 0 5 V for 10 s the toner request message appears Note When the toner request message is displayed under these conditions the available copy mode and the number of copies that c...

Страница 58: ...ection A When the toner hopper lockup sensor TLS output voltage is below 0 5 V toner is replenished to control toner density B When the toner hopper lockup sensor TLS output voltage exceeds 4 5 V while toner sensor output voltage is below the toner feed start level toner is not replenished C When the toner sensor output voltage is over the toner feed start level while the toner hopper lockup senso...

Страница 59: ...oner image from the drum surface onto the paper and the separation charger that helps the paper separate from the drum surface In the transfer charger a high voltage generated by the high voltage transformer PCB HVTPCB is applied to the both ends of the tungsten wire The separation charger uses the AC voltage applied from the high voltage transformer PCB to neutralize the residual charge on the pa...

Страница 60: ... SC REM SC CONT 24 V DC ST ALM SC TC CN5 B7 CN5 B6 CN5 B5 CN5 B4 CN5 B3 CN5 B1 CCM FWD CCM REV CN8 B4 CN8 B5 CN1 7 CN1 8 CN1 9 CN1 10 CN1 11 CN1 13 EPCB HVTPCB Drum CCM Figure 1 3 34 Transfer and separation section block diagram ...

Страница 61: ... sponges travel along the transfer charger shield cleaning the inside of the shield 6 7 3 1 8 5 2 4 9 0 Figure 1 3 35 Transfer charger assembly 1 Transfer charger front housing 8 Tungsten wire for separation 2 Transfer charger rear housing 9 Transfer charger cleaning pad 3 Transfer charger front lid 0 Separation charger cleaning pad 4 Transfer charger rear lid Shield cleaning sponges 5 Transfer ch...

Страница 62: ... separation A When the print key is pressed the paper feed motor PFM turns on B 700 ms after the paper feed motor PFM turns on separation charging SC REM starts C 210 m after the registration clutch RCL turn on to start secondary paper feed transfer charging TC REM starts D 270 ms after the trailing edge of the paper turns the registration switch RSW off transfer charging TC REM ends E 290 to 3000...

Страница 63: ...sh that remove residual toner from the drum surface after the transfer process and the cleaning spiral that carries the residual toner back to the toner recycling assembly 4 3 5 1 2 Figure 1 3 36 Cleaning section 1 Drum 2 Cleaning blade 3 Cleaning brush 4 Cleaning spiral 5 Lower cleaning seal ...

Страница 64: ...g section The cleaning lamp CL consists of 36 LEDs which remove residual charge from the drum surface Cleaning lamp Figure 1 3 37 Charge erasing section CN2 A2 EPCB CL Drum CL REM Figure 1 3 38 Charge erasing section block diagram ...

Страница 65: ...ge erasing A When the print key is pressed the paper feed motor PFM turns on B 50 ms after the paper feed motor PFM turns on the cleaning lamp CL lights to remove the residual charge from the drum surface after the residual toner is removed by the cleaning section C 600 ms after the paper feed motor PFM turns off the cleaning lamp CL turns off ...

Страница 66: ...per cover 2 Fixing unit front guide 3 Fixing unit upper guide 4 Fixing unit lower left guide 5 Heat roller 6 Press roller 7 Heat roller separation claws 8 Fixing heater M H1 9 Fixing heater S H2 0 Eject switch ESW Fixing unit thermostat TH Fixing unit thermistor FTH Press roller separation claws ...

Страница 67: ... is applied by the pressure springs so that the toner on the paper is melted fused and fixed onto the paper When the fixing process is completed the paper is separated from the heat roller by its separation claws and is ejected from the copier to either the eject section or duplex section H1 H2 TH H1 REM H2 REM CN6 8 CN6 7 EPCB CN3 B8 CN3 B7 FTH 5 V DC FTH TB3 CN10 1 CN10 2 PSPCB CN4 5 CN4 4 Heat ...

Страница 68: ...at TH 5 Fixing unit themistor FTH The heat roller is heated by fixing heaters M or S H1 or H2 inside it its surface temperature is detected by the fixing unit thermistor FTH and is regulated by the fixing heaters turning on and off If the fixing section becomes abnormally hot either the fixing unit thermistor detects it or fixing unit thermostat TH operates in each case shutting the power to the f...

Страница 69: ... 1 42 ppm 180 C 356 F 52 ppm 190 C 374 F 2 42 ppm 60 s 52 ppm 120 s 3 42 ppm 116 s 52 ppm 176 s Timing chart 1 3 7 Fixing temperature control A 2s after the main switch MSW is turned on the power relay PRY and fixing heater M H1 turn on to heat the heat roller The charger cleaning motor CCM also turns on to clean the charger wire and cooling fan motor 1 CFM1 rotates at half speed B 1 s after fixin...

Страница 70: ... after copying is enabled the drive motor DM paper conveying motor PCM and image formation section fan motor IFFM turn off and aging ends Cooling fan motor 1 CFM1 rotates at half speed I 600 ms after aging ends the cleaning lamp CL developing bias DB REM and paper conveying fan motor PCFM turn off Fixing control temperature correction Depending on the ambient temperature the fixing control tempera...

Страница 71: ...r separation Paper is separated in the fixing section by the separation claws as shown in Figure 1 3 42 Heat roller separation claws Press roller separation claws Heat roller Press roller Figure 1 3 42 Paper separation ...

Страница 72: ...ft and eject section 1 Eject roller 2 Eject pulley 3 Upper eject guide 4 Feedshift guide 5 Upper right feedshift guide 6 Right feedshift roller 7 Left feedshift roller 8 Lower right feedshift guide 9 Lower left feedshift guide 0 Lower feedshift guide Lower feedshift roller Feedshift pulley Left switchback eject guide Right middle switchback eject guide Right switchback feed roller Left switchback ...

Страница 73: ...2A3 4 1 3 50 FSSOL1 FSSOL2 FSSOL ESW SBE SW FSSW EPCB CN3 A8 CN3 A9 CN3 B9 CN3 A1 CN3 A4 Figure 1 3 44 Feedshift and eject section block diagram ...

Страница 74: ... Duplex section 1 Duplex forwarding pulley 2 Upper refeed guide 3 Paper tapping guide 4 Refeed pulley 5 Switchback roller 6 Duplex upper registration roller 7 Duplex lower registration roller 8 Duplex conveying roller 9 Duplex conveying pulley 0 Duplex eject roller Duplex eject pulley Side registration guides Switchback feedshift guide Stock switch STKSW Duplex registration switch DUPRSW Duplex pa...

Страница 75: ...BFSSOL turns on to operate the switchback feedshift guide The paper is then sent to the duplex paper conveying section by the rotation of the switchback roller During switchback ejection the paper is conveyed to the feedshift and eject section and ejected with the copied face down 1 3 5 4 2 In duplex copy mode During switchback ejection Figure 1 3 46 Duplex refeed mechanism 1 Duplex forwarding pul...

Страница 76: ...3 EPCB STKSW DUPRSW SBFSSOL SBFSSOL1 SBFSSOL2 SRM DUPESW DUPFWDSOL DUP PCSW DUP PTSOL CN10 12 CN10 10 CN9 7 CN9 16 CN10 14 CN10 8 CN9 8 CN9 11 CN10 1 CN10 5 CN9 12 SRHPSW Figure 1 3 47 Duplex section block diagram ...

Страница 77: ...t solenoid SBFSSOL turns on operating the switchback guide to switch the paper path to the duplex unit conveying section D 60 ms after copying onto the first face back is competed and the trailing edge of the paper turns the feedshift switch FSSW off the side registration motor SRM rotates forward for 12 pulses for side registration At the same time the duplex paper tapping solenoid DUPPTSOL turns...

Страница 78: ...ch 1 FCL1 and feed clutch 4 FCL4 turn off D 74 ms after feed clutch 4 FCL4 turns off the registration clutch RCL turns on and the upper and lower registration rollers rotate to start secondary paper feed At the same time feed clutch 5 FCL5 turns on and the lower feed roller rotates at low speed E 100 ms after the trailing edge of the paper turns the feed switch FSW off feed clutch 5 FCL5 turns off...

Страница 79: ... on the side registration motor SRM rotates forward to move the side registration guides inwards L Whenthesideregistrationhomepositionswitch SRHPSW turnsoff thesideregistration motor SRM turns off M 500 ms after the side registration home position switch SRHPSW turns off the side registration motor SRM reverses for 5 pulses and the side registration guide stops at its home position ...

Страница 80: ...conveying section 0 9 8 3 7 6 4 2 5 1 Figure 1 3 48 Original feed section 1 Original table 2 DF forwarding pulleys 3 DF original feed pulley 4 DF separation pulley 5 DF original feed upper guide 6 DF original feed lower guide 7 Original stopper 8 DF registration pulley 9 DF registration roller 0 DF registration guide Original set switch OSSW Original feed switch OFSW Original feed clutch OFCL Orig...

Страница 81: ...2A3 4 1 3 58 OFSW OFSOL OFCL OFM DFDPCB CN6 B5 CN5 B12 CN5 B13 CN5 A5 CN6 B2 CN5 B1 CN5 B6 OSSW Figure 1 3 49 Original feed section block diagram ...

Страница 82: ...inal feed pulley to start primary original feed The original feed motor OFM rotates forward during this operation B 556 OFM pulses after the leading edge of the original turns the original feed switch OFSW on the original feed clutch OFCL and original feed motor OFM turn off 20 ms later the rotation of the motor switches to the reverse direction and secondary original feed is performed by rotation...

Страница 83: ...r original conveying section is reversed and conveyed to the original conveying section Figure 1 3 50 Original switchback section 1 Switchback pulley 2 Switchback roller 3 Switchback feedshift guide 4 Left switchback guide 5 Switchback guide 6 Original switchback switch OSBSW 7 Switchback feedshift solenoid SBFSSOL 8 Switchback pressure solenoid SBPSOL 1 8 5 6 2 7 3 4 ...

Страница 84: ...2A3 4 1 3 61 DFDPCB CN6 A5 CN5 B8 CN5 A2 CN5 A3 OSBSW SBPSOL SBFSSOL Figure 1 3 51 Original switchback section block diagram ...

Страница 85: ...he switchback feedshift solenoid SBFSSOL then turns off allowing the switchback feedshift guide to return to the original position by which the path of the original is switched back to the original conveying section The now reversed original is carried to the original conveying section and the switchback pressure solenoid SBPSOL turns off releasing the switchback pulley to prevent an original jam ...

Страница 86: ...iginal When the scanning of the first face reverse face of the original is complete the original is conveyed to the original switchback section again 1 2 4 9 5 6 3 8 7 0 Figure 1 3 53 Original conveying section 1 Upper original conveying pulley 2 Upper original conveying roller 3 Lower original conveying roller 4 Front scanning pulley 5 Middle original conveying roller 6 Middle original conveying ...

Страница 87: ...2A3 4 1 3 64 DFTSW DFDPCB CN6 A14 CN5 A7 CN5 A8 CN5 A13 EFSSOL OCM Figure 1 3 54 Original conveying section block diagram ...

Страница 88: ...ulley C When the trailing edge of the original turns the original switchback switch OSBSW off the switchback feedshift solenoid SBFSSOL turns off the switchback feedshift guide returns to the original position D 115OFMpulsesaftertheoriginalswitchbackswitch OSBSW turnsoff theoriginalfeed motor OFM turns off 100 ms later the original feed motor OFM rotates forward switching the rotational direction ...

Страница 89: ... turns off the original conveying motor OCM turns off D 115OFMpulsesaftertheoriginalswitchbackswitch OSBSW turnsoff theoriginalfeed motor OFM turns off E 100 ms after the original feed motor OFM turns off the motor starts rotating forward switching the rotational direction of the switchback roller The original in the original switchback section is then reversed and conveyed to the original conveyi...

Страница 90: ... the lift of the right cassette The upper and lower deck separation rollers in the separation section convey paper received from the right cassette primary paper feed section into the copier preventing multiple sheets from being fed at one time 6 5 43 4 2 6 4 1 9 7 8 0 Figure 1 3 55 Mechanical construction 1 8 Deck side cover 9 Upper deck separation roller 0 Lower deck separation roller Bracket Pa...

Страница 91: ...h 1 PFCL1 0 Paper feed clutch 2 PFCL2 Paper conveying clutch CCL Paper deck motor pulse sensor 1 PDMSENS1 Paper deck motor pulse sensor 2 PDMSENS2 Deck open closed safety switch DOSSW Side cover switch SCSW Deck paper conveying motor CM Paper deck motor 1 PDM1 Paper deck motor 2 PDM2 Paper level detection sensor 1 PLDSENS1 Paper level detection sensor 2 PLDSENS2 Dehumidifier heater 1 DH1 Dehumidif...

Страница 92: ...ere is a torque limiter on the lower deck separation roller PFSW4 copier PPSENS1 PPSENS2 PPSENS3 FCL3 copier PFCL1 64 P 70 ms 100 ms Paper feed signal from the copier A BC Timing chart 1 3 13 Right cassette primary paper feed A The paper feed signal from the copier turns paper feed clutch 1 PFCL1 on starting primary paper feed B 64 pulses after paper feed switch 4 PFSW4 on the copier has been turn...

Страница 93: ...4 1 3 70 PFSW4 PFCL1 Lower deck separation roller Deck paper feed roller 1 Paper path FCL3 Upper deck separation roller Feed roller 4 Feed pulley Lift Copier Figure 1 3 57 Right cassette paper feed section ...

Страница 94: ...empty its lift serves as a guide for the paper being conveyed from the left cassette lift PFCL1 CN5 6 CN4 4 CN9 5 PDMPCB I FPCB PFCL1 PFCL1 CN1 4 PFSW4 copier PFSW4 copier Figure 1 3 58 Right cassette primary paper feed section block diagram ...

Страница 95: ...aper feed A When copier paper feed switch 4 PFSW4 is turned on by the last paper from the right cassette paper feed clutch 2 PFCL2 turns on to start primary paper feed B Thepaperconveyingclutch CCL turnsonassoonastheleadingedgeofthepaperfrom the left cassette turns paper path sensor 3 PPSENS3 on C Paper feed clutch 2 PFCL2 turns off as soon as the leading edge of the paper from the left cassette t...

Страница 96: ...eft cassette paper feed section PPSENS3 CCL PFCL2 PPSENS2 PPSENS2 PPSENS3 PFCL2 CCL PPSENS1 PPSENS2 PPSENS3 PFCL2 CCL PPSENS1 CN4 8 CN4 2 CN5 4 CN5 2 CN7 2 I FPCB CN2 6 CN2 11 CN1 5 CN1 6 CN1 9 CN1 6 CN1 11 CN4 5 CN4 6 CN4 9 CN9 5 PDMPCB PFSW4 copier PFSW4 copier PPSENS1 Figure 1 3 60 Left cassette primary paper feed section block diagram ...

Страница 97: ...ed the lift is raised until deck level switch 1 DLSW1 turns on When desk level switch 1 DLSW1 is turned off as the paper on the lift is used paper deck motor 1 PDM1 starts to raise the lift until the switch turns on Deck level switch 1 Lift Air damper Lift belt assembly Winch shaft Paper deck motor 1 Figure 1 3 61 Raising and lowering the lift When the deck is opened for removing a jammed paper or...

Страница 98: ...2A3 4 1 3 75 DLSW1 DLSW2 DLSW1 DLSW2 PDM1 PDM2 CN3 3 CN3 9 I FPCB CN2 7 CN2 9 CN1 7 CN1 9 CN7 1 CN7 4 PDMPCB DLSW2 PDM2 DLSW1 PDM1 Figure 1 3 62 Lift block diagram ...

Страница 99: ... on the copier touch panel This message is not shown when only one of them is on As more copies are made with the message on paper path sensors 1 2 and 3 PPSENS1 2 3 or the paper empty sensor PESENS start to detect absence of paper and the message on the copier touch panel changes to Place paper in deck Lift belt assembly Paper level detection sensor 1 Sensor lever Paper level detection sensor 1 W...

Страница 100: ...4230 5230 S M MCA ELECTRICAL SECTION II II Electrical Section ...

Страница 101: ...1 1 11 2A3 4 CONTENTS 2 1 Electrical Parts Layout 2 1 1 Electrical parts layout 2 1 1 1 Copier 2 1 1 2 SRDF 2 1 11 3 Large paper deck 42 ppm optional 52 ppm standard 2 1 15 ...

Страница 102: ...aces output and input signals to and from electrical components and optional devices 4 High voltage transformer PCB HVTPCB Main charging Generates developing bias and high voltages for transfer and separation 5 Scanner motor PCB SMPCB Controls the scanner motor 6 Inverter PCB INPCB Controls the exposure lamp 7 CCD PCB CCDPCB Reads the image off originals 8 Operation unit main PCB OMPCB Controls th...

Страница 103: ...ed on the LCD 13 Humidity sensor PCB HUMPCB Detects the absolute humidity External humidity sensor EHUMSENS Detects the external humidity External temperature thermistor ETTH Detects the external temperature 14 Memory copy PCB 1 MCPCB1 Reads and outputs the image 15 Memory copy PCB 2 MCPCB2 Reads and outputs the image 42 ppm optional 52 ppm standard ...

Страница 104: ...s in the scanning system 1 Scanner home position switch SHPSW Detects the scanner in the home position 2 Original detection switch ODSW Operates the original size sensors 3 Original size sensors 1 OSD1 Detects the original size 4 Original size sensors 2 OSD2 Detects the original size For inch specifications only ...

Страница 105: ...pier switches in the paper feed and conveying system 1 Upper paper switch PSW U Detects the presence of paper in the upper drawer 2 Lower paper switch PSW L Detects the presence of paper in the lower drawer 3 Upper paper length switch PLSW U Detects the length of paper in the upper drawer inch specifications Detects the presence of the upper drawer metric specifications 4 Lower paper length switch...

Страница 106: ...aching the upper limit 12 Lower lift limit switch LICSW L Detects the lower drawer lift reaching the upper limit 13 Paper feed switch 1 PFSW1 Controls feed clutch 4 14 Paper feed switch 2 PFSW2 Controls feed clutch 1 2 and 3 and the upper paper feed clutch 15 Paper feed switch 3 PFSW3 Controls the lower paper feed clutch 16 Paper feed switch 4 PFSW4 Controls feed clutch 3 17 Feed switch FSW Contro...

Страница 107: ...he left cover is opened resets paper jam detection 4 Safety switch 3 SSW3 Breaks the safety circuit when the right cover is opened resets paper jam detection 5 Heater switch HSW Turns the optical and drawer heaters on and off 6 Toner sensor TNS Detects the toner density in the developing section 7 Toner level sensor TLDS Detects the toner level in the toner hopper 8 Toner hopper lockup sensor TLS ...

Страница 108: ...es the upper drawer lift 6 Lower lift motor CLM L Drives the lower drawer lift 7 Toner feed motor TFM Replenishes toner 8 Toner recycle motor TRM Replenishes recycled toner 9 Charger cleaning motor CCM Cleans the transfer and separation charger wires 10 Image formation unit fan motor IFFM Collects scattered toner 11 Paper conveying section fan motor Assists paper advance along the paper PCFM conve...

Страница 109: ... 4 Feed clutch 2 FCL2 Controls the drive of feed roller 2 5 Feed clutch 3 FCL3 Controls the drive of feed rollers 3 and 4 6 Feed clutch 4 FCL4 Controls the drive of the lower feed roller at high speed 7 Feed clutch 5 FCL5 Controls the drive of the lower feed roller at low speed 8 Eject speed switching clutch ESCL Switches the paper ejection speed 9 Registration clutch RCL Secondary paper feed 10 B...

Страница 110: ...ion 5 Duplex paper conveying switch Detects a paper jam in the duplex DUPPCSW paper conveying section 6 Duplex eject switch DUPESW Detects a paper jam in the duplex eject section 7 Side registration home position switch Detects the side registration guides in SRHPSW the home positions 8 Feedshift solenoid FSSOL Operates the feedshift guide 9 Duplex forward solenoid DUPFWDSOL Operates the duplex fo...

Страница 111: ...g heater S H2 Heats the heat roller 5 Fixing unit thermostat TH Prevents overheating in the fixing section 6 Relay PRY Turns the AC power and 24 V DC power supplies to the fixing section on and off 7 Laser scanner unit LSU Polygon motor PM Drives the polygon mirror Laser diode LD Generates the laser beam 8 Optical heater OPH Dehumidifies the optical section 9 Drawer heater CH Dehumidifies the draw...

Страница 112: ...hine front side Machine inside Machine back side Figure 2 1 9 SRDF PCBs 1 DF driver PCB DFDPCB Controls electrical components of SRDF 2 Original set LED PCB OSLEDPCB Indicates presence of originals on the SRDF or an original jam ...

Страница 113: ...riginal reversing cover is opened resets original jam detection 3 Original set switch OSSW Detects the presence of an original 4 Original feed switch OFSW Detects primary original feed end timing 5 Original switchback switch OSBSW Detects an original jam in the original switchback section 6 DF timing switch DFTSW Detects the original scanning timing 7 Original size length switch OSLSW Detects the ...

Страница 114: ...achine front side Machine inside Machine back side Figure 2 1 11 SRDF motors 1 Original feed motor OFM Drives the original feed and switchback sections 2 Original conveying motor OCM Drives the original conveying section ...

Страница 115: ...oid OFSOL Moves the DF forwarding pulleys vertically 2 Switchback feedshift solenoid Moves the switchback feedshift guide SBFSSOL 3 Eject feedshift solenoid EFSSOL Moves the eject feedshift guide 4 Switchback pressure solenoid Moves the switchback pulley SBPSOL 5 Original feed clutch OFCL Controls the drive of the DF original feed pulley ...

Страница 116: ...andard Machine front side Machine inside Machine back side 2 1 Figure 2 1 13 Large paper deck PCBs 1 Deck main PCB PDMPCB Controls other PCBs and electrical components 2 Interface PCB I FPCB Interfaces between the deck main PCB and other electrical components ...

Страница 117: ...n 6 Deck level switch 2 DLSW2 Detects the left cassette lift in the home position 7 Upper limit switch 1 UPSW1 Detects the right cassette lift being raised past the limit 8 Upper limit switch 2 UPSW2 Detects the left cassette lift being raised past the limit 9 Side cover switch SCSW Detects if the deck side cover is opened or closed 10 Deck open closed safety switch Detects if the deck is open or ...

Страница 118: ...ses the left cassette lift 4 Paper feed clutch 1 PFCL1 Regulates drive transmission to deck paper feed roller 1 and the upper and lower deck separation rollers 5 Paper feed clutch 2 PFCL2 Regulates drive transmission to deck paper feed roller 2 6 Paper conveying clutch CCL Regulates drive transmission to the deck paper conveying roller 7 Dehumidifier heater 1 DH1 Dehumidifies paper in the right ca...

Страница 119: ......

Страница 120: ...1 2 2 2 Paper misfeed detection conditions 2 2 2 1 Copier 2 2 2 2 Large paper deck 42 ppm optonal 52 ppm standard 2 2 11 3 Paper feed desk optional for 42 ppm only 2 2 13 4 Finisher optional 2 2 13 2 2 3 Original misfeed detection 2 2 14 2 2 4 Original misfeed detection conditions 2 2 15 ...

Страница 121: ...el in the operation unit indicating a paper jam the jam location and the jam code To remove the jammed paper open either the drawer duplex unit front cover right cover or left cover as necessary To reset the paper misfeed detection open and close the respective cover to turn safety switches 1 2 or 3 off and on 3 6 4 7 2 1 5 3 6 4 7 2 1 5 Figure 2 2 1 Misfeed location indication 5 Large paper deck ...

Страница 122: ...2A3 4 2 2 2 2 2 2 Paper misfeed detection conditions 1 Copier BYPPFCL RCL RSW FSW PFSW1 PFSW2 PFCL U DUPESW DUPPCSW DUPFWDSOL DUPRSW FSSW ESW SBESW PFCL L PFSW3 PFSW4 Figure 2 2 2 Copier ...

Страница 123: ...iming chart 2 2 1 No paper feed from copier lower drawer jam code 11 Paper feed switch 3 PFSW3 does not turn on within 656 ms after the lower paper feed clutch PFCL L is turned on even if retry of this operation is carried out twice after turning off the lower paper feed clutch PFCL L for 1 second the switch again fails to turn on within the same time PFCL L PFSW3 656ms On Off On Off 656ms 1 s 1 s...

Страница 124: ...not turn on within 733 ms of paper feed switch 2 PFSW2 turning on PFSW2 733 ms On Off On Off PFSW1 Timing chart 2 2 5 Paper feed switch 2 PFSW2 does not turn on within 814 ms of paper feed switch 3 PFSW3 turning on PFSW3 814 ms On Off On Off PFSW2 Timing chart 2 2 6 Jam in converging section jam code 20 The registration switch RSW does not turn on within 444 ms of the feed switch FSW turning on FS...

Страница 125: ... Paper feed switch 1 PFSW1 does not turn off within 733 ms of paper feed switch 2 PFSW2 turning off PFSW2 733 ms On Off On Off PFSW1 Timing chart 2 2 9 Paper feed switch 2 PFSW2 does not turn off within 814 ms of paper feed switch 3 PFSW3 turning off PFSW3 814 ms On Off On Off PFSW2 Timing chart 2 2 10 Paper feed switch 1 PFSW1 does not turn off within 833 ms of duplex eject switch DUPESW turning ...

Страница 126: ...ff FSW Timing chart 2 2 12 The feed switch FSW does not turn off within 2528 ms of turning on during bypass paper feed 2528 ms On Off FSW Timing chart 2 3 13 3 Paper conveying section Jam in registration transfer section jam code 30 The registration switch RSW does not turn off within 764 ms of the feed switch FSW turning off RSW 764 ms On Off On Off FSW Timing chart 2 2 14 ...

Страница 127: ...52 ms On Off On Off ESW Timing chart 2 2 15 5 Eject section Jam in eject section jam code 50 The eject switch ESW does not turn off within 2528 ms of turning on 2528 ms On Off ESW Timing chart 2 2 16 Jam in switchback eject section jam code 51 The switchback eject switch SBESW does not turn off within 1470 ms of turning on 1470 ms On Off SBESW Timing chart 2 2 17 ...

Страница 128: ...iming chart 2 2 18 The feedshift switch FSSW does not turn off within 1400 ms of the eject switch ESW turning off ESW 1400 ms On Off On Off FSSW Timing chart 2 2 19 7 Duplex section Jam in duplex stock section jam code 60 The switchback eject switch SBESW does not turn on within 856 ms of the duplex forward solenoid DUPFWDSOL turning on DUPFWDSOL 856 ms On Off On Off SBESW Timing chart 2 2 20 ...

Страница 129: ...PCSW does not turn on within 860 ms of the duplex registration switch DUPRSW turning on DUPRSW 860 ms On Off On Off DUPPCSW Timing chart 2 2 22 The duplex eject switch DUPESW does not turn on within 860 ms of the duplex paper conveying switch DUPPCSW turning on DUPPCSW 860 ms On Off On Off DUPESW Timing chart 2 2 23 Paper feed switch 1 PFSW1 does not turn on within 833 ms of the duplex eject switc...

Страница 130: ...aper conveying switch DUPPCSW does not turn off within 860 ms of the duplex registration switch DUPRSW turning off DUPRSW 860 ms On Off On Off DUPPCSW Timing chart 2 2 26 The duplex eject switch DUPESW does not turn off within 860 ms of the duplex paper conveying switch DUPPCSW turning off DUPPCSW 860 ms On Off On Off DUPESW Timing chart 2 2 27 ...

Страница 131: ...s not turn on within 672 ms of paper feed clutch 1 PFCL1 turning on the clutch is then held off for 1 s and turned back on but the switch again fails to turn on within 672 ms of the retry PFCL1 PFSW4 672 ms On Off On Off 672 ms 1 s Timing chart 2 2 28 Multiple sheets in paper feed section jam code 21 Paper feed switch 4 PFSW4 does not turn off within 1470 ms of turning on 1470 ms On Off PFSW4 Timi...

Страница 132: ...to reach PPS1 in large paper deck horizontal paper path jam code 16 Paper path sensor 2 PPSENS2 does not turn on within 150 ms of paper path sensor 3 PPSENS3 turning on PPSENS2 PPSENS3 150 ms On Off On Off Timing chart 2 2 31 Paper failing to reach PPS0 in large paper deck horizontal paper path jam code 17 Paper path sensor 1 PPSENS1 does not turn on within 405 ms of paper path sensor 2 PPSENS2 tu...

Страница 133: ...feed desk lower drawer jam code 13 Jam in paper feed desk vertical paper conveying section jam code 19 4 Finisher optional see the finisher service manual Initial clogging jam jam code 00 Jam in paper entry section jam code 81 Jam in eject section of non sort tray jam code 82 Jam in paper conveying section of internal tray jam code 83 Jam in eject section of sort tray jam code 84 ...

Страница 134: ...l in the operation unit The SRDF original set indicator also flashes red To remove the jammed original open the SRDF or DF original reversing cover To reset the original misfeed detection open and close the SRDF or DF original reversing cover to turn DF safety switch 1 or 2 off and on OCM OSBSW DFTSW OFSW OFM Figure 2 2 4 Original misfeed detection ...

Страница 135: ...d Off On Off OFSW Burst of OFM pulses Timing chart 2 2 33 An original jam in the original feed conveying section jam code 71 During the secondary original feed in the single sided original mode the DF timing switch DFTSW does not turn on within 3425 original feed motor OFM pulses from the start of reverse rotation of the original feed motor OFM Alternatively during continuous original feed in the ...

Страница 136: ... DFTSW turning on 10200 P On Off DFTSW Burst of OCM pulses Timing chart 2 2 36 In the single sided or double sided original mode the DF timing switch DFTSW turns off within 2016 original conveying motor OCM pulses from the DF timing switch DFTSW turning on 2016 P On Off DFTSW Burst of OCM pulses Timing chart 2 2 37 While scanning the first face reverse face of an original in the double sided origi...

Страница 137: ... chart 2 2 39 During switchback operation of an original in the double sided original mode the original switchback switch OSBSW does not turn off within 5100 original feed motor OFM pulses from the original switchback switch OSBSW turning on 5100 P On Off OSBSW Burst of OFM pulses Timing chart 2 2 40 During the secondary original feed in the double sided original mode the DF timing switch DFTSW do...

Страница 138: ......

Страница 139: ...r PCB 2 3 11 2 3 8 Operation unit main PCB operation unit right PCB and operation unit left PCB 2 3 12 1 Operation unit left PCB 2 3 14 2 Operation unit right PCB 2 3 15 2 3 9 Deck main PCB 42 ppm optonal 52 ppm standard 2 3 16 1 Paper deck motor drive circuits 2 3 17 2 Clutch drive circuit 2 3 18 3 Operational principle of reflective photosensors PPSENS1 PPSENS2 PPSENS3 and PESENS 2 3 19 4 Reset ...

Страница 140: ...utput circuit IC3 main Q302 Overvoltage overcurrent detection circuits PWM control circuit IC1 TR2 TR3 H2 REM H2 H1 H1 REM PT2 PC1 PC2 PC3 PT1 L For 120 V specifications only PSPCB Rectifier circuit D TRNS C Q201 D D201 D202 SLEEP SIG 24 V DC GND GND 5 1 V DC GND Z CROSS SIG 12 V DC L201 C101 Q1 Q2 D001 R129 N A B C T1 A B Figure 2 3 1 Power source PCB block diagram ...

Страница 141: ...The 12 V DC output circuit receive 24 V DC from the 24 V DC output circuit and outputs stable 12 V DC by the function of a power supply regulator In the energy saving mode the FETs Q210 and Q302 are opened when they receive a sleep signal from the main PCB MPCB thus cutting off the output of 24 V DC and a part of 5 1 V DC Since input to the 12 V DC control circuit IC4 is also cut off output of 12 ...

Страница 142: ... secondary paper feed end timing 19 Eject switch ESW Detects paper jam in the fixing section For inch specifications only 2 3 2 Engine PCB Figure 2 3 2 Engine PCB block diagram The engine PCB EPCB transmits the status of each switch to the main PCB MPCB and transmits the control signals output from the main PCB MPCB through driver ICs to motors clutches and solenoids It also receives and transmits...

Страница 143: ...ngine PCB Booklet stitcher Communication microcomputer 1 IC33 BUCKUP RAM IC15 ENGINE CPU IC66 DUAL PORT RAM IC44 SELB SELC VTC IC47 IC58 LSU FIFO IC36 Operation unit main PCB Printer Board 1 CCDPCB SCANNER CPU IC53 IC18 19 IC28 PRT DATA SCAN DATA Memory copy PCB1 Memory copy PCB2 2 Scanner motor PCB Address bus Data bus Data bus Address bus VIDEO DATA 1 Optional 2 42 ppm optional 52 ppm standard F...

Страница 144: ...c The main CPU IC23 controls the engine CPU IC66 and the scanner CPU IC53 and controls the flow of image data transmitted between the MIP IC41 memory copy PCB 1 MCPCB1 memory copy PCB 2 MCPCB2 and the printer board The scanner CPU IC53 controls the SHD IC29 and the MIP IC41 and sets the processing for image signals from the CCD PCB CCDPCB Also it controls driving of the scanner and the SRDF via th...

Страница 145: ...e Clock frequency 24 39 MHz Address bus Address bus Address bus Data bus Data bus Data bus DRAMs U13 14 15 18 19 20 Sort memory ASIC U16 FF CPU U17 CODEC U26 CODEC U25 SRAM U4 11 EPROM U1 Clock frequency 31 8 MHz Clock frequency 39 86 MHz Clock frequency 3 6864 MHz Figure 2 3 4 Memory copy PCB 1 block diagram ...

Страница 146: ...signals from the main PCB MPCB and output the images to the engine the component where printing to paper and driving of mechanisms are executed It also performs editing operations such as image rotation image summary and image synthesizing Since the original scanning speed of the scanner and the printing speed of the engine the component where printing to paper and driving of mechanisms are execut...

Страница 147: ... 2 OSD1 2 and the original detection switch ODSW The scanner motor SM is driven by turning the output for motor phase switchover on and off SM A SM A SM B SM B It is activated by the driver IC1 processing the currently set reference signal SM Vref mode signals SM M1 M3 SM CWB phase changeover clock SM CLK drive stop signals SM ENABLE from the main PCB The exposure lamp EL is turned on when the sig...

Страница 148: ... PCB CCDPCB receives clock signals φ SHIFT φ CLK φ RS φ CLP and generate eleven signals based on those clock signals necessary to drive the CCD IC1 When clock signals are input the CCD IC1 outputs analog signals which are divided into even pixel signals and odd pixel signals depending on the set density of the image which are transmitted to the main PCB MPCB via the emitter follower circuit and di...

Страница 149: ...ock diagram The DF driver PCB DFDPCB consists of a motor drive ICs and several other components It mainly serves to drive the original feed motor OFM and the original conveying motor OCM under the control of signals received form the main PCB MPCB It also relays the 24 V DC power supply to the SRDF clutches and solenoids and the 5 V DC power supply to various switches and drives and relays inputs ...

Страница 150: ...ddress decode circuit unit EPROM IC12 EPROM IC16 SRAM IC9 SRAM IC20 CPU IC19 LCD controller IC11 DC DC converter IC8 CFL lighting circuit unit Scan signal Return signal Scan signal Return signal Address bus Address bus Data bus Data bus Key switch LED display Key switch LED display Main PCB Figure 2 3 8 Operation unit main PCB operation unit right PCB and operation unit left PCB block diagram ...

Страница 151: ... operation unit right PCB ORPCB consisting of key switches and LEDs is controlled by scan signals and LED lighting signals from the operation unit main PCB OMPCB The operation unit left PCB OLPCB consists of key switches LEDs and the CFL lighting drive circuit Key switches and LEDs are controlled by scan signals and LED lighting signals from the operation unit main PCB OMPCB and the CFL lighting d...

Страница 152: ... signal selection signals DIGLED L1 L4 The key switch operated is identified by the scan signals SCAN L1 L3 and the return signals DIGKEY L1 L3 As an example to light LED 1 the LED lighting selection signal DIGLED L1 should be driven low in synchronization with a low level on the scan signal SCAN L1 Transistor TR1 conducts and LED1 is lit LEDs can be lit dynamically by repeating such operations As...

Страница 153: ...ls DIGLED R1 R4 received from the operation unit main PCB OMPCB the LED to be lit is selected and the key switch pressed is identified by the scan signals SCAN R1 R4 and the return signals DIGKEY R1 R4 As an example to light LED17 the LED lighting selection signal DIGLED R1 should be driven low in synchronization with a low level on the scan signal SCAN R1 Transistor TR4 conducts and LED17 is lit ...

Страница 154: ... ROM PPSENS1 PPSENS2 PPSENS3 PESENS DLSW1 UPSW1 DLSW2 SCSW DOSSW Oscillator circuit PFCL1 PFCL2 CCL I FPCB 24 V DC 5 V DC SGND PDM2 drive circuit Reset circuit PLDSENS2 PLDSENS1 Figure 2 3 11 Deck main PCB block diagram The deck main PCB PDMPCB consists of the CPU IC7 which serially communicates with the main PCB MPCB via the engine PCB EPCB the deck paper conveying motor drive circuit the paper d...

Страница 155: ...istor Q1 is turned on causing paper deck motor 1 PDM1 to rotate When transistor Q1 is turned off paper deck motor 1 PDM1 stops A brake circuit ensures the prompt stopping of the motor When transistor Q1 turns off transistor Q3 turns on supplying 24 V DC to CN7 1 thereby preventing paper deck motor 1 PDM1 from rotating further under momentum When the right cassette lift is raised past the limit upp...

Страница 156: ...0 15 IN1 IN2 IN3 IN4 19 CPU IC7 PDMPCB 01 02 03 04 COM2 COM1 9 16 IC4 Figure 2 3 13 Paper conveying clutch drive circuit When pin 19 of the CPU IC7 goes low pin 2 of IC4 goes low which turns the paper conveying clutch CCL on The other clutches are controlled in the same manner ...

Страница 157: ...ensor 3 PPSENS3 Paper path sensors 1 and 2 PPSENS1 PPSENS2 and the paper empty sensor PESENS operate in the same manner Pulsating signal from pin 5 of the CPU IC7 turns Q14 on and off causing the LED on the sensor PCB to flash When the flashing LED light reflects on the paper the phototransistor turns on and off The on off signal is then inverted by IC9 4 and the paper presence signal pulse is inp...

Страница 158: ...and also determines if the CPU IC7 is operating correctly If the supply voltage VCC drops below VSL approx 4 2 V DC the reset signal RES is output to the CPU IC7 A in the timing chart IC1 monitors the clock signal CK from pin 50 of the CPU IC7 which goes low periodically If the CPU IC7 fails IC1 detects that the clock signal CK has stopped and sends a reset signal RES to the CPU IC7 B in the timin...

Страница 159: ...4230 5230 S M MCA III Set Up and Adjustment Section III SET UP AND ADJUSTMENT SECTION ...

Страница 160: ... kit 42 ppm optional 52 ppm standard 3 1 30 3 1 4 Installing the image memory SIMM option 3 1 33 3 1 5 Installing the optical heater service part 3 1 35 3 1 6 Installing the drawer heater service part 3 1 38 3 1 7 Installing the key counter option 3 1 41 3 1 8 Installing the dehumidfier heaters service part 3 1 44 3 1 9 Installing the MMD host monitoring system device optional for 120 V specificat...

Страница 161: ...se a surface capable of supporting the weight of the machine Place the machine on a level surface maximum allowance inclination 1 Avoid air borne substances that may adversely affect the machine or degrade the photoconductor such as mercury acidic or alkaline vapors inorganic gasses NOx SOx gases and chlorine based organic solvents Select a room with good ventilation 6 Allow sufficient access for ...

Страница 162: ...the height adjuster 2 Install a toner cartridge Install the feed bottom protector only for 42 ppm 1 Release the cleaning blade Apply toner to the cleaning blade maintenance item U160 Exit maintenance mode Start Install the drum Adjust the fixing pressure Carry out initial developer setting maintenance item U130 Remove the developing unit Completion of the machine installation 1 When neither the pa...

Страница 163: ...ctor 1 Light source unit 1 pins Light source unit 2 pin Copy tray 2 Paper size label sheet Cleaning blade pin Drum Figure 3 1 2 a 1 When neither the paper feed desk nor the large paper deck is installed 2 For 220 240 V specifications only ...

Страница 164: ...3 1 4 2A3 4 52 ppm Light source unit 1 pins Light source unit 2 pin Copy tray Paper size label sheet Cleaning blade pin Drum Figure 3 1 2 b For 220 240 V specifications only ...

Страница 165: ...k retainer 9 Left pad Machine bottom cover 3 Paper size label sheet 0 Bottom pads Hinge joint 4 M4 6 TP screws Skid Plastic bag 5 BVM4 6 bronze Top plate Bar code labels binding screws Inner frame Copy tray 6 Power cord Outer case Feed bottom protector 7 Drum set Tray spacer For 220 240 V specifications only ...

Страница 166: ...spacer 2 Paper size label sheet 9 Tray spacer Upper case 3 Bottom pads 0 Machine cover Business reply mail 1 4 Outer case Hinge joint Power cord 2 5 Right pad Bar code labels Copy tray 2 6 Left pad Plastic bag 7 Skid Drum set 1 For 120 V specifications only 2 For 220 240 V specifications only ...

Страница 167: ...the drawers 4 Remove the two tapes holding the right cover 5 Open the front cover and remove the three tapes holding the SRDF 6 Remove the two tapes holding the power cord 7 Remove the tape binding the power cord Power cord SRDF Front cover Duplex unit Drawers Right cover Figure 3 1 4 For 120 V specifications only Remove the tapes 42 ppm ...

Страница 168: ...iginal reversing cover 10 Remove the tape holding the paper ejection guide 11 Remove the three tapes holding the pins for light source units 1 and 2 12 Remove the tape holding the left cover Paper ejection guide Feed bottom protector DF original reversing cover Light source unit 1 pins Light source unit 2 pin Left cover Figure 3 1 5 ...

Страница 169: ...3 1 9 2A3 4 13 Open the duplex unit and remove the two tapes holding the duplex cover Duplex cover Duplex unit Figure 3 1 6 14 Open the drawers and remove the two tapes from each of them Figure 3 1 7 ...

Страница 170: ...and remove the paper from the contact glass 16 Remove the protective film from the edge of the contact glass 17 Remove the tape holding the original detection switch Original detection switch SRDF Paper Protective film Figure 3 1 8 ...

Страница 171: ...cover 4 Remove the tape holding the deck side cover 5 Open the front cover and remove the three tapes holding the SRDF 6 Remove the two tapes holding the power cord 7 Remove the tape binding the power cord Drawers Right cover Deck side cover SRDF Front cover Power cord Figure 3 1 9 For 120 V specifications only Remove the tapes 52 ppm ...

Страница 172: ...ve the tape holding the paper ejection guide 10 Remove the three tapes holding the pins for light source units 1 and 2 11 Remove the tape holding the left cover Paper ejection guide DF original reversing cover Light source unit 1 pins Light source unit 2 pin Left cover Figure 3 1 10 ...

Страница 173: ...A3 4 12 Open the front cover and then the duplex unit Remove the two tapes holding the duplex cover Duplex cover Duplex unit Figure 3 1 11 13 Open the drawers and remove the tape from each of them Figure 3 1 12 ...

Страница 174: ...and remove the paper from the contact glass 15 Remove the protective film from the edge of the contact glass 16 Remove the tape holding the original detection switch Original detection switch SRDF Paper Protective film Figure 3 1 13 ...

Страница 175: ...ight source unit 2 pin Light source unit 1 pins Figure 3 1 14 1 Open the front cover 2 Turn the paper transfer section release lever to the right Paper transfer section release lever Illustration shows a 42 ppm Figure 3 1 15 Remove the developing unit Remove pins holding light source units 1 and 2 ...

Страница 176: ...t release button pull the image formation unit out Image formation unit Image formation unit release button Illustration shows a 42 ppm Figure 3 1 16 4 Remove the two screws and open the image formation rail Screw Screw Image formation rail Figure 3 1 17 ...

Страница 177: ... shutter toward the machine front close the shutter 7 Lift the toner sub hopper slightly and turn it toward the machine right Toner sub hopper 1 pin connector 4 pin connector Shutter Developing unit Joint Figure 3 1 18 8 Hold the front and rear of the developing unit and remove it from the image formation unit Developing unit Figure 3 1 19 Removing the developing unit ...

Страница 178: ... Screws Hook Figure 3 1 20 2 Shake the developer bottle well to agitate the developer 3 While turning the developing gear in the direction of the arrow in the diagram uniformly pour developer into the developing unit Caution Never turn the developing gear in the reverse direction Developer Developing gear Figure 3 1 21 Loading developer 4 Refit the developing unit upper cover using the two screws ...

Страница 179: ...wo screws and open the upper cleaning cover Screw Screw Screws Main charger assembly Upper cleaning cover Figure 3 1 22 3 Remove the screw from each of the front and rear drum retainers and then the retainers Rear drum retainer Screw Screw Front drum retainer Figure 3 1 23 Install the drum ...

Страница 180: ...4 Installing the drum 6 Close the upper cleaning cover and secure using the two screws 7 Fit the main charger assembly to the image formation unit and secure using the two screws When installing the main charger assembly fix with the assembly pushed all the way toward the machine front 8 Fit the developing unit to the image formation unit 9 Return the toner sub hopper to the original position 10 O...

Страница 181: ...lease plate Illustration shows a 42 ppm Figure 3 1 25 14 Return the paper transfer section release lever to the original position to secure the paper conveying section 1 While lifting the fixing unit release lever pull the fixing unit out from the machine Fixing unit Fixing unit release lever Illustration shows a 42 ppm Figure 3 1 26 Pulling out the fixing unit Adjust the fixing pressure ...

Страница 182: ...he fixing unit clockwise until each nut clamps the angle bracket against the locking nuts underneath Angle bracket Fixing pressure nut Locking nuts Figure 3 1 27 Adjusting the fixing pressure 3 While lifting the fixing unit release lever slide the fixing unit back into the machine 4 Close the front cover ...

Страница 183: ...Display example CONTROL 156 Toner sensor control voltage TARGET 100 Toner feed start level HUMID 91 Absolute humidity 4 Press the stop clear key 1 Run maintenance items U131 and U156 and check that the values set in maintenance item U130 are displayed on the touch panel 2 Press the stop clear key 1 Enter 160 using the numeric keys and press the print key 2 Press the print key to execute the mainte...

Страница 184: ...ntact with the drum 5 Retighten the cleaning blade pin to secure the cleaning blade lever Cleaning blade pin Cleaning blade lever Figure 3 1 28 6 While pressing the image formation unit safety lock release plate slide the image formation unit back into the machine 7 Return the paper transfer section release lever to the original position to secure the paper conveying section 8 Close the front cove...

Страница 185: ...on shows a 42 ppm Figure 3 1 30 4 Insert the toner cartridge by aligning the two arrows on the top of the toner cartridge with the two markings on the machine 5 Shift the toner cartridge release lever to the right to secure the toner cartridge Toner cartridge release lever Markings Toner cartridge Illustration shows a 42 ppm Figure 3 1 31 6 Close the front cover ...

Страница 186: ... 2 Fit the feed bottom protector using two M4 x 6 TP screws 3 Refit all removed parts Right front lower cover B Screw Screw Right rear lower cover M4 6 TP screws Feed bottom protector Figure 3 1 32 1 When neither the paper feed desk nor the large paper deck is installed Install the feed bottom protector only for 42 ppm 1 ...

Страница 187: ...ad paper so that the copying side the side facing upward when unpacked faces downward When loading paper on the bypass table load so that the copying side the side facing upward when unpacked faces upward Loading paper upside down may cause a paper jam Copying side side facing upward when unpacked Figure 3 1 34 3 For 220 240 V specifications only Adjust the height adjusters 2 Install the copy tray...

Страница 188: ...paper size using four M3 8 flat head screws Side guides Screws Screws Figure 3 1 36 5 Set the paper size on the operation panel For 220 240 V specifications only 1 Place an original and make test copies Check if the center lines of the large paper deck the bypass table and each drawer are correct If not adjust the center lines Completion of the machine installation Make test copies ...

Страница 189: ...on orientation Setting date display order Sets the number of copies for switching the copy eject tray in the finisher Setting the number of digits of ID code Setting the ejection method in the booklet stitcher Switching between duplex simplex copy mode Setting preheat energy saver mode Setting auto drawer size detection Setting the copy density adjustment range Setting the ID code error output Dou...

Страница 190: ...t P N 2AC82020 Contents of the kit Memory copy PCB assembly P N 2AC01120 Three 3 BVM4 6 bronze binding screws P N B1304060 Procedure 1 Detach the SRDF connector 2 Remove the seven screws holding the rear cover and then the cover 3 Remove the eight screws holding the main PCB cover and then the cover M4 Screws Main PCB cover Screws Screws Figure 3 1 37 ...

Страница 191: ...connector of the main PCB 5 Clip the memory copy PCB over the board support Main PCB Connector Connector Memory copy PCB Board support Figure 3 1 38 6 Secure the memory copy PCB using the three BVM4 6 bronze binding screws Screw Screw Screw Memory copy PCB Figure 3 1 39 ...

Страница 192: ...3 1 32 2A3 4 7 Insert the connector of the machine into the connector on the memory copy PCB Memory copy PCB Connector Connector Figure 3 1 40 8 Refit all removed parts ...

Страница 193: ... or 32 MB 72 pin SIMM Procedure 1 Detach the SRDF connector 2 Remove the seven screws holding the rear cover and then the cover 3 Remove the eight screws holding the main PCB cover and then the cover To install an add on image memory to memory copy PCB 2 only proceed to step 5 Memory copy PCB 2 Memory copy PCB 1 M4 Screws Main PCB cover Screws Screws Figure 3 1 41 ...

Страница 194: ...over and then the cover M4 Screws Screws Screws Sequence cover Figure 3 1 42 5 Fit an image memory into the add on memory slot on the memory copy PCB 2 1 Memory copy PCB 2 Memory copy PCB 1 Add on memory slot Image memory Figure 3 1 43 6 Refit all removed parts ...

Страница 195: ...edure 1 Detach SRDF connector 2 Remove the SRDF 3 Remove the seven screws holding the rear cover and then the cover 4 Remove the two screws holding the upper rear cover and then the cover 5 Remove the two screws holding the upper right cover and then the cover 6 Remove the contact glass 7 Move the scanner toward the machine right 8 Pass the 2 pin connector of the optical heater cable to the machin...

Страница 196: ...main PCB into the 2 pin connector of the dehumidifier relay cable 13 Insert the 4 pin connector of the main PCB into the 4 pin connector of the dehumidifier relay cable Wire saddle 1 pin connectors Optical heater cable 2 pin connector 2 pin connector Dehumidifier relay cable 4 pin connector 4 pin connector 2 pin connector 2 pin connector Main harness Wire saddle Wire saddle Wire saddle Wire saddle...

Страница 197: ...efit the lower left cover using the two screws 17 Insert the heater switch instead 18 Plug the two 1 pin connectors of the dehumidifier relay cable onto the terminals of the heater switch Heater switch Heater switch 1 pin connector Dehumidifier relay cable 1 pin connector Cap Lower left cover Figure 3 1 46 19 Refit all removed parts ...

Страница 198: ...07120 Procedure 1 Remove the four screws holding the upper drawer and then the drawer 2 Remove the two screws holding the lower left cover and then the cover 3 Remove the lower drawer 4 Pass the 2 pin connector of the drawer heater cable to the machine rear through the cable hole in the left back corner of the machine 5 Fit the drawer heater using the two screws 6 Attach the binding band to the dr...

Страница 199: ... cable 11 Insert the 2 pin connector of the main harness into the 2 pin connector of the dehumidifier relay cable 12 Insert the 4 pin connector of the main harness into the 4 pin connector of the dehumidifier relay cable 2 pin connector Dehumidifier relay cable 4 pin connector 4 pin connector 2 pin connector 2 pin connector Main harness Wire saddle 1 pin connectors Wire saddle Wire saddle Wire sad...

Страница 200: ...ver 15 Refit the lower left cover using the two screws 16 Insert the heater switch instead 17 Plug the two 1 pin connectors of the dehumidifier relay cable onto the terminals of the heater switch Heater switch Heater switch 1 pin connector Dehumidifier relay cable 1 pin connector Cap Figure 3 1 49 18 Refit all removed parts ...

Страница 201: ...ews P N B4304100 One 1 M4 6 chrome TP A screw P N B4104060 Two 2 M3 6 bronze flat head screws P N B2303060 One 1 M3 bronze nut P N C2303000 Procedure 1 Fit the key counter assembly to the key counter retainer using the two screws and nut 2 Fit the key counter mount to the key counter cover using the two screws and attach the key counter retainer to the mount using the two screws M3 6 flat head scr...

Страница 202: ...over 4 Remove the screw holding the right rear lower cover and then the cover 5 Remove the two screws and detach the middle right cover from the machine 6 Cut out the aperture plate on the middle right cover using nippers Screw Middle right cover Screw Aperture plate Figure 3 1 51 ...

Страница 203: ...with the key counter assembly inserted to the key counter cover retainer on the machine Screw 4 pin connector 4 pin connector Aperture Middle right cover Key counter cover retainer 66060021 M4 10 screw B4304100 Key counter cover M4 10 screw B4304100 M4 6 screw B4104060 Figure 3 1 52 11 Insert the key counter into the key counter assembly 12 Turn the main switch on and enter the maintenance mode 13...

Страница 204: ...ses using two screws for each Screws Screws Dehumidifier heater Left Dehumidifier heater Heater base Heater base Right Figure 3 1 53 2 Remove the two screws from each of the deck right cover deck left cover and deck rear cover and then the covers 3 Open the large paper deck 4 Detach the deck paper conveying motor connector 5 Remove the spring from the deck paper conveying motor bracket 6 Remove th...

Страница 205: ...Screws Dehumidifier heater assembly Dehumidifier heater assembly Left Right Figure 3 1 55 9 Fit the edgings to the two U shaped cutouts in the rear frame 10 Pull the dehumidifier heater wires out to the machine rear through the edgings Dehumidifier heater wires Edging Edging Left rear of the deck Right rear of the deck Figure 3 1 56 ...

Страница 206: ...ors into the relay wire connectors see A in Figure 3 1 58 13 Insert the main wire connector into the relay wire connector see B in Figure 3 1 58 14 Tidy up the large paper deck wires and relay wire using the six bands and route the wires while clipping the bands into holes in the rear frame Band Bands Bands Band Relay wire Main wire A B Figure 3 1 58 15 Refit all removed parts ...

Страница 207: ...e signal cable cover and then the cover Screws Signal cable cover Figure 3 1 59 2 Pull the 10 pin connector out of the machine remove the jumper and insert the connector into the 10 pin connector of the signal cable Secure the signal cable using the two screws removed in step 1 Screws 10 pin connector 10 pin connector Signal cable Jumper Figure 3 1 60 ...

Страница 208: ...f the MMD host monitoring system device and tighten the two screws on the signal cable Screws bronze binding tap tight M3 16 Screw Screw Rear cover MMD host monitoring system device Figure 3 1 61 5 Insert one connector of the modular connector cable into the LINE jack on the MMD host monitoring system device and the other into a telephone jack LINE TEL Modular connector cable Figure 3 1 62 ...

Страница 209: ...enance item 3 2 1 2 Maintenance mode items list 3 2 4 3 Contents of maintenance mode items 3 2 8 3 2 2 Copier management 3 2 99 1 Executing a copier management item 3 2 99 2 Department management 3 2 100 3 Week timer 3 2 101 4 Copy default 3 2 102 5 Machine default 3 2 105 6 Language 3 2 107 ...

Страница 210: ...871087 Enter the number of the maintenance item to be executed using the numeric or Up Down keys Press the print key The maintenance item is run Press the stop clear key Enter 001 using numeric or Up Down keys and press the print key End Entering the maintenance mode Selecting a maintenance item Exiting the maintenance mode Yes No No Run another maintenance mode Yes Run the item again ...

Страница 211: ...it on the touch panel Correcting position of FOLIO U035 LENGTH DATA 330 WIDTH DATA 210 330 1 2 4 3 Start Stop Clear 5 6 5 6 C Metric Inch Figure 3 2 1 1 Adjustment window Displays the data to be set 2 Up Down keys Changes the setting 3 Items Displays the selected item in reverse 4 Current setting Displays the previously set data by pressing the print key 5 Print key Sets the changed setting 6 Stop...

Страница 212: ... Items Displays the selected item in reverse 2 Print key Starts operation 3 Stop clear key Stops operation Interrupt copy mode Outputting a test copy or VTC pattern is required in some maintenance items Such an output is enabled by pressing the interrupt key to enter interrupt copy mode However since this function is restricted depending on maintenance items only outputting may be enabled or a tes...

Страница 213: ...e print start timing Adjusting leading edge registration Adjusting leading edge registration second face Adjusting the print center line U035 Setting folio size Length Width U036 Setting envelope size Length Width U051 Adjusting the amount of slack in the paper before registration Drawer feed Bypass feed Duplex feed U052 Adjusting the side margins for duplex copying U053 Performing fine adjustment...

Страница 214: ...g shading U092 Adjusting the scanner automatically U093 Setting the exposure density gradient Text text and photo photo mode U099 Checking and setting the original size detection sensor U100 Setting the surface potential U101 Setting high voltages Developing bias Transfer voltage Separation voltage U102 Setting the cleaning interval for the transfer charger U110 Checking clearing the drum count U1...

Страница 215: ...system U203 Operating DF separately U204 Setting the presence or absence of a key card or key counter U206 Setting the presence or absence of the coin vender U209 Setting date and time U243 Checking the operation of the DF motors clutches and solenoids U244 Checking the DF switches U245 Checking messages U247 Checking the operation of the large paper deck and paper feed desk U248 Setting the paper...

Страница 216: ...ng auto drawer size detection U348 Setting the copy density adjustment range U350 Setting the ID code error output U402 Adjusting margins in image printing U403 Adjusting margins for reading an original on the contact glass U404 Adjusting margins for DF original reading U901 Checking clearing copy counts by paper feed locations U904 Checking clearing the service call counts U905 Checking clearing ...

Страница 217: ...t Method 1 Press the print key The screen for selecting an item is displayed 2 Select the item to be output The selected item is displayed in reverse 3 Press the print key The interrupt copy mode is entered and a list is output When A4 11 81 2 paper is available a report of this size is output If not specify the paper feed location When output is complete the screen for selecting an item is displa...

Страница 218: ...ctronic counter Also to move the mirror frame of the scanner to the position for transport position in which the frame can be fixed Start Press the print key The screen for selecting an item is displayed Method 1 Select a mode 2 Use the numeric keys or Up Down keys to input the OEM code 3 Press the print key The maintenance No selection screen will appear again Completion To exit the maintenance m...

Страница 219: ...ing 1 Enter a telephone number up to 15 digit using the numeric keys To enter symbols such as hyphens and parentheses select as required from the symbols displayed on the touch panel as shown below To move the cursor press either of the arrows in the bottom row 2 Press the print key The phone number is set and the screen for selecting a maintenance item No is displayed Completion To exit the maint...

Страница 220: ...e print key The currently set machine number is displayed Setting 1 Enter the last six digits of the machine number using the numeric key Do not enter the first two digits 3 and 7 2 Press the print key The machine number is set Completion To exit the maintenance mode without changing the current setting press the stop clear key The screen for selecting a maintenance item No is displayed ...

Страница 221: ...ous copying is performed when set to 999 in duplex copy mode continuous copying is performed regardless of the setting Copy density Keys on the operation panel other than the energy saver key 5 To control the paper feed pulley remove all the paper in the drawers or the drawers With the paper present the paper feed pulley does not operate 6 Press the print key The operation starts Copy operation is...

Страница 222: ...iginal settings Purpose Used when replacing the backup RAM on the main PCB Method 1 Press the print key The screen for executing is displayed 2 Press EXECUTE on the touch panel It is displayed in reverse 3 Press the print key All data in the backup RAM is initialized and the original settings for Japan specifications are set When initialization is complete the machine automatically returns to the ...

Страница 223: ...Used to return the machine settings to the factory settings Method 1 Press the print key The screen for executing is displayed 2 Press EXECUTE on the touch panel It is displayed in reverse 3 Press the print key All data other than that for adjustments due to variations between machines is initialized When initialization is complete the machine automatically returns to the same status as when the m...

Страница 224: ... 1 Press the print key The screen for executing is displayed 2 Press SCANNER on the touch panel EXECUTE is displayed 3 Press EXECUTE on the touch panel It is displayed in reverse 4 Press the print key The data for the optical section U060 to 099 U403 U404 and U990 is initialized Completion To exit the maintenance mode press the stop clear key The screen for selecting a maintenance item No is displ...

Страница 225: ... Select the motor to be operated The selected item is displayed in reverse and the operation starts 3 To stop operation press the stop clear key Completion Press the stop key after operation stops The screen for selecting a maintenance item No is displayed Display Operation MAIN MOTOR CONV MOTOR FEED MOTOR The drive motor operates and developing bias is applied The paper conveying motor operates T...

Страница 226: ...the on status of a switch is detected that switch is displayed in reverse Completion Press the stop clear key The screen for selecting a maintenance item No is displayed Display Switches FEED1 SW FEED2 SW FEED3 SW FEED4 SW FEED SW R SW EJE SW BRA SW REV SW DUP PESW DUP1 SW DUP2 SW DUP3 SW Paper feed switch 1 PFSW1 Paper feed switch 2 PFSW2 Paper feed switch 3 PFSW3 Paper feed switch 4 PFSW4 Feed s...

Страница 227: ...stop clear key is pressed If the upper or lower paper feed clutch is turned on while a motor is driving paper is conveyed by the rotation of the paper feed pulley resulting in a paper jam Be sure to remove the paper drawers before turning either of these clutches on 4 To stop the motor drive press the interrupt copy key Completion Press the stop clear key The screen for selecting a maintenance ite...

Страница 228: ...d turns on for 1 s MSW OFF is selected when the operation of the main switch is checked in auto shutoff mode Completion Press the stop clear key The screen for selecting a maintenance item No is displayed U034 Adjusting the print start timing Adjustment See pages 3 3 18 and 19 Display Solenoids SB LIFT BRANCH END PRE TRAY FEE TRAY CHG MSW OFF Bypass solenoid BYPSOL Feedshift solenoid FSSOL Duplex ...

Страница 229: ... the image area for printing onto an envelope when the optional printer unit is installed Purpose To prevent the image at the trailing edge or right or left side of the paper from not being printed by setting the actual size of the envelop used Method Press the print key The screen for selecting an item is displayed Setting 1 Select the item to be set The selected item is displayed in reverse and ...

Страница 230: ...en for selecting an item is displayed Setting 1 Select the item to be set The selected item is displayed in reverse and the current setting is displayed in the adjustment window 2 Change the setting using the Up Down keys Increasing the setting makes the motor speed faster and the image longer and decreasing it makes the speed slower and the image shorter 3 Press the print key The value is set Int...

Страница 231: ...lected item is displayed in reverse and the current setting is displayed in the adjustment window 2 Change the setting using the Up Down keys Increasing the setting makes the density lower and decreasing it makes the density higher 3 Press the print key The value is set Interrupt copy mode While this maintenance item is being performed copying from an original can be made in interrupt copy mode Co...

Страница 232: ...cleaned This is due to flaws or stains inside the shading plate To prevent this problem the shading position should be changed so that shading is possible without being affected by the flaws or stains Method 1 Press the print key The screen for adjustment is displayed 2 Change the setting using the Up Down keys Increasing the setting moves the shading position toward the machine right and decreasi...

Страница 233: ...djusting the scanner leading edge registration Adjustment See page 3 3 39 U067 Adjusting the scanner center line Adjustment See page 3 3 38 U070 Adjusting the DF magnification Adjustment See page 3 3 96 U071 Adjusting the DF scanning timing Adjustment See page 3 3 98 U072 Adjusting the DF center line Adjustment See page 3 3 97 ...

Страница 234: ...al sizes for each setting in SIZE 4 Press the print key Scanning starts under the selected conditions 5 To stop operation press the stop clear key Completion Press the stop clear key when scanning stops The screen for selecting a maintenance item No is displayed Display ZOOM SIZE LAMP Operating conditions ZOOM Magnification Original size LAMP on and off of the exposure lamp Setting range 25 to 400...

Страница 235: ... preset value using the Up Down keys Since this value is related to the automatic exposure adjustment in the copy initial setting mode ensure that the exposure step of the automatic exposure is at the center before adjusting 2 Press the print key The setting is set and the screen for maintenance item No is displayed Completion Press the stop clear key when scanning stops The screen for selecting a...

Страница 236: ...e image areas Method Press the print key The screen for selecting an item is displayed Setting 1 Select ON or OFF The selected item is displayed in reverse Initial setting OFF If moiré on the copy image is significant change the setting to ON Note that when the moiré reduction mode is turned on the resolution may be slightly reduced 2 Press the print key The value is set The screen for selecting a...

Страница 237: ... with a non scanned output PG pattern Method 1 Press the print key The screen for selecting an item is displayed 2 Select the PG pattern to be output Display GRAYSCALE To check the laser scanner unit engine output characteristics MONO LEVEL To check the drum quality 256 LEVEL To check resolution reproducibility in printing 1 DOT LINE To check fine line reproducibility To adjust the position of the...

Страница 238: ...r Entirely white paper is output when the setting is 0 and entirely black paper is output when it is 255 4 Press the interrupt key The screen for copy mode is displayed 5 Press the print key A PG pattern is output Completion Press the stop clear key at the screen for selecting an item The screen for selecting a maintenance item No is displayed Description Output conditions for MONO LEVEL Setting r...

Страница 239: ...anning values at nine points of the contact glass on the touch panel Purpose To check the change in original scanning values before and after shading The results may be used to decide the causes for fixing unevenness uneven density of the gray area of an image either due to optical shading or CCD or other problems Also to check the causes for a white or black line appearing longitudinally ...

Страница 240: ...lack line appears the cause may assumed to be based on the results of the scanning operation before shading if a white line appears they may be assumed based on the results of the scanning operation after shading Note that depending on the thickness and location of the black or white line it may not be possible to use this method to determine the cause This is because the displayed values obtained...

Страница 241: ...xecuting is displayed 3 Press the print key Auto adjustment starts When adjustment is complete each adjusted value is displayed If a problem occurs during auto adjustment an error code is displayed and operation stops Should this happen determine the details of the problem and either repeat the procedure from the beginning or adjust the remaining items manually by running the corresponding mainten...

Страница 242: ...justed The selected item is displayed in reverse and the current setting is displayed in the adjustment window 2 Adjust the setting using the Up Down keys Increasing the setting makes the change in density larger and decreasing it makes the change smaller Figure 3 2 5 Exposure density gradient Image density Density adjustment Dark Light Light Center Dark Density adjustment range Special area Setti...

Страница 243: ...eshold value Purpose To adjust the sensitiveness of the sensor and size judgement time if the original size detection sensor malfunctions frequently due to incident light or the like Start 1 Press the print key The screen for selecting an item is displayed 2 Select an item The screen for executing each item is displayed Method to display the data for the sensor 1 Press the print key The detection ...

Страница 244: ... value using the Up Down keys A larger value increases the original size judgment time and a smaller value decreases it 2 Press the print key The value is set 3 To return to the screen for selecting an item press the stop clear key Completion Press the stop clear key at the screen for selecting an item The screen for maintenance item No is displayed U099 Display LEVEL WAIT TIME ORIGINAL AREA SIZE ...

Страница 245: ...Press the MC DATA on the touch panel of the screen for selecting an item 2 Change the setting using the Up Down keys Increasing the setting makes the surface potential higher and decreasing it makes the potential lower Change in value per step approximately 3 6 V 3 Press the print key The value is set Interrupt copy mode While this maintenance item is being performed copying from an original can b...

Страница 246: ...developing bias 1 Select the item to be adjusted The selected item is displayed in reverse and the current setting is displayed in the adjustment window 2 Change the setting using the Up Down keys Increasing the setting makes the developing bias higher and decreasing it makes the bias lower 3 Press the print key The value is set 4 To return to the screen for selecting in item press the stop clear ...

Страница 247: ...fer voltage output is stopped Setting the separation voltage 1 Change the setting using the Up Down keys Increasing the setting makes the separation voltage higher and decreasing it makes the voltage lower 2 Press the print key The value is set 3 To return to the screen for selecting an item press the stop clear key Interrupt copy mode While this maintenance item is being performed copying from an...

Страница 248: ... key The screen for selecting an item is displayed 2 To execute the cleaning operation press TEST RUN The cleaning operation for the transfer charger is executed once Setting 1 Change the setting using the Up Down keys When set to 3 the transfer charger is cleaned every 3000 copies 3 by 1000 counted after the main switch is turned on When set to 0 the transfer charger is not cleaned 2 Press the pr...

Страница 249: ...eared before shipping do not clear it when installing Method Press the print key The drum counter count is displayed Clearing 1 Press CLEAR on the touch panel 2 Press the print key The count is cleared and the screen for selecting a maintenance item No is displayed Setting 1 Enter a six digit count using the numeric keys 2 Press the print key The count is set and the screen for selecting a mainten...

Страница 250: ...od Press the print key The drum drive time is displayed in minutes Clearing 1 Press CLEAR on the touch panel 2 Press the print key The time is cleared and the screen for selecting a maintenance item No is displayed Setting 1 Enter a five digit drive time in minutes using the numeric keys 2 Press the print key The time is set and the screen for selecting a maintenance No is displayed Completion To ...

Страница 251: ... result is displayed The toner sensor output value is displayed on the right side of the screen Supplement The following data is also renewed or cleared by performing this maintenance item Renewing the toner sensor control voltage U131 Renewing the toner feed start level U156 Clearing the developing drive time U157 Clearing the developing count U158 Resetting the toner feed start level and toner e...

Страница 252: ...or light Method Press the print key The current setting for the toner sensor control voltage is displayed Setting 1 Change the setting using the Up Down keys Increasing the setting makes the density higher and decreasing it makes the density lower Increasing the setting too high may result in toner scattering 2 Press the print key The value is set Completion Press the stop clear key The screen for...

Страница 253: ...ht side of the screen Completion Press the stop clear key when toner replenishment stops The screen for selecting a maintenance item No is displayed U133 Collecting the recycled toner Description Transfers residual toner in the cleaning section toner main hopper and toner sub hopper to the developing unit Purpose To dispose of residual toner inside the machine when the developer is replaced Be sur...

Страница 254: ...played U135 Checking toner motor operation Description Drives the toner feed motor or toner recycle motor Purpose To check the operation of the toner feed motor or toner recycle motor Caution Note that driving either of the motors unnecessarily long may cause a toner jam resulting in machine lockup Be sure to drive each motor for just several seconds Method 1 Press the print key The screen for sel...

Страница 255: ...em No is displayed U137 Checking the toner level detection sensor Description Displays the detection status of the toner level detection sensor and toner hopper lockup detection sensor Purpose To check the toner level and recycle toner level in the toner hopper Method 1 Press the print key The detected status of the each sensor is displayed When there is toner or if the sensor connector is disconn...

Страница 256: ...creen for executing is displayed 2 Press the print key The current data is displayed The current toner sensor output value is displayed on the right side of the screen Completion Press the stop clear key The screen for selecting a maintenance item No is displayed Display TARGET NOW CONTROL NOW HUMID Description Current toner feed level corrected value for humidity and drive time Current toner sens...

Страница 257: ...er density lower 3 Press the print key The value is set Setting for the toner empty level 1 Press EMPTY 2 Change the setting using the Up Down key Increasing the setting makes the toner empty level higher the toner density is lower when the toner empty is detected 3 Press the print key The value is set Completion Press the stop clear key The screen for selecting maintenance item No is displayed Di...

Страница 258: ...ion To exit the maintenance mode without changing the time press the stop clear key The screen for selecting a maintenance item No is displayed U158 Checking clearing the developing count Description Checks or clears the developing count which is used as a reference when correcting the toner control It is automatically cleared when U130 is executed Purpose To check the developing count after repla...

Страница 259: ...d when replacing or cleaning the cleaning blade or the drum Method 1 Press the print key The screen for executing is displayed 2 Press the print key Operation starts When the operation is complete the screen for selecting a maintenance item No is displayed Completion To exit this maintenance item without performing operation press the stop clear key The screen for selecting a maintenance item No i...

Страница 260: ...setting using the Up Down key The respective temperatures are to be set such that CONTROL TEMP SECOND TEMPFIRST TEMP 3 Press the print key The value is set Interrupt copy mode While this maintenance item is being performed a test pattern for measuring fixing pressure is output in interrupt copy mode see page 3 3 79 Completion Press the stop clear key The screen for selecting maintenance item No is...

Страница 261: ...item No is displayed To exit the forced stabilization mode turn the power off and on Completion To exit this maintenance item without executing forced fixing stabilization press the stop clear key U196 Turning the fixing heater on Description Turns the fixing heater on Purpose To check fixing heaters M or S Method 1 Press the print key The screen for selecting an item is displayed 2 Select the hea...

Страница 262: ...ions 2 Press the print key The setting is set The screen for selecting a maintenance item No is displayed Completion To exit this maintenance item without changing the current setting press the stop clear key The screen for selecting a maintenance item No is displayed U200 Turning all LEDs on Description Turns all the LEDs on the operation panel on Purpose To check if all the LEDs on the operation...

Страница 263: ...s the print key The screen for executing is displayed and the key displayed at the upper left of the touch panel flashes 2 Press on the center of the key The key on lower right flashes 3 Press the center of the flashing Initialization of the touch panel is complete and the screen for selecting a maintenance item No is displayed Completion To exit this maintenance item without initializing press th...

Страница 264: ...ions on the touch panel Completion Press the stop clear key on the basic screen The screen for selecting a maintenance item No is displayed Maintenance item No select screen U202 Technician arrive Maintenance count clear Service report leave Phone number setting Device initialization To initialize the MMD host monitoring system run the following modes in order Phone number setting 4 Device initial...

Страница 265: ...sh clear DRUM DEVELOPER FIXING ROLLER BLADE MAIN CHARGER 00000000 00000000 00000000 00000000 00000000 Clear Checkmark the replaced parts Counts are cleared Basic status screen Clear Ready to send Push print key Print key U202 Maintenance parts check clear Select parts push clear SEP CLAW MOUNT SEP CLAW ASS Y HEAT ROLLER PRESS ROLLER FIX HEATER M 00000000 00000000 00000000 00000000 00000000 Clear U...

Страница 266: ...tem and enter the digits using numeric keys Press the interrupt key to enter a space 4 The phone number is stored Basic status screen Set Print key Preventive maintenance Repair PM Repair Courtesy call Ready to send Push print key Ready to send Push print key Transmission starts Print key Stop clear key Select an item Basic status screen 3 Service report leave Select a mode U202 Stop clear key ...

Страница 267: ...s using the numeric keys and press the print key Enter the digits using the numeric keys and press the print key PPC ID Initialization ID 000000 000000 Model Personal ID 000000 000000 Device initialization Select a mode U202 Device initialization Select a mode U202 Enter the digits using the numeric keys and press the print key PPC ID Initialization ID Total count 000000 000000 00000000 Model Pers...

Страница 268: ...y Check Initialization succeeded Check Initialization successful Basic status screen Check xxxx Reason for failure Check MMD system problem No Screen depending on the reason for failure Yes 5 1 Retry initialization No Yes Standard Special by MODEL Retry initialization Device initialization Select a mode U202 ...

Страница 269: ...ning this simulation with paper 4 Select the item to be operated The selected item is displayed in reverse and operation starts 5 To stop continuous operation press the stop clear key Completion Press the stop clear key when the operation stops The screen for selecting the maintenance item No is displayed Display ADF MODE RADF MODE ADF MODE NON PAPER RADF MODE NON PAPER Operation With paper single...

Страница 270: ...ssary in this maintenance item Method Press the start key Setting 1 Select the optional counter to be installed The selected counter is displayed in reverse Pressing the reversed item again resets the selection 2 Press the print key The screen for selecting a maintenance item No is displayed Completion To exit this maintenance item without changing the current setting press the stop clear key The ...

Страница 271: ...f the coin vender Description Sets the presence or absence of the optional coin vender Also sets the details for coin vender operation such as mode and unit price This is an optional device which is currently supported only by Japanese specification machines so no setting is necessary ...

Страница 272: ...e print key The current setting for the day of the week is displayed 5 Set the day of the week using the numeric or Up Down keys and press the print key The current time setting for hours is displayed 6 Set the time hours 0 to 23 using the numeric or Up Down keys and press the print key The current time setting for minutes is displayed 7 Set the minutes using the numeric or Up Down keys and press ...

Страница 273: ...operation starts 3 To turn each motor off press the stop clear key Completion Press the stop clear key when operation stops The screen for selecting a maintenance item No is displayed Display F MOTOR C MOTOR FEED CL EJ JCT SL REV JCT SL FEED SL REVPRS SL Motors clutches and solenoids Original feed motor OFM Original paper conveying motor OCM Original feed clutch OFCL Eject feedshift solenoid EFSSO...

Страница 274: ...the status If the on status of a switch is detected the corresponding switch is displayed in reverse 2 To return to the screen for selecting an item press the stop clear key Method for the volume switch 1 Move the original insertion guides to check the detection status of the original size width switch As shown on the next page the detected original width is displayed as a numerical value with the...

Страница 275: ...n to the screen for selecting an item press the stop clear key Completion Press the stop clear key at the screen for selecting an item The screen for selecting a maintenance item No is displayed Numerical value A5R B5R Folio A4R B4 B5 CF 11 15 A3 A4 Original width to be detected 51 2 81 2 81 2 14 81 2 11 11 17 11 15 11 81 2 000 49 664 50 176 61 440 61 952 103 936 104 448 139 264 139 776 146 432 14...

Страница 276: ...he optional paper feed desk 2 1 42 ppm optional 52 ppm standard 2 Optonal for 42 ppm only Purpose To check the operation of motors and clutches of the respective paper feed devices Start 1 Press the print key The screen for selecting an item is displayed 2 Select the paper feed device to be checked The screen for executing is displayed Method 1 Press the item to be operated The selected item is di...

Страница 277: ...h section if in punch mode paper jams or is Z folded frequently due to too much slack in the paper or the position of punch holes varies due to too little slack in the paper Punch limit setting Sets the punch limit to notify the user of the time to collect punch hole scrap Punch hole scrap count display clearing Used to manually clear the punch hole scrap count if a message requiring collection of...

Страница 278: ...m to be set 3 Change the setting using the numeric keys or the Up Down keys To clear the punch hole scrap count press the all clear reset key PUNCH LIMIT can be changed in increments of 1000 times When the punch hole scrap count reaches the punch limit Check punch waste tank is displayed on the touch panel 4 Press the print key The value is set 5 To return to the screen for selecting an item press...

Страница 279: ...een for selecting an item The screen for selecting a maintenance item No is displayed Display A4R B4R A3R Description Adjustment of booklet stapling position for A4R size Adjustment of booklet stapling position for B4R size Adjustment of booklet stapling position for A3R size Setting range 125 to 125 125 to 125 125 to 125 Initial setting 0 0 0 Chang in value per step 0 25 mm 0 25 mm 0 25 mm Left s...

Страница 280: ...p clear key The screen for selecting an item is displayed U251 Checking clearing the maintenance count Description Displays clears and changes the maintenance count Purpose To check the maintenance count Also to clear the count during maintenance service Method Press the print key The maintenance count is displayed Clearing 1 Press CLEAR on the touch panel 2 Press the print key The count is set an...

Страница 281: ...unt press the stop clear key The screen for entering a maintenance item No is displayed Supplement The specified initial settings are provided according to the destinations in the maintenance items below To change the initial settings in those items be sure to run maintenance item U021 after changing the destination Initial setting according to the destinations Display JAPAN METRIC INCH EUROPE MET...

Страница 282: ...ethod Press the print key The screen for selecting an item is displayed Setting 1 Select double or single count Initial setting DOUBLE COUNT 2 Press the print key The value is set and the screen for selecting an maintenance item No is displayed Completion To exit this maintenance item without changing the current setting press the stop clear key The screen for selecting an maintenance item No is d...

Страница 283: ...tart key The screen for entering an item is displayed Setting 1 Select either ON or OFF The selected item is displayed in reverse Initial setting ON 2 Press the print key The setting is set The screen for selecting a maintenance item is displayed Completion To exit this maintenance item without changing the current setting press the stop clear key The screen for selecting a maintenance item No is ...

Страница 284: ...e value is set Current settings are displayed Setting 1 Change the setting using the Up Down key The setting can be changed by 30 s per step Pressing the Up key when set to 270 rolls over the setting to 0 When set to 0 the auto clear function is cancelled 2 Press the print key The value is set The screen for selecting a maintenance item is displayed Completion To exit this maintenance item without...

Страница 285: ... mode Method Press the print key The setting is set The screen for selecting an item is displayed Setting 1 Select ON or OFF The selected item is displayed in reverse Initial setting ON 2 Press the print key The setting is set The screen for selecting a maintenance item is displayed When change from OFF to ON the initial value of 15 min is set Completion To exit this maintenance item without chang...

Страница 286: ... made using the Up Down keys The setting can be changed by 5 copies per step When set to 0 the number of copies is not limited regardless of the setting for single or continuous copying 3 Press the print key The setting is set and the screen for entering a maintenance item No is displayed Completion To exit this maintenance item without changing the current setting press the stop clear key The scr...

Страница 287: ...equently in the paper conveying or fixing sections when the number of copies is counted before the paper reaches those sections copying is charged without a copy being made To prevent this the copy timing should be made later Method Press the start key The screen for selecting an item is displayed Setting 1 Select the copy count timing Initial setting EJECT 2 Press the print key The setting is set...

Страница 288: ...he screen for selecting an item is displayed Setting 1 Select an ejection orientation Initial setting Face down 2 Press the print key The setting is set and the screen for entering a maintenance item No is displayed Completion To exit this maintenance item without changing the current setting press the stop clear key The screen for selecting a maintenance item is displayed Display FACE DOWN NORMAL...

Страница 289: ...without changing the current setting press the stop clear key The screen for selecting a maintenance item is displayed U265 Setting OEM purchaser code Description Sets the OEM purchaser code Purpose Sets the code when replacing the main PCB and the like Method Press the print key Setting 1 Use the numeric keys or Up Down keys to adjust the preset value 2 Press the print key The count is set and th...

Страница 290: ... the numeric keys or Up Down keys to adjust the preset value The copy eject tray is switched from the sub tray to the main tray when the number of copies ejected to the sub tray exceeds the preset value 2 Press the print key The setting is set and the screen for entering a maintenance item No is displayed Completion To exit this maintenance item without changing the current setting press the stop ...

Страница 291: ...item is displayed Setting 1 Select the number of digits Initial setting 4 digits 2 Press the print key The setting is set and the screen for entering a maintenance item No is displayed Completion To exit this maintenance item without changing the current setting press the stop clear key The screen for selecting a maintenance item is displayed Display 4 digits 7 digits Description The number of dig...

Страница 292: ...ting Method Press the print key The screen for selecting an item is displayed Setting 1 Select an ejection method Initial setting 2 BIN 2 Press the print key The setting is set and the screen for entering a maintenance item No is displayed Completion To exit this maintenance item without changing the current setting press the stop clear key The screen for selecting a maintenance item is displayed ...

Страница 293: ...sed mode Method Press the start key The screen for selecting an item is displayed Setting 1 Select ON or OFF Initial setting OFF 2 Press the print key The setting is set and the screen for entering a maintenance item No is displayed Completion To exit this maintenance item without changing the current setting press the stop clear key The screen for selecting a maintenance item is displayed Display...

Страница 294: ...print key The setting is set and the screen for entering a maintenance item No is displayed Completion To exit this maintenance item without changing the current setting press the stop clear key The screen for selecting a maintenance item is displayed Display INSTANT READY ENERGY STAR E 2000 SILENT MDOE Control in preheat mode Without decreasing the fixing control temperature the display on the op...

Страница 295: ...he message is displayed Purpose To change the time to display the maintenance due indication Method Press the print key The current setting is displayed Setting 1 Change the setting using the numeric or Up Down keys Initial setting 0 2 Press the print key The setting is set and the screen for entering a maintenance item No is displayed Completion To exit this maintenance item without changing the ...

Страница 296: ...or selecting an item is displayed Setting 1 Select ON or OFF Initial setting ON for inch and OFF for metric specifications 2 Press the print key The setting is set and the screen for entering a maintenance item No is displayed Completion To exit this maintenance item without changing the current setting press the stop clear key The screen for selecting a maintenance item is displayed Display ON OF...

Страница 297: ...ted set to SPECIAL AREA Method Press the print key The screen for selecting an item is displayed Setting 1 Select the density range Initial setting SPECIAL AREA 2 Press the print key The setting is set and the screen for entering a maintenance item No is displayed Completion To exit this maintenance item without changing the current setting press the stop clear key The screen for selecting a maint...

Страница 298: ... Press the print key The setting is set and the screen for entering a maintenance item No is displayed Completion To exit this maintenance item without changing the current setting press the stop clear key The screen for selecting a maintenance item is displayed U402 Adjusting margins for image printing Adjustment See page 3 3 20 U403 Adjusting margins for reading an original on the contact glass ...

Страница 299: ...e is not installed the corresponding count is not displayed Clearing 1 Select the count to be cleared The selected item is displayed in reverse To clear the counts for all paper feed locations press ALL on the touch panel 2 Press the print key The setting is set and the screen for entering a maintenance item No is displayed Completion To exit this maintenance item without changing the current sett...

Страница 300: ...hod 1 Press the print key The jam count is displayed by jam codes 2 Change the screen using the Up Down keys Clearing 1 Press ALL on the touch panel Jam counts cannot be cleared individually 2 Press the print key The count is cleared and the screen for entering a maintenance item No is displayed Completion To exit this maintenance item without changing the current setting press the stop clear key ...

Страница 301: ...e parts Method 1 Press the print key The jam count is displayed by service call codes 2 Change the screen using the Up Down keys Clearing 1 Select the count to be cleared The selected count is displayed in reverse To clear all counts press ALL on the touch panel 2 Press the print key The count is cleared When all counts are cleared the screen for entering a maintenance item No is displayed Complet...

Страница 302: ...item is displayed in reverse 2 Press the print key The count is cleared 3 To return to the screen for entering an item press the stop clear key Completion Press the stop clear key at the screen for selecting an item The screen for selecting a maintenance item is displayed Display CHANGE ADF RADF Description Original replacement count No of single sided originals that has passed through the DF in A...

Страница 303: ... and the related parts are serviced The following sections can be the subject of the partial operation SRDF Large paper deck Copier upper drawer Copier lower drawer Paper feed desk upper drawer Paper feed desk lower drawer Duplex unit Finisher Method 1 Press the print key 2 Press RESET on the touch panel 3 Press the print key to reset partial operation control The maintenance mode is exited and th...

Страница 304: ... count value on each ejection location is displayed Clearing 1 Select the item for which the count value is to be reset The selected item is highlighted To reset the count values for all ejection locations press ALL on the touch panel 2 Press the print key The count is cleared Completion To exit this maintenance item without changing the current setting press the stop clear key The screen for sele...

Страница 305: ...the value for maintenance work Method Press the print key The count value of the total counter is displayed Clearing The count value cannot be changed or cleared Completion To exit this maintenance item without changing the current setting press the stop clear key The screen for selecting a maintenance item is displayed Display COUNT Description Count value of electronic counter ...

Страница 306: ...ated time of illumination for the exposure lamp is displayed in minutes Clearing 1 Press CLEAR on the touch panel 2 Press the print key The accumulated time is cleared and the screen for selecting a maintenance item No is displayed Setting 1 Enter a six digit accumulated time using the numeric keys 2 Press the print key The time is set and the screen for selecting a maintenance item is displayed C...

Страница 307: ...printer count is displayed Clearing 1 Press CLEAR on the touch panel 2 Press the print key The count is set and the screen for selecting a maintenance item is displayed Setting 1 Enter a six digit numerical value using the numeric keys 2 Press the print key The count is set and the screen for selecting a maintenance item is displayed Completion To exit this maintenance item without changing the co...

Страница 308: ...wer bypass and duplex feeds 3 3 22 3 3 3 Optical section 3 3 23 1 Detaching and refitting the exposure lamp 3 3 23 2 Detaching and refitting the scanner wires 3 3 24 2 1 Detaching the scanner wires 3 3 24 2 2 Refitting the scanner wires 3 3 25 3 Replacing the laser scanner unit 3 3 28 4 Replacing the ISU reference 3 3 30 5 Adjusting the longitudinal squareness reference 3 3 32 6 Adjusting scanner ...

Страница 309: ...lter 3 3 78 10 Adjusting the fixing pressure reference 3 3 79 3 3 10 Feedshift and duplex section 3 3 80 1 Detaching and refitting the duplex forwarding pulley 3 3 80 2 Detaching and refitting the switchback roller duplex upper registration roller 3 3 81 3 Adjusting the position of the side registration section 3 3 87 4 Adjusting the side registration amount 3 3 88 3 3 11 SRDF section 3 3 89 1 Det...

Страница 310: ...it Never substitute wire for thermostats as the copier may be seriously damaged When installing a thermostat ensure the correct clearance if specified using a thickness gauge Use the following testers when measuring voltages Hioki 3200 Sanwa MD 180C Sanwa YX 360TR Beckman TECH300 Beckman DM45 Beckman 330 capable of measuring RMS values Beckman 3030 capable of measuring RMS values Beckman DM850 cap...

Страница 311: ...e print key Enter the maintenance item number using the numeric keys or Up Down keys The selected maintenance item is run Press the stop clear key Press the print key Start End Maintenance mode is entered The maintenance item is selected Maintenance mode is exited Repeat the same maintenance item Run another maintenance item No No Yes Yes ...

Страница 312: ...ws Procedure Removing the primary paper feed unit 1 Remove right front lower covers B and A and the right rear lower cover 2 Open the front cover and the right cover 3 Open the duplex unit and upper and lower drawer at the same time 4 Remove the screw holding the primary paper feed unit and then the unit Primary paper feed unit Screw Screw Figure 3 3 1 Detaching the primary paper feed unit ...

Страница 313: ...ng the forwarding pulley 5 Raise the forwarding pulley retainer in the direction the arrows and remove it from the primary paper feed unit Forwarding pulley retainer Figure 3 3 2 Detaching the forwarding pulley retainer ...

Страница 314: ...ving the upper paper feed pulley 7 Remove the two stop rings 8 Remove the paper feed clutch wires from the notches on the rear of the paper feed housing 9 Pull the upper paper feed shaft toward the rear of the primary paper feed unit see the arrow below and remove the upper paper feed pulley Stop rings Upper paper feed shaft Notches Upper paper feed pulley Wires Paper feed clutch Figure 3 3 4 Deta...

Страница 315: ...on the rear of the primary paper feed unit 11 Pull the lower paper feed shaft to the rear see the arrow shown below Lower paper feed shaft Stop ring Figure 3 3 5 12 Remove the lower paper feed pulley Lower paper feed pulley Figure 3 3 6 Detaching the lower paper feed pulley ...

Страница 316: ...ient it correctly as shown in Figure 3 3 7 Forwarding pulley Machine front Machine rear Figure 3 3 7 When fitting the upper paper feed pulley keep its blue end toward the machine front After fitting the upper paper feed pulley refit the wires which were removed in step 8 in the paper feed housing notches When refitting the clutch be sure to refit the stop ...

Страница 317: ...er paper feed pulleys as follows Procedure Removing the bypass paper feed unit 1 Open the right cover and bypass table and remove right front lower cover B the right rear lower cover and middle right cover 2 Detach the connector under the bypass table and then the bypass table Connector Bypass table Figure 3 3 8 Detaching the bypass table ...

Страница 318: ...feed unit Removing the bypass forwarding pulley 4 Remove the stop ring at the front of the bypass forwarding pulley retainer 5 Pull out the bypass forwarding pulley shaft in the direction of the arrow and remove the bypass forwarding pulley Stop ring Bypass forwarding pulley Bypass forwarding pulley shaft Bypass forwarding pulley retainer Figure 3 3 10 Detaching the bypass forwarding pulley ...

Страница 319: ...he direction of arrow A and remove it from the bypass forwarding pulley retainer 9 Push the bypass solenoid lever in the direction of arrow B and remove the bypass forwarding pulley retainer in the direction of arrow C Bypass forwarding pulley retainer Bushing Bypass solenoid lever Spring Stop ring A B C Figure 3 3 11 Detaching the bypass forwarding pulley retainer ...

Страница 320: ...ushing 11 Slightly move the bypass paper feed shaft in the direction of the arrow and remove the shaft from the bypass front frame Bypass front frame Spring pin Stop ring Gear Bushing Bypass paper feed shaft Figure 3 3 12 Detaching the bypass paper feed shaft ...

Страница 321: ...er feed pulley Bushing Bypass paper feed shaft Figure 3 3 13 Detaching the bypass upper paper feed pulley Removing the bypass lower paper feed pulley 13 Remove the two screws holding the bypass separation retainer and then the retainer Screws Bypass separation retainer Figure 3 3 14 Detaching the bypass separation retainer ...

Страница 322: ...r paper feed pulley 1 15 Remove the stop ring and then the bypass lower paper feed pulley Stop ring Bypass lower paper feed pulley Figure 3 3 16 Detaching the bypass lower paper feed pulley 2 16 Replace the bypass forwarding upper and lower paper feed pulleys 17 Refit all removed parts Caution When refitting the upper paper feed pulley orient its blue end toward the machine rear ...

Страница 323: ...Remove the four screws and take the drawer out of the machine Screws Screws Drawer Figure 3 3 17 3 Remove the two screws and 8 pin socket from the rear of the drawer 4 Detach the 8 pin paper width switch connector from the 8 pin socket 5 Remove the three screws holding the rack adjuster 6 While raising the drawer lift in the direction of the arrow remove the rack adjuster Drawer lift 8 pin socket ...

Страница 324: ...crews Paper width switch Figure 3 3 19 Detaching the paper width switch 8 Apply the specified grease to the printed surface of the new paper width switch shaded area in the diagram and fit the switch to the rack adjuster Apply the specified grease Figure 3 3 20 Paper width switch 9 Refit all removed parts ...

Страница 325: ...screw holding the inner right cover and then the cover 4 Remove the screw holding the upper registration cleaner assembly Replace the assembly 5 Refit all removed parts Detaching the lower registration cleaner assembly 1 Open the front cover 2 Remove the screw holding the lower registration cleaner assembly Replace the assembly 3 Refit all removed parts Upper registration cleaner assembly Screw In...

Страница 326: ...rt End Is the center of the image aligned with that of the original Loosen the three screws holding the rack adjuster and change the position of the adjuster so that the centers of the original and the copy image are aligned For example 1 move it toward the machine front For example 2 move it toward the machine rear Screws Rack adjuster Figure 3 3 23 Adjusting the position of the rack adjuster Ori...

Страница 327: ... Is the leading edge registration within the range of 20 1 mm Press the print key The new setting is stored Press the stop clear key to exit maintenance mode End Selected the item to be adjusted For output example 1 decrease the value using the Down key For output example 2 increase the value using the Up key RCL ON DATA Leading edge registration RCL ON DATA 2 Leading edge registration for duplex ...

Страница 328: ...ct perform the above adjustments in maintenance mode Procedure Yes No Start Enter maintenance mode Enter 034 using the numeric keys Press the print key Press the interrupt key Press the print key to make a test copy Is the image correct Press the print key The new setting is stored Press the stop clear key to exit maintenance mode End Select LSUOUT DATA For output example 1 decrease the value usin...

Страница 329: ...trailing edge margin 5 0 10 0 5 0 Printer left right margin 5 0 10 0 3 0 Printer trailing edge margin for duplex copying secondface 5 0 10 0 4 0 Increasing the value makes the margin wider and decreasing it makes the margin narrower Changing the value by 1 moves the margin by 0 1 mm for all Select the items to be adjusted on the touch panel Are the margins correct Change the setting using the Up D...

Страница 330: ... A B Ejection direction reference Printer trailing edge margin for duplex copying 3 1 0mm Printer leading edge margin 3 1 0mm Printer left margin 2 0 5mm Printer right margin 2 0 5mm Printer trailing edge margin 3 1 0mm Duplex copy mode first face A3 11 17 Normal copy mode A3 11 17 Figure 3 3 26 ...

Страница 331: ...n key Setting range 30 20 Changing the value by 1 changes the amount of slack by 1 mm Reference DECK DATA 20 BYPASS DATA 5 DUPLEX DATA 25 The greater the value the larger the amount of slack the smaller the value the smaller the amount of slack The new setting is stored Select the item to be adjusted DECK DATA Amount of slack at the registration roller for drawer feed BYPASS DATA Amount of slack a...

Страница 332: ...contact glass remove the contact glass 4 Move the scanner to the cutouts at the center of the machine Caution When moving the scanner do not touch the exposure lamp nor inverter PCB 5 Detach the exposure lamp 2 pin connector from the inverter PCB 6 Remove the two screws holding the exposure lamp and then the lamp 7 Clean or replace the exposure lamp 8 Refit all removed parts Exposure lamp 2 pin co...

Страница 333: ...g the lamp wire and remove the wire from the inverter PCB Caution Remove the lamp wire completely from the machine 6 Remove the screws holding the front cover and then the cover 7 Remove the four screws holding the operation unit lower and inner covers and then the covers 8 Detach the three connectors and clamp from under the operation unit main PCB 9 Remove the six screws holding the operation un...

Страница 334: ... holes at the front and rear of the scanner unit to pin the mirror 2 frame in position 2 Secure the two frame securing tools at the machine front and rear using the two screws for each 3 Hook the round terminal on one end of the scanner wire onto the left catch on the inside of the scanner unit 1 4 Loop the scanner wire around the rear groove in the scanner wire pulley on the mirror 2 frame windin...

Страница 335: ...the scanner wire pulley at the machine left winding from below to above 4 10 Loop the scanner wire around the front groove in the scanner wire pulley on the mirror 2 frame winding from below to above 5 11 Run the scanner wire around the wire guide at the machine left 6 12 Hook the round terminal onto the scanner wire spring 7 13 Hook the other end of the scanner wire spring onto the catch at the m...

Страница 336: ...frame 20 While holding the scanner wire on the mirror 1 lower frame secure the wire retainers at the front and rear of the mirror 1 lower frame using the two screws for each Screws Screws Frame securing tool Mirror 2 frame Wire retainer Mirror 1 lower frame Wire retainer Frame securing tool Mirror 2 frame Mirror 1 lower frame Figure 3 3 33 Securing the scanner wire 21 Retighten the two screws secu...

Страница 337: ...ration unit main PCB 6 Remove the six screws holding the operation unit and then the unit 7 Remove the five clamps and two connectors at the front of the scanner unit 8 Remove the five clamps and twelve connectors at the rear of the scanner unit 9 Remove the screw holding the two grounding wires at the rear of the scanner unit and then the wires 10 Remove the wires detached in steps 7 8 and 9 from...

Страница 338: ...he three pins and replace the laser scanner unit 17 Refit all removed parts Caution When fitting the scanner unit fit from directly above the machine to prevent deformation of the grounding point Pins Laser scanner unit Laser scanner unit Connector LSU adjuster mount Connectors Screws Figure 3 3 35 Replacing the laser scanner unit ...

Страница 339: ...ht cover 2 While taking care not to touch the shading plate or rear face of the contact glass remove the contact glass 3 Remove the ISU and lower ISU covers and detach the two connectors Screws Screws Screws ISU cover Screws Connectors Lower ISU cover Screws ISU Figure 3 3 36 Detaching the ISU and lower ISU covers 4 Remove the four screws holding the ISU and then the ISU 5 Check or replace the ISU...

Страница 340: ...s the following tools Two 2 positioning pins P N 18568120 Procedure 1 Secure the ISU using the two positioning pins 2 Refit the four screws 3 Remove the two positioning pins ISU Positioning pin Positioning pin Screws Screws Figure 3 3 37 Installing the ISU ...

Страница 341: ...reness of the copy image and if it is not obtained perform the longitudinal squareness adjustment Procedure Yes No Press the print key and make a test copy at 100 magnification Start Remove the contact glass Loosen the two screws and adjust the position of the mirror 2 frame For copy example 1 move the frame in the direction of the white arrow e For copy example 2 move the frame in the direction o...

Страница 342: ...three screws and refit the contact glass Yes No Press the print key and make a copy at 100 magnification Start End Is the image correct Enter maintenance mode Enter 089 using the numeric keys Press the interrupt key Select 1 DOT LINE Press the print key Exit maintenance mode Press the stop clear key Remove the contact glass Loosen the three screws and adjust the position of the laser scanner unit ...

Страница 343: ...2A3 4 3 3 34 Pin holes Laser scanner unit LSU adjustment shaft Adjustment access hole in the machine front Figure 3 3 41 Adjusting the position of the laser scanner unit ...

Страница 344: ...the contact glass Remove the contact glass and adjust the lateral squareness of the ISU by rotating the pin For copy example 1 rotate the pin in the direction of the black arrow For copy example 2 rotate the pin in the direction of the white arrow e Yes No Press the print key and make a test copy at 100 magnification Start End Is the image correct Place the original on the contact glass Pin Figure...

Страница 345: ...o Start End Press the interrupt key Exit maintenance mode Set an A3 size original and make a test copy with the 100 magnification Is the image correct Setting range 25 25 Reference 0 Changing the value by 1 changes the magnification by 0 1 Increasing the value makes the image wider and decreasing it makes the image narrower For copy example 1 increase the value using the Up key For copy example 2 ...

Страница 346: ...nter 065 using the numeric keys Yes No Start End Press the interrupt key Exit maintenance mode Set an A3 size original and make a test copy with the 100 magnification Is the image correct Setting range 25 25 Reference 0 Changing the value by 1 changes the magnification by 0 1 Increasing the value makes the image longer and decreasing it make the image shorter For copy example 1 increase the value ...

Страница 347: ... Enter maintenance mode Enter 067 using the numeric keys Press the print key Press the interrupt key Set an A3 size original and make a test copy with the 100 magnification Is the scanner center line correct For copy sample 1 decrease the value using the Down key For copy sample 2 increase the value using the Up key Press the print key The new setting is stored Press the stop clear key Exit the ma...

Страница 348: ...s the scanner leading edge registration correct Yes No Start Enter maintenance mode Enter 066 using the numeric keys Press the print key Press the interrupt key Set an A3 size original and make a test copy with the 100 magnification For copy sample 1 decrease the value using the Down key For copy sample 2 increase the value using the Up keys Press the print key The new setting is stored Press the ...

Страница 349: ... maintenance mode Enter 403 using the numeric keys Press the print key Set an A3 size original and make a test copy with the 100 magnification Press the print key The new setting is stored Setting range default Scanner left margin 0 20 2 Scanner leading edge margin 4 20 6 Scanner right margin 0 20 2 Scanner trailing edge margin 0 20 6 Changing the value by one moves the margin by 0 5 mm for all Se...

Страница 350: ...s the stop clear key Exit maintenance mode End Proceed to another mode A B Scannerleading edge margin 3 1 0mm Scanner left margin 2 1 0mm Original Scanner right margin 2 1 0mm Scanner trailing edge margin 3 1 0mm Figure 3 3 48 ...

Страница 351: ...f the charger wire must not protrude more than 2 mm from under the charger wire retainer pin Use clean undamaged tungsten wire Keep the charger wire taut by stretching it Clean the main charger shield when replacing the charger wire Do not use organic solvents such as alcohol or thinner to clean the main charger shield Procedure 1 Draw the image formation unit out of the machine 2 Remove the two s...

Страница 352: ...ger front and rear lids 5 Remove the charger spring from the charger wire retainer pin and charger terminal and then the charger wire Charger wire Charger wire retainer pin Main charger rear lid Main charger front lid Charger terminal Charger spring Main charger grid Grid tension plate Figure 3 3 50 Detaching the charger wire ...

Страница 353: ...r spring onto the charger terminal of the main charger rear housing 8 Pass the wire through the notch in the charger wire retainer pin and stretch it taut The charger wire must be adjusted so that the charger spring stretches to 13 2 mm and the spring end aligns with the rib on the main charger rear housing 9 Hook the charger wire onto the projection on the main charger front housing 10 Insert the...

Страница 354: ...case or storage bag to protect the surface from light Procedure 1 Open the front cover 2 Lower the paper conveying section by turning the paper transfer section release lever as shown in Figure 3 3 52 While pressing the image formation unit release button pull the image formation unit out from the machine Paper transfer section release lever Image formation unit release button Image formation unit...

Страница 355: ...lade lever in the direction of the arrow so that the cleaning blade is kept away from the drum and then tighten the cleaning blade pin 5 Remove the two screws and open the upper cleaning cover on the left of the drum 6 Remove the two screws and open the image formation rail in the direction of the arrow Screw Image formation rail Cleaning blade lever Cleaning blade pin Upper cleaning cover Screw S...

Страница 356: ... sub hopper 1 pin connector 4 pin connector Figure 3 3 55 9 Move the developing unit to the right of the image formation unit and remove it from the unit 10 Remove one screw each from the drum front and rear retainers and then the drum from the image formation unit Drum Screw Screw Developing unit Image formation unit Drum rear retainer Drum front retainer Figure 3 3 56 Detaching the developing un...

Страница 357: ...2A3 4 3 3 48 11 Remove the drum front and rear retainers from the drum Replace the drum Drum rear retainer Drum front retainer Drum Figure 3 3 57 Detaching the drum front and rear retainers ...

Страница 358: ...ing the drum orient correctly with the thinner end of the drum flange shaft at the machine front and the thicker end at the machine rear Drum Machine rear Machine front Drum flange Drum flange Figure 3 3 58 When refitting the toner sub hopper align the toner sub hopper hole with the developing unit hole and connect the coupling to the joint When installing the main charger assembly fix the assembl...

Страница 359: ...Do not clean the drum with alcohol or other organic solvent Required supplies Polishing cloth specified synthetic cotton Toner Procedure 1 Remove the drum from the imaging unit see page 3 3 45 2 Apply a polishing cloth to the drum and gently wipe the drum taking care not to damage the surface 3 Apply toner to another cloth and wipe the drum surface with it in the same manner 4 Refit the drum 5 Ref...

Страница 360: ...er seal is soiled Procedure 1 Draw the image formation unit out and remove the developing unit 2 Remove the two screws holding the developing unit upper seal and then the seal 3 Clean or replace the developing unit upper seal 4 Refit all removed parts Screws Developing unit upper seal Figure 3 3 61 Detaching the developing unit upper seal ...

Страница 361: ...g a hexagonal wrench 2 Turn the developing roller shaft using a straight screwdriver until the distance between the top of the magnetic brush and the bottom of the developing unit housing is 15 mm reference 3 Tighten the hexagonal socket head screw to secure the developing roller shaft If the distance is smaller than the specified value carrier or background appears on the copy image 4 After adjus...

Страница 362: ...re 1 Remove the two screws holding the developing unit upper seal and then the seal When refitting the seal fit while holding it upward 2 Remove the two screws disengage the two hooks and detach the developing unit upper cover Screws Screws Hook Developing unit upper cover Developing unit upper seal Hook Figure 3 3 63 Detaching the developing unit upper cover ...

Страница 363: ...blade until the correct distances are obtained at the center and ends of the developing unit housing the 0 50 mm gauge should go into the gap and the 0 55 mm one should not The smaller the distance the lighter the image the larger the distance the darker the image Adjustment screw Developing roller Adjustment screw Adjustment screw Doctor blade Figure 3 3 64 ...

Страница 364: ...front cover 2 Slide off the developing duct cover downward 3 Replace the developing duct filter Caution When fitting the developing duct filter ensure that the harder side of the filter faces the fan 4 Refit all removed parts Developing duct filter Developing duct cover Figure 3 3 65 Detaching the developing duct filter ...

Страница 365: ...of the transfer charger housing The cut end of the charger wire must not protrude from under the charger wire retainer pin Keep the charger wire taut by stretching the charger spring Clean the charger shield when replacing the charger wire Procedure 1 Turn the paper transfer section release lever to the right to lower the paper conveying section 2 Remove the connector pin and then the transfer cha...

Страница 366: ...eparation charger cleaning pad 6 Remove the charger wire retainer pins charger springs and then the charger wires Separation guide Transfer charger rear lid Transfer charger front lid Transfer charger cleaning pad Separation charger cleaning pad Charger wire retainer pins Charger wires Charger springs Figure 3 3 67 Detaching the charger wires ...

Страница 367: ...the hole at the front of the transfer charger housing The charger wire must be adjusted so that the charger spring stretches to 12 5 1 5 mm Cut off the excess wire under the charger wire retainer pin 11 Refit all removed parts When installing the main charger assembly fix the assembly pushed all the way toward the machine front Charger wire retainer pin Front of the transfer charger housing Rear o...

Страница 368: ... the cleaning blade as follows Procedure 1 Draw the image formation unit out 2 Remove the developing unit main charger assembly and drum 3 Remove the pin holding the cleaning blade and then the blade 4 Check or replace the cleaning blade Pin Cleaning blade Figure 3 3 69 Detaching the cleaning blade ...

Страница 369: ...ling the cleaning blade take care not to trap the sponges at both ends After replacing the cleaning blade move it away from the drum and run maintenance item U160 see page 3 2 50 Cleaning blade Sponge Sponge Figure 3 3 70 Installing the cleaning blade ...

Страница 370: ...as follows Procedure 1 Remove the developing unit main charger assembly and drum 2 Remove the cleaning spring Cleaning spring Figure 3 3 71 3 Shift the thrust spring toward the machine rear and detach the cleaning blade shaft Thrust spring Cleaning blade shaft Cleaning blade shaft Figure 3 3 72 ...

Страница 371: ... cleaning brush 6 Clean or replace the cleaning brush 7 Refit all removed parts When installing the cleaning brush position the end with the D section at the machine rear and take care not to pinch the cleaning lower seal assembly 2 pin connector Cleaning brush Bushing Bushing Cleaning unit Cleaning lower seal assembly Gear E ring E ring D section Figure 3 3 73 ...

Страница 372: ...assembly and drum 2 Remove the four screws holding the drum separation claw assembly and then the assembly 3 Remove the two screws holding the cleaning lower seal assembly and then the assembly 4 Replace the drum separation claw assembly and cleaning lower seal assembly Drum separation claw assembly Cleaning lower seal assembly Screws Screw Screw Figure 3 3 74 Detaching the drum claw assembly and ...

Страница 373: ...g heaters M and S as follows Procedure 1 While raising the fixing unit release lever draw the fixing unit out of the machine 2 Remove the screw holding the fixing unit and then the unit Screw Fixing unit Fixing unit release lever Illustration shows a 42 ppm Figure 3 3 75 Detaching the fixing unit ...

Страница 374: ...e fixing unit front cover and then the cover 5 Remove the screw and two pins holding the fixing unit upper cover and then the cover Fixing unit front cover Screws Pins holding the fixing unit cover Screw Fixing unit upper cover Fixing unit cover Figure 3 3 76 Detaching the fixing unit front cover and cover ...

Страница 375: ...e fixing unit wire from the fixing unit thermostat Fixing heater wire Fixing unit wire Fixing unit thermostat Figure 3 3 77 7 Detach the two connectors on the fixing heater wire on the rear of the fixing unit Connector white Connector red Figure 3 3 78 ...

Страница 376: ... heater front retainer Screw Fixing heater S Fixing heater M S M Figure 3 3 79 Detaching fixing heaters M and S 10 Replace fixing heaters M and S When fitting place fixing heater M on the right and S on the left as viewed form the fixing unit front Fit the white connector on the rear of the fixing unit to heater M and the red one to heater S 11 Refit all removed parts ...

Страница 377: ...thermistor Replace the fixing unit thermistor as follows Procedure 1 Detach the connector 2 Remove the screw holding the fixing unit thermistor and then the thermistor Connector Fixing unit thermistor Screw Figure 3 3 80 Detaching the fixing unit thermistor ...

Страница 378: ...tion on the thermistor through the hole in the fixing unit thermistor film and then insert into the cutout in the fixing unit stay Fixing unit thermistor Projection Fixing unit thermistor film Cutout Fixing unit stay Figure 3 3 81 Installing the fixing unit thermistor 4 Refit all removed parts ...

Страница 379: ...eriously damaged Procedure 1 Remove the connectors of the fixing unit wire and the fixing heater wire from the fixing unit thermostat Remove the connectors while pushing the projection on each connector 2 Remove the two screws and then the fixing unit thermostat 3 Replace the fixing unit thermostat Fixing heater wire Fixing unit thermostat Fixing unit wire Screws Figure 3 3 82 Detaching the fixing...

Страница 380: ...ng the press roller Replace the press roller as follows Procedure 1 Remove the two screws and open the fixing unit stay in the direction of the arrow Screw Screw Fixing unit stay Figure 3 3 83 Detaching the fixing unit stay ...

Страница 381: ...Detaching the press roller 3 Remove the E ring on either the front or rear end of the press roller and pull out the press roller shaft E ring Press roller shaft E ring Figure 3 3 85 Detaching the press roller shaft 4 Replace the press roller 5 Refit all removed parts ...

Страница 382: ... fixing unit stay see page 3 3 71 3 Loosen the screw holding each of the fixing unit front and rear frames and move the heat roller stopper in the direction of the arrow 4 Remove the heat roller Heat roller stopper Heat roller Screw Fixing unit front frame Heat roller stopper Screw Fixing unit rear frame Figure 3 3 86 Detaching the heat roller ...

Страница 383: ...ont end of the heat roller 6 Remove the circlip gear bearing and bushing from the rear end of the heat roller 7 Replace the heat roller Circlip Circlip Bearing Bearing Gear Bushing Heat roller Bushing Figure 3 3 87 Refitting the heat roller 8 Refit all removed parts ...

Страница 384: ...heat roller separation claw shaft and the springs from the seven heat roller separation claws 3 Remove the heat roller separation claws from the fixing unit upper guide 4 Replace the heat roller separation claws Springs Fixing unit upper guide Heat roller separation claws E ring Fixing unit cover Figure 3 3 88 Detaching the heat roller separation claws 5 Refit all removed parts ...

Страница 385: ... follows Procedure 1 Open the fixing unit cover 2 Remove the two E rings from each of the press roller separation claws and then the four claws 3 Replace the press roller separation claws Fixing unit cover Press roller separation claws Figure 3 3 89 Detaching the press roller separation claws 4 Refit all removed parts ...

Страница 386: ...he cooling filter as follows Procedure 1 Remove the screw holding the ozone filter retainer and then the retainer 2 Replace the cooling filter Ozone filter retainer Cooling filter Screw Figure 3 3 90 Detaching the cooling filter 3 Refit all removed parts ...

Страница 387: ... follows Procedure 1 Remove the two screws holding the lower left cover and then the cover 2 Remove the four screws holding the middle right cover and then the cover 3 Replace the ozone filter Ozone filter Figure 3 3 91 Fitting the ozone filter 4 Refit all removed parts ...

Страница 388: ...ess the print key Wait for 30 s and remove the jammed paper manually Press the interrupt key Exit maintenance mode Is the width of the black band printed on the image indicating the part which stopped in the fixing section 7 0 0 5 mm Turn the fixing pressure nuts to adjust the fixing pressure Press the interrupt key Clean the heat and press roller if they are dirty Fixing pressure nuts Figure 3 3 ...

Страница 389: ...as follows Procedure 1 Open the duplex unit 2 Remove the stop ring and duplex forwarding pulley 3 Refit all removed parts When fitting the duplex forwarding pulley align the projections of the duplex forwarding pulley with the slots in the forwarding pulley Slots Forwarding pulley Stop ring Projections Duplex forwarding pulley Figure 3 3 94 ...

Страница 390: ...witchback roller 1 Open the duplex unit 2 Remove the two screws holding the duplex unit front cover and then the cover only for 42 ppm 3 Loosen the three screws at the front of the duplex unit Remove the two screws on the top and then the duplex unit cover Duplex unit front cover Screws Screws Screws Duplex unit cover Illustration shows a 42 ppm Figure 3 3 95 Detaching the duplex unit cover ...

Страница 391: ...ping guide by gently bending it and taking out of the hole in the machine rear first 8 Remove the four screws holding the side registration section and slide off the section toward the machine right 9 Remove the two screws holding the duplex paper conveying upper cover and then the cover 3 pin connector Duplex paper conveying upper cover Paper tapping guide Side registration section Screw Screws S...

Страница 392: ...ft solenoid and then the solenoid Screw Switchback feedshift solenoid Figure 3 3 97 Detaching the switchback feedshift solenoid 11 Remove the E ring and then the bushing at the front of the duplex unit Bushing E ring Figure 3 3 98 Detaching the switchback roller 1 ...

Страница 393: ...p ring holding the switchback roller and then the roller from the shaft When refitting the switchback roller fit so that it turns in the same direction as the shaft when the shaft is turned in the direction of the white arrow Bushing Fixing drive gear E ring E ring Pin Shaft Switchback roller Stop ring Figure 3 3 99 Detaching the switchback roller 2 ...

Страница 394: ...ront cover 42 ppm only and then the duplex unit cover 2 Remove the screw holding the switchback feedshift solenoid and then the solenoid 3 Remove the E ring and then the bushing at the tront of the duplex unit Bushing E ring Figure 3 3 100 Detaching the duplex upper registration roller 1 ...

Страница 395: ...r of the duplex unit and then the duplex registration gear 6 Remove the spring pin and bushing and then the duplex upper registration roller Figure 3 3 101 Detaching the duplex upper registration roller 2 Screws Stock switch mount Bushing Spring pin Duplex registration gear E ring Duplex upper registration roller Bushing ...

Страница 396: ...l Make a test copy at 100 and using the largest size paper in duplex mode End Loosen the four screws holding the side registration section move the section and retighten the screws For copy example 1 move the sec tion toward the machine front For copy example 2 move the sec tion toward the machine rear Screws Screws Side registration section Illustration shows a 42 ppm Figure 3 3 103 Adjusting the...

Страница 397: ...ithin 1 mm Press the print key The new setting is stored After paper is stocked in the duplex unit open the unit and move the paper all the way to the side registration rear guide Remove the paper and reinstall the duplex unit Remove the paper and reinstall the duplex unit Press the stop clear key Exit maintenance mode End Change the setting using the Up Down keys Increasing the value makes the ga...

Страница 398: ... the two stop rings and then the original feed pulley assembly by sliding out the bushings Stop ring Stop ring Bushing Bushing Original feed pulley assembly Figure 3 3 105 Detaching the original feed pulley assembly Detaching the DF original feed pulley 4 Remove the two stop rings and then the DF original feed pulley from the original feed front shaft DF forwarding pulleys DF forwarding belt DF fo...

Страница 399: ...riginal feed pulley and DF forwarding pulleys 7 Refit all removed parts When fitting the DF original feed pulley and DF forwarding pulleys ensure that the side having the one way clutch faces the machine rear DF forwarding pulleys DF forwarding belt DF original feed pulley 28 Forwarding shaft Stop ring Bushing One way clutch Figure 3 3 107 Detaching the DF forwarding pulleys ...

Страница 400: ...F reversing cover 2 Remove the two screws holding the upper original feed section cover and then the cover 3 Remove the two screws holding the DF rear cover 4 Remove the screw holding the fulcrum pin and then the pin 5 Detach the 6 pin connector and remove the original table Fulcrum pin 6 pin connectors Original table Screw Figure 3 3 108 ...

Страница 401: ...riginal feed upper guide and pressing the original set switch actuator remove the DF original feed lower guide DF original feed upper guide DF original feed lower guide Original set switch actuator Screws To be loosened only Screws Screw Screw Figure 3 3 109 9 Detach the original set switch 3 pin connector 10 Remove the two screws holding the separation pulley retainer Separation pulley retainer 3...

Страница 402: ...n shaft 12 Clean or replace the DF separation pulley 13 Refit all removed parts When fitting the DF separation pulley ensure that the side having the one way clutch faces the machine rear DF separation pulley Stop rings One way clutch Separation shaft Pin Figure 3 3 111 Detaching the DF separation pulley ...

Страница 403: ... and duplex feeds page 3 3 22 and the scanner image lateral squareness reference page 3 3 33 first Check for lateral squareness of the copy image and if squareness is not obtained adjust the lateral squareness of the DF Procedure Adjust the position of the SRDF For copy example 1 rotate the adjustment screw in the direction of the white arrow e For copy example 2 rotate the adjustment screw in the...

Страница 404: ...ring the right leg of the SRDF on the right 3 Adjust the position of the SRDF by rotating the adjustment screw behind the right leg of the SRDF 4 Retighten the screw loosened in step 2 5 Refit all removed parts Figure 3 3 113 Screw Adjustment screw SRDF right leg ...

Страница 405: ...ginal on the DF and make a test copy Yes No Start End Exit maintenance mode Press the stop clear key Is the image correct Enter 070 using the numeric keys Press the interrupt key Setting range 25 25 Changing the value by 1 changes the magnification by 0 1 Reference 0 Change the setting For copy example 1 increase the value using the Up key to make the copy image longer For copy example 2 decrease ...

Страница 406: ...ter maintenance mode Place and original on the DF and make a test copy Yes No Start End Change the setting For copy example 1 increase the value using the Up key For copy example 2 decrease the value using the Down key Exit maintenance mode Press the stop clear key Is the image correct Enter 072 using the numeric keys Press the interrupt key Press the print key Setting range 39 0 39 0 Changing the...

Страница 407: ...mode Enter 071 using the numeric keys and press the print key Yes No Start End For copy example 1 increase the value using the Up key For copy example 2 decrease the value using the Down key Press the interrupt key Exit maintenance mode Press the stop clear key Place an original on the DF and make a test copy Is the image correct Setting range 32 32 Reference 0 Changing the value by 1 moves the co...

Страница 408: ...alue using the Down key Press the interrupt key Exit maintenance mode Press the stop clear key Place an original on the DF and make a test copy Is the image correct Setting range 32 32 Reference 0 Changing the value by 1 moves the copy image by 0 19 mm Press the print key The new setting is stored To adjust the DF trailing edge registration select TRAIL EDGE ADJ Figure 3 3 117 Original Copy exampl...

Страница 409: ...in narrower Touch panel display DF A MARGIN DF left margin DF B MARGIN DF leading edge margin DF C MARGIN DF right margin DF D MARGIN DF trailing edge margin Yes No Start Enter maintenance mode Enter 404 using the numeric keys Press the print key Place an original on the DF and make a test copy Press the print key The new setting is stored Setting range default DF left margin 0 20 2 DF leading edg...

Страница 410: ...s No A B Proceed to another mode Press the stop clear key Exit maintenance mode End DF leading edge margin 3 1 0mm DF left margin 2 0 5mm DF right margin 2 0 5mm DF trailing edge margin 3 1 0mm Original Figure 3 3 118 ...

Страница 411: ...side cover 3 Remove the stop rings 4 Remove the one way drum 5 Clean or replace the upper and lower deck separation rollers 6 Refit all removed parts One way drum Upper deck separation roller Stop rings Lower deck separation roller Deck side cover Figure 3 3 119 Detaching and refitting the upper and lower deck separation rollers One way drum Upper deck separation roller Figure 3 3 120 Installing t...

Страница 412: ...ws holding the deck paper conveying motor bracket and then the bracket 4 Remove the two screws holding the deck paper conveying unit assembly and then the assembly Deck paper conveying roller Spring Screws Deck paper feed roller 1 Deck paper conveying motor bracket Screws Deck paper feed roller 2 Deck paper conveying unit assembly Figure 3 3 121 Detaching and refitting the deck paper conveying uni...

Страница 413: ...p ring 2 While pressing the roller down pull out the shaft 3 Take deck paper feed roller 1 out and clean or replace 4 Refit all removed parts Stop ring Deck paper feed roller 1 Shaft Figure 3 3 122 Detaching and refitting deck paper feed roller 1 Use the above procedure to detach and refit deck paper feed roller 2 and the paper conveying roller ...

Страница 414: ...and retighten the screws Yes Are the center lines of the original and copy image misaligned Loosen the two screws securing the center adjuster and adjust the position of the adjuster For copy example 1 move it toward the machine rear a For copy example 2 move it toward the machine front f Retighten the two screws securing the center adjuster and close the large paper deck Start End Make a test cop...

Страница 415: ...PCB Initial Settings 3 4 1 Replacing the main PCB 3 4 1 1 Replacing the main PCB only 3 4 1 2 Replacing the main PCB and backup RAM 3 4 1 3 4 2 Replacing the main PCB ROMs 3 4 2 3 4 3 Adjustment free variable resisters VR 3 4 3 ...

Страница 416: ...f the current settings for maintenance items 3 Exit the maintenance mode 4 Turn the main switch off and disconnect the power plug 5 Replace the main PCB and backup RAM with the new ones After installing the new backup RAM 6 Insert the power plug and turn the main switch on 7 Enter maintenance mode 8 Execute maintenance item U020 9 Execute maintenance item U252 and select the destination 10 Execute...

Страница 417: ...ROM IC P N 2A368060 Procedure 1 Turn the main switch off and disconnect the power plug 2 Remove the screw securing the main PCB ROM cover 3 Replace the main ROM IC IC45 engine ROM IC IC57 and scanner ROM IC IC54 4 Refit the main PCB ROM cover 5 Insert the power plug and turn the main switch on Scanner ROM IC Main ROM IC Engin ROM IC Figure 3 4 1 Replacing the main PCB ROMs ...

Страница 418: ...e variable resisters VR The variable resistors listed below are set at the factory prior to shipping and should not be adjusted in the field High voltage transformer PCB VR101 VR102 VR201 VR202 VR301 VR401 VR402 Power source PCB VR301 ...

Страница 419: ...1 1 25 2A3 4 CONTENTS 3 5 Self Diagnosis 3 5 1 Self diagnosis 3 5 1 1 Self diagnostic function 3 5 1 ...

Страница 420: ...displayed as a code consisting of C followed by a number between 001 and 924 indicating the nature of the problem A message is also displayed requesting the user to call for service After removing the problem the self diagnostic function can be reset by turning safety switches 1 2 or 3 off and back on Call for service 012345678901234 C241 Figure 3 5 1 Service call code display ...

Страница 421: ...ck the connection of con nectors CN6 on the main PCB and CN6 on the operation unit main PCB and the continuity across the connector termi nals Repair or replace if nec essary Replace the main PCB or op eration unit main PCB and check for correct operation C001 C003 C010 C011 C021 Memory copy PCB 1 com munication problem Problems with data from memory copy PCB 1 Memory copy PCB 2 prob lem 1 Problem...

Страница 422: ...n of con nector CN4 on the main PCB and the connector on the printer board Repair or re place if necessary Replace the main PCB or printer board and check for correct operation Code Contents Remarks Causes Check procedures corrective measures Communication problem between the engine PCB and main PCB There is no reply after 20 retries at communication Scanner communication problem There is no reply...

Страница 423: ...the connector terminals Defective main PCB or memory copy PCB 1 Poor contact of the connector terminals Defective en gine PCB Defective main PCB Defective deck main PCB Poor contact of the connector terminals Defective en gine PCB Defective main PCB Defective desk main PCB C026 C032 C032 Memory copy PCB 1 com munication problem There is no reply after five retries at transmitting There is no reply...

Страница 424: ...opy PCB 2 and check for correct operation Replace the main PCB and check for correct operation Replace the exposure lamp or inverter PCB Replace the mainPCB Adjust the position of the con tact glass shading plate If the problem still occurs re place the scanner home posi tion switch Replace the ISU Finisher communication problem 2 Communication errors from the communication micro computer IC56 on ...

Страница 425: ...oothly If not grease the bushings and gears Check for broken gears and replace if any Poor contact of the drive motor connector ter minals Defective drive motor rotation control circuit Defective drive transmission system Poor contact of the paper con veying motor connector ter minals Defective paper conveying mo tor rotation con trol circuit Defective drive transmission system C200 C210 Drive mot...

Страница 426: ...LOCK signal remains high for 1 s 1 s after the paper feed motor has turned on Desk drive motor prob lem 3 DDM LOCK signal remains high for 1 s 2 s after the desk drive motor has turned on Check for continuity across the coil If none replace the side registration motor Check if CN9 12 on the en gine PCB goes high when the side registration home position switch is on and goes low when the switch is ...

Страница 427: ...f the upper lift motor Defective upper lift motor Poor contact of the upper lift motor connec tor terminals Defective upper lift limit switch Poor contact of the upper lift limit switch connector ter minals Broken gears or couplings of the lower lift motor Defective lower lift motor Poor contact of the lower lift motor connec tor terminals C231 C241 C242 Desk drive motor prob lem 3 DDM LOCK signal...

Страница 428: ...upper desk lift motor con nector termi nals Defective upper desk lift limit switch Poor contact of the upper desk lift limit switch connector ter minals Check if CN15 4 on the en gine PCB goes low when the lower lift limit switch is turned on If not replace the upper lift limit switch Reinsert the connector Also check for continuity within the connector cable If none rem edy or replace the cable R...

Страница 429: ...ive scan ner home posi tion switch Defective main PCB or scan ner motor PCB Defective scan ner motor Replace the lower desk lift motor Check for continuity across the coil If none replace the lower desk lift motor Reinsert the connector Also check for continuity within the connector cable If none rem edy or replace the cable Check if CN3 12 on the desk main PCB goes low when the lower desk lift li...

Страница 430: ...ly gon motor Defective power source PCB Defective en gine PCB Poor contact of the polygon motor connec tor terminals Defective poly gon motor Replace the main PCB and check for correct operation Check the connection of con nector CN7 on the scanner motor PCB and the continuity across the connector termi nals Repair or replace if nec essary Replace the original size sen sor Replace the main PCB or ...

Страница 431: ...PCB and the continuity across the connector terminals Re pair or replace if necessary Measure the resistance If it is infinite replace the fixing unit thermistor Check and reinstall if neces sary Check for continuity If none replace the fixing unit thermo stat C401 C420 C510 C511 C610 Polygon motor steady state problem The polygon motor rotation is not stable for 600 ms af ter the polygon motor ro...

Страница 432: ... CN3 B8 on the engine PCB and the continuity across the connector terminals Re pair or replace if necessary Measure the resistance If it is infinite replace the fixing unit thermistor Check and reinstall if neces sary Check for continuity If none replace the fixing unit thermo stat Check and reinstall if neces sary Check for continuity If none replace the fixing unit heater M or S C610 C620 Broken...

Страница 433: ...main PCB if C640 is detected while CN4 3 on the power source PCB outputs the zero crossing signal Replace the toner sensor Reinsert the connector Also check for continuity within the connector cable If none rem edy or replace the cable Replace the developer C630 C640 C710 Abnormally high fixing temperature The fixing temperature ex ceeds 220 C 428 F for 10 s The fixing unit high tem perature detec...

Страница 434: ...tor cable If none rem edy or replace the cable Replace the humidity sensor PCB Remove the recycled toner in the toner main hopper if it locks up Replace the toner hopper lockup sensor Reinsert the connectors Also check for continuity within the cable If none remedy or re place the cable Check for continuity across the coils If none replace the recycle motor Reinsert the connectors Also check for c...

Страница 435: ... tray unit or front cover catches are damaged The paper conveying motor con nector makes poor contact The paper conveying motor mal functions Defective fin isher main PCB The paper conveying belt is out of phase The paper conveying belt clutch malfunctions The paper conveying belt home position sen sor malfunc tions The paper conveying belt home position sen sor connector makes poor contact The in...

Страница 436: ...ogger motor and check for correct opera tion Reinsert the connector Also check for continuity within the connector cable If none rem edy or replace the cable Replace the front jogger home position sensor and check for correct operation Replace the finisher main PCB and check for correct opera tion C814 C817 Finisher tray elevation motor problem 2 The sort tray is not de tected in the home position...

Страница 437: ...e rear jog ger motor malfunctions The rear jog ger motor home position sensor con nector makes poor contact The rear jog ger motor home position sensor mal functions Defective fin isher main PCB C818 Finisher rear jogger motor problem 2 While the rear jogger is not detected in the home posi tion the rear jogger home position sensor does not detect the jogger within 1 5 s of the start of rear jogge...

Страница 438: ... check the car tridge and the stapling section of the stapler b Replace the rear stapler and check for correct opera tion Replace the finisher main PCB and check for correct opera tion C821 C822 Finisher front stapler problem 2 The front stapler home po sition sensor does not change state from non de tection to detection within 0 2 s of the start of front stapler motor counterclock wise forward ro...

Страница 439: ...eck paper con veying motor PCB and check for correct operation Check the gears and remedy if necessary Reinsert the connector Also check for continuity within the connector cable If none rem edy or replace the cable Check the gears and remedy if necessary C920 C921 Deck paper conveying motor problem 1 No pulse is input within 500 ms of the start up No pulse is input within 100 ms of the previous p...

Страница 440: ...r continuity within the connector cable If none rem edy or replace the cable Reinsert the connector Also check for continuity within the connector cable If none rem edy or replace the cable Reinsert the connector Also check for continuity within the connector cable If none rem edy or replace the cable C922 C923 C924 Paper deck motor 2 prob lem 1 No pulse is input within 20 ms of the start up No pu...

Страница 441: ...f the original and copy image when the SRDF is used 3 6 15 22 There is a regular error between the leading edges of the original and copy image when the SRDF is used 3 6 15 23 When the duplex unit is used the center of the original image and that of the copy image do not align 3 6 16 24 When the large paper deck is used the center of the original image and that of the copy image do not align 3 6 1...

Страница 442: ...An original jams in the SRDF during copying a jam in the original switchback section 3 6 27 5 Original jams frequently 3 6 27 Feedshift and duplex sections 3 6 28 1 A paper jam in the feedshift section is indicated during copying jam in feedshift section 3 6 28 2 A paper jam in the duplex section is indicated during copying jam in duplex conveying section 3 6 28 3 A paper jam in the duplex section...

Страница 443: ...ate 3 6 78 20 Feed clutch 4 does not operate 3 6 79 21 Feed clutch 5 does not operate 3 6 79 22 The registration clutch does not operate 3 6 79 23 The bypass paper feed clutch does not operate 3 6 79 24 The eject speed switching clutch does not operate 3 6 80 25 The bypass solenoid does not operate 3 6 80 26 The cleaning lamp does not turn on 3 6 80 27 The exposure lamp does not turn on 3 6 80 28 ...

Страница 444: ... The feedshift solenoid does not operate 3 6 93 3 The duplex forward solenoid does not operate 3 6 92 4 The switchback feedshift solenoid does not operate 3 6 93 5 The duplex paper tapping solenoid does not operate 3 6 93 6 The message requesting covers to be closed is displayed when the left cover is closed 3 6 93 7 Others 3 6 93 Large paper deck 42 ppm optional 52 ppm standard 3 6 94 1 The large...

Страница 445: ...ew 3 6 101 3 Paper jams 3 6 101 4 Abnormal noise is heard 3 6 101 Large paper deck 42 ppm optional 52 ppm standard 3 6 102 1 No primary paper feed 3 6 102 2 Paper is fed askew 3 6 102 3 Multiple sheets of paper are fed at one time 3 6 102 4 Paper jams 3 6 102 5 Abnormal noise is heard 3 6 103 ...

Страница 446: ...ee page 3 6 7 6 A black line appears longitudinally See page 3 6 7 7 A black line appears laterally See page 3 6 8 8 One side of the copy image is darker than the other See page 3 6 8 9 Black dots appear on the image See page 3 6 9 10 Image is blurred See page 3 6 9 11 The leading edge of the image is consist ently misaligned with the original See page 3 6 10 12 The leading edge of the image is sp...

Страница 447: ...lar error between the centers of the original and copy image when the SRDF is used See page 3 6 15 22 There is a regular error between the leading edges of the original and copy image when the SRDF is used See page 3 6 15 23 When the duplex unit is used the center of the original image and that of the copy image do not align See page 3 6 16 20 Image contrast is low carrier scattering See page 3 6 ...

Страница 448: ...2A3 4 3 6 3 25 Toner scatters at the leading edge of the image See page 3 6 17 ...

Страница 449: ...the wire Reinsert the connector Also check for continuity within the connector cable If none remedy or replace the cable Check if CN1 84 on the main PCB goes low when maintenance item U101 is run If not replace the main PCB Check if CN5 B7 on the engine PCB goes low when CN1 84 on the main PCB is held low while maintenance item U101 is run If not replace the engine PCB Check if transfer charging t...

Страница 450: ... PCB goes low when maintenance item U100 is run If not replace the main PCB Check if CN5 B13 on the engine PCB goes low when CN1 86 on the main PCB is held low while maintenance item U100 is run If not replace the engine PCB Check if main charging takes place when CN1 1 on the high voltage transformer PCB goes low while maintenance item U100 is run If not replace the high voltage transformer PCB R...

Страница 451: ...age requesting toner replenishment replace the cartridge Check the number of copies made with the current developer If it has reached the specified limit replace the developer Clean the drum or if the maintenance level has been reached replace the drum see page 3 3 45 Causes 1 Deteriorated developer Causes Check procedures corrective measures 1 Deteriorated developer Check the number of copies mad...

Страница 452: ...fer charger wire 2 Foreign matter in the developing section 3 Flawed drum 4 Dirty shading plate Clean the transfer charger wire or if it is flawed replace it Check if the magnetic brush is formed uniformly If not replace the developer Replace the drum see page 3 3 45 Clean the shading plate 6 A black line appears longitudinally Causes 1 Dirty contact glass 2 Dirty or flawed drum 3 Deformed or worn...

Страница 453: ...heck if the exposure lamp light is distributed evenly If not replace the exposure lamp see page 3 3 23 Replace the drum see page 3 3 45 Clean any part contaminated with toner or carrier in the developing section Clean the main charger wire grid and shield 7 A black line appears laterally Causes 1 Flawed drum 2 Dirty developing section 3 Leaking main charger housing 8 One side of the copy image is ...

Страница 454: ...cleaning blade Replace the cleaning blade see page 3 3 59 Causes 1 Scanner moves erratically 2 Deformed press roller 3 Paper conveying section drive problem Causes Check procedures corrective measures 1 Scanner moves erratically 2 Deformed press roller 3 Paper conveying section drive problem Check if there is any foreign matter on the front and rear scanner rails If any remove it Replace the press...

Страница 455: ...e is sporadically misaligned with the original Causes 1 Registration clutch bypass paper feed clutch or upper or lower paper feed clutch installed or operating incorrectly Causes Check procedures corrective measures 1 Registration clutch bypass paper feed clutch or upper or lower paper feed clutch installed or operating incorrectly Check the installation position and operation of the registration ...

Страница 456: ...edures corrective measures 1 Paper curled Check the paper storage conditions 2 Paper damp Check the paper storage conditions 3 Defective pressure springs Replace the pressure springs Causes 1 Defective cleaning blade Causes Check procedures corrective measures 1 Defective cleaning blade Replace the cleaning blade see page 3 3 59 ...

Страница 457: ...place the paper 3 Drum condensation Clean the drum see page 3 3 50 4 Flawed drum Replace the drum see page 3 3 45 16 Fixing is poor Causes 1 Wrong paper 2 Defective pressure springs 3 Flawed press roller Causes Check procedures corrective measures 1 Wrong paper Check if the paper meets specifications 2 Defective pressure springs Replace the pressure springs 3 Flawed press roller Replace the press ...

Страница 458: ...see page 3 3 38 3 Original placed incorrectly Place the original correctly 18 Image center does not align with the original center 17 Image is out of focus Causes 1 Defective image scanning unit Causes Check procedures corrective measures 1 Defective image scanning unit Replace the image scanning unit Causes 1 Misadjusted image center line 2 Misadjusted scanner center line 3 Original placed incorr...

Страница 459: ...see page 3 3 35 20 Image contrast is low carrier scattering Causes 1 No developing bias output Causes Check procedures corrective measures 1 No developing bias output A Developing bias wire makes poor contact B Defective main PCB C Defective high voltage transformer PCB Check the developing bias wire If there are any problems replace it Check if CN1 85 on the main PCB goes low when maintenance ite...

Страница 460: ...corrective measures Readjust the DF original scanning start position see page 3 3 98 Causes 1 Misadjusted DF original scanning start position 21 There is a regular error between the centers of the original and copy image when the SRDF is used Causes 1 Misadjusted DF center line Check procedures corrective measures Readjust the DF center line see page 3 3 97 Causes 1 Misadjusted DF center line ...

Страница 461: ...ge and that of the copy image do not align Causes 1 Side registration section installed incorrectly 1 Side registration sec tion installed incor rectly Adjust the installation position of the side registration section see page 3 3 87 Causes Check procedures corrective measures 24 When the large paper deck is used the center of the original image and that of the copy image do not align Causes 1 Cen...

Страница 462: ...clean the paper powder from the upper registration cleaner assembly Causes 1 Upper registration cleaner assembly soiled with paper powder 25 Toner scatters at the leading edge of the image Causes 1 Upper registration cleaner assembly soiled with paper powder ...

Страница 463: ...t at CN13 2 on the engine PCB check if CN13 1 on the engine PCB re mains low when the feed switch is turned on and off If it does replace the feed switch With 5 V DC present at CN8 B1 on the engine PCB check if CN8 B2 on the engine PCB remains low when the registra tion switch is turned on and off If it does replace the registra tion switch 1 A paper jam in the paper feed convey ing or eject secti...

Страница 464: ...ch 2 Check if the upper paper feed clutch malfunctions Electrical problem with the up per paper feed clutch With 5 V DC present at CN3 B10 on the engine PCB check if CN3 B9 on the engine PCB remains low when the eject switch is turned on and off If it does replace the eject switch Change the paper Check visually and replace any deformed pulleys Check visually and replace pa per feed switch 1 if it...

Страница 465: ...itch actuator Defective feed switch Check if the bypass paper feed clutch malfunctions Electrical problem with the by pass paper feed clutch Change the paper Check visually and replace any deformed pulleys Check visually and replace pa per feed switch 3 if its actuator is broken With 5 V DC present at CN13 11 on the engine PCB check if CN13 10 on the engine PCB goes low when paper feed switch 3 is...

Страница 466: ... feed switch is turned on If not replace the feed switch Check visually and replace pa per feed switch 1 if its actuator is broken With 5 V DC present at CN13 5 on the engine PCB check if CN13 4 on the engine PCB goes low when paper feed switch 1 is turned on If not replace paper feed switch 1 Check visually and replace pa per feed switch 2 if its actuator is broken With 5 V DC present at CN13 8 o...

Страница 467: ... feed rollers 1 2 and 3 are de formed Check if the feed pulleys and feed rollers 1 2 and 3 do not contact each other Check if the feed guides are deformed Check if the feed guides are deformed Check if the upper middle and lower feed guide plates are de formed Check visually and replace the registration switch if its actuator is broken With 5 V DC present at CN8 B1 on the engine PCB check if CN8 B...

Страница 468: ...d its separation claws contact each other Check if the eject roller and eject pulley contact each other Check visually and remedy if necessary Check see page 3 6 81 Check visually and remedy if necessary Check visually and remedy if necessary Check and remedy if neces sary Check see page 3 6 81 Check visually and remedy if necessary Check visually and remedy if necessary Repair or replace if neces...

Страница 469: ...e switchback eject switch Check visually and replace any deformed rollers Check visually and remedy if necessary Broken switchback eject switch actuator Defective switchback eject switch Check if the left or right switchback feed roller is deformed Check if the right middle or left switchback eject guide is deformed 13 A paper jam in the eject section is indicated during copying jam in switchback ...

Страница 470: ... any found With 5 V DC present at CN6 B4 on the DF driver PCB check if CN6 B5 on the DF driver PCB remains low when the original feed switch is turned on and off If it does replace the original feed switch Remove any found With 5 V DC present at CN6 A6 on the DF driver PCB check if CN6 A5 on the DF driver PCB remains low when the original switchback switch is turned on and off If it does replace t...

Страница 471: ... 5 V DC present at CN6 A6 on the DF driver PCB check if CN6 A5 on the DF driver PCB remains low when the original switchback switch is turned on and off If it does replace the original switchback switch Check and remedy Check visually and replace the deformed pulley Check visually and replace the deformed pulley Check visually and replace the deformed pulley Defective DF timing switch Defective or...

Страница 472: ...ctions An original outside the specifi cations is used The DF forwarding pulleys DF original feed pulley or DF switchback pulley is dirty with paper powder The DF original feed pulley and the DF separation pulley do not contact correctly Check and remedy Check and remedy With 5 V DC present at CN6 A6 on the DF driver PCB check if CN6 A5 on the DF driver PCB remains low when the original switchback...

Страница 473: ...e engine PCB check if CN9 7 on the engine PCB goes low when the duplex registration switch is turned on If not replace the duplex registration switch Check visually and replace the duplex eject switch if its actua tor is broken 1 A paper jam in the feedshift sec tion is indi cated during copying jam in feedshift section 2 A paper jam in the duplex section is indi cated during copying jam in duplex...

Страница 474: ...lex registration switch actuator Defective duplex registration switch With 5 V DC present at CN9 13 on the engine PCB check if CN9 11 on the engine PCB goes low when the duplex eject switch is tuned on If not re place the duplex eject switch Check and remedy Check visually and remedy if necessary Check and remedy Check see page 3 6 94 Check visually and replace the switchback eject switch if its a...

Страница 475: ...stallation condition Check for continuity across CN1 9 CN7 2 and CN1 4 CN5 6 on the interface PCB If none replace the interface PCB Check if the voltage at CN4 9 on the deck main PCB changes in the pattern 2 V DC 0 V DC pulse 0 V DC If it does replace the deck main PCB 1 A paper jam in the large paper deck is indicated during copying paper failing to reach PPS0 in large paper deck horizontal paper...

Страница 476: ... at CN1 6 on the deck main PCB with paper path sensor 2 is turned on by holding a sheet of paper level about 10 to 20 mm below the bottom of the paper conveying base If not paper path sensor 2 or the interface PCB is defective Check the interface PCB and if it is okay replace paper path sensor 2 Check see page 3 6 98 Remedy or replace Check the installation condition Check for continuity across CN...

Страница 477: ...turned on by holding a sheet of paper level about 10 to 20 mm below the bottom of the paper conveying base If not paper path sensor 3 or the interface PCB is defective Check the interface PCB and if it is okay replace paper path sensor 3 Check see page 3 6 97 Check the installation condition Remedy or replace Check for continuity across CN1 5 CN5 4 and CN2 11 CN4 2 on the interface PCB If none rep...

Страница 478: ...1 J1025 D203 J0519 J1539 Q306 Q305 R205 TRNS R101 R206 J1021 J1538 J1537 J1020 J1202 J0517 D304 ZD401 ZD301 ZD201 R319 R401 R320 R208 IC2 R325 R203 R326 R327 CN1 C207 J1540 CN2 J1026 Q202 C203 R209 J1504A D202 J1014A C202 3 1 3 1 3 2 1 1 B3 D201 C201 J1017 J1016 C101 C103 R115 R116 R117 R114 A B 1 B2 J1031 J0522 R202 F202 R213 J1023 R204 J0518 C205 C206 R207 PC1 R102 R103 D101 PC2 J1529 J1528 C107...

Страница 479: ...3 4 5 5 V DC 5 V DC supply for EPCB output 4 1 3 1 12 V DC 12 V DC supply for SMPCB output 4 2 3 3 0 5 V DC PSPCB SLEEP SIG signal input 4 3 3 3 0 5 V DC pulse PSPCB zero cross signal input 4 4 3 7 0 5 V DC H1 on off input 4 5 3 7 0 5 V DC H2 on off input 5 1 6 1 2 3 24 V DC 24 V DC supply for finisher output 5 2 6 1 2 3 24 V DC 24 V DC supply for finisher output 5 3 6 1 2 3 24 V DC 24 V DC supply...

Страница 480: ...inals CN Voltage Remarks 10 1 9 1 120 0 V AC H1 on off output 120 V specs 220 240 0 V AC H1 on off output 220 240 V specs 10 2 9 1 120 0 V AC H2 on off output 120 V specs 220 240 0 V AC H2 on off output 220 240 V specs ...

Страница 481: ... TR8 TR9 IC14 IC13 TR11 TR10 TR12 CN21 DT2 F2 F3 TR2 140 139 70 69 72 71 2 1 1 IC1 8 1 IC2 8 1 1 1 1 1 5 1 5 IC12 1 5 5 9 11 1 IC3 IC8 IC4 1 8 6 1 CN18 12 11 2 1 CN16 12 1 CN13 15 1 CN6 CN15 1 2 1 16 15 CN19 CN14 CN20 4 1 B10 A10 B1 A1 B9 B1 A1 A9 8 CN11 9 1 CN7 2 1 CN17 CN10 18 17 2 1 18 17 2 1 CN9 26 25 2 1 IC20 1 8 IC19 1 8 IC5 DT5 1 8 IC6 CN1 1 5 1 1 11 IC7 IC11 IC15 IC10 1 9 IC18 RA8 RA7 C7 C...

Страница 482: ...e input 1 17 2 B10 0 5 V DC HVTPCB GRID control voltage input 1 18 2 B10 ETTH detection voltage output 1 19 2 B10 0 5 V DC EHUMSENS detection voltage output 1 20 2 B10 24 V DC Control voltage for MPCB output 1 21 2 B10 0 5 V DC H ALARM signal output 1 23 2 B10 0 5 V DC TC on off output 1 24 2 B10 0 5 V DC MMD 3 connected not connected output 1 25 2 B10 0 5 V DC Finisher 1 connected not connected o...

Страница 483: ... 5 V DC BYPPSW on off output 1 58 2 B10 5 0 V DC LICSW L on off output 1 59 2 B10 5 0 V DC LICSW U on off output 1 60 2 B10 0 5 V DC BYPEDSW on off output 1 61 2 B10 5 0 V DC SRHPSW on off output 1 62 2 B10 0 5 V DC Duplex unit installed not installed output 1 63 2 B10 0 5 V DC Key card 3 ENABLE signal output 1 64 2 B10 0 5 V DC Key card 3 key counter 1 connected not connected output 1 65 2 B10 0 ...

Страница 484: ...k 4 OE signal input 1 94 2 B10 0 5 V DC pulse Paper feed desk 4 SCLK signal input 1 95 2 B10 0 5 V DC pulse Paper feed desk 4 SOUT signal input 1 96 2 B10 0 5 V DC pulse Paper feed desk 4 SIN signal output 1 97 2 B10 0 5 V DC pulse MMD 3 count on off input 1 101 2 B10 0 5 V DC TC on off input 1 102 2 B10 0 5 V DC Finisher 1 RESET signal input 1 103 2 B10 0 5 V DC Paper feed desk 4 RESET signal inp...

Страница 485: ...V DC Key card 3 control signal input 1 136 2 B10 0 5 V DC Key card 3 control signal input 1 137 2 B10 0 5 V DC Key card 3 control signal input 1 138 2 B10 0 5 V DC Key card 3 control signal input 1 139 2 B10 0 5 V DC Key card 3 key counter 1 copy count signal input 1 140 2 B10 0 24 V DC Key card 3 on off output 2 A1 2 A11 24 V DC 24 V DC supply for CL output 2 A2 2 A11 0 24 V DC CL on off output 2...

Страница 486: ...output 3 B7 3 B11 5 V DC 5 V DC supply for FTH output 3 B8 3 B11 0 5 V DC FTH detection voltage input 3 B9 3 B11 0 5 V DC ESW on off input 3 B10 3 B11 5 V DC 5 V DC supply for ESW output 4 1 3 B11 24 0 V DC SSW1 on off input 4 2 3 B11 24 0 V DC SSW2 on off SOURCE output 4 3 3 B11 24 0 V DC SSW3 on off input 4 4 3 B11 24 0 V DC PRY on off SOURCE output 4 5 3 B11 24 0 V DC 24 V DC supply for MSW out...

Страница 487: ...C H1 on off output 6 8 6 4 0 5 V DC H2 on off output 7 1 7 2 24 V DC 24 V DC supply for LSU output 8 A2 8 B3 24 V DC 24 V DC supply for CLM U output 8 A3 8 B3 0 24 V DC CLM U on off output 8 A4 8 B3 24 V DC 24 V DC supply for CLM L output 8 A5 8 B3 0 24 V DC CLM L on off output 8 A8 8 A7 0 5 V DC PLSW U on off input 8 A10 8 A9 0 5 V DC PLSW L on off input 8 B1 8 B3 5 V DC 5 V DC supply for RSW out...

Страница 488: ... 3 12 B6 0 5 V DC pulse SRM coil energization pulse output B 10 4 12 B6 0 5 V DC pulse SRM coil energization pulse output A 10 5 6 12 B7 24 V DC 24 V DC supply for SRM output 10 7 12 B7 24 V DC 24 V DC supply for DUPFWDSOL output 10 8 12 B7 0 24 V DC DUPFWDSOL on off output 10 9 12 B7 24 V DC 24 V DC supply for SBFSSOL output 10 10 12 B7 0 24 V DC SBFSSOL latch on signal output 10 12 12 B7 0 24 V ...

Страница 489: ... 13 15 5 V DC 5 V DC supply for PFSW4 output 14 A2 14 A3 5 V DC 5 V DC supply for BYPPSW output 14 A4 14 A3 0 5 V DC BYPPSW on off input 14 A5 14 A9 24 V DC 24 V DC supply for BYPPFCL output 14 A6 14 A9 24 V DC 24 V DC supply for BYPSOL output 14 A7 14 A9 0 24 V DC BYPPFCL on off output 14 A8 14 A9 0 24 V DC BYPSOL on off output 14 B2 14 B1 0 5 V DC BYPPWSW DIG2 on off input 14 B3 14 B1 0 5 V DC B...

Страница 490: ...DC Paper feed desk 4 RESET signal output 17 9 17 1 0 5 V DC pulse Paper feed desk 4 OE signal output 17 10 17 1 0 5 V DC pulse Paper feed desk 4 SCLK signal output 17 11 17 1 0 5 V DC pulse Paper feed desk 4 SOUT signal output 17 12 17 1 0 5 V DC pulse Paper feed desk 4 SIN signal input 17 17 17 18 24 V DC 24 V DC supply for large paper deck 2 or Paper feed desk 4 output 19 A1 19 B9 5 V DC 5 V DC ...

Страница 491: ...9 B7 19 B9 0 5 V DC Key card 3 control signal output 19 B8 19 B9 0 5 V DC Key card 3 control signal output 19 B10 19 B10 0 5 V DC Key card 3 on off output 20 1 20 4 24 V DC 24 V DC supply for key card 3 output 20 2 20 4 0 5 V DC Key card 3 key counter 1 copy count signal output 20 3 20 4 0 5 V DC Key card 3 key counter 1 connected not connected input 21 2 21 1 0 5 V DC pulse Finisher 1 serial sign...

Страница 492: ... 30 1 1 2 71 72 69 70 139 140 C255 R432 R433 C256 L178 L174 1 25 26 1 1 TP19 TP20 TP18 L195 LA7 RA66 TR14 TR9 L173 5150 C51 TR10 LA1 LA2 TR12 TR27 TR26 TR13 TR28 TR25 RA69 LA3 LA4 LA5 LA6 L144 L143 C293 L146 C32 L140 C294 L141 L142 C38 C37 C36 RA42 C33 RA43 RA44 RA46 IC38 TP9 TR24 RA47 120 81 80 L153 C45 C46 C47 C48 R3 R4 R5 TP5 RA29 RA28 C24 RA27 L102 RA7 RA8 L104 L106 L105 RA11 1 37 R212 XT14 R1...

Страница 493: ...age output 1 18 2 A4 ETTH detection voltage input 1 19 2 A4 0 5 V DC EHUMSENS detection voltage input 1 20 2 A4 24 V DC Control voltage for MPCB input 1 21 2 A4 0 5 V DC H ALARM control voltage input 1 23 2 A4 0 5 V DC TC on off input 1 24 2 A4 0 5 V DC MMD 3 connected not connected input 1 25 2 A4 0 5 V DC Finisher 1 connected not connected input 1 28 2 A4 0 5 V DC STKSW on off input 1 29 2 A4 0 ...

Страница 494: ...B10 5 0 V DC LICSW U on off input 1 60 2 B10 0 5 V DC BYPEDSW on off input 1 61 2 B10 5 0 V DC SRHPSW on off input 1 62 2 B10 0 5 V DC Duplex unit installed not installed input 1 63 2 B10 0 5 V DC Key card 3 ENABLE signal input 1 64 2 B10 0 5 V DC Key card 3 key counter 1 connected not connected input 1 65 2 B10 0 5 V DC Key card 3 control signal output 1 66 2 B10 0 5 V DC Key card 3 control signa...

Страница 495: ...sk 4 SCLK signal output 1 95 2 A4 0 5 V DC pulse Paper feed desk 4 SOUT signal output 1 96 2 A4 0 5 V DC pulse Paper feed desk 4 SIN signal input 1 97 2 A4 0 5 V DC pulse MMD 3 count on off output 1 101 2 A4 0 5 V DC TC on off output 1 102 2 A4 0 5 V DC Finisher 1 RESET signal output 1 103 2 A4 0 5 V DC Paper feed desk 4 RESET signal output 1 104 2 A4 0 24 V DC FCL3 on off output 1 105 2 A4 0 24 V...

Страница 496: ...37 2 A4 0 5 V DC Key card 3 control signal output 1 138 2 A4 0 5 V DC Key card 3 control signal output 1 139 2 A4 0 5 V DC Key card 3 key counter 1 copy count signal output 1 140 2 A4 0 24 V DC Key card 3 on off input 2 A1 2 A4 0 5 V DC MCPCB1 image control signal MCPSEL output 2 A2 2 A4 0 5 V DC pulse MCPCB1 serial communication signal output 2 A3 2 A4 0 5 V DC pulse MCPCB1 communication control ...

Страница 497: ...V DC pulse MCPCB1 image control signal DATA4 output 2 B13 2 B7 0 5 V DC pulse MCPCB1 image control signal DATA5 output 2 B14 2 B7 0 5 V DC pulse MCPCB1 image control signal DATA6 output 2 B15 2 B7 0 5 V DC pulse MCPCB1 image control signal DATA7 output 3 A1 3 A4 0 5 V DC MCPCB2 2 image control signal MCPSEL output 3 A2 3 A4 0 5 V DC pulse MCPCB2 2 serial communication signal output 3 A3 3 A4 0 5 V...

Страница 498: ...signal DATA2 output 3 B11 3 B7 0 5 V DC pulse MCPCB2 2 image control signal DATA3 output 3 B12 3 B7 0 5 V DC pulse MCPCB2 2 image control signal DATA4 output 3 B13 3 B7 0 5 V DC pulse MCPCB2 2 image control signal DATA5 output 3 B14 3 B7 0 5 V DC pulse MCPCB2 2 image control signal DATA6 output 3 B15 3 B7 0 5 V DC pulse MCPCB2 2 image control signal DATA7 output 4 2 4 1 0 3 3 V DC pulse Printer bo...

Страница 499: ...M Vref output 5 5 5 16 0 5 V DC SM drive control signal SM M1 output 5 6 5 16 0 5 V DC SM drive control signal SM M2 output 5 7 5 16 0 5 V DC SM drive control signal SM M3 output 5 8 5 16 0 5 V DC SM drive control signal SM M4 output 5 9 5 16 0 5 V DC SM drive control signal SM M5 output 5 10 5 16 0 5 V DC pulse SM drive clock pulse output 5 11 5 16 0 5 V DC SM rotation direction switching signal ...

Страница 500: ... 2 5 V DC 5 V DC supply for CCDPCB output 11 4 11 1 2 0 5 V DC CCD drive clock signal φ SHIFT output 11 5 11 1 2 0 5 V DC CCD drive clock signal φ SHIFT output 11 6 11 1 2 0 5 V DC CCD drive clock signal φ CLP output 11 7 11 1 2 0 5 V DC CCD drive clock signal φ CLP output 11 8 11 1 2 0 5 V DC CCD drive clock signal φ RS output 11 9 11 1 2 0 5 V DC CCD drive clock signal φ RS output 11 10 11 1 2 0...

Страница 501: ...6 0 5 V DC pulse OCM drive clock pulse output 13B 7 5 16 0 5 V DC OCM rotation direction switching signal OCM CWB output 13B 8 5 16 OCM current control voltage OCM Vref output 13B 9 5 16 0 5 V DC OCM drive control signal OCM M3 output 13B 10 5 16 0 5 V DC OCM drive control signal OCM M2 output 13B 11 5 16 0 5 V DC OCM drive control signal OCM M1 output 14 1 5 16 0 5 V DC OSBSW on off input 14 2 5 ...

Страница 502: ... RA99 RA100 RA101 RA102 RA103 RA104 RA105 RA83 RA84 RA85 RA87 RA86 RA89 RA88 RA66 RA67 RA63 RA64 RA70 RA71 RA61 RA62 RA65 0 1 G 91 CE1 CN2 1 2 CE2 CE3 CE5 CE6 CE8 CE9 CE11 CE4 RA1 RA15 RA16 RA39 RA72 RA108 RA109 RA110 RA111 RA113 RA112 RA73 RA74 RA75 GND RA76 RA77 RA78 RA79 CN4 1 2 CN5 1 2 71 72 71 72 RA40 RA13 RA14 GND A1 B1 A16 B16 RA2 RA3 RA4 RA5 CN1 RA6 TP4 TP7 1 U16 76 77 152 304 229 TP8 TP9 ...

Страница 503: ... PHSYNC input 1 A11 1 A4 0 5 V DC pulse MCPCB1 2 2 image control clock pulse output 1 A12 1 A13 0 5 V DC MCPCB1 2 2 control signal MCP MREW output 1 A14 1 A13 0 5 V DC MCPCB1 2 2 control signal MCP IDA output 1 A16 1 A15 0 5 V DC MCPCB1 2 2 control signal MCP IDB output 1 B1 1 B6 0 5 V DC MCPCB1 2 2 control signal SEMCP MCP1 output 1 B2 1 B6 0 5 V DC MCPCB1 2 2 RESET signal input 1 B3 1 B6 0 5 V D...

Страница 504: ...TA4 input 1 B13 1 B7 0 5 V DC pulse MCPCB1 2 2 image control signal DATA5 input 1 B14 1 B7 0 5 V DC pulse MCPCB1 2 2 image control signal DATA6 input 1 B15 1 B7 0 5 V DC pulse MCPCB1 2 2 image control signal DATA7 input 2 1 2 2 5 V DC 5 V DC supply for MCPCB1 2 2 input 2 42 ppm optional 52 ppm standard ...

Страница 505: ...1 14 CN6 L2 L3 R12 R1 R2 R3 R4 R5 R6 C6 R7 C7 R8 C8 R9 C9 L4 C19 C20 C1 C3 R10 R11 JP3 C11 C5 C4 C10 J4 J10 C16 C17 C18 C15 C14 J14 J13 J16 J17 J8 JP5 JP15 JP6 J1 J7 J6 J3 J2 JP16 JP9 JP11 JP12 JP14 C23 J15 J11 TP1 JP10 JP13 J12 CN4 3 1 C2 R14 D1 C22 C21 DT2 R13 E C B 1 2 5 6 L5 CN3 CN5 1 3 CN2 6 1 E C B ...

Страница 506: ...energization pulse output B_ 2 2 3 5 6 24 V DC 24 V DC supply for SM output 2 3 3 5 6 0 5 V DC pulse SM coil energization pulse output B 2 4 3 5 6 0 5 V DC pulse SM coil energization pulse output A 2 5 3 5 6 24 V DC 24 V DC supply for SM output 2 6 3 5 6 0 5 V DC pulse SM coil energization pulse output A_ 3 1 3 5 6 0 5 V DC EL on off output 3 2 3 5 6 0 5 V DC EL on off output 3 3 3 5 6 24 V DC 24 ...

Страница 507: ...3 C11 R18 IC2 CN1 C17 IC3 IC4 C3 C23 C9 F1 F2 F4 F3 F5 RA1 R22 R23 R24 C2 C1 R9 R4 1 1 1 5 1 9 11 9 F6 TR2 TR1 CN2 7 1 C4 C7 R2 R5 R6 R7 R12 R13 R15 R16 R17 C5 F8 R25 R29 R8 C6 C8 R28 R27 R32 F19 R31 R33 R34 R35 R36 E C B E C B IC5 1 5 ...

Страница 508: ... 5 V DC CCD drive clock signal φ CLP input 1 6 1 10 11 0 5 V DC CCD drive clock signal φ CLP input 1 7 1 10 11 0 5 V DC CCD drive clock signal φ SHIFT input 1 8 1 10 11 0 5 V DC CCD drive clock signal φ SHIFT input 1 9 1 10 11 5 V DC 5 V DC supply for CCDPCB input 2 1 2 6 7 CCD control signal VO_O output 2 2 2 6 7 CCD control signal VO_O output 2 3 2 6 7 CCD control signal VO_E output 2 4 2 6 7 CC...

Страница 509: ... OCM Vref input 2 7 1 9 10 0 5 V DC OCM rotation direction switching signal OCM CWB input 2 8 1 9 10 0 5 V DC pulse OCM drive clock pulse input 2 9 1 9 10 0 5 V DC OCM control signal OCM RET input 2 10 1 9 10 0 5 V DC OCM enable signal input 2 11 1 9 10 0 5 V DC OFM rotation direction switching signal OFM CWB input 2 12 1 9 10 0 5 V DC pulse OFM drive clock pulse input 2 13 1 9 10 0 5 V DC OFM con...

Страница 510: ...0 5 V DC OSLED green off on input 3 10 1 9 10 0 5 V DC OSLED red off on input 3 11 1 9 10 0 5 V DC SRDF installed not installed signal 4 3 4 2 0 24 V DC DFSSW1 on off output 4 4 4 2 0 24 V DC DFSSW2 on off output 5 A1 1 3 4 0 24 V DC 24 V DC supply for SBPSOL output 5 A2 1 3 4 0 24 V DC SBPSOL latch on signal output 5 A3 1 3 4 0 24 V DC SBPSOL release signal output 5 A4 1 3 4 24 V DC 24 V DC suppl...

Страница 511: ...4 V DC supply for OFSOL output 5 B12 1 3 4 0 24 V DC OFSOL latch on signal output 5 B13 1 3 4 0 24 V DC OFSOL release signal output 6 A5 6 A4 0 5 V DC OSBSW on off input 6 A6 6 A4 5 V DC 5 V DC supply for OSBSW output 6 A8 6 A7 0 5 V DC OSWSW on off input 6 A9 6 A7 5 V DC 5 V DC supply for OSWSW output 6 A11 6 A10 0 5 V DC OSLSW on off input 6 A12 6 A10 5 V DC 5 V DC supply for OSLSW output 6 A14 ...

Страница 512: ... 50 31 14 1 1 1 2 18 17 9 3 K D2 D3 CN8 D4 1 2 C C C C C C C C C C C E 3 4 CN4 1 2 B E B B E B D8 D7 D6 TR4 TR3 TR5 TR6 TR7 TR8 D5 E C C B C TR1 IC1 IC2 IC4 IC18 IC19 IC15 IC11 IC10 IC13 IC5 IC6 1 IC7 FUSE1 IC3 CN5 C26 C25 C29 TR2 C11 IC9 C14 IC8 IC17 IC20 IC21 CN2 CN1 L22 L17 L18 L19 L20 E B C E C RA8 X1 RA3 RA4 RA5 30 51 80 81 50 1 1 10 1 1 1 1 8 8 31 100 RA6 RA7 RA9 RA10 RA11RA12 RA13 ...

Страница 513: ...DC OLPCB key return signal DIGKEY L1 input 2 6 1 8 0 5 V DC OLPCB key return signal DIGKEY L2 input 2 7 1 8 0 5 V DC OLPCB key return signal DIGKEY L3 input 2 8 1 8 0 5 V DC pulse OLPCB scan signal SCAN L1 output 2 9 1 8 0 5 V DC pulse OLPCB scan signal SCAN L2 output 2 10 1 8 0 5 V DC pulse OLPCB scan signal SCAN L3 output 2 11 1 8 0 5 V DC pulse OLPCB LED on DIG LED L1 output 2 12 1 8 0 5 V DC p...

Страница 514: ...se Touch panel detection voltage Y2 output 4 2 6 2 0 5 V DC pulse Touch panel detection voltage X1 input 4 3 6 2 0 5 V DC pulse Touch panel detection voltage Y1 input 4 4 6 2 0 5 V DC pulse Touch panel detection voltage X2 output 5 3 5 2 5 V DC 5 V DC supply for OMPCB input 5 4 5 1 24 V DC 24 V DC supply for OMPCB input 6 3 6 2 0 5 V DC OMPCB RESET MMI signal input 6 4 6 2 0 5 V DC OMPCB ENG ERROR...

Страница 515: ...LMS2 TP14 24 V TP15 PG TP7 LMS1 TP8 LS2 TP6 LS1 TP21 E1 TP20 E2 TP27 E1CLK TP26 E2CLK TP10 CLK TP19 MOT CLK TP30 MOT PWM R SEN P2 PP51 TP25 TP3 TP4 TP1 PP50 PP52 TP13 TP18 SG RS2 RS1 Txd Rxd BCL P1 RCL EMP OSC1 TP31 A WR 1 1 4 CN3 C14 C15 FUSE1 3A 125 V PF4065K500A MADE IN JAPAN SG 5 CN9 C18 C16 CN6 1 3 5 1 CN12 SEC A A K DA1 CN1 1 11 CN4 1 12 WARNING FOR CONTINUED PROTECTION AGAINST RISK OF FIRE ...

Страница 516: ...RCL PFCL1 PFCL2 and CCL output 4 2 4 8 24 V DC Power supply for RCL PFCL1 PFCL2 and CCL output 4 4 4 8 24 0 V DC PFCL1 off on output 4 5 4 8 24 0 V DC PFCL2 off on output 4 6 4 8 24 0 V DC CCL off on output 4 7 4 8 5 V DC Power supply for PPSENS1 3 PESENS SCSW UPSW1 2 and DLSW1 2 output 4 9 4 8 2 0 pulse 0 V DC PPSENS1 paper present absent input 4 11 4 8 5 0 V DC SCSW on off input 7 1 7 6 9 24 0 V...

Страница 517: ... Terminals CN Voltage Remarks 12 1 12 2 24 V DC Power supply for CM output 12 3 12 2 5 0 V DC pulse CM drive PWM signal output 12 4 12 2 5 V DC Power supply for CM output 12 5 12 2 5 0 V DC pulse CM FG signal input ...

Страница 518: ...ower source PCB Reinsert the connector Also check for continuity within the connector cable If none remedy or replace the cable Check visually and replace the drive motor if necessary 1 The machine does not op erate when the main switch is turned on 2 The drive motor does not operate C200 No electricity at the power outlet The power cord is not plugged in properly The front cover left cover and or...

Страница 519: ... coil energization pulse signals are output at CN5 5 CN5 6 CN5 7 CN5 8 and CN5 9 on the main PCB when maintenance item U073 is run If not replace the main PCB Check for continuity across the coil If none replace the upper lift motor Reinsert the connector Also check for continuity within the connector cable If none remedy or replace the cable Check if 24 V DC is output across CN8 A2 and CN8 A3 on ...

Страница 520: ...medy or replace the cable Run maintenance item U135 and check if drive pulse signal is output across CN2 A5 and CN2 A6 on the engine PCB If not replace the engine PCB Check for continuity across the coil If none replace the paper conveying section fan mo tor Reinsert the connector Also check for continuity within the connector cable If none remedy or replace the cable Run maintenance item U030 If ...

Страница 521: ...ow while maintenance item U030 is run If not replace the paper feed motor Run maintenance item U030 and check if CN1 87 on the main PCB goes low If not replace the main PCB Check for continuity across the coil If none replace the paper conveying motor Reinsert the connector Also check for continuity within the connector cable If none remedy or replace the cable Check if the paper feed motor rotate...

Страница 522: ...check for continuity within the connector cable If none remedy or replace the cable Run maintenance item U102 and check if CN8 B4 and CN8 B5 on the engine PCB go low If not replace the engine PCB Check for continuity across the coil If none replace the image formation unit fan motor Reinsert the connector Also check for continuity within the connector cable If none remedy or replace the cable Run ...

Страница 523: ... item U032 and check if CN15 14 on the engine PCB goes low If not replace the engine PCB Check for continuity across the coil If none replace feed clutch 1 Reinsert the connector Also check for continuity within the connector cable If none remedy or replace the cable Run maintenance item U032 and check if CN12 A4 on the engine PCB goes low If not replace the engine PCB Check for continuity across ...

Страница 524: ... U032 and check if CN8 B9 on the engine PCB goes low If not replace the engine PCB Check for continuity across the coil If none replace feed clutch 5 Reinsert the connector Also check for continuity within the connector cable If none remedy or replace the cable Run maintenance item U032 and check if CN12 A2 on the engine PCB goes low If not replace the engine PCB Check for continuity across the co...

Страница 525: ...3 A11 on the engine PCB goes low If not replace the engine PCB Check for continuity across the coil If none replace the bypass solenoid Reinsert the connector Also check for continuity within the connector cable If none remedy or replace the cable Run maintenance item U033 and check if CN14 A8 on the engine PCB goes low If not replace the engine PCB Reinsert the connector Also check for continuity...

Страница 526: ... CN3 1 and CN3 2 on the scanner motor PCB are always low replace the scanner motor PCB Check for continuity across each heater If none replace the heater see page 3 3 63 Check for continuity across thermostat If none remove the cause and replace the thermostat Measure the resistance If it is Ω replace the fixing unit thermistor Check visually and clean the thermistor sen sor parts If fixing heater...

Страница 527: ... Check if the developing bias is output when CN1 4 on the high voltage transformer PCB goes low while maintenance item U030 is run If not replace the high voltage transformer PCB Broken transfer charger wire Poor contact in the high voltage transformer PCB connector terminals Defective main PCB Defective engine PCB Defective high voltage trans former PCB Broken separation charger wire Poor contact...

Страница 528: ...evel of CN5 2 on the scanner motor PCB does not change when the original de tection switch is turned on and off replace the original detection switch Check the original and correct if necessary Reinsert the connector Also check for continuity within the connector cable If none remedy or replace the cable Check if sensor operates correctly If not replace it or if necessary the scanner motor PCB Rei...

Страница 529: ...0 on the engine PCB goes low when the lower paper switch is turned on with 5 V DC present at CN15 8 on the engine PCB If none replace the lower pa per switch Reinsert the connector Also check for continuity within the connector cable If none remedy or replace the cable Check if CN14 A4 on the engine PCB goes low when the bypass paper switch is turned on with 5 V DC present at CN14 A2 on the engine...

Страница 530: ...o check for continuity within the connector cable If none remedy or replace the cable Reinsert the connector Also check for continuity within the connector cable If none remedy or replace the cable Check if CN8 A10 on the main PCB goes low when the lower paper length switch is turned on If not replace the lower paper length switch Check if the levels of CN9 23 CN9 24 and CN9 25 on the engine PCB c...

Страница 531: ...heck if CN13 7 on the engine PCB remains low when paper feed switch 2 is turned on and off If it does replace paper feed switch 2 With 5 V DC present at CN13 11 on the engine PCB check if CN13 10 on the engine PCB remains low when paper feed switch 3 is turned on and off If it does replace paper feed switch 3 With 5 V DC present at CN13 2 on the engine PCB check if CN13 1 on the engine PCB remains...

Страница 532: ...afety switch 1 2 or 3 Wiring is broken shorted or makes poor contact Noise Reinsert the connector Also check for continuity within the connector cable If none remedy or replace the cable Check for continuity across each switch If there is no continuity when the switch is on replace it Check for continuity If none repair Locate the source of noise and remove Problem Causes Check procedures correcti...

Страница 533: ...ed motor Reinsert the connector Also check for continuity within the connector cable If none remedy or replace the cable Check for continuity across the original feed motor coil and connector terminals If good replace the DF driver PCB Check for continuity across the coil If none replace the original conveying motor Reinsert the connector Also check for continuity within the connector cable If non...

Страница 534: ...r continuity across the coil If none replace the switchback pressure solenoid Reinsert the connector Also check for continuity within the connector cable If none remedy or replace the cable Check if the switchback pressure solenoid operates when CN5 A2 or CN5 A3 on the DF driver PCB is low If it does replace the DF driver PCB 4 The switch back feedshift solenoid does not operate 5 The eject feedsh...

Страница 535: ... coil If none replace the original feed clutch Reinsert the connector Also check for continuity within the connector cable If none remedy or replace the cable Check if the original feed clutch operates when CN5 A5 on the DF driver PCB is low If it does replace the DF driver PCB Reinsert the connector Also check for continuity within the connector cable If none remedy or replace the cable Check for...

Страница 536: ... around the DF timing switch Defective DF tim ing switch 9 An original jams when the main switch is turned on Remove any found With 5 V DC present at CN6 A15 on the DF driver PCB check if CN6 A14 on the DF driver PCB remains low when the DF timing switch is turned on and off If it does replace the DF timing switch ...

Страница 537: ...ex forward solenoid Reinsert the connector Also check for continuity within the connector cable If none remedy or replace the cable Run maintenance item U033 and check if CN10 8 on the engine PCB goes low If not replace the engine PCB 1 The side reg istration motor does not ro tate C220 2 The feedshift solenoid does not operate 3 The duplex forward sole noid does not operate Poor contact in the si...

Страница 538: ...ack feedshift solenoid Reinsert the connector Also check for continuity within the connector cable If none remedy or replace the cable Run maintenance item U033 and check if CN10 10 on the engine PCB goes low If not replace the engine PCB Check for continuity across the coil If none replace the duplex paper tapping solenoid Reinsert the connector Also check for continuity within the connector cabl...

Страница 539: ...ain PCB goes low when paper deck motor 1 is turned on placing paper on the right cassette lift and closing the large paper deck will turn paper deck motor 1 on until deck level switch 1 turns on while the deck open closed safety switch is on and 24 V DC is present at CN1 4 on the deck main PCB If not replace the deck main PCB 1 The large paper deck does not operate when the print key is pressed 2 ...

Страница 540: ...er deck motor 2 on until deck level switch 2 turns on while the deck open closed safety switch is on and 24 V DC is present at CN1 4 on the deck main PCB If not replace the deck main PCB Reinsert the connector Also check for continuity within the connector cable If none remedy or replace the cable Check for continuity across the coil If none replace paper feed clutch 1 Check if CN4 4 on the deck m...

Страница 541: ...er feed clutch 2 does not operate while CN4 5 on the deck main PCB is low check for continuity across CN5 3 CN1 1 and CN5 4 CN1 5 on the interface PCB If none replace the interface PCB Reinsert the connector Also check for continuity within the connector cable If none remedy or replace the cable Check for continuity across the coil If none replace the paper conveying clutch Check if CN4 6 on the d...

Страница 542: ...eed rollers feed rollers 1 2 3 4 feed pulleys bypass forwarding pulley and bypass upper lower paper feed pulleys Check if the upper or lower pa per feed pulley is deformed Check if the forwarding pulley is deformed Electrical problem with the fol lowing electromagnetic clutches upper lower paper feed clutches feed clutches 1 2 3 4 5 and bypass paper feed clutch Check if the surfaces of the upper a...

Страница 543: ... is deformed Check if the press roller is ex tremely dirty or deformed Check if the contact between the heat roller and its separa tion claws is correct Check if the contact between the eject roller and pulley is correct Check if the developing unit is extremely dirty Reinstall the scanner wire see page 3 3 24 See page 3 6 74 Replace the lower paper feed pulley if it is worn see page 3 3 3 Change ...

Страница 544: ...d gears operate smoothly Check if the following electro magnetic clutches are installed correctly upper lower paper feed clutches feed clutches 1 2 3 4 5 and bypass paper feed clutch Grease the bearings and gears Correct Problem Causes check procedures Corrective measures ...

Страница 545: ...n roller do not contact each other correctly Originals outside the specifica tions are used The surfaces of the DF forward ing pulleys DF original feed pulley or DF separation pulley are dirty with paper powder The DF original feed pulley and the DF separation pulley do not contact each other correctly 1 No primary original feed 2 No secondary original feed 3 Originals jam Check and clean them wit...

Страница 546: ...ey refeed pulley switchback roller and duplex upper lower registration rollers Check if the duplex forwarding pulley is deformed Electrical problem with the paper tapping solenoid Side registration amount ad justed incorrectly Check if the paper is exces sively curled Deformed guides along the pa per conveying path The feedshift solenoid malfunc tions Check if the contact between the feedshift low...

Страница 547: ...eck if deck paper feed roller 1 2 or the deck paper conveying roller is worn or deformed Check if the paper side guides are deformed Check if the paper is excessively curled Paper is not loaded correctly Check if the upper or lower deck separation roller is worn or deformed Check if the paper is excessively curled Check if the upper and lower deck separation rollers contact each other when the dec...

Страница 548: ... gears operate smoothly Check for any abnormality with motors and clutches Check for any drive belt out of place Problem Causes check procedures Corrective measures 4 Paper jams 5 Abnormal noise is heard Remedy or replace Grease the bushings and gears Replace Remedy if necessary ...

Страница 549: ...Main PCB 3 9 3 7 19 Main PCB 4 9 3 7 20 Main PCB 5 9 3 7 21 Main PCB 6 9 3 7 22 Main PCB 7 9 3 7 23 Main PCB 8 9 3 7 24 Main PCB 9 9 3 7 25 Memory copy PCB 1 12 3 7 26 Memory copy PCB 2 12 3 7 27 Memory copy PCB 3 12 3 7 28 Memory copy PCB 4 12 3 7 29 Memory copy PCB 5 12 3 7 30 Memory copy PCB 6 12 3 7 31 Memory copy PCB 7 12 3 7 32 Memory copy PCB 8 12 3 7 33 Memory copy PCB 9 12 3 7 34 Memory c...

Страница 550: ...PCB 3 7 45 Interface PCB 3 7 46 SRDF connection diagram 3 7 47 General connection diagram 42 ppm copier 3 7 48 General connection diagram 52 ppm copier 3 7 49 SRDF wiring diagram 3 7 50 Large paper deck wiring diagram 3 7 51 ...

Страница 551: ...CN9 1 2 3 4 MSW PRY H1 H2 CCM Fwd rotation CCM Rev rotation DM PCM CL DB REM CFM1 Half speed CFM1 Full speed PCFM IFFM PM MSW On Primary stabilization fixing temperature 175 C 347 F Secondary stabilization fixing temperature 1 Copying possible 2 Aging end 1 180 C 356 F 42 ppm or 190 C 374 F 52 ppm 2 Copying is possible at the earlier timing of 60 s 42 ppm or 120 s 52 ppm after secondary stabilizat...

Страница 552: ... ON Rev rotation CN2 1 2 3 4 5 6 SHPSW CN4 2 SM Off Fwd rotation Scanner initialization SHPSW OFF Original scanning operation A3 11 x 17 original magnification ratio 100 manual copy density control Rev rotation CN2 1 2 3 4 5 6 SHPSW CN4 2 SM Off Fwd rotation Rev rotation CN2 1 2 3 4 5 6 SHPSW CN4 2 FVSYNC signal 154 P 43 P 76 P 410 P 414 P 110 P 9921 P 154 P Timing chart No 2 Scanner operation ...

Страница 553: ...FM CN5 B3 B4 B5 B6 OFSW CN6 B5 OSBSW CN6 A5 OCM CN5 A10 A11 A12 A13 DFTSW CN6 A14 Primary original feed 200 ms 556 P 2 20 ms 30 ms 288 P 2 556 P 2 30 ms 2337 P 3 200 ms Repeats Original ejection 1 During enlargement copying magnification 10 530 ms 2 Burst of OFM pulses 3 Burst of OCM pulses 20 ms 30 ms 288 P 2 Timing chart No 3 Original feed operation 1 single side original mode multiple originals...

Страница 554: ...nals 1 2 OSSW CN6 B2 OFSOL A CN5 B12 OFSOL R CN5 B13 OFCL CN5 A5 OFM CN5 B3 B4 B5 B6 OFSW CN6 B5 SBFSSOL CN5 B8 SBPSOL A SBPSOL R CN5 A2 CN5 A3 OSBSW CN6 A5 OCM CN5 A10 A11 A12 A13 EFSSOL CN5 A7 DFTSW CN6 A14 Primary original feed 200 ms 556 P 1 20 ms 115 P 1 100 ms 327 P 1 100 ms 288 P 2 564 P 2 30 ms 30 ms Scanning the first face Scanning speed 1 Burst of OFM pulses 2 Burst of OCM pulses Repeats...

Страница 555: ...FSOL A CN5 B12 OFSOL R CN5 B13 OFCL CN5 A5 OFM CN5 B3 B4 B5 B6 OFSW CN6 B5 SBFSSOL CN5 B8 SBPSOL A SBPSOL R CN5 A2 CN5 A3 OSBSW CN6 A5 OCM CN5 A10 A11 A12 A13 EFSSOL CN5 A7 DFTSW CN6 A14 Repeats Switchback operation Primary feed of next original Scanning the image Original ejection 1 Burst of OFM pulses 2 Burst of OCM pulses 115 P 1 2337 P 2 30 ms 2337 P 2 200 ms 100 ms 30 ms 327 P 1 100 ms 288 P ...

Страница 556: ...5 manual copy density control 50 ms 50 ms 520 ms 520 ms 360 ms 115 ms 65 ms 74 ms 74 ms 80 ms 100 ms 210 ms 270 ms 300 ms 520 ms Print key CL CFM1 CFM2 FSW RSW FCL5 RCL ESW DB REM MC REM SC REM TC REM PFM DM PCM BYPSOL BYPPFCL CN2 A2 CN3 B4 CN3 B6 CN13 1 CN8 B2 CN12 A2 CN8 B11 CN3 B9 CN5 B10 CN5 B13 CN5 B5 CN5 B7 CN11 3 CN12 B4 CN5 A8 CN14 A8 CN14 A7 600 ms 700 ms 600 ms 600 ms 250 ms 520 ms 100 m...

Страница 557: ...ol 50 ms 50 ms 520 ms 520 ms 174 ms 360 ms 74 ms 74 ms 210 ms 270 ms 300 ms 520 ms Print key CL CFM1 CFM2 FCL4 FSW RSW FCL5 RCL ESW DB REM MC REM SC REM TC REM PFM DM PCM PFCL U FCL2 PFSW2 FCL1 PFSW1 CN2 A2 CN3 B4 CN3 B6 CN8 B9 CN13 1 CN8 B2 CN12 A2 CN8 B11 CN3 B9 CN5 B10 CN5 B13 CN5 B5 CN5 B7 CN11 3 CN12 B4 CN5 A8 CN15 13 CN12 A8 CN13 7 CN12 A4 CN13 4 600 ms 700 ms 600 ms 600 ms 250 ms 520 ms 100...

Страница 558: ... TC REM PFM DM PCM PFCL L FCL3 PFSW3 FCL2 PFSW2 FCL1 PFSW1 CN2 A2 CN3 B4 CN3 B6 CN8 B9 CN13 1 CN8 B2 CN12 A2 CN8 B11 CN3 B9 CN5 B10 CN5 B13 CN5 B5 CN5 B7 CN11 3 CN12 B4 CN5 A8 CN15 14 CN12 A10 CN13 10 CN12 A8 CN13 7 CN12 A4 CN13 4 50 ms 50 ms 100 ms 520 ms 520 ms 700 ms 250 ms 50 ms 50 ms 35 ms 35 ms 35 ms 35 ms 35 ms 520 ms 174 ms 74 ms 100 ms 74 ms 100 ms 74 ms 35 ms 210 ms 128 ms 365 ms 128 ms ...

Страница 559: ... ms 520 ms 700 ms 210 ms 270 ms 210 ms 270 ms 300 ms 600 ms 290 30000 ms 360 ms 74 ms 232 ms 58 ms 162 ms 520 ms 60 ms 12 P Print key FSSOL1 FSSOL2 SBFSSOL1 SBFSSOL2 FSSW DUPFWDSOL DUPPTSOL SRM SRHPSW DUPRSW PFM DM PFCL U FCL2 PFSW2 FCL1 PFSW1 FCL4 FSW FCL5 RCL CL CFM2 DB REM SC REM TC REM MC REM CFM1 ESW RSW PCM DUPESW DUPPCSW CN3 A8 CN3 A9 CN10 10 CN10 12 CN3 A4 CN10 8 CN10 14 CN10 1 2 3 4 5 CN9...

Страница 560: ...32 ms 58 ms 162 ms 520 ms Image ready Print key FSSOL1 FSSOL2 SBFSSOL1 SBFSSOL2 FSSW DUPFWDSOL DUPPTSOL SRM SRHPSW DUPRSW PFM DM PFCL U FCL2 PFSW2 FCL1 PFSW1 FCL4 FSW FCL5 RCL CL CFM2 DB REM SC REM TC REM MC REM CFM1 ESW RSW PCM DUPESW DUPPCSW CN3 A8 CN3 A9 CN10 10 CN10 12 CN3 A4 CN10 8 CN10 14 CN10 1 2 3 4 5 CN9 12 CN9 7 CN11 3 CN12 B4 CN15 13 CN12 A8 CN13 7 CN12 A4 CN13 4 CN8 B9 CN13 1 CN12 A2 C...

Страница 561: ... 8 1 2 3 4 5 6 7 8 3 7 11 Timing chart No 11 Primary paper feed from large paper deck right cassette Paper feed shignal from the copier PFSW4 from the copier PPSENS1 CN4 9 PPSENS2 CN1 6 PPSENS3 CN1 11 PFCL1 CN4 4 CCL CN4 6 PFCL2 CN4 5 PFCL1 On for the first sheet PFCL1 On for the second sheet 100 ms 100 ms 64 P 64 P ...

Страница 562: ... 2 3 4 5 6 7 8 3 7 12 Timing chart No 12 Primary paper feed from large paper deck left cassette PFCL1 On for the first sheet PFCL1 On for the second sheet Paper feed signal from the copier PFSW4 from the copier PPSENS1 CN4 9 PPSENS2 CN1 6 PPSENS3 CN1 11 PFCL1 CN4 4 CCL CN4 6 PFCL2 CN4 5 100 ms 100 ms 43 P 43 P 64 P 64 P ...

Страница 563: ...4 1 C9 C10 C11 RF1 R119 D107 R118 6 4 5 1 2 8 9 R117 R115 D106 D105 D101 R116 R113 R112 R101 R106 R107 C105 C111 C106 C102 C108 C109 R103 R104 R108 D103 D102 ZD101 C110 R105 PC3 1 2 ZD103 C114 R125 R124 R123 C113 PT1 TR2 4 1 3 2 3 C116 R128 R127 R126 C115 PT2 TR3 4 1 3 2 3 ZD102 Q3 IC1 C107 PC1 PC2 3 4 4 3 R111 R109 R110 D104 R129 C104 R114 Q2 Q1 1 1 2 2 3 3 C102 C103 C112 C101 R120 TR1 2 3 1 D001...

Страница 564: ...12 R211 R210 R206 R203 R204 R208 R209 Q201 Q203 Q202 Q305 Q306 F201 1 2 18 19 13 12 4 5 6 8 TRNS 9 CN1 1 CN1 2 CN1 3 CN1 4 CN1 5 CN1 6 CN1 7 CN1 8 CN3 1 CN3 2 CN3 3 CN3 4 CN2 1 CN2 2 CN2 3 CN2 4 CN2 5 CN2 6 CN2 7 CN7 9 CN7 1 CN7 2 CN7 3 CN4 3 CN4 1 CN4 4 CN4 5 CN3 5 CN3 6 CN3 7 CN3 8 CN6 1 CN6 2 CN6 3 CN6 4 CN6 5 CN6 6 CN6 7 CN7 5 CN7 6 CN7 7 CN5 8 CN5 1 CN5 2 CN5 3 CN5 4 CN5 5 CN5 6 F202 F301 F30...

Страница 565: ...3 CN1 61 CN1 62 CN1 59 S CN1 38 CN13 4 CN13 7 CN13 10 CN13 13 PFSW1 PFSW2 PFSW3 PFSW4 PFSW4 CN17 7 CN1 37 CN1 36 CN1 35 S S CN3 B8 FTH CN1 21 H ALARM FTH CN1 1 CN1 8 CN2 B11 TNS SIG TNS SIG S 3 2 1 G S CN1 2 CN2 B7 S G S G CN1 18 ETTH EHUMSENS CN5 A1 ETTH S S G CN1 19 CN5 A3 EHUMSENS S G S S G S G CN2 A9 CN2 B4 CN3 A2 CN3 A5 CN3 B10 CN3 B7 CN5 A4 CN5 A9 CN8 A11 CN8 B1 CN9 5 CN9 6 CN9 13 CN9 14 CN9...

Страница 566: ... REM TC REM DB REM MC REM A A A A A A CN11 1 PFM CLK CN1 88 S G S CN11 3 PFM REM DM CLK DM REM PCM CLK PCM REM SC REM TC REM DB REM MC REM PFM CLK PFM REM CN1 87 5 2C 2E 1E 1 1E 1 4 2E 4 3 1C 6 2C 3 1C 6 2B 2 1B 1 1B 2 E 3 6 4 2B 1C 2C 1 1B IC4 IC4 IC4 R2 R54 R55 TR5 TR4 R41 R40 R39 TR3 R38 R42 D14 D15 R1 IC4 2 E 3 6 D24 TR15 TR16 4 2B 1C 2C 5 2B 2 1B S G P G P G S G S G S S R CN3 A9 FSSOL1 FSSOL2...

Страница 567: ...V CN13 B1 OFM RET CN13 B2 OFM CLK CN13 B3 OFM CWB CN13 B4 OCM ENABLE CN13 B5 OCM RET CN13 B6 OCM CLK CN13 B7 OCM CWB CN13 B8 OCM Vref CN13 B9 OCM M3 CN13 B10 OCM M2 CN13 B11 OCM M1 CN13 A1 OSLED RED CN13 A2 OSLED GN CN13 A3 SBPSOL2 CN13 A4 SBPSOL1 CN13 A5 DFCL CN13 A6 EFSSOL CN13 A7 CN13 A8 SBFSSOL CN13 A9 OFSOL2 CN13 A10 OFSOL1 CN13 A11 OFM ENABLE CN5 6 G S G S TR14 B C E G S G S G TR26 4 2E 2C 1...

Страница 568: ... REFHO6 REFHO5 REFHO4 REFHO3 VSS REFHO2 REFHO1 REFHO0 REFLE7 REFLE6 VDD3 V REFLE5 REFLE4 REFLE3 REFLE2 VSS REFLE1 REFLE0 REFLO7 REFLO6 VDD5 V REFLO5 REFLO4 REFLO3 REFLO2 INCLK VSS STOP2 STOP1 AVDD2 AVSS2 AVDD1 AVSS1 REFLO1 REFLO0 MPX CLP3 VSS CLP2 CLP1 SHDE2 SHDE1 SHPO A0 A1 A2 A3 A4 VSS A5 A6 A7 A8 _SHDCS VDD3 V _IOWR _IORD D0 D1 VSS D2 D3 TPD D4 D5 VDD5 V D6 D7 XTST _RESET VSS XTCK0 XTCK1 XSM MS...

Страница 569: ... 112 111 SD27 SD26 SD25 SD24 SD23 SD22 SD21 SD20 110 109 108 107 106 105 104 103 102 SA213 SA212 C42 C40 C41 C39 L148 R340 C205 SA211 SA210 SA29 SA28 101 100 99 98 97 96 95 94 93 92 91 SA27 SA26 SA25 SA24 SA23 SA22 SA21 SA20 90 89 88 87 86 85 84 83 82 SD17 SD16 SD15 SD14 SD13 SD12 SD11 81 VDD5 V3 SD27 SD26 SD25 SD24 SD23 SD22 VSS18 SD21 SD20 WR2_ OE2_ SA213 VDD3 V11 SA212 SA211 SA210 SA29 SA28 VSS...

Страница 570: ...7 C214 C31 C293 C211 C210 C182 C50 C294 C209 C208 C143 C4 C29 CN10 3 CN10 6 CN10 7 5 1 V L143 S L144 S G S G A G L141 L142 G 5 V 12 V G ANALOG S VIN 3 ADJ 1 IC38 C35 C30 C216 C215 VOUT 2 4 S CN10 1 5 1 V L140 R490 C218 C219 C32 S G A A S G S G F G A G A G A G R483 R407 R342 R124 R19 B TR24 C295 R499 R498 D S G TR6 R497 R288 C33 R489 D S G R290 R289 R287 C174 3 7 20 ...

Страница 571: ... A4 A5 A6 A7 P12 CNVss _RESET P11 P10 Xin Xout Vss P07 P06 P05 P04 P03 P02 P01 P00 1 D0 _WR M _RD M _SCC1 R264 R259 R263 INT SCC1 R SCAN T MCP2 R MCP2 T MCP1 R MCP1 T SCAN _W _R _S BM INTR R D3 T D3 R D2 T D2 R D1 T D1 P16 P15 P14 P13 PA0 PA1 PA2 PA3 PA4 PA5 PA6 PA7 PB0 PB1 PB2 PB3 PB4 PB5 PB6 BP7 R255 R269 7 8 9 10 11 12 13 14 15 16 2 3 4 6 5 48 42 41 40 39 38 37 36 35 34 33 47 46 45 43 44 10 11 ...

Страница 572: ... FCL 2 REM CN1 104 FCL 3 REM CN1 134 BYPPFCL REM CN1 115 RCL REM CN1 114 PCFM REM CN1 78 FSSOL 1 REM CN1 79 FSSOL 2 REM CN1 84 TC REM CN1 80 PRY REM CN1 81 SSW1SOURCE CN1 83 H ALM L LIM U LIM R463 R464 SC REM CN1 86 MC REM CN1 85 DB REM CN1 72 CL REM CN1 71 IFFM REM CN1 109 H1 REM CN1 108 H2 REM CN1 38 PFSW1 CN1 37 PFSW2 CN1 36 PFSW3 CN1 35 PFSW4 CN1 34 FSW CN1 33 RSW CN1 10 SSW3 CN1 9 SSW2 CN1 7 ...

Страница 573: ... A7S S G CN1 91 FINISHER T D R467 CN1 90 MMD R D S G CN1 89 MMD T D R466 CN1 27 COIN VENDER R D S G CN1 26 COIN VENDER T D LCF R D LCF T D S G S G S _RES SCC2 _RES SCC2 CN15 2 5 V CN15 14 CN15 17 CN15 29 CN15 1 CN15 11 CN15 30 CN15 26 GND GND CN15 15 CN15 16 L248 R495 IPC SET R494 L249 L252 L250 L251 G S G S G R381 3 1 2 CN1 140 KCARD REM CN1 139 KCARD REM CN1 101 TC REM CN1 100 COIN COPYING CN1 9...

Страница 574: ... _RE _WE _RRES _WRES Q2 Q3 Q4 Q5 Q6 Q7 MCPCLK M2 CN3 A12 L76 MCPMREW M2 CN3 A14 L73 MCPIDA M2 CN3 A16 L71 MCPIDB M2 CN2 A11 L187 MCPCLK M1 CN2 A12 L185 MCPMREW M1 CN2 A14 L182 MCPIDA M1 CN2 A16 L180 MCPIDB M1 5 6 7 8 4 4 3 1 1 4 4 3 1 1 4 2 3 2 2 3 2 3 2 1 5 6 7 8 4 3 2 1 8 7 6 5 1 2 3 4 RA65 RA4 RA37 RA38 RA36 1 19 2 4 6 8 11 13 15 17 IC48 CN2 A9 CN2 A10 CN2 A1 PVSYNC M1 PHSYNC M1 _MCPSEL M1 _1G ...

Страница 575: ... 2 3 SMRE M SOVSYNC M SCNCLK M 8 7 6 RA102 8 7 6 5 1 2 3 4 8 7 6 5 1 2 3 4 8 7 6 1 2 3 S SID0M SID1M _M1OE M1SEL SID3M SID2M PID0 PID1 PID3 PID2 2 3 15 1 6 5 11 10 13 14 4 7 9 12 1A 1B _G S 2B 2A 3A 3B 4B 4A 1Y 2Y 3Y 4Y IC50 R343 S G L193 L191 L190 L188 R402 R400 R399 R397 CN2 B10 CN2 B8 CN2 B11 CN2 B9 M1 DATA2 M1 DATA0 M1 DATA 3 M1 DATA1 SID4M SID5M SID7M SID6M PID4 PID5 PID7 PID6 2 3 15 1 6 5 11...

Страница 576: ...7 U9 U9 2 4 6 8 1 2 3 4 8 7 6 5 18 16 14 12 9 7 5 3 11 13 15 17 9 7 5 3 11 13 15 17 2 4 6 8 18 16 14 12 2 4 6 8 0 1 2 3 4 5 6 7 8 7 6 5 8 7 6 5 0 7 1 6 2 5 3 4 1 2 3 4 1 2 3 4 18 16 14 12 2 4 6 8 18 16 14 12 1 2 3 4 8 7 6 5 11 13 15 17 9 7 5 3 A1 A2 A3 A4 Y1 Y2 Y3 Y4 Y1 Y2 Y3 Y4 A1 A2 A3 A4 Y1 Y2 Y3 Y4 A1 A2 A3 A4 A1 A2 A3 A4 Y1 Y2 Y3 Y4 A1 A2 A3 A4 Y1 Y2 Y3 Y4 A1 A2 A3 A4 Y1 Y2 Y3 Y4 1 19 19 1 1 ...

Страница 577: ...ONE1_ DACK1_ DREO1_ X1 GND2 VCC2 X2 SCLK CTSB_ RTSB_ TXDB RXDB TXRAYA_ RARDYA_ CTSA_ RTSA_ GND3 VCC3 TXDA RXDA TIN2 TOUT2 TGATE2 1 2 3 4 5 6 7 8 9 10 11 12 13 14 15 16 17 18 19 20 21 22 23 24 25 26 27 28 29 30 31 32 33 34 35 36 RMC_ W_R SIZ1 SIZ0 DS_ AS_ BGACK_ BG_ BR_ BERR_ HALT_ RESET_ GND11 CLKOUT VCC11 XFC VCC10 EXTAL VCCSYN XTAL GND10 MODCK VCC9 IPIPE_ IFEICH BKPT_ FREEZE TIN1 TOUT1 TGATEL TC...

Страница 578: ...249 251 252 253 256 257 258 259 260 261 263 264 269 270 272 273 276 277 280 281 283 284 287 288 290 291 293 294 295 296 297 298 299 300 301 302 1 2 3 4 5 6 7 8 9 10 11 12 13 14 15 16 17 18 19 20 21 22 23 24 25 26 27 28 29 30 31 32 33 34 35 36 37 38 39 40 41 42 43 44 45 46 47 48 49 50 51 52 53 54 55 56 57 58 59 60 61 62 63 64 65 66 67 68 69 70 71 72 73 74 75 76 3 4 5 6 8 9 13 15 16 17 18 21 22 23 2...

Страница 579: ...A4 A3 A2 A1 A0 IO1 IO2 IO3 GND VCC WE_ A13 A8 A9 A11 OE_ A10 CE_ IO8 IO7 IO6 IO5 IO4 A14 A12 A7 A6 A5 A4 A3 A2 A1 A0 IO1 IO2 IO3 GND RA17 1 2 3 4 8 7 6 5 0 1 2 3 301 8 9 13 15 16 17 18 21 22 23 24 25 26 27 28 29 30 31 32 33 34 35 36 293 294 295 296 297 298 299 300 263 264 269 270 272 273 276 277 280 281 283 284 287 288 290 291 A0 A1 A2 A3 A4 A5 A6 A7 A8 A9 A10 A11 A12 A13 A14 A15 A16 A17 A18 A19 A...

Страница 580: ...1D26 SM1D11 SM1D27 SM1D12 SM1D28 SM1D29 SM1D13 SM1D30 SM1D14 SM1D31 SM1D15 CN5 CN5 CN5 CN5 CN5 CN5 CN5 CN5 CN5 CN5 CN5 CN5 CN5 CN5 CN5 CN5 CN5 CN5 CN5 CN5 CN5 CN5 CN5 CN5 CN5 CN5 CN5 CN5 CN5 CN5 CN5 CN5 CN5 CN5 CN5 CN5 CN5 CN5 CN5 CN5 CN5 CN5 1 39 72 12 13 14 15 16 17 18 28 31 32 19 44 45 34 33 40 43 41 42 47 10 30 59 SM1GND SM1GND SM1GND R80 C85 C86 C88 C87 CE11 CE10 CE9 VPL5 L5 F3 8 24 9 25 10 2...

Страница 581: ...D26 SM2D11 SM2D27 SM2D12 SM2D28 SM2D29 SM2D13 SM2D30 SM2D14 SM2D31 SM2D15 CN4 CN4 CN4 CN4 CN4 CN4 CN4 CN4 CN4 CN4 CN4 CN4 CN4 CN4 CN4 CN4 CN4 CN4 CN4 CN4 CN4 CN4 CN4 CN4 CN4 CN4 CN4 CN4 CN4 CN4 CN4 CN4 CN4 CN4 CN4 CN4 CN4 CN4 CN4 CN4 CN4 CN4 1 39 72 12 13 14 15 16 17 18 28 31 32 19 44 45 34 33 40 43 41 42 47 10 30 59 SM2GND SM2GND SM2GND R79 C79 C80 C82 C81 CE8 CE7 CE6 VPL5 L4 F2 8 24 9 25 10 26 1...

Страница 582: ... 2 1 0 R55 C53 C56 L63 D1 D2 D3 D4 D5 D6 D7 D8 D9 D10 D11 D12 D13 D14 D15 D16 LCAS0 UCAS0 RAS0 OE0 W0 2 3 4 5 7 8 9 10 33 34 35 36 38 39 40 41 31 30 14 29 13 0 1 2 3 4 5 6 7 8 9 10 11 12 13 14 15 VSS1 VCC1 VSS2 VCC2 VSS3 VCC3 A9 A8 A7 A6 A5 A4 A3 A2 A1 A0 NC1 NC2 NC3 NC4 NC5 42 1 37 6 22 21 28 27 26 25 24 23 20 19 18 17 11 12 15 16 32 9 8 7 6 5 4 3 2 1 0 R46 C34 C37 L56 1 0 U18 U13 RA72 8 7 6 5 1 ...

Страница 583: ... CD20 CD19 CD18 GND14 VDD13 CD17 CD16 CD15 CD14 CD13 GND13 VDD12 CD12 CD11 CD10 CD9 CD8 GND12 109 110 111 112 113 114 115 116 117 118 119 120 121 122 123 124 125 126 127 128 129 130 131 132 133 134 135 136 137 138 139 140 141 142 143 144 0 1 2 3 4 5 6 7 157 156 155 Q1HWR_ Q1HRD_ Q1HCS_ 1 2 3 4 CDAK CDRD CDWR INTR VDD17 GND18 HD0 HD1 HD2 HD3 HD4 VDD18 GND19 HD5 HD6 HD7 TEST0 TEST1 VDD19 GND20 MCLK ...

Страница 584: ...1 RESET HRD HWR HCS VDD21 GND22 HA0 HA1 HA2 HA3 TOUT1 TOUT2 VDD22 GND1 PDO PD1 PD2 PD3 PD4 VDD1 GND2 PD5 PD6 PD7 PD8 PD9 VDD2 GND3 PD10 PD11 PD12 PD13 PD14 VDD3 GND4 PD15 PD16 PD17 PD18 PD19 VDD4 GND5 PD20 PD21 PD22 PD23 PD24 VDD5 GND6 CDRQ GND17 VDD16 CD31 CD30 CD29 CD28 GND16 VDD15 CD27 CD26 CD25 CD24 CD23 GND15 VDD14 CD22 CD21 CD20 CD19 CD18 GND14 VDD13 CD17 CD16 CD15 CD14 CD13 GND13 VDD12 CD12...

Страница 585: ...16 15 14 13 12 11 18 17 16 15 14 13 12 11 18 17 16 15 14 13 12 11 18 17 16 15 14 13 12 11 15 14 13 12 11 10 9 8 15 14 13 12 11 10 9 8 15 14 13 12 11 10 9 8 7 6 5 4 3 2 1 0 7 6 5 4 3 2 1 0 7 6 5 4 3 2 1 0 2 3 4 5 6 7 8 9 10 2 3 4 5 6 7 8 9 10 2 3 4 5 6 7 8 9 10 2 3 4 5 6 7 8 9 10 U24 U21 U23 U22 A0 A1 A2 A3 A4 A5 A6 A7 GND A0 A1 A2 A3 A4 A5 A6 A7 GND A0 A1 A2 A3 A4 A5 A6 A7 GND A0 A1 A2 A3 A4 A5 A6...

Страница 586: ...VPL5 VCC3 VCC3 VCC3 VPL5 VPL5 VPL5 VCC3 2 5 6 4 4 1 1 2 3 U5 D CLK Q _Q _PRE _CLR CT3 U3 1 2 3 4 8 7 6 5 reset at 2 07V CT VSC OUTC GND RES_ VS VSB RI_ VCC RST_ RST_ 74 003 15A MCP 2AC 304 1 001 13F iRESET_ 003 15A MCP 2AC 304 1 46 RCKEN 1 2 1 2 4 3 4 3 X2 X1 DE GND DE GND VCC OUT VCC OUT 41 003 15A 003 15A 002 02C 001 13D MCP 2AC 304 1 MCP 2AC 304 1 iRCK2 CPUCLK D CLK Q _Q _PRE _CLR U6 12 9 8 10 ...

Страница 587: ...C24 20 10 VCC GND U7 VCC3 GPL5 L44 C22 R34 C25 20 10 VCC GND U9 VCC3 GPL5 GPL5 GPL5 GPL5 L45 L40 C18 C16 R35 C26 20 10 VCC GND U10 VPL5 GPL5 C40 5 3 VCC GND U12 VPL5 VPL5 GPL5 C15 5 3 VCC GND U5 B2P VH E 5 1 V G 5 V 1 2 CN2 CN2 L2 L1 CE1 CT1 CT2 CE2 C2 C4 C5 C94 C1 R2 C3 R4 1 3 2 U2 VIN VOUT GND VCC3 VPL5 R89 R90 R1 R3 FG1 FG3 FG4 GPL5 GMI5 FG2 GPL5 GMI5 GPL5 GPL5 GMI5 GMI5 GND1 GPL5 GND2 GPL5 GND...

Страница 588: ...2 CN1 13 SM Vref SM M1 SM M2 SM M3 SM M4 SM M5 SM CLK SM CWB SM A SM _A SM B SM _B SM COM SM COM SM RET SM ENABLE CN1 10 CN1 9 CN1 11 CN1 7 CN1 8 CN1 5 CN1 4 CN1 6 CN2 6 CN2 4 CN2 1 CN2 3 6 5 2 1 19 20 21 22 7 3 4 NO MOUNT 5V 5V 5V 5V G G G G G 24 V 24 V 24 V G G G 24 V G 24 V 5 1 V G 5 V 24 V Vref M1 M2 M3 M4 M5 CLK CWB _RES RET EN A _A B _B MOI MO1 MO2 PG PG SG VDD L2 C4 CN4 2 CN1 2 SHPSW SHPSW ...

Страница 589: ...27 2 28 1 12 7 8 13 14 15 21 22 1 2 3 4 8 5 1 2 3 4 8 5 6 7 6 4 5 7 A G A G A G A G A G A G A G S S S C17 C18 CN1 1 ΦCLK ΦCLK ΦRS ΦCLP ΦSHIFT 5 V 5 V 5 V ΦRS ΦCLP ΦSHIFT CN1 2 CN1 3 CN1 4 CN1 5 CN1 6 CN1 7 CN1 8 CN1 9 CN1 10 CN1 11 CN2 1 VO_O VO_E 12V G Analog G Analog VO_O VO_E CN2 2 CN2 3 CN2 4 CN2 5 CN2 6 CN2 7 A G A G A G A G A G A G A G VDD VDD VDD VDD VGG VOUT_EVEN VOUT_ODD GND GND GND CP1_E...

Страница 590: ... G CN2 17 CN5 B8 CN2 19 CN5 A7 CN2 20 CN5 A5 CN2 21 CN5 A2 S S 5 4 1C 2C 1B E 2B 1 3 2 P G CN2 22 CN5 A3 P G CN2 15 CN5 B12 P G S G CN2 16 CN5 B13 SBFSSOL EFSSOL OFCL SBPSOL1 SBPSOL2 OFSOL1 OFSOL2 P G S G R S S G S S CN4 3 CN4 4 SBFSSOL EFSSOL OFCL SBPSOL1 SBPSOL2 OFSOL 1 OFSOL2 DFSSW2 DFSSW1 CN3 7 5 4 1C 2C 1B E 2B 1 3 2 CN3 6 DFSSW2 DFSSW1 P G P G S CN2 6 CN2 7 CN2 9 CN2 10 CN2 1 CN2 2 CN2 3 CN5...

Страница 591: ...R32 R22 R62 R67 R68 R70 R72 R71 R66 R65 R61 6 5 4 A0 A1 A2 A3 A4 A5 A6 A7 A8 A9 A10 A11 A12 A13 A14 A15 A16 A17 A18 A19 D0 D1 D2 D3 D4 D5 D6 D7 A0 A1 A2 A3 A4 A5 A6 A7 A8 A9 A10 A11 A12 A13 A14 A15 A16 A17 A18 A19 A23 D0 D1 D2 D3 D4 D5 D6 D7 P110 P111 31 32 33 34 35 36 37 38 39 40 41 42 43 44 45 46 47 48 49 50 LED L4 LED L3 LED L2 LED L1 LED R4 LED R3 LED R2 LED R1 100 99 98 97 96 95 94 93 92 91 9...

Страница 592: ... DB1 VA3 VA2 VA1 VA0 D7 D6 D5 D4 D3 D2 D1 22 20 27 10 9 8 7 6 5 4 3 25 24 21 23 2 26 1 28 14 11 12 13 15 16 17 18 19 O0 O1 O2 O3 O4 O5 O6 O7 O0 O1 O2 O3 O4 O5 O6 O7 S S G S G _OE _CE _WE A0 A1 A2 A3 A4 A5 A6 A7 A8 A9 A10 A11 A12 A13 A14 Vcc GND I O0 I O1 I O2 I O3 I O4 I O5 I O6 I O7 S S Vdd G P G CN1 14 LCD REM CN1 10 XSCL CN1 11 LP CN1 12 DIN CN1 6 XD0 CN1 5 XD1 CN1 4 XD2 CN1 3 XD3 CN1 8 G 5 V C...

Страница 593: ...6 CNB 7 CNB 8 CNB 13 CNB 14 R17 R7 R8 TR4 R18 R19 R20 CNB 10 CNB 9 CNB 12 CNB 11 N C DIG KEY_R1 KEY8 KEY9 KEY10 KEY11 D4 D5 D6 D7 KEY12 KEY13 KEY14 KEY15 KEY16 KEY17 KEY18 KEY19 KEY20 KEY21 KEY22 KEY23 DIG KEY_R2 DIG KEY_R3 DIG KEY_R4 SCAN_R1 SCAN_R2 SCAN_R3 SCAN_R4 BUZZER BZ1 5 V DIG LED_R2 DIG LED_R1 LED17 LED18 LED19 LED20 DIG LED_R4 DIG LED_R3 Operation unit right PCB 3 7 43 ...

Страница 594: ... CNA 4 CNA 2 CNC 1 CNC 4 CNT VR 23 V CNA 10 DIG KEY_L1 DIG KEY_L2 DIG KEY_L3 SCAN_L1 SCAN_L2 5 V N C DIG LED_L1 DIG LED_L2 DIG LED_L3 DIG LED_L4 CFL REM 24 V G 24 V 5 V B2 R25 TH1 R21 R29 R28 R13 R15 R22 R23 R30 R24 C2 C1 T1 12 7 4 3 2 1 5 R9 R1 TR1 R2 R3 TR2 LED1 LED2 LED3 LED4 LED5 LED6 LED7 LED8 LED9 LED10 LED11 LED12 LED13 LED14 LED15 LED16 R4 R5 TR3 R6 R10 R11 R12 R14 R26 R27 TR6 TR7 TR8 TR5 ...

Страница 595: ... 2 3 1 Q5 GROUND AGROUND C E B 2 3 1 Q6 GROUND AGROUND 2 R24 5 V 1 2 R27 5 V 1 C E 2 1 04 B 3 C E 2 1 B 3 Q2 1 2 K A D3 SIG 1 2 K A D2 2 R26 1 24 V 24 V C E 2 1 B 3 Q3 1 2 K A D1 SIG 1 2 K A D4 2 R25 1 24 V 5 V GROUND 2 1 C8 IC2 2 1 C9 IC3 2 1 C10 IC5 2 1 C13 IC8 2 1 C12 IC7 2 1 C11 IC6 2 1 C19 IC9 2 1 C5 GROUND 2 R49 1 2 R55 1 5 V 2 R22 1 5 V 1 2 R21 2 C6 1 GROUND 24 V IN1 IN2 IN3 IN4 01 02 03 04...

Страница 596: ...4 V CCL 24 V PFCL2 24 V PFCL1 N C N C 1 2 3 4 5 6 7 8 CN6 1 CN6 2 CN6 3 CN6 4 CN6 5 5 V SG SCSW DOSSW 24 V 1 2 3 4 5 CN8 1 CN8 2 CN8 3 N C N C N C 1 2 3 CN7 1 CN7 2 CN7 3 CN7 4 5 V PPSENS1 LED CLK N C 1 2 3 4 CN1 1 CN1 2 CN1 3 CN1 4 CN1 5 CN1 6 CN1 7 CN1 8 CN1 9 CN1 10 CN1 11 24 V 24 V N C PFCL1 PFCL2 CCL 5 V SG PPSENS1 N C SCSW 1 2 3 4 5 6 7 8 9 10 11 CN2 1 CN2 2 CN2 3 CN2 4 CN2 5 CN2 6 CN2 7 CN2...

Страница 597: ...N A 19 CN A 20 CN A 18 CN A 16 CN A 17 CN A 15 CN A 13 CN A 14 CN A 12 CN A 10 CN A 11 CN A 9 CN A 7 CN A 8 CN A 6 CN A 4 CN A 5 CN A 3 CN A 1 CN A 2 CN B 19 CN B 20 CN B 17 CN B 18 CN B 16 CN B 14 CN B 15 CN B 22 CN B 23 CN B 21 CN B 13 CN B 11 CN B 12 CN B 10 CN B 8 CN B 9 CN B 7 CN B 5 CN B 6 CN B 4 CN B 2 CN B 3 CN B 1 CN A 23 OSBSW OFSW OSSW OSWSW DF SHORT DFSSW2 OSLSW DFSSW1 DFTSW FG FG SG S...

Страница 598: ... 3 2 2 1 4 10 24 V G 24 V E 5 1 V G 5 V G 24 V H1 REM H2 REM 24 V PRY REM R24 V MSW OFF REM PRY SOURCE SSW1 SOURCE SSW1 SSW2 SOURCE SSW2 SSW3 SOURCE SSW3 PWSW U 2 PWSW L 2 PLSW U PLSW L 4 3 2 1 DF11 8P 5 6 7 8 3 4 1 2 4 3 2 1 DF11 8P 5 6 7 8 3 4 1 2 9 19 9 20 9 21 9 22 9 23 9 24 9 25 9 26 13 1 13 2 13 3 13 4 13 5 13 6 13 7 13 8 13 9 8 A7 8 A8 8 A9 8 A10 3 A4 3 A5 3 A6 3 A7 3 A8 3 A9 PWSW U DIG 0 P...

Страница 599: ...24 V G 24 V 24 V G 24 V E 5 1 V G 5 V PRY 4 1 5 3 2 43or44 23or24 A1orA2 33or34 43or44 23or24 A1orA2 33or34 K A SSW1 SSW2 SSW3 3 1 1 1 1 1 3 1 3 2 3 1 3 2 2 1 4 10 24 V G 24 V E 5 1 V G 5 V G 24 V H1 REM H2 REM 24 V PRY REM R24 V MSW OFF REM PRY SOURCE SSW1 SOURCE SSW1 SSW2 SOURCE SSW2 SSW3 SOURCE SSW3 PWSW U 2 PWSW L 2 PLSW U PLSW L 4 3 2 1 DF11 8P 5 6 7 8 3 4 1 2 4 3 2 1 DF11 8P 5 6 7 8 3 4 1 2 ...

Страница 600: ...A OCM B OCM A OCM B BK WE RD BE YW OE C5 B1 RD C5 B2 GY C5 B3 GY C5 B4 GY C5 B5 GY C5 B6 GY B 23 B 22 B 21 B 20 B 19 B 18 B 17 B 16 B 15 B 14 B 13 B 12 B 11 B 10 B 9 B 8 B 7 B 6 B 5 B 4 B 3 B 2 B 1 A 23 A 22 A 21 A 20 A 19 A 18 A 17 A 16 A 15 A 14 A 13 A 12 A 11 A 10 A 9 A 8 A 7 A 6 A 5 A 4 A 3 A 2 A 1 C3 10 C3 9 C2 22 C2 21 C2 20 C2 19 C2 18 C2 17 C2 16 C2 15 C2 14 C2 13 C2 12 C2 11 C2 10 C2 9 C2...

Страница 601: ...1 CN4 2 CN4 3 CN4 4 CN4 5 CN4 6 CN4 7 CN4 8 CN4 9 CN4 10 CN4 11 CN4 12 5 V SGND PLDSENS1 5 V SGND PLDSENS2 CN2 1 CN2 2 CN2 3 CN2 4 CN2 5 CN2 6 DCNJ 22 DCNJ 21 DCNJ 20 DCNJ 19 DCNJ 18 DCNJ 17 DCNJ 16 DCNJ 15 DCNJ 14 DCNJ 13 DCNJ 12 DCNP 22 DCNP 21 DCNP 20 DCNP 19 DCNP 18 DCNP 17 DCNP 16 DCNP 15 DCNP 14 DCNP 13 DCNP 12 CN1 1 CN1 2 CN1 3 CN1 4 CN1 5 CN1 6 CN1 7 CN1 8 CN1 9 CN1 10 CN1 11 5 V DLSW1 SGN...

Страница 602: ...d P O Box 40008 Fairfield New Jersey 07004 0008 TEL 973 808 8444 FAX 973 882 4401 Midwestern Region 225 Spring Lake Drive Itasca Illinois 60143 TEL 630 250 7447 FAX 630 250 8787 Western Region 14101 Alton Parkway P O Box 57006 Irvine California 92618 7006 TEL 949 457 9000 FAX 949 457 9119 Southeastern Region 1500 Oakbrook Drive Norcross Georgia 30093 TEL 770 729 9786 FAX 770 729 9873 Southwestern ...

Отзывы: