background image

G A L A X Y ®   A U R O U R A       C O N F I G U R A T I O N   A N D   S Y S T E M   I N T E G R A T I O N   G U I D E  


14                                            


Section 1 Intro and Overview 

1.2    Model Variations 

 
1.2.1  Galaxy Aurora   Model Descriptions 


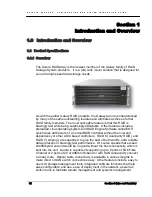
The Aurora has 4 primary models with many storage variations: 
 

GAUR24-4FC8-10.8TX:

 GALAXY AURORA 8GBIT FC STORAGE APPLIANCE, 24BAY HOTSWAP 

SAS 4U RACKMOUNT, REDUNDANT P/S, 1X2.66GHZ CORE I7 CPU, 12GB (6X2GB) RAM, 
24X450GB SAS 15K RPM DRIVES, LINUX O/S & EOS APP ON DOM, QUAD-PORT 8GBIT FC HBA, 
RAID 6, 1

ST

 YEAR G1 WARRANTY 


GAUR24-4FC8-14.4TX: 

GALAXY AURORA 8GBIT FC STORAGE APPLIANCE, 24BAY HOTSWAP 

SAS 4U RACKMOUNT, REDUNDANT P/S, 1X2.66GHZ CORE I7CPU, 12GB (6X2GB) RAM, 
24X600GB SAS 15K RPM DRIVES, LINUXO/S & EOS APP ON DOM, QUAD-PORT 8GBIT FC HBA, 
RAID 6, 1STYEAR G1 WARRANTY 
 

GAUR24-4FC8-18TB

: GALAXY AURORA 8GBIT FC STORAGE APPLIANCE, 24BAY HOTSWAP 

SAS 4U RACKMOUNT, REDUNDANT P/S, 1X2.66GHZ CORE I7 CPU, 12GB (6X2GB) RAM, 
24X750GB SAS 7200RPM DRIVES, LINUX O/S & EOS APP ON DOM, QUAD-PORT 8GBIT FC HBA, 
RAID 6, 1ST YEAR G1 WARRANTY 

 
GAUR24-4FC8-24TB: 

GALAXY AURORA 8GBIT FC STORAGE APPLIANCE, 24BAY HOTSWAP 

SAS 4U RACKMOUNT, REDUNDANT P/S, 1X2.66GHZ CORE I7 CPU, 12GB (6X2GB) RAM, 
24X1TB SAS 7200RPM DRIVES, LINUX O/S & EOS APP ON DOM, QUAD-PORT 8GBIT FC HBA, 
RAID 6, 1ST YEAR G1 WARRANTY 


The Aurora models share the same basic setup, configuration, and administration so the main portion 
of the manual will discuss these functions.   
 

For ease of purpose, the main portion of the manual will  


be based on the 

GAUR24-4FC8-24TB

 version of the Aurora . 


Содержание Galaxy Aurora Series

Страница 1: ...Galaxy Aurora Series RAID Storage System Configuration and System Integration Guide Version 2 1 February 2011...

Страница 2: ...ive Eden Prairie MN 55344 3732 952 829 0300 Sales rorke com techsupport rorke com This manual is preliminary and under construction and only applies to the Galaxy Aurora product Contact Rorke Tech sup...

Страница 3: ...ations 11 1 1 1 Overview 11 1 1 2 Basic Features and Advantages 12 1 2 Model Variations 14 1 2 1 Galaxy Aurora Model Descriptions 14 1 3 Product Description 15 1 3 1 Description of Physical Components...

Страница 4: ...on Aurora Windows Clients 34 2 2 5 Linux Client RAID Connections and LUN Preparation 51 2 2 6 Windows Client RAID Connections and LUN Preparation 54 2 2 7 Apple OSX Client RAID Connections and LUN Pre...

Страница 5: ...therboard problems 112 4 9 Drive Backplane problems 115 4 10 Boot device problems 116 4 11 Data Drive problems 116 4 12 SAS HBA problems 116 4 13 Infiniband HCA problems 117 4 14 SAS Infiniband Host c...

Страница 6: ...GUI a Little Faster 138 Find the IP Addresses of Other Aurora s on the Network 139 Adding Deleting Changing Webmin Users 139 Changing Passwords 140 Run a CLI command from Webmin 140 Change the Networ...

Страница 7: ...n of such revisions or changes Product specifications are also subject to change without prior notice Trademarks Rorke Data and the Rorke Data logo are registered trademarks of Rorke Data Inc Rorke Da...

Страница 8: ...e fails leave it in place until you have a replacement unit and you are ready to replace it Airflow Consideration The subsystem requires an airflow clearance especially at the front and rear Handle su...

Страница 9: ...damage to the equipment or result in personal injury Warnings should be taken seriously Warnings are easy to recognize The word warning is written as WARNING both capitalized and bold and is followed...

Страница 10: ...installed on your system should provide the complete functionality listed in the specification sheet user s manual We provide special revisions for various application purposes Therefore DO NOT upgrad...

Страница 11: ...G A L A X Y A U R O U R A C O N F I G U R A T I O N A N D S Y S T E M I N T E G R A T I O N G U I D E 10 Section 1 Intro and Overview This page left blank intentionally...

Страница 12: ...operating system and RAID Engine Software called EOS which does all the work of a normal RAID controller without the cost and dependency of other ASIC based controllers RAID 6 dual parity RAID and RAI...

Страница 13: ...ID Engine and GUI application RAID level 6 dual parity RAID protection RAID level 0 striping RAID function 8 X 8Gb Fibre Channel and 2 X 20 40Gb InfiniBand SAN support 24 Removable Hot Swap Disk Drive...

Страница 14: ...T E M I N T E G R A T I O N G U I D E 13 Section 1 Intro and Overview Redundant Power Supplies UPS Support and Network UPS Support Secure front bezel protection Console Tool as well as Remote Console...

Страница 15: ...M 24X600GB SAS 15K RPM DRIVES LINUXO S EOS APP ON DOM QUAD PORT 8GBIT FC HBA RAID 6 1STYEAR G1 WARRANTY GAUR24 4FC8 18TB GALAXY AURORA 8GBIT FC STORAGE APPLIANCE 24BAY HOTSWAP SAS 4U RACKMOUNT REDUNDA...

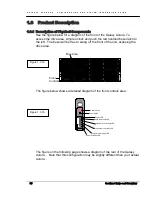
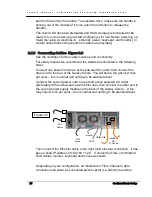
Страница 16: ...tch to the left The bezel will be free to swing off the front of the unit exposing the drive area The figure below shows a detailed diagram of the front controls area The figure on the following page...

Страница 17: ...ower Supply Handle V Network Port 2 Link LED E Upper Power Connector W SAS Card 3 Heartbeat F Lower Power Connector X SAS Card 3 Activity G Upper Power Status LED Y SAS Card 2 Heartbeat H Lower Power...

Страница 18: ...ory key s hub s and or a USB keyboard or mouse To the right of the USB connectors is a green serial connector It is not used To the right of the serial connector is an analog VGA connector You may att...

Страница 19: ...g 50 60 Hz dual hot swap and redundant with PFC N 1 design Ventilation 6 fans 4 front 80mm x 80mm x 25mm 2 rear 60mm x 60mm x 25mm Environment Controller Internal Temperature visible and audio alarm I...

Страница 20: ...e following functions EOS Linux based RAID application and User configuration troubleshooting interface Remote system administration Administrative tasks can be performed in the Web based GUI Alternat...

Страница 21: ...ngs to assure there is no overloading of supply circuits that could have an effect on over current protection and supply wiring Reliable grounding of this equipment must be maintained Particular atten...

Страница 22: ...unlatch the slides If the rack is on wheels be sure to use the wheel locks when installing or removing the Galaxy Aurora from the rack If the rack does not have wheel locks place something against th...

Страница 23: ...R O U R A C O N F I G U R A T I O N A N D S Y S T E M I N T E G R A T I O N G U I D E 22 Section 1 Intro and Overview Follow the instructions for each of these illustrations Kit Contents the rack moun...

Страница 24: ...G A L A X Y A U R O U R A C O N F I G U R A T I O N A N D S Y S T E M I N T E G R A T I O N G U I D E 23 Section 1 Intro and Overview...

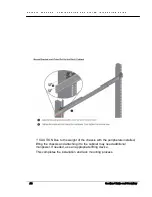
Страница 25: ...U I D E 24 Section 1 Intro and Overview CAUTION Due to the weight of the chassis with the peripherals installed lifting the chassis and attaching it to the cabinet may need additional manpower If need...

Страница 26: ...criptions Figure 2 1 The Aurora comes with a lockable removable front bezel Remove this bezel to access the operator panel that has indictors for operational and fault conditions and activity Green LE...

Страница 27: ...ng wrong with the power this LED will illuminate 2 1 2 Installing drives into the Aurora Figure 2 2 The Galaxy Aurora features 24 removable drives They have been shipped separately to insure the Auror...

Страница 28: ...ng order Connect one power cord to an active powered AC outlet then connect the other end to the rear of the Galaxy Aurora You will hear a fan get loud then get quiet this is normal and nothing to be...

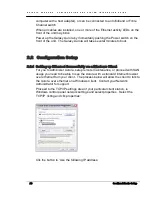
Страница 29: ...minutes to boot 2 2 Configuration Setup 2 2 1 Setting up Ethernet Connectivity on a Windows Client For you to administer Aurora setup remote maintenance or proceed with SAN usage you need to be able t...

Страница 30: ...OK and your client can now see the Aurora over Ethernet using as standard Internet Browser The Aurora has been setup with a fixed default IP address of 192 168 1 129 2 2 2 Installing Fibre Channel HB...

Страница 31: ...The current version at the time of this writing was 1 4 it will be used for the examples This version will change so expect that version is your results of the following commands Save the OFED file i...

Страница 32: ...is applicable only to IPoIB IP over InfiniBand which we are not using so press n enter If you have a card with more than one port it will repeat this question for each of the ports The response will...

Страница 33: ...ou need to perform some additional steps to actually connect to the LUN Type the following commands modprobe ib_srp srp_sg_tablesize 58 enter This loads the Infiniband SCSI RDMA client driver and sets...

Страница 34: ...port add_target enter Where port is the name of the port that the array is physically connected to Using the example from above ibsrpdm c sys class infinitand_srp srp mthca0 1 add_target enter The LU...

Страница 35: ...have user account control disabled to install drivers Disconnect all IB cables Drivers can be obtained from http www mellanox com content pages php pg products_dyn product_family 32 menu_section 34 t...

Страница 36: ...N G U I D E 35 Section 2 Basic Setup The InstallShield Wizard title page will launch Left click on the Next button to continue A license agreement window will open Left click on the bubble next to I...

Страница 37: ...l open requesting where to install OFED Use the default location and left click on the Next button to continue You will be presented with a screen asking if you want to do a typical or custom installa...

Страница 38: ...T E G R A T I O N G U I D E 37 Section 2 Basic Setup A popup menu will appear Left click on the selection which reads This feature will be installed on local hard drive The red X icon will disappear...

Страница 39: ...R O U R A C O N F I G U R A T I O N A N D S Y S T E M I N T E G R A T I O N G U I D E 38 Section 2 Basic Setup The Ready to Install screen will open Left click on the Install button to begin the insta...

Страница 40: ...ich says the driver being installed hasn t been certified by Microsoft you do want to click on the OK button to install it You may see multiple of these windows warnings this is normal Once the instal...

Страница 41: ...A C O N F I G U R A T I O N A N D S Y S T E M I N T E G R A T I O N G U I D E 40 Section 2 Basic Setup This will cause the start menu to open Right click on Computer The following pop up menu will app...

Страница 42: ...A C O N F I G U R A T I O N A N D S Y S T E M I N T E G R A T I O N G U I D E 41 Section 2 Basic Setup The Computer Management window opens In the left column left click on Services and Applications t...

Страница 43: ...A N D S Y S T E M I N T E G R A T I O N G U I D E 42 Section 2 Basic Setup The options on the left will expand Left click on Services The middle portion of the screen expands with Services Scroll dow...

Страница 44: ...U R O U R A C O N F I G U R A T I O N A N D S Y S T E M I N T E G R A T I O N G U I D E 43 Section 2 Basic Setup Search for and right click on OpenSM The following popup menu will appear Left click o...

Страница 45: ...T I O N G U I D E 44 Section 2 Basic Setup The properties window will appear Left click on the large button next to Startup type which reads Disabled or Manual Click on the pull down and several opti...

Страница 46: ...R A T I O N G U I D E 45 Section 2 Basic Setup Restart the client After the restart you should see a Found New Hardware wizard Left click on the option which reads Locate and install driver software...

Страница 47: ...S Y S T E M I N T E G R A T I O N G U I D E 46 Section 2 Basic Setup The insert the disc window opens Left click on I don t have the disc Show me other options The windows cant find window opens Left...

Страница 48: ...F I G U R A T I O N A N D S Y S T E M I N T E G R A T I O N G U I D E 47 Section 2 Basic Setup The browse for driver window opens Notice that it says Include subfolders The easiest way to do this is...

Страница 49: ...E M I N T E G R A T I O N G U I D E 48 Section 2 Basic Setup The browse for folder window will open Browse and navigate to the C Program Files Mellanox MLNX_WinOF SRP folder and left clik to select it...

Страница 50: ...49 Section 2 Basic Setup In this example the SRP folder was selected in the C Program Files Mellanox MLNX_WINOF folder Once you ve selected the folder and clicked the OK button you will be returned t...

Страница 51: ...and left click on the Install button After a few moments a successful installed screen will appear Left click on the Close button Several new hardware found pop up windows may open depending on how ma...

Страница 52: ...In the example above the last line shows the Aurora LUN GalaxyIB My LUN The Aurora device manufacturer is shown as GalaxyIB with the My LUN name as the model name The version number 2091 is the versi...

Страница 53: ...t doesn t really matter what you name it but it does have to have a name preferably unique Also the file system chosen for this example was ext3 Other file systems may be used on your client some offe...

Страница 54: ...m accounting information done This filesystem will be automatically checked every 27 mounts or 180 days whichever comes first Use tune2fs c or i to override The amount of time it takes to create the f...

Страница 55: ...t command Your Aurora LUN is now available for use by Linux clients 2 2 6 Windows Client RAID Connections and LUN Preparation After the Window InfiniBand drivers are installed or the Fibre channel HBA...

Страница 56: ...p This will cause the start menu to pop up Your screen will look different not every computer has the same programs in the list Along the right side of the menu is a grey area in the image above move...

Страница 57: ...e screen will change If this is the first time that this LUN has been formatted for Windows an Initialize Disk popup will appear on top of the disk management window This warning will usually also onl...

Страница 58: ...om the client it may erase any data that was on the LUN Left click on the bubble next to GPT Then left click on the OK button The Disk Management window will open In the example below a 1TB LUN was us...

Страница 59: ...U I D E 58 Section 2 Basic Setup The following pop up menu will appear left click on New Simple Volume This will open the New Simple Volume Wizard Left click on the Next button to continue The Specify...

Страница 60: ...I D E 59 Section 2 Basic Setup The assign drive letter window opens Use the default and note the letter Click on the Next button to continue The format partition window opens Leave all values at defau...

Страница 61: ...A C O N F I G U R A T I O N A N D S Y S T E M I N T E G R A T I O N G U I D E 60 Section 2 Basic Setup On the same window left click on the Perform a quick format checkbox So it is checked then left c...

Страница 62: ...and provides the last chance to go back and make any changes before the LUN is formatted and volume created on it If everything looks OK click on the Finish button to continue When the partitioning is...

Страница 63: ...G A L A X Y A U R O U R A C O N F I G U R A T I O N A N D S Y S T E M I N T E G R A T I O N G U I D E 62 Section 2 Basic Setup...

Страница 64: ...he following popup window If you get this warning it will save all of the steps necessary in setting up the Aurora with Apple Disk Utility So if the Disk Insertion warning does appear click on the Ini...

Страница 65: ...2 Basic Setup The next column to the right will populate showing the contents of the Applications folder On most systems this new column will be too large to fit on the screen so you will need to scro...

Страница 66: ...populate showing the contents of the Utilities folder double click on Disk Utility Apple Disk Utility will open You will see the LUN listed on the left in the example above it is a 1TB LUN showing Ga...

Страница 67: ...U I D E 66 Section 2 Basic Setup In the middle of the screen click on Current in the Volume Scheme pulldown to expose a partition list Drag down to set the number of partitions to 1 Partition then rel...

Страница 68: ...T I O N A N D S Y S T E M I N T E G R A T I O N G U I D E 67 Section 2 Basic Setup At the bottom right click on the Apply button A popup warning will appear CAUTION Proceeding beyond this point will...

Страница 69: ...asic Setup The partition and volume creation process will begin this will only take a few seconds When it is done if you have OS X 10 5 or above another popup window will appear about Time Machine Cli...

Страница 70: ...ommand line interface For ease of use the user should use a browser remotely to verify the basic operations and functionality This is accessed by opening a browser and typing the following URL http 19...

Страница 71: ...tion 3 Aurora Management 3 0 Aurora GUI Detailed Operations The GUI Menu provides you with simple and basic functions that can give you the overall status of the Aurora Once logged in through a browse...

Страница 72: ...rowser enter the following URL http 192 168 1 129 10000 This will give you a login prompt The user name is admin with the password being password The initial web admin page opens In the Webmin menu on...

Страница 73: ...G A L A X Y A U R O U R A C O N F I G U R A T I O N A N D S Y S T E M I N T E G R A T I O N G U I D E 72 Section 3 Management Main GUI Screen...

Страница 74: ...RAID does not necessarily need to contain all of the disks in the array Because of this there are three possible things you could see in this table If no RAID s are defined it will say No Raids define...

Страница 75: ...nt The cache size selected is directly subtracted from the RAM in the array so care must be taken so that not all of the RAM is not used up For example if you have 6GB of RAM and already have an RAID...

Страница 76: ...set to 16 and the RAID Size The total usable capacity of the RAID in Gigabytes in this case 1914GB or 1 9TB The Code Rev is the version of the driver that is currently on the array in this example 20...

Страница 77: ...O N F I G U R A T I O N A N D S Y S T E M I N T E G R A T I O N G U I D E 76 Section 3 Management of the RAID that you would like information for to go to the RAID Details screen for that RAID This is...

Страница 78: ...right of cache stripes show the total capacity of the RAID in Gigabytes in this example 1093 Gigabytes the RAID Level 0 or 6 the number of devices which make up the RAID and the overall status of the...

Страница 79: ...was clicked Back on the Raid Details screen here is how the LUN status now appears It shows the name of the LUN as MyLun then it shows the name of the RAID that it belongs to BigFoot the size capacit...

Страница 80: ...id device name The upper table represents reads the lower table represents writes The numbers at the top of the table columns are times in milliseconds For example the first column indicates 0 15 mil...

Страница 81: ...de of the drives In this case the numbers are low because this is a very slow array the drives are connected to a PCI X SAS card In this test using the first drive as an example 11276 sectors fell int...

Страница 82: ...a Delete function If you want to delete the LUN Note all initiators and targets must be removed first left click on the Delete button In this table we see the the name of the LUN MyLun the name of the...

Страница 83: ...ve Current Config As enter the file pathname that you would like to save to then left click on the Save Current Config As button The next item in the Configurations table is Reload Configuration this...

Страница 84: ...ach column then left click on Display Trace to go to the screen to show the results of what you selected Under type Commands displays only commands all displays commands and all other information reco...

Страница 85: ...en restarts the trace in a single operation To perform the desired action select the action under type then left click on the Control Trace button Below the Trace table is a Log File table as follows...

Страница 86: ...time in Microseconds that it took to execute the command User is the originator of the command localhost indicates that the array itself requested the command Lun is the logical LUN number of the LUN...

Страница 87: ...virtual head is positioned In the example it is a straight line going up to the right because it is the tail end of a sequential read The vertical axis is the LBA address The top right chart shows the...

Страница 88: ...A C O N F I G U R A T I O N A N D S Y S T E M I N T E G R A T I O N G U I D E 87 Section 3 Management To return to the NumaRAID GUI Main page left click on the link at the bottom which reads Return to...

Страница 89: ...lient with The next column to the right is labeled Target it pertains only to Fibre Channel clients The target will indicate NULL for Infiniband clients On Fibre Channel clients it will indicate the p...

Страница 90: ...button defaulting to one of the users in this example Gamer Real time users are users who get the priority over the user of the storage that they request while the other users get whatever is left Th...

Страница 91: ...the parameters and what they mean do Maximum Read Ahead Distance in 128k Stripes When you playback video for example you are essentially doing one large sequential read To make playback smoother the...

Страница 92: ...send a request to the array to send back another 1MB This is happening anywhere up to millions of times per second This setting controls how many of those commands will be buffered at a time The defa...

Страница 93: ...t the cache for non real time users Keep in mind this setting only applies to non real time users see below for real time users Note that this setting applies globally to all non real time users Perce...

Страница 94: ...form of error detection and correction Raid 6 only If this value is enabled while the array is reading it will compare the data read against the two parity generators there has to be a 3 way match be...

Страница 95: ...e diagnostic message log Note that it is important that this function only be used when directed to do so and it must be disabled when not in use otherwise it would fill up the boot drive Here is a sa...

Страница 96: ...t you would like to view on the right then click the corresponding Chart button on the left to see the charts below for that selection The options are as follows NumaRAID Device This shows graphs pert...

Страница 97: ...ws the current day and lower left shows the last day On each set of charts read information is in green color and write information is in red The first group of charts is for data rates Vertically the...

Страница 98: ...for example in the upper right chart we see four bars The left bar shows that there were about 39000 commands executed which took 100 microseconds to execute The middle bar shows that there were about...

Страница 99: ...t you would like to see here is a single bar as far to the right as possible This indicates that the array did a lot of large transfers which were all equal in size Going vertically is the number of c...

Страница 100: ...urrent status of that slot The SMART button to the left of each drive takes you to the SMART details for that particular drive below When you are finished and wish to return to the NumaRAID Main GUI s...

Страница 101: ...This list only gets bigger hence the grown name Vendor Cache Information This is just a category heading which describes the next 5 lines Blocks Sent to the Initiator In the case of SAS the host adap...

Страница 102: ...of whether or not it was reading or writing even just sitting idle counts as being powered up In fact if the drive had power and was put to sleep it would also be counted here Number of Minutes until...

Страница 103: ...the drive had to write the sector more than once based on a verify failure The forth column shows the total numbers of errors corrected i e The sum of the first three columns The fifth column shows ho...

Страница 104: ...G A L A X Y A U R O U R A C O N F I G U R A T I O N A N D S Y S T E M I N T E G R A T I O N G U I D E 103 Section 3 Management...

Страница 105: ...This voltage is especially important for powering the motors on the hard drives as well as the fans in the system 5V This is the 5V power output as seen from the motherboard This voltage operates the...

Страница 106: ...U R A C O N F I G U R A T I O N A N D S Y S T E M I N T E G R A T I O N G U I D E 105 Section 3 Management NumaRAID Main GUI Page link at the bottom of the Sensor Details screen to return to the Main...

Страница 107: ...ss and subnet mask on the right then left click on the Update button on the left If you wish to set a static IP address change the DHCP dropdown to n type the IP address and subnet mask The middle tab...

Страница 108: ...elp you find a solution Rorke Technical Support email support is available at techsupport rorke com or is available 9am 5pm five days a week by phone at 800 328 8147 4 1 Chassis Status Indicators The...

Страница 109: ...ted as failing to operate properly The bad drive will cause the RAID to show a degraded status in the GUI and its location in the RAID will have a Red FAILED indication 4 2 GUI status indicators The A...

Страница 110: ...oming out of the power connection on the power supply when it is connected this is typically due to a worn out power cord or damaged receptacle on the power supply If sparks or smoke comes out of the...

Страница 111: ...ual power supply system the buzzer may not sound as there is no problem with the power supply the DC distribution board is just sending out power form one power supply instead of two Systems with remo...

Страница 112: ...this board is a connector which is attached to a flat ribbon cable The connector can be opened and ribbon cable removed but it is very difficult to reassemble The ribbon cable passes through a hole in...

Страница 113: ...the inside could also be rusting and those can t be cleaned with the Royal Jelly 4 8 Motherboard problems Connectors As with the plugs which plug into them many connectors can be damaged especially SA...

Страница 114: ...oard or coming from the power supply in other words a more serious problem CMOS Battery We do show the status of the CMOS battery from the motherboard in the NumaRAID GUI If the battery gets low 6 of...

Страница 115: ...this is considered a legacy port most motherboards still come with these connectors They are very high priority in terms of interrupt and are controlled usually by an Intel i8042 chip located somewhe...

Страница 116: ...these backplanes are constructed varies Typically the discreet backplane has SAS connectors on the drives which go through the board i e through hole whereas on the switched backplane the drive conne...

Страница 117: ...e damaged especially the shielding on the multilane SAS connector As mentioned before if this shielding becomes bent it may prevent the cable from locking in properly But note how this card interfaces...

Страница 118: ...ust lock to the shield in order to be sure that the card edge connector on the cable is securely mated properly If this latch becomes bent it must be fixed at all cost If it can not be fixed the cable...

Страница 119: ...t work These aside single ports can fail and multiple ports can fail If all ports fail try swapping the card otherwise check the software then the cables then the SFPs These small SFP is almost an ent...

Страница 120: ...lastic If you took a clear semi thick piece of plastic and bent it you would find that where it bends it turns opaque white and you can t see through that part It is similar with the fibre itself you...

Страница 121: ...he problem If you are using a switch and it is zoned make sure the array and the client are in the same zone I have had a tech support story once about a switch which was rented by a customer and alth...

Страница 122: ...heck the LEDs on the array and the client they should indicate a link at the speed of the client s adapter If not there might be a bad cable SFP or HBA Infiniband Based Clients Infiniband cabling and...

Страница 123: ...is the most critical piece of software If it is not running you won t get a connection Also if there is only one machine on the network running OpenSM and it is rebooted or otherwise locks up it will...

Страница 124: ...andby which is used to power the on off switch and is capable of communicating through the motherboard even if the array is off To access the IPMI services make sure you have a connection to the IPMI...

Страница 125: ...ray will reboot as if you actually hit the reset button on the front You can turn on the array via the power on button Once the array is on and starting to boot you can click on the small window in th...

Страница 126: ...e fans are in red this was normal for this particular model where there are no fans connected to connectors 4 through 7 On this system there were 5 fans one each on connectors 1 through 3 and connecto...

Страница 127: ...an arrow key to stop it from counting then select Safe Boot Watch the screen carefully it will eventually reach a login prompt login as root default password is rdserdse Once you are in you can type...

Страница 128: ...Section 5 Application Technical Customer Notes 5 0 Application Technical Customer Notes 5 1 Windows Infiniband Performance Tuning In Windows you can improve performance However to do so you will need...

Страница 129: ...G A L A X Y A U R O U R A C O N F I G U R A T I O N A N D S Y S T E M I N T E G R A T I O N G U I D E 128 Section 5 Application Technical Notes Left click on Accessories...

Страница 130: ...G A L A X Y A U R O U R A C O N F I G U R A T I O N A N D S Y S T E M I N T E G R A T I O N G U I D E 129 Section 5 Application Technical Notes...

Страница 131: ...G A L A X Y A U R O U R A C O N F I G U R A T I O N A N D S Y S T E M I N T E G R A T I O N G U I D E 130 Section 5 Application Technical Notes Left click on Command Prompt...

Страница 132: ...his will open a command prompt window which looks as follows From the command prompt type regedit enter Once you run regedit drag the scrollbar on the left area all the way to the top if it is not alr...

Страница 133: ...n 5 Application Technical Notes Type Ctrl F This will open the search window The text box which is prompting what to search for is already selected type ModeFlags Already typed in the picture At the b...

Страница 134: ...I N T E G R A T I O N G U I D E 133 Section 5 Application Technical Notes Left click on the Find Next button The computer will search for the text specified When it finds something the Searching wind...

Страница 135: ...T I O N A N D S Y S T E M I N T E G R A T I O N G U I D E 134 Section 5 Application Technical Notes Press enter This will cause a small pop up window to appear Press 2 enter f3 This will change the va...

Страница 136: ...T I O N G U I D E 135 Section 5 Application Technical Notes You will know the search is complete when the following pop up window appears When it is finished left click on the OK button and close the...

Страница 137: ...some information It is either the first screen you see after logging into Webmin or in the webmin menu on the left you can left click on System Information located near the bottom of the menu Items w...

Страница 138: ...the table If you check the left bubble the default Allow from all addresses All IP addresses will be able to access this array The other two bubbles are used in conjunction with the text box below Yo...

Страница 139: ...odule next to this is a drop down Left click on the drop down and select NumaRAID GUI 5 Left click on the Save button at the bottom of the screen To return to the NumaRAID GUI expand the Hardware cate...

Страница 140: ...u can create other users logins for Webmin without having to create Linux users This is done as follows 1 Expand the Webmin group on the left if it is not already 2 Under the Webmin group left click o...

Страница 141: ...sword at next login option is NOT checked and make sure the Change password in other modules option IS checked then left click on the Change button To return to the NumaRAID GUI expand the Hardware ca...

Страница 142: ...and will not result in any loss of data Note that the extended test can take a long time to run during which time the array will be inaccessible To return to the NumaRAID GUI expand the Hardware cate...

Страница 143: ...se the software system time isn t saved anywhere it is just an offset running from RAM The Set system time to hardware time button will set the system software time to the current time read from the h...

Страница 144: ...from a management point of view or lack thereof It worked like this The clients are called initiators and arrays are called targets You would flash the firmware on the switch such that a certain numbe...

Страница 145: ...ut As switch connections increase it may be necessary to have more than one switch this is called cascading switches The problem is that cascading the switches kind of goes back to provisioning in tha...

Страница 146: ...Infiniband Switch Configurations Quick note about Infiniband switches Infiniband switches are not the same as Fibre Channel switches because of how the subnet is run The subnet is run by clients so sw...

Отзывы: