PT113
Instruction Manual
25
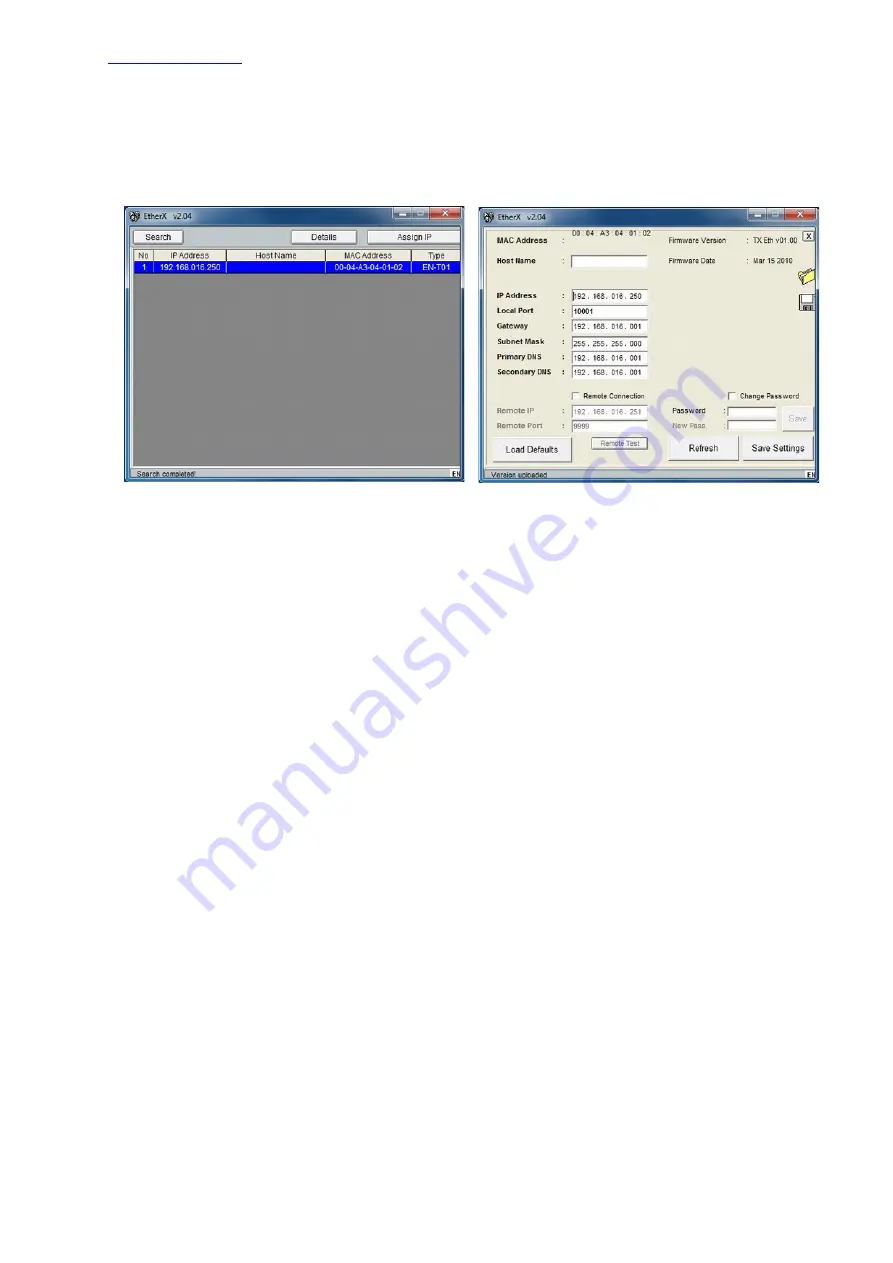
To configure the Ethernet port ensure that the device is connected on the same Ethernet network as
the PC with AzComT, then click on “Find on LAN”. The following window opens.
Note:
Windows 7, SP1 or later is required for EtherX to function correctly. When first run EtherX will
cause windows firewall (if running) to ask for permission to access the network. This must be allowed
for EtherX to detect your device.
If you have multiple devices on the Ethernet network they will be listed. Each device has it's MAC
address on the label, locate the MAC address listed in the software from the information on the label of
the device you are configuring and double click on it to open the window on the right.
Make the necessary settings here to suit your network, enter the password and click “Save Settings” to
save to the PT113EN.
Warning:
The changes do not take effect until a power off and power on cycle is performed.
Parameter
Description
Host Name
: Device name of the instrument.
Default is ‘ ’.
IP Address
: Set the IP address manually to suit your network.
Default is ‘192.168.16.250’.
Local Port
: Ethernet connection port of the instrument.
Default is ‘10001
Gateway
: Network point that acts as an entrance to another network or internet.
Default is ‘192.168.16.254’.
Subnet Mask
: Describes IP address range that can be used in the network subnet.
Default is ‘255.255.255.0’.
Primary DNS
: Obtain primary DNS manually.
Default is ‘208.67.222.222’.
Secondary DNS : Obtain secondary DNS manually.
Default is ‘208.67.220.220’.
Remote
Connection
:
Automatic connection to any device on the network. Continuous output can
be streamed to any device listening of the address and port set below,
such as a printer or PC.
Default is ‘Disabled’.
Remote IP
: IP address of the PC or Device to automatically connect to.
Remote Port
: Ethernet port of the PC or Device to automatically connect to.
Password
: Enter the password here to save changes or to change the password.
Default password:123456


