background image

Simple Home Theater Guide

02

11

En

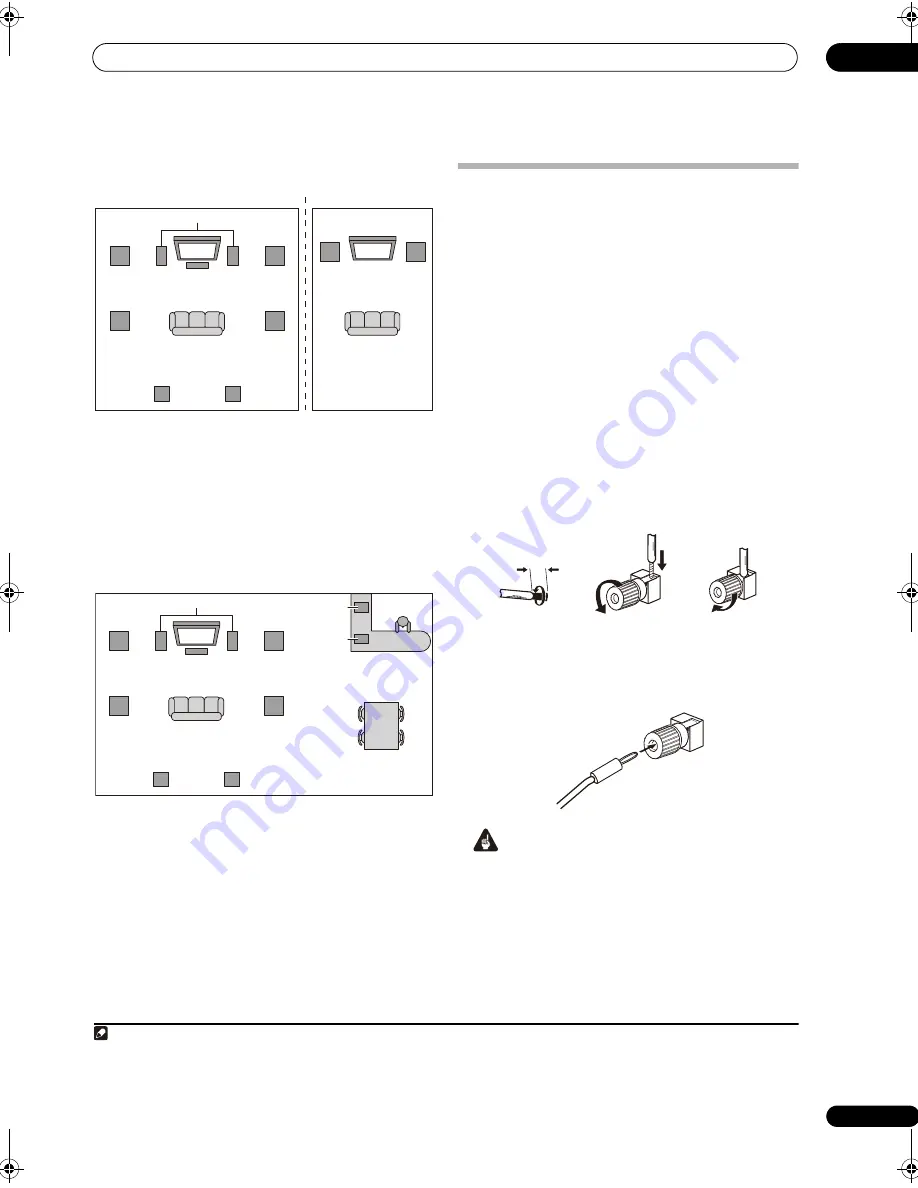
7.2-c Zone 2 connections

Features

: Up to 7.2-channel playback in the main zone 

with playback of a different device in Zone 2.

Speakers used

: Total 9 (4 front, 1 center, 2 surround, 2 

surround back)

Applicable listening rooms

: When there are two 

listening rooms

Output Setup

7.2ch + ZONE 2

7.2-c speaker B connections

Features

: Up to 7.2-channel playback in the normal 

listening room plus stereo playback of the same sound in 
another room (for example a kitchen). Furthermore, 
different front speakers can be used for movies (multi-
channel playback) and music (stereo playback).

Speakers used

: Total 9 (4 front, 1 center, 2 surround, 2 

surround back)

Applicable listening rooms

: When there is a main 

listening room + a kitchen, etc.

Output Setup

7.2ch + Speaker B

Positioning and connecting the 
speakers

For the speaker layout, refer to 

Selecting the speaker 

layout/usage pattern

 on page 10. We recommend 

positioning the speakers before connecting them. Use 
one of the five connection examples below according to 

the speaker layout/usage pattern selected.

1

 Use 

commercially available speaker cords to make the 
connections.

Bare wire connections

Make sure that the speaker cable you’re going to use is 
properly prepared with about 10 mm (

3

/

8

 in.) of insulator 

stripped from each wire, and the exposed wire strands 
twisted together (

fig. A

).

To connect a terminal, unscrew the terminal a few turns 
until there is enough space to insert the exposed wire 
(

fig. B

). Once the wire is in position, tighten the terminal 

until the wire is firmly clamped (

fig. C

).

Banana plug connections

If you want to use speaker cables terminated with banana 
plugs, screw the speaker terminal fully shut, then plug 
the banana plug into the end of the speaker terminal.

 Important

• Before connecting the equipment, make sure that 

the power is turned off and the power cords are 
unplugged from the power outlets.

Main Zone

Subwoofer

TV

Center (C)

Front 

right (R)

Front 

left (L)

Surround 

left (SL)

Surround 
right (SR)

Surround back 

left (SBL)

Surround back 

right (SBR)

Zone 2

TV

Front 

right (R)

Front 

left (L)

Subwoofer

TV

Center (C)

Front 

right (R)

Front 

left (L)

Surround 

left (SL)

Surround 
right (SR)

Surround back 

left (SBL)

Surround back 

right (SBR)

Speaker B

Speaker B

Note

1 • You can use speakers with a nominal impedance between 6 

Ω

 and 16 

Ω

 (or between 4 

Ω

 and 16 

Ω

 for the R1/L1 terminals).

• Each speaker connection on the receiver comprises a positive (+) and negative (–) terminal. Make sure to match these up with the terminals on the 

speakers themselves.

• Make sure that all the bare speaker wire is twisted together and inserted fully into the speaker terminal. If any of the bare speaker wire touches the back 

panel it may cause the power to cut off as a safety measure.

(fig. A)

(fig. B)

(fig. C)

10 mm (

3

/

8

 in.)

SC_09TX.book  Page 11  Monday, November 26, 2007  10:32 PM

Содержание SC-09TX - Elite AV Network Receiver

Страница 1: ...uctions REC ...

Страница 2: ...rs for connections D8 10 3a_En FEDERAL COMMUNICATIONS COMMISSION DECLARATION OF CONFORMITY This device complies with part 15 of the FCC Rules Operation is subject to the following two conditions 1 This device may not cause harmful interference and 2 this device must accept any interference received including interference that may cause undesired operation Product Name AUDIO VIDEO MULTI CHANNEL REC...

Страница 3: ...walked on or pinched particularly at plugs convenience receptacles and the point where they exit from the apparatus 1 2 3 4 5 6 7 8 9 10 Only use attachments accessories specified by the manufacturer Use only with the cart stand tripod bracket or table specified by the manufacturer or sold with the apparatus When a cart is used use caution when moving the cart apparatus combination to avoid injury...

Страница 4: ...our local authorities or the Electronics Industries Alliance www eiae org K057_En If the AC plug of this unit does not match the AC outlet you want to use the plug must be removed and appropriate one fitted Replacement and mounting of an AC plug on the power supply cord of this unit should be performed only by qualified service personnel If connected to an AC outlet the cut off plug can cause seve...

Страница 5: ...puts 27 Installing your speaker system 28 Connecting the speakers 29 Placing the speakers 29 THX speaker system setup 30 Connecting antennas 30 AM loop antenna 31 FM wire antenna 31 Connecting external antennas 31 Plugging in the receiver 31 04 Controls and displays Front panel 32 Operating range of remote control unit 33 Remote control 34 05 Listening to your system Auto playback 36 Listening in ...

Страница 6: ...sing your PC 77 09 Playback with HOME MEDIA GALLERY inputs Enjoying the Home Media Gallery 78 Usable free media servers 78 PlaysForSure 78 DLNA CERTIFIED Audio Video Image Player 78 Supported file formats 78 Connecting to the network through LAN interface 79 Using the USB interface 80 Confirming the IP Address 80 Connecting a USB device 80 Readable USB devices 80 Readable data files 81 Removing a ...

Страница 7: ...directly 113 Programming signals from other remote controls 113 Erasing one of the remote control button settings 114 Resetting the remote control presets 114 Confirming preset codes 115 Renaming input source names 115 Direct function 115 Multi Operation and System Off 115 Programming a multi operation or a shutdown sequence 116 Using multi operations 116 Using System off 117 Controls for TVs 117 ...

Страница 8: ...ere is vibration or other movement in places that are very dusty in places that have hot fumes or oils such as a kitchen Do not touch this receiver s bottom panel while the power is turned on The bottom panel gets hot when the power is on and touching it could cause burns Loading the batteries Caution Incorrect use of batteries may result in such hazards as leakage and bursting Observe the followi...

Страница 9: ...ect your TV and DVD player See Connecting your TV and DVD player on page 21 to do this For surround sound you ll want to hook up using a digital connection from the DVD player to the receiver 4 Plug in the receiver and switch it on followed by your DVD player your subwoofer and the TV Plug the power cable into the AC outlet and switch on the receiver 1 Make sure you ve set the video input on your ...

Страница 10: ...ons Features The front center and surround channels are all reproduced with high quality bi amp Fewer speakers are used than with other patterns and the maximum number of channels is 5 2 but this pattern provides the highest sound quality Speakers used Total 5 bi amp compatible speakers 2 front 1 center 2 surround Applicable listening rooms Suited to all listening rooms Output Setup All Ch Bi Amp ...

Страница 11: ...or stripped from each wire and the exposed wire strands twisted together fig A To connect a terminal unscrew the terminal a few turns until there is enough space to insert the exposed wire fig B Once the wire is in position tighten the terminal until the wire is firmly clamped fig C Banana plug connections If you want to use speaker cables terminated with banana plugs screw the speaker terminal fu...

Страница 12: ...f the speakers connected FRONT FRONT CENTER SUR ROUND A SUR ROUND A SUR ROUND B R1 R2 SURROUND BACK SUR ROUND B R3 R4 R5 L5 SURROUND BACK Single L4 L3 L2 L1 Normal LOW HIGH FRONT All ch Bi Amp R LOW HIGH SURROUND LOW HIGH CENTER R HIGH LOW SURROUND L HIGH LOW FRONT L Center C Front right R Front left L Surround left A SL A Surround right A SR A Surround left B SL B Surround right B SR B Surround b...

Страница 13: ...RECEIVER SOURCE MAIN MULTI OPERATION ZONE2 3 DVR1 GALLERY HOMEMEDIA INPUTSELECT CD TUNER iPod HDMI PHONO CD R DVR2 VIDEO1 VIDEO2 BD TV SAT SACD XM SIRIUS RECEIVER AUDIO PARAMETER TOP MENU BAND CATEGORY MENU T EDIT VIDEO PARAMETER SETUP SOURCE TV RCV INPUT MUTE TUNE TUNE ST ST MUTE VOL VOL TVCONTROL CH Enter SOURCE TV RCV SETUP RETURN SETUP ENTER PHONES SPEAKERS AUTO SURROUND STREAM DIRECT STATUS L...

Страница 14: ...ource you will only hear sound from the front left right speakers in the default listening mode See also Listening to your system on page 36 for information on different ways of listening to sources It is possible to check on the LCD whether or not multi channel playback is being performed properly When using a surround back speaker Dolby Digital EX is displayed when playing Dolby Digital signals ...

Страница 15: ...equency phase characteristics of the speakers connected Standard speakers designed exclusively for audio use generally reproduce sound with the divided frequency bands output from a speaker system consisting of multiple speakers in case of typical 3 way speakers for instance the tweeter the squawker midrange and the woofer output sound in the high middle and low frequency ranges respectively Thoug...

Страница 16: ...e 1 To calibrate and analyze the frequency phase characteristics of the speakers follow the procedures in Auto MCACC Setup see Automatically setting up for surround sound MCACC Full Band Phase Control on page 12 or FULL BAND PHASE CTRL in the System Setup see Full Band Phase Control on page 53 Select ALL when you perform the Auto MCACC Setup with CUSTOM Upon calibration of the frequency phase char...

Страница 17: ...ndoor or outdoor antennas for radio broadcasts See Connecting antennas on page 30 8 iPod input terminal Use to connect your Apple iPod as an audio or video source See Connecting an iPod on page 60 9 SIRIUS Radio input See Using SIRIUS Radio on page 64 IN S400 S400 AUDIO For LD ASSIGNABLE 6 1 ASSIGNABLE FRONT FRONT CENTER SUR ROUND A SUR ROUND A SUR ROUND B R1 L R VIDEO AUDIO L R AUDIO L L L R R L ...

Страница 18: ...ording to the input function of the receiver See Switching components on and off using the 12 volt trigger on page 75 18 Component video inputs x5 Use the inputs to connect any video source that has component video output such as a DVD recorder See Using the component video jacks on page 25 19 MULTI ZONE component video output Use to connect monitors or TVs in a separate room See MULTI ZONE listen...

Страница 19: ...8 OFF The ZONE 2 video input can also be converted For details see ZONE Video Setup on page 103 HDMI IN S VIDEO IN VIDEO IN COMPONENT VIDEO IN HDMI OUT S VIDEO MONITOR OUT VIDEO MONITOR OUT COMPONENT VIDEO MONITOR OUT High picture quality Terminal for connection with source device Terminal for connection with TV monitor Video signals can be output 2 An HDMI connection can only be made with DVI equ...

Страница 20: ...al Visual Interface DVI in one specification HDCP is used to protect digital content transmitted and received by DVI compliant displays HDMI has the capability to support standard enhanced or high definition video plus standard to multi channel surround sound audio HDMI features include uncompressed digital video one connector instead of several cables and connectors and communication between the ...

Страница 21: ... coaxial cable designed for digital audio for the 2 RF connection You may need to assign the RF IN digital input when setting up the receiver see also The Input Setup menu on page 101 IN S400 S400 AUDIO For LD ASSIGNABLE 6 1 ASSIGNABLE L R VIDEO AUDIO L R AUDIO L L L R R L R R L L R R L R L R AUDIO LAN 10 100 ZONE3 OUT ZONE2 OUT ZONE2 OUT ZONE3 OUT MONITOR OUT OUT IN 1 IN 2 IN 3 IN 4 1 OUT 2 OUT 3...

Страница 22: ... 2 OUT 3 OUT 4 IR CONTROL COMPONENT VIDEO ASSIGN ABLE ASSIGN ABLE VIDEO IN OUT SUB WOOFER FRONT CENTER 1 2 1 2 EXTRA SUR ROUND Single SUBW FRONT CENTER SUR ROUND SUR ROUND BACK SURROUND BACK PRE OUT MULTI CH IN IN SIRIUS IN iPod AM LOOP ANTENNA IN 1 IN 2 IN 3 IN 4 IN 5 IN 6 OUT1 HDMI CTRL OUT2 HDMI RF IN IN TV 1 IN SAT 2 IN DVR VCR 1 3 IN DVR VCR2 4 IN VIDEO GAME 1 5 IN CD R TAPE MD 6 DVD LD IN 1 ...

Страница 23: ... CTRL OUT2 HDMI RF IN IN TV 1 IN SAT 2 IN DVR VCR 1 3 IN DVR VCR2 4 IN VIDEO GAME 1 5 IN CD R TAPE MD 6 DVD LD IN 1 BD IN 2 CD IN 3 SACD IN 4 COAXIAL XM 1 4 ASSIGNABLE OPTICAL 1 6 ZONE2 OUT SOURCE OUT ZONE3 SOURCE OUT 1 2 3 4 12V TRIGGER DCOUT12VTOTAL250mAMAX RS 232C VIDEO GAME1 IN SAT IN IN IN AUX IN IN IN CD R TAPE MD REC SEL OUT CD SACD PHONO TV IN BD IN DVD LD IN IN IN IN DVD LD IN DVD LD 1 1 ...

Страница 24: ...SIGN ABLE ASSIGN ABLE VIDEO IN OUT SUB WOOFER FRONT CENTER 1 2 1 2 EXTRA SUR ROUND Single SUBW FRONT CENTER SUR ROUND SUR ROUND BACK SURROUND BACK PRE OUT MULTI CH IN IN SIRIUS IN iPod AM LOOP ANTENNA IN 1 IN 2 IN 3 IN 4 IN 5 IN 6 OUT1 HDMI CTRL OUT2 HDMI RF IN IN TV 1 IN SAT 2 IN DVR VCR 1 3 IN DVR VCR2 4 IN VIDEO GAME 1 5 IN CD R TAPE MD 6 DVD LD IN 1 BD IN 2 CD IN 3 SACD IN 4 COAXIAL XM 1 4 ASS...

Страница 25: ...BLE L R VIDEO AUDIO L R AUDIO L L L R R L R R L L R R L R L R AUDIO LAN 10 100 ZONE3 OUT ZONE2 OUT ZONE2 OUT ZONE3 OUT MONITOR OUT OUT IN 1 IN 2 IN 3 IN 4 1 OUT 2 OUT 3 OUT 4 IR CONTROL COMPONENT VIDEO ASSIGN ABLE ASSIGN ABLE VIDEO IN OUT SUB WOOFER FRONT CENTER 1 2 1 2 EXTRA SUR ROUND Single SUBW FRONT CENTER SUR ROUND SUR ROUND BACK SURROUND BACK PRE OUT MULTI CH IN IN SIRIUS IN iPod AM LOOP ANT...

Страница 26: ...N 4 IN 5 IN 6 OUT1 HDMI CTRL OUT2 HDMI RF IN IN TV 1 IN SAT 2 IN DVR VCR 1 3 IN DVR VCR2 4 IN VIDEO GAME 1 5 IN CD R TAPE MD 6 DVD LD IN 1 BD IN 2 CD IN 3 SACD IN 4 COAXIAL XM 1 4 ASSIGNABLE OPTICAL 1 6 ZONE2 OUT SOURCE OUT ZONE3 SOURCE OUT 1 2 3 4 12V TRIGGER DCOUT12VTOTAL250mAMAX RS 232C VIDEO GAME1 IN SAT IN IN IN AUX IN IN IN CD R TAPE MD REC SEL OUT CD SACD PHONO TV IN BD IN DVD LD IN IN IN I...

Страница 27: ...ons Select these inputs using INPUT SELECT remote or the INPUT SELECTOR dial front panel to select VIDEO GAME 2 IN S400 S400 AUDIO For LD ASSIGNABLE 6 1 ASSIGNABLE L R VIDEO AUDIO L R AUDIO L L L R R L R R L L R R L R L R AUDIO LAN 10 100 ZONE3 OUT ZONE2 OUT ZONE2 OUT ZONE3 OUT MONITOR OUT OUT IN 1 IN 2 IN 3 IN 4 1 OUT 2 OUT 3 OUT 4 IR CONTROL COMPONENT VIDEO ASSIGN ABLE ASSIGN ABLE VIDEO IN OUT S...

Страница 28: ...OUT 2 OUT 3 OUT 4 IR CONTROL COMPONENT VIDEO ASSIGN ABLE ASSIGN ABLE VIDEO IN OUT SUB WOOFER FRONT CENTER 1 2 1 2 EXTRA SUR ROUND Single SUBW FRONT CENTER SUR ROUND SUR ROUND BACK SURROUND BACK PRE OUT MULTI CH IN IN SIRIUS IN iPod AM LOOP ANTENNA IN 1 IN 2 IN 3 IN 4 IN 5 IN 6 OUT1 HDMI CTRL OUT2 HDMI RF IN IN TV 1 IN SAT 2 IN DVR VCR 1 3 IN DVR VCR2 4 IN VIDEO GAME 1 5 IN CD R TAPE MD 6 DVD LD IN...

Страница 29: ... put your speakers in the room has a big effect on the quality of the sound The following guidelines should help you to get the best sound from your system The subwoofer can be placed on the floor Ideally the other speakers should be at about ear level when you re listening to them Putting the speakers on the floor except the subwoofer or mounting them very high on a wall is not recommended For th...

Страница 30: ...your listening position for the following THX modes THX Ultra2 CINEMA THX Ultra2 MUSIC and THX Ultra2 GAMES See also THX Audio Setting on page 58 to make the settings that will give you the best sound experience when using the Home THX modes page 37 Connecting antennas The supplied antennas provide a simple way to listen to AM and FM radio If you find that reception quality is poor an outdoor ante...

Страница 31: ...M loop antenna For the best possible reception suspend horizontally outdoors Plugging in the receiver Only plug in after you have connected all your components to this receiver including the speakers 1 Plug the supplied power cord into the AC IN socket on the back of the receiver 2 Plug the other end into a power outlet Caution Handle the power cord by the plug part Do not pull out the plug by tug...

Страница 32: ...ponent is selected page 65 8 HDMI indicator Blinks when connecting an HDMI equipped component lights when the component is connected page 19 PHONES SPEAKERS AUTO SURROUND STREAM DIRECT STATUS LCD VIEW DIMMER TUNER EDIT BAND CTRL ZONE2 ZONE3 VIDEO GAME 2 INPUT DIGITAL IN S VIDEO VIDEO L R AUDIO MULTI ZONE CONTROL MCACC SETUP MIC USB TUNE TUNE PARAMETER SETUP ST ST AUDIO VIDEO RETURN ENTER SC 09TX M...

Страница 33: ... switched in three steps page 110 20 DIMMER Dims or brightens the LCD display page 110 21 USB interface Connect a USB audio device for playback page 80 22 SPEAKERS Use to change the speaker system page 68 23 AUTO SURROUND STREAM DIRECT Press to select Auto Surround page 36 or Stream Direct page 38 listening 24 PHONES jack Use to connect headphones When the headphones are connected there is no soun...

Страница 34: ...115 6 TV CONTROL buttons These buttons are dedicated to control the TV assigned to the TV button Thus if you only have one TV to hook up to this system assign it to the TV input source button see page 113 for more on this TV Use to turn on off the power of the TV TV VOL Use to adjust the volume on your TV INPUT Use to select the TV input signal TV CH Use to select channels MUTE Use to mute the sou...

Страница 35: ...witch on off Phase Control or Full Band Phase Control page 15 A ATT Attenuates lowers the level of an analog input signal to prevent distortion page 110 GENRE Automatically selects the most appropriate Advanced Surround mode for the genre of the source currently being played back this feature is available only when a Pioneer DVD recorder supporting HDMI Control is connected to this receiver via HD...

Страница 36: ...d encoded the proper decoding format will automatically be selected and shows in the display 4 With two channel sources you can select from 2 Pro Logic IIx MOVIE Up to 7 1 channel sound especially suited to movie sources 2 Pro Logic IIx MUSIC Up to 7 1 channel sound especially suited to music sources5 2 Pro Logic IIx GAME Up to 7 1 channel sound especially suited to video games 2 PRO LOGIC 4 1 cha...

Страница 37: ...for sources recorded in Dolby Digital and DTS but also to all multi channel music sources DVD Audio etc THX Ultra2 GAMES This mode is suited to playing the sound of games Using the Advanced surround effects The Advanced surround effects can be used for a variety of additional surround sound effects Most Advanced Surround modes are designed to be used with film soundtracks but some modes are also s...

Страница 38: ...e Surround Advance modes STEREO See Listening in stereo above for more on this F S SURR FOCUS Use to provide a rich surround sound effect directed to the center of where the front left and right speakers sound projection area converges F S SURR WIDE Use to provide a surround sound effect to a wider area than FOCUS mode 1 Using Stream Direct Use the Stream Direct modes when you want to hear the tru...

Страница 39: ...se select AUTO SURROUND or DIRECT if this is a problem 2 Different presets might also have separate calibration settings for the same listening position depending on how you re using your system These presets can be set in Automatically setting up for surround sound MCACC Full Band Phase Control on page 12 or Automatic MCACC Expert on page 44 either of which you should have already completed 3 The...

Страница 40: ...edly to cycle the virtual surround back channel options Each press cycles through the options as follows VirtualSB ON Virtual Surround Back is always used for example on 5 1 encoded material VirtualSB AUTO Virtual Surround Back is automatically applied to 6 1 encoded sources for example Dolby Digital EX or DTS ES VirtualSB OFF Virtual Surround Back mode is switched off Note 1 By using a combinatio...

Страница 41: ... d AUTO b d DTS HD Master Audio DTS HD DTS EXPRESS WMA9 Pro 88 2 kHz 96 kHz encoded stereo sources ON AUTO a Only applicable when using the Virtual Surround Back mode b Not applicable when using the Virtual Surround Back mode c Sound is output from the surround back speakers only when THX Ultra2 CINEMA THX MUSIC or THX GAMES is selected d Advanced surround mode may not be available depending on th...

Страница 42: ... cut mode The four noise cut modes can be used when receiving AM broadcasts Press the MPX button to select the noise cut mode 1 to 4 Using Neural THX This feature uses Neural Surround THX technologies to achieve optimal surround sound from FM radio While listening to FM radio press AUTO DIRECT for Neural THX listening See About Neural THX Surround on page 136 for more on this The Neural THX mode c...

Страница 43: ...ant Choose from the following characters for a name up to four characters long ABCDEFGHIJKLMNOPQRSTUVWXYZ abcdefghijklmnopqrstuvwxyz 0123456789 _ space Use to select a character to set the position and ENTER to confirm your selection Tip To erase a station name simply repeat steps 1 to 3 and input four spaces instead of a name Once you have named a station preset you can press DISP when listening ...

Страница 44: ... The Input Setup menu on page 101 OSD Language The OSD s display language can be changed see Changing the OSD display language OSD Language on page 102 Other Setup Makes customized settings to reflect how you are using the receiver see The Other Setup menu on page 103 Automatic MCACC Expert If your setup requires more detailed settings than those provided in Automatically setting up for surround s...

Страница 45: ...u re finished settings the options press RETURN to go back to the Auto MCACC main setup Note 1 Except in cases where you are only adjusting one parameter i e channel level from the CUSTOM setup screen step 2 2 If you are planning to select any options other than Normal read through Speaker output setting on page 47 and make sure to connect your speakers as necessary before continuing to step 3 3 T...

Страница 46: ...message ERR in the right side column or the speaker configuration displayed isn t correct there may be a problem with the speaker connection If selecting RETRY doesn t work turn off the power and check the speaker connections If there doesn t seem to be a problem you can simply use to select the speaker and to change the setting and number for surround back and continue 7 Make sure OK is selected ...

Страница 47: ...he speaker setting Normal Select for Normal surround connections All Ch Bi Amp Select for 5 2 channel high sound quality connections Front Bi Amp Select for 7 2 channel front high sound quality connections 7 2ch ZONE 2 Select for 7 2 channel Zone 2 connections 7 2ch Speaker B Select for 7 2 channel speaker B connections 3 Select Confirm The layout of the speaker terminals for the selected item is ...

Страница 48: ...o the overall balance of your speaker system see Fine Channel Level below Fine SP Distance Make precise delay settings for your speaker system see Fine Speaker Distance on page 49 Precision Distance Fine adjusting the positions of the speakers see Fine adjusting the positions of the speakers Precision Distance on page 49 Standing Wave Control overly resonant low frequencies in your listening room ...

Страница 49: ...lay settings are matched up press to confirm and continue to the next channel For comparison purposes the reference speaker will change depending on which speaker you select If you want to go back and adjust a channel simply use to select it 4 When you re finished press RETURN You will return to the Manual MCACC setup menu Fine adjusting the positions of the speakers Precision Distance Before usin...

Страница 50: ...was performed it may not be possible to adjust properly In this case we recommend performing the procedure at Fine Speaker Distance on page 49 in the Auto MCACC custom measurements then performing the adjustment described here without moving the microphone The adjustment here is for adjusting for an error of 1 2 inch or less not adjustable with the Auto MCACC Setup 0 0 may be displayed after dista...

Страница 51: ...omatic MCACC Expert on page 44 to calibrate the room automatically This should provide a balanced calibration that suits the characteristics of your listening room If you still aren t satisfied with the results the manual Advanced EQ setup below provides a more customized calibration of your system using the direct sound of the speakers This is done with the help of a graphical output that can be ...

Страница 52: ...ration results In such cases you should recalibrate your system Using Acoustic Calibration EQ Professional 1 Select EQ Professional then press RETURN 2 Select an option and press ENTER Reverb Measurement Use this to measure the reverb characteristics of your room for graphical output using a PC see Connecting a PC for Advanced MCACC output on page 77 to connect an RS 232C cable before selecting th...

Страница 53: ...tting For an optimal system calibration based on the direct sound coming from the speakers we recommend using the 30 50ms setting Use the buttons to select the channel frequency and time setting Use the buttons to switch between them You can switch between your connected speakers excluding the subwoofer and display the measurements for the following frequencies 63Hz 125Hz 250Hz 500Hz 1kHz 2kHz 4kH...

Страница 54: ...ta below Memory Rename Name your MCACC presets for easy identification see Renaming MCACC presets below MCACC Memory Copy Copy settings from one MCACC preset to another see Copying MCACC preset data below MCACC Memory Clear Clear any MCACC presets that you don t want see Clearing MCACC presets below Output PC See Connecting a PC for Advanced MCACC output on page 77 for more on this Note 1 When Mea...

Страница 55: ...verwrite an MCACC preset you re currently using this can t be undone 4 Select Copy to confirm and copy the settings Completed shows in the OSD to confirm the MCACC preset has been copied then you automatically return to the Data Management setup menu Clearing MCACC presets If you are no longer using one of the MCACC presets stored in memory you can choose to clear the calibration settings of that ...

Страница 56: ... send the bass frequencies to the subwoofer Center Select LARGE if your center speaker reproduces bass frequencies effectively or select SMALL to send bass frequencies to the other speakers or subwoofer If you didn t connect a center speaker choose NO the center channel is sent to the front speakers Surr3 Select LARGE if your surround speakers reproduce bass frequencies effectively Select SMALL to...

Страница 57: ...e remote control and then use to adjust the level Note 1 If you have a subwoofer and like lots of bass it may seem logical to select LARGE for your front speakers and PLUS for the subwoofer This may not however yield the best bass results Depending on the speaker placement of your room you may actually experience a decrease in the amount of bass due low frequency cancellations In this case try cha...

Страница 58: ...finish THX Audio Setting When the THX Loudness Plus function is used sound can be played with the full surround effect even when the volume is low With some speaker setups depending on the position of the subwoofer and the walls in your listening area you may experience overly resonant frequencies in the bass If you have this problem use the THX Ultra2 subwoofer setup to switch on boundary gain co...

Страница 59: ... 4 feet apart 4 ft Surround speakers more than 4 feet apart 6 When you re finished press RETURN You will return to the Manual SP Setup menu Return a Speaker Setting b Channel Level c Speaker Distance d X Curve e THX Audio Setting 6 Manual SP Setup DVD LD 55 0dB Loudness Plus ON THX Ultra2 SW YES Boundary Gain Compensation OFF SB SP Position 0 1 ft SBL SBR Finish 6e THX Audio Setting DVD LD 55 0dB ...

Страница 60: ...t be played on this receiver When an iPod or iPod nano of fifth generation or above is connected the audio signals are transferred from the iPod in digital format LPCM allowing playback with higher sound quality Video contents can be played on this receiver by connecting an iPod compatible with the Video Browse function IN S400 S400 AUDIO For LD ASSIGNABLE 6 1 ASSIGNABLE L R VIDEO AUDIO L R AUDIO ...

Страница 61: ...is Playlists Songs Artists Albums Songs Albums Songs Songs Podcasts Genres Artists Albums Songs Composers Albums Songs Audiobooks Shuffle Songs Tip You can play all of the songs or videos in a particular category by selecting the All item at the top of each category list For example you can play all the songs by a particular artist Basic playback controls The following table shows the basic playba...

Страница 62: ...details see About XM on page 136 Connecting your XM Radio receiver After purchasing an XM Mini Tuner sold separately you will also need to activate the XM Radio digital radio service to receive broadcasts 1 Connect an XM Mini Tuner to the XM Radio jack on the rear of this receiver You will also need to activate the XM Radio service 2 Press XM to switch to the XM RADIO input For best reception you ...

Страница 63: ...t you want You can also use the number buttons to select a preset The default for all presets is XM001 4 Press ENTER After pressing ENTER the preset class and number stop blinking and the receiver stores the XM channel Tip You can also press MEMORY during reception display to save the information of up to five songs See Using the XM Menu below to recall this information Listening to channel preset...

Страница 64: ...enter the SIRIUS Channel Guide then navigate through the channels one at time with the buttons or switch through pages with the buttons Press ENTER to listen to the SIRIUS radio broadcast To browse by genre first press CATEGORY use to select a genre then press ENTER To cancel and exit any time press RETURN Note 1 In order to activate your radio subscription you will need the SIRIUS ID SID which un...

Страница 65: ...put under parental lock are not displayed in the Channel Guide but may be accessed by directly inputting their channel number and providing the parental lock password Antenna Aiming Check the strength of satellite and terrestrial reception Memory Recall Use to browse your saved song information see Tip above Password Set Set the parental lock password 3 When you re finished press TOP MENU to retur...

Страница 66: ...ent you are looking for might be listed on additional display screens i LINK is displayed after unassigned device names e g DV 79AVi i LINK If a connected devices cannot output playback a source using the i LINK connection is displayed after the input device name e g DV 79AVi Non compatible devices cannot be assigned to inputs When the cables for an assigned input device become loose or the power ...

Страница 67: ...n fig 1 or a tree fig 2 The system will not work if the connected components form a loop If a loop is detected the message LOOP CONNECT shows in the display Figs 3 and 4 show connections that form a loop Another consideration when connecting i LINK devices is the speed of the interface At present there are three speeds S100 slowest S200 and S400 fastest This receiver uses the S400 type Although yo...

Страница 68: ...on the DVD player you re using the analog output level of the subwoofer channel may be too low In this case the output level of the subwoofer can be increased by 10 dB in the Multi Ch In Setup in Other Setup For details see Multi Channel Input Setup on page 103 Switching the speaker system When the A B speaker system is switched the speakers being played switches Select the speaker system to be us...

Страница 69: ... A B selection with the surround back channel processing selection page 40 can be used to switch between the speaker configuration for high sound quality multi channel music sources DVD Audio discs SACDs etc recommended by the ITU R and a speaker system for viewing movies as recommended by THX Note that to do so you must make 9 1 channel or 9 2 channel speaker connections and set the speaker outpu...

Страница 70: ...same way Make sure that the connections are properly inserted Caution Most speakers with both High and Low terminals have two metal plates that connect the High to the Low terminals These must be removed when you are bi amping the speakers or you could severely damage the amplifier See your speaker manual for more information If your speakers have a removable crossover network make sure you do not...

Страница 71: ... setting Sound output from the PREOUT SURROUND BACK terminals Sound output from the PREOUT EXTRA terminals Normal Surround back channel sound Surround B channel sound All CH Bi Amp None None Front Bi Amp Surround back channel sound None 7 2ch ZONE 2 Surround back channel sound None 7 2ch Speaker B Surround back channel sound Down mixed 2 channel sound IN S400 S400 AUDIO For LD ASSIGNABLE 6 1 ASSIG...

Страница 72: ...OUT With video signals the composite video VIDEO ZONE2 OUT and component video COMPONENT VIDEO ZONE2 OUT signals can be output but the S video signal cannot be output a Any analog signal including the iPod signal With the MULTI CH IN input sound is output only from the front L R channels ZONE3 Analog audio signals AUDIO ZONE3 OUT a and digital audio signal OPTICAL ZONE3 SOURCE OUT With video signa...

Страница 73: ...IN CD R TAPE MD REC SEL OUT CD SACD PHONO TV IN BD IN DVD LD IN IN IN IN DVD LD IN DVD LD 1 1 5 IN VIDEO GAME 1 3 IN BD 2 IN DVR VCR 1 4 IN DVR VCR 2 5 IN ZONE2 OUT DVR VCR 2 DVR VCR 1 REC SEL OUT REC SEL OUT IN REC SEL OUT REC SEL OUT S VIDEO Y PB PR VIDEO ZONE2 OUT CENTER R5 L5 LOW HIGH CENTER ZONE3 OUT ZONE2 OUT MONITOR OUT CO C V VIDEO 12V TRIGGER DVR VCR 2 ZONE2 OUT VIDEO ZONE2 OUT CENTER OUN...

Страница 74: ...RECSEL Setting in the ZONE Audio Setup menu to ZONE 3 page 104 2 Note that when recording this also selects the RECOUT input source See Making an audio or a video recording on page 109 for more on this 3 If the receiver is in standby the display is dimmed and ZONE and your selected sub zone s continue to show in the display 4 The tuner cannot be tuned to more than one station at a time Therefore c...

Страница 75: ...O ZONE3 OUT ZONE2 OUT ZONE2 OUT ZONE3 OUT MONITOR OUT OUT IN 1 IN 2 IN 3 IN 4 1 OUT 2 OUT 3 OUT 4 IR CONTROL COMPONENT VIDEO ASSIGN ABLE ASSIGN ABLE VIDEO IN OUT FRONT CENTER SUR ROUND SUR ROUND BACK MULTI CH IN OUT1 HDMI CTRL OUT2 SUR ROUND B SURROUND BACK Single L4 L3 L2 L1 AC IN HIGH LOW SURROUND L HIGH LOW FRONT L 1 2 3 4 12V TRIGGER DCOUT12VTOTAL250mAMAX RS 232C VIDEO GAME1 IN SAT IN IN IN AU...

Страница 76: ...atures include On screen displays when making receiver settings such as speaker setup MCACC setup and so on On screen volume display On screen display of listening mode Automatic video input switching on the plasma display Automatic volume muting on the plasma display See also SR Setup for Pioneer plasma displays on page 104 for more on setting up the receiver Important The SR features do not work...

Страница 77: ...ccess Connect your computer to the RS 232C jack on the rear panel of the receiver Make sure that the receiver and all connected components are switched off and disconnected from the power outlet when you do this 1 Use a commercially available cable to connect the RS 232C jack on your computer to the 9 pin RS 232C jack on this receiver See the documentation provided with the Advanced MCACC applicat...

Страница 78: ...stem requirements known issues installation procedures and other updated information PlaysForSure PlaysForSure is a marketing certification given by Microsoft The PlaysForSure logo makes it easy to find digital media stores and devices that work together Digital media purchased from online stores carrying the PlaysForSure logo is available for use on this unit This unit complies with PlaysForSure ...

Страница 79: ...ch and Search may not work depending on the media server s capability and functionality Connecting to the network through LAN interface Caution Before making or changing the connections switch off the power and disconnect the power cord from the power outlet Plugging in should be the final step By connecting this receiver to the network via the LAN terminal you can play back files stored on compon...

Страница 80: ...ds by connecting a USB device to this receiver When you insert a USB flash drive or multi card reader into the USB port the root directory or the Device List screen appears In addition you can connect your digital camera directly to this receiver using a USB connector cable 1 Press HOME MEDIA GALLERY The Home Media Gallery screen is displayed 2 Select USB then ENTER The Device List is displayed on...

Страница 81: ...e USB flash drive Starting the Home Media Gallery function 1 Press HOME MEDIA GALLERY The Home Media Gallery screen is displayed 2 Select Media Navigator USB My Playlist or Setup then ENTER To return to the previous screen press RETURN To exit Home Media Gallery select other input source Navigating the files and folders By selecting Media Navigator the previously selected server menu is automatica...

Страница 82: ... List XXXX XXXX XXXX XXXX XXXX XXXX XXXX XXXX All Photos 1 27 1 Tool Title XXXX Album XXXX Date 2006 11 19 Server XXXXXX Title XXXX Album XXXX Date 2006 11 19 Server XXXXXX All Photos 1 27 1 Tool XXXX XXXX XXXX XXXX All Photos 1 27 1 Tool Title XXXX Album XXXX Date 2006 11 19 Server XXXXXX List screen Thumbnail screen Thumbnail List screen Slide Show Setup Used to set up a slide show on the Photo ...

Страница 83: ... Each category Movie Music and Photo has five different Playlists in which you can register up to 100 files each The My Playlist option can contain sound and image files selected in the Media Navigator To edit a Playlist use the Tool Menu page 82 1 Press HOME MEDIA GALLERY The Home Media Gallery screen is displayed 2 Select My Playlist then ENTER 3 Select a Playlist list from Movie Playlist Music ...

Страница 84: ...end during playback To cancel the mode press AUTO DIRECT Blue on the remote control STEREO F S SURR Red Every press toggles the repeat mode among No Repeat and Repeat Once or among No Repeat Repeat Once and Repeat All while in Playlist STANDARD Green Available only in Playlist or Consecutive Playback mode Every press toggles the random mode between Random Off and Random On ADV SURR Yellow Switches...

Страница 85: ...ack press ENTER or The system returns to the normal playback mode Note This function may not be supported depending on the content Add to My Playlist 1 While navigating or playing select the file to be added to My Playlist then ENTER 2 Press ADV SURR Yellow then select Add to My Playlist from the Tool Menu then ENTER A Playlist Selection dialog screen appears 3 Select a Playlist then ENTER A check...

Страница 86: ...tent from the server menu on the Media Navigator screen the Music Player automatically launches Select a category folder or device to access the submenu containing the required file or content The Music Player screen appears when you select a music file from My Playlist just like selecting a file in the server Note The Music Player only displays a List screen Screen Components 1 Category or Folder...

Страница 87: ...ing content in the Playlist press STANDARD Green to select Random On Random Repeat playback starts 2 Press STANDARD Green again to cancel the random mode Random Off is selected Plays back the selected content Pauses while in playback and plays while in PAUSE Pauses the playback Stops the Player and does not return to the previous screen Selecting the Stop Music from the Tool Menu also stops the Pl...

Страница 88: ...humbnail List Displays the previous image content Display the next image content Plays a slideshow Pauses the slideshow Stops the Player and returns to the previous screen List Thumbnail Thumbnail List Rotates the image 90º clockwise Each press toggles the rotation angle by 90º among 90º 180º 270º and 0º Rotates the image 90º counter clockwise Each press toggles the rotation angle by 90º among 270...

Страница 89: ... ENTER The slideshow setup finishes Note After setting the Interval time it may take longer than the preset time as the Interval time means the time up until the Home Media Gallery starts obtaining the next image Key operations may not work while obtaining the next image Setting up BGM for the slideshow 1 Press HOME MEDIA GALLERY The Home Media Gallery screen is displayed 2 Select photo content in...

Страница 90: ...TER or to start a slideshow The slideshow starts and photo images in the folder automatically display one by one To display a key guide press DISP 4 While using Photo Player press AUTO DIRECT Blue to rotate a photo The displayed image rotates by one quarter clockwise Each time AUTO DIRECT Blue is pressed the image rotates 90º 180º 270º and Rotate Off The Photo Player goes into PAUSE the slideshow ...

Страница 91: ... sort results are displayed Even while sorting you can select content to play To return to the sort screen press RETURN during playback 6 Press RETURN to cancel the sort mode Note The Select a sorting order screen can be displayed while navigating through the music categories Adding files to My Playlist The Home Media Gallery function provides My Playlist a self contained play list that allows you...

Страница 92: ... to 9 Subnet mask such as 255 255 255 0 Enter the same figures as you checked IP Address such as 192 168 201 Enter the same figures as used in the media server PC etc you use For enter 3 digit figures 0 254 that have not been used for network connections yet 5 Press ENTER on the setup item s box after the entry is complete The screen turns to setup selection mode Repeat steps 2 to 4 to complete th...

Страница 93: ...oard Software Keyboard is displayed only when you select Search or Change Name Move You can change the listing order of the content registered in My Playlist 1 Choose the playlist for which you want to change the order of the contents then ENTER 2 Press ADV SURR Yellow 3 Select Move from the Tool Menu then ENTER The content selected is placed in a yellow box Source Selection mode 4 Select the desi...

Страница 94: ...e server is in the sleep mode the server name is dimmed grayed out You cannot select a server unless that media server has been set up Resetting to default You can reset the setups you have entered within the Home Media Gallery function to default see Default Settings on page 92 1 Press HOME MEDIA GALLERY The Home Media Gallery screen is displayed 2 Select Setup then ENTER 3 Select Default Setting...

Страница 95: ...products that share content through wired or wireless networks in the home DNS Domain Name Service Server DNS Server is a server that determines the name of network computer within the Internet The server functions to exchange IP address to the hostname hostname to the IP address Ethernet A frame based computer networking technology for local area networks LANs This receiver supports 100BASE TX IP...

Страница 96: ...ts the Mass Storage Class Windows Media Connect Microsoft Windows Media Connect is a new technology to distribute music photos and video stored on a PC with Windows XP installed to a stereo system of TV Using this technology you can playback files stored on the PC from various devices wherever you like in your home Windows Media DRM Windows Media DRM is copyright protection technology developed by...

Страница 97: ...els Up to 6 Multi channel audio signals are down mixed to 2 channels Compatible image file formats JPEG Resolution Up to 8192 x 8192 pixels YUV444 YUV422 YUV420 1280 x 768 pixels RGB and grayscale This receiver is not compatible with progressive JPEG images BMP Resolution No restrictions PNG Resolution Up to 2048 x 1024 pixels TIFF Resolution Up to 2048 x 1024 pixels Compression format Uncompresse...

Страница 98: ...terminal on this receiver To use the HDMI control function connect this receiver and plasma TV using the HDMI OUT 1 terminal Connecting the HDMI control compatible component using the HDMI OUT 2 terminal may result in malfunction If this happens turn off the HDMI control compatible component s HDMI control setting HDMI Control is compatible with up to six units 3 DVD or Blu ray disc players and 3 ...

Страница 99: ... mode begins once you carry out an operation for the plasma display For more information see the operating manual of your plasma display Synchronized amp mode operations By connecting a component to this receiver with an HDMI cable you can use synchronized amp mode which allows you to synchronize the following operations2 Displays on the plasma display when you mute or adjust the volume of this re...

Страница 100: ...irect connection with other amps or an AV converter such as an HDMI switch can cause operational errors Only connect components you intend to use as a source to the HDMI input of this receiver Interrupting a direct connection with other amps or an AV converter such as an HDMI switch can cause operational errors ...

Страница 101: ...hoose to rename the input function for easier identification Select Rename to do so or Default to return to the system default 12V Trigger 1 to 4 After connecting a component to one of the 12 volt triggers see Switching components on and off using the 12 volt trigger on page 75 select MAIN ZONE 2 ZONE 3 or OFF for the corresponding trigger setting to switch it on automatically along with the main ...

Страница 102: ...he System Setup menu Note 1 You will have to make an SR cable connection from a CONTROL OUT jack on the display to the CONTROL IN jack on this receiver opposite from the setup in Using this receiver with a Pioneer plasma display on page 75 Note that to control this receiver using the remote you will have to point it at the plasma display s remote sensor after making this connection Input source In...

Страница 103: ...ces In the Multi Channel Input Setup you can assign a video input to the multi channel input 1 Select Multi Ch In Setup from the Other Setup menu 2 Select the SW Input Gain setting you want 0dB Outputs sound of the subwoofer at the level originally recorded on the source 10dB Outputs sound of the subwoofer at the level increased by 10 dB 3 Select the Video Input setting you want When the multi cha...

Страница 104: ...Make the following settings if you have connected a Pioneer plasma display to this receiver using an SR cable Note that the number of function settings available will depend on the plasma display you ve connected See also Using this receiver with a Pioneer plasma display on page 75 and Using the SR mode with a Pioneer plasma display on page 76 1 Select SR Setup from the Other Setup menu 2 Select t...

Страница 105: ...tion mode is set 2 Use to select the background color pattern type The type switches between Type 1 and Type 2 Type 1 Blue background color Type 2 Black background color 3 When you re finished press RETURN You will return to the Other Setup menu Return a Multi Ch In Setup b ZONE Video Setup c ZONE Audio Setup d SR Setup e HDMI Control Setup f i LINK Check g Display Image 9 Other Setup DVD LD 55 0d...

Страница 106: ...NIGHT Allows you to hear effective surround sound of movies at low volumes MID LOUD OFF MIDNIGHT ON LOUDNESS Used to get good bass and treble from music sources at low volumes LOUDNESS ON TONE Tone Control Applies the treble and bass tone controls to a source or bypasses them completely BYPASS ON BASSc Adjusts the amount of bass 6 to 6 dB Default 0 dB TREBLEc Adjusts the amount of treble 6 to 6 dB...

Страница 107: ...ward positive settings 3 to 3 Default 0 PANORAMAh Extends the front stereo image to include the surround speakers for a wraparound effect OFF ON Setting What it does Option s CENTER IMAGEi Center Image Applicable only when using a center speaker Adjusts the center image to create a wider stereo effect with vocals Adjust the effect from 0 all center channel sent to front right and left speakers to ...

Страница 108: ...re direct mode When the audio adjustment function s HDMI audio output is set to THROUGH 2 Adjustments can be performed while watching the actual screen by pressing ENTER after selecting the setting item This may not be possible for some video signals 3 All of the setting items can be set for each input source Setting items other than VIDEO CONV can only be selected when VIDEO CONV is set to ON Set...

Страница 109: ...e ZONE 3 shows in the display Playing a different source when recording Using this receiver it s possible to listen to a different analog source than the one you re recording 1 During recording press the REC SELECT CONTROL button on the front panel until RECOUT shows in the display 2 2 While RECOUT shows in the display use the INPUT SELECTOR dial to select the source you want to record The default...

Страница 110: ...ont LCD display Note that when selecting sources the display automatically brightens for a few seconds Set the operation selector switch to RCV then press DIMMER repeatedly to change the brightness of the front LCD display Switching the HDMI output Set which terminal to use when outputting video and audio signals from the HDMI output terminals HDMI OUT1 or HDMI OUT2 The HDMI OUT1 terminal is compa...

Страница 111: ...the ENTER button on the front panel 4 Select RESET using then press the ENTER button on the front panel The display shows RESET OK 5 Press ENTER to confirm OK appears in the display to indicate that the receiver has been reset to the factory default settings Note that all settings will be saved even if the receiver is unplugged SOURCE TV RCV VOL VOL CH SOURCE TV RCV CATEGORY STATUS THX MPX MEMORY ...

Страница 112: ...rround back channel Processing ON Phase Control ON Full Band Phase Control OFF Sound Retriever OFF Sound Delay 0 frame Dual Mono CH1 DRC AUTO SACD Gain 0 dB Surr B Delay 0 msec LFE Attenuate 0 dB Auto delay OFF Digital Safety OFF Effect Level ExtendedStereo 90 Other modes 50 2 PL II Music Options Center Width 3 Dimension 0 Panorama OFF Neo 6 Options Center Image Neo 6 MUSIC 3 Neo 6 CINEMA 10 All I...

Страница 113: ...irst one 2 To try out the remote control switch the component on or off into standby by pressing SOURCE If it doesn t seem to work select the next code from the list if there is one If you can t find or properly enter a preset code you can still teach the remote individual commands from another remote control see Programming signals from other remote controls below 7 If your component is controlle...

Страница 114: ...to erase other buttons 6 Press and hold the MULTI OPERATION button for a couple of seconds when you re done Resetting the remote control presets This will erase all preset remote control preset codes and programmed buttons 4 1 While pressing the MULTI OPERATION button press SETUP The remote LCD display shows SETUP 2 Use to select RESET then press ENTER RESET flashes in the LCD display 3 Press and ...

Страница 115: ...e time using your receiver to playback a different component This could let you for example use the remote control to set up and listen to a CD on the receiver and then use the remote control to rewind a tape in your VCR while you continue to listen to your CD player When direct function is on any component you select using the input source buttons will be selected by both the receiver and the rem...

Страница 116: ...source component selected in step 3 program a Pioneer TV or monitor to switch on if the input function selected in step 2 has video input terminals These take priority in multi operations not shutdown 8 Repeat steps 5 to 7 to program a sequence of up to five commands 9 When you re finished use to select EXIT from the menu and press ENTER You will return to the remote control Setup menu Select EXIT...

Страница 117: ...hes the DTV on or off DTV Switches the TV or CATV between standby and on Cable TV Satellite TV TV Switches the DTV on or off DTV Press to get information on DTV programs DTV Use to choose the BLUE commands on a DTV menu DTV Use to choose the YELLOW commands on a DTV menu DTV Use to choose the RED commands on a DTV menu DTV Use to choose the GREEN commands on a DTV menu DTV AUDIO Use to switch DTV ...

Страница 118: ...playback Cassette deck Fast rewinds fast forwards the tape Cassette deck ENTER Navigates DVD menu options DVD BD DVR player CH Selects channels VCR DVD DVR player AUDIO Changes the audio language or channel DVD BD DVR player STANDARD Switches to the VCR controls when using a VCR DVD HDD recorder VCR DVD DVR player DISP Press to display information DVD BD DVR player AUTO DIRECT Switches to the hard...

Страница 119: ...t Ideally all the speakers should be equidistant from the listening position Tip If the speakers cannot be set at equal distances on a circle use the Auto MCACC Setup speaker distance correction and Fine Speaker Distance functions to make them equalize the distance artificially Step 2 Adjusting the speaker height Adjust the heights angles of the different speakers Adjust so that the front speaker ...

Страница 120: ...could excessively amplify the bass sound If the subwoofer must be installed near a wall place it at an angle so that it is not parallel to the wall surface This can help reduce any sympathetic vibrations but depending on the shape of the room this could result in standing waves However even if standing waves are generated their influence on the sound quality can be prevented using the Auto MCACC s...

Страница 121: ...osition of front speakers and monitor The front speakers should be as equidistant as possible to the monitor Position of center speaker and monitor Since mostly dialogs are output from the center speaker keeping the center speaker as close as possible to the screen makes the overall sound more natural For TVs using Braun tubes however when installing the center speaker on the floor adjust its angl...

Страница 122: ...dependent service company for help AMP OVERHEAT flashes the power turns off and the power indicator flashes Allow the unit to cool down in a well ventilated place before switching back on Wait at least 1 minute then try turning the power on again Symptom Remedy No sound is output when an input source is selected No sound output from the front speakers Check the volume mute setting press MUTE and s...

Страница 123: ...ume control make sure this is not turned down No sound when using the System Setup or Status menu If the HDMI input source is selected sound is muted until exiting either menu If sound is muted in the sub zone ZONE 2 it will be restored after exiting the System Setup menu Symptom Remedy Symptom Remedy Broadcast stations cannot be selected automatically or there is considerable noise in radio broad...

Страница 124: ... to this receiver using the same type of video cable as you used to connect your video component Make sure the input assignment is correct for components connected using component video HDMI or S Video cables see The Input Setup menu on page 101 Check the video output settings of the source component Check that the video input you selected on your TV is correct Some components such as video game u...

Страница 125: ...and after measurements EQ adjustments made using the Manual MCACC setup on page 48 do not appear to change the graphical output Despite level adjustments being made the filters used for analysis may not display these adjustments in the graphical output However these adjustments are taken this into account by the filters dedicated to overall system calibration Lower frequency response curves do not...

Страница 126: ...hin 7 m 23 feet and a 30º angle of the remote sensor on the front panel see Operating range of remote control unit on page 33 Check that there are no obstacles between the receiver and the remote control Make sure that there is no fluorescent or other strong light shining on to the remote sensor Check the connections of the CONTROL IN jack see Operating other Pioneer components with this unit s se...

Страница 127: ...m all channels In this case make a digital or analog audio connection To output signals in DeepColor use an HDMI cable High Speed HDMI Cable to connect this receiver to a component or TV with the DeepColor feature No picture Try changing the Resolution setting in Setting the Video options on page 108 Set the HDMI output setting to the connected HDMI OUT terminal in Switching the HDMI output on pag...

Страница 128: ...rectly to a PC It is strongly recommended to use 100BASE TX for playback quality and display speed Check the logical connections IP Address setup DHCP etc Confirm the IP Address is correct if acquired by Auto IP and Firewall setup Also check if the IP Address is properly acquired with DHCP on the Network Setup screen that follows the Setup menu Using two or more application servers on a single PC ...

Страница 129: ...he supported files and if the speed of the device is sufficient poor device speed may result in interrupted or delayed display of images due to a bit rate problem When using a digital camera that is not Mass Storage Class compliant insert the Flash Memory card into the multi card reader Confirm that the device is correctly inserted or removed Check that the firmware file has been correctly downloa...

Страница 130: ...rom the XM satellite signal This message can also occur in weak XM signal conditions This message should disappear in a few seconds in good signal conditions If you see this message often reposition the XM antenna to get better signal reception No Signal The XM Mini Tuner is not receiving the XM satellite signal Something may be blocking the XM antenna s view of the satellites or the antenna is no...

Страница 131: ...The sound may be interrupted if this happens during playback LOOP CONNECT The i LINK network cannot function because the connected components form a loop See The Input Setup menu on page 101 for more on this NO NAME When an i LINK equipped component has no name this message is displayed instead of the proper component name NO SIGNAL A component is outputting an i LINK signal that the receiver cann...

Страница 132: ...01 Failed to obtain WMDRM authorization 503 Authorization failed 503 Please check for trouble in routers hubs and other network devices Failed to obtain WMDRM authorization 504 Authorization failed 504 The maximum allowed number of devices are connected to the server Failed to obtain WMDRM 505 Authorization failed 505 The content license is off Please turn on the license from the server Failed to ...

Страница 133: ... decoder can then use for enhanced surround listening with greater sound detail Dolby Digital Plus Dolby Digital Plus is the next generation audio technology for all high definition programming and media It combines the efficiency to meet future broadcast demands with the power and flexibility to realize the full audio potential expected in the upcoming high definition era Built on Dolby Digital t...

Страница 134: ...ith all existing decoders This means that DVD players can play this software using a conventional DTS 5 1 channel decoder DTS EXPRESS DTS EXPRESS is a low bitrate encoding technology supporting up to 5 1 channels with fixed data transfer rates This format is incorporated with sub audio on HD DVD and secondary audio on Blu ray Disc while boasting the potential applicability to upcoming broadcasts a...

Страница 135: ... soundtracks that have been encoded with Dolby Digital Surround EX technology are able to reproduce an extra channel which has been added during the mixing of the program This channel called Surround Back places sounds behind the listener in addition to the currently available front left front center front right surround right surround left and subwoofer channels This additional channel provides t...

Страница 136: ...livers the rich envelopment and discrete image detail of surround sound in a format 100 compatible with stereo This product is manufactured under license from Neural Audio Corporation and THX Ltd Pioneer Corporation hereby grants the user a non exclusive non transferable limited right of use to this product under USA and foreign patent patent pending and other technology or trademarks owned by Neu...

Страница 137: ...is distributed according to the same disclaimer and license as libpng 1 2 5 with the following individual added to the list of Contributing Authors Cosmin Truta libpng versions 1 0 7 July 1 2000 through 1 2 5 October 3 2002 are Copyright c 2000 2002 Glenn Randers Pehrson and are distributed according to the same disclaimer and license as libpng 1 0 6 with the following individuals added to the lis...

Страница 138: ...be misrepresented as being the original source 3 This Copyright notice may not be removed or altered from any source or altered source distribution The Contributing Authors and Group 42 Inc specifically permit without fee and encourage the use of this source code as a component to supporting the PNG file format in commercial products If you use this source code in a product acknowledgment is not r...

Страница 139: ...ACT TORT OR OTHERWISE ARISING FROM OUT OF OR IN CONNECTION WITH THE SOFTWARE OR THE USE OR OTHER DEALINGS IN THE SOFTWARE Copyright c 1988 1997 Sam Leffler Copyright c 1991 1997 Silicon Graphics Inc THE SOFTWARE IS PROVIDED AS IS AND WITHOUT WARRANTY OF ANY KIND EXPRESS IMPLIED OR OTHERWISE INCLUDING WITHOUT LIMITATION ANY WARRANTY OF MERCHANTABILITY OR FITNESS FOR A PARTICULAR PURPOSE IN NO EVENT...

Страница 140: ...the program proprietary To prevent this we have made it clear that any patent must be licensed for everyone s free use or not licensed at all The precise terms and conditions for copying distribution and modification follow GNU General Public License TERMS AND CONDITIONS FOR COPYING DISTRIBUTION AND MODIFICATION 0 This License applies to any program or other work which contains a notice placed by ...

Страница 141: ...bove on a medium customarily used for software interchange or c Accompany it with the information you received as to the offer to distribute corresponding source code This alternative is allowed only for noncommercial distribution and only if you received the program in object code or executable form with such an offer in accord with Subsection b above The source code for a work means the preferre...

Страница 142: ...to time Such new versions will be similar in spirit to the present version but may differ in detail to address new problems or concerns Each version is given a distinguishing version number If the Program specifies a version number of this License which applies to it and any later version you have the option of following the terms and conditions either of that version or of any later version publi...

Страница 143: ...is a sample alter the names Yoyodyne Inc hereby disclaims all copyright interest in the program Gnomovision which makes passes at compilers written by James Hacker signature of Ty Coon 1 April 1989 Ty Coon President of Vice This General Public License does not permit incorporating your program into proprietary programs If your program is a subroutine library you may consider it more useful to perm...

Страница 144: ... the entire combination fits its criteria of freedom The Lesser General Public License permits more lax criteria for linking other code with the library We call this license the Lesser General Public License because it does Less to protect the user s freedom than the ordinary General Public License It also provides other free software developers Less of an advantage over competing non free program...

Страница 145: ...ction or a table of data to be supplied by an application program that uses the facility other than as an argument passed when the facility is invoked then you must make a good faith effort to ensure that in the event an application does not supply such function or table the facility still operates and performs whatever part of its purpose remains meaningful For example a function in a library to ...

Страница 146: ... work also fall under Section 6 whether or not they are linked directly with the Library itself 6 As an exception to the Sections above you may also combine or link a work that uses the Library with the Library to produce a work containing portions of the Library and distribute that work under terms of your choice provided that the terms permit modification of the work for the customer s own use a...

Страница 147: ...lly receives a license from the original licensor to copy distribute link with or modify the Library subject to these terms and conditions You may not impose any further restrictions on the recipients exercise of the rights granted herein You are not responsible for enforcing compliance by third parties with this License 11 If as a consequence of a court judgment or allegation of patent infringeme...

Страница 148: ... OR DATA BEING RENDERED INACCURATE OR LOSSES SUSTAINED BY YOU OR THIRD PARTIES OR A FAILURE OF THE LIBRARY TO OPERATE WITH ANY OTHER SOFTWARE EVEN IF SUCH HOLDER OR OTHER PARTY HAS BEEN ADVISED OF THE POSSIBILITY OF SUCH DAMAGES END OF TERMS AND CONDITIONS How to Apply These Terms to Your New Libraries If you develop a new library and you want it to be of the greatest possible use to the public we...

Страница 149: ...SIC THX GAMES As above Dolby Digital Surround 2 Pro Logic llx MOVIE 2 Pro Logic llx MUSIC 2 Pro Logic llx GAME 2 PRO LOGICa Neo 6 CINEMA Neo 6 MUSIC 2 Pro Logic IIx MOVIE THX 2 Pro Logic llx MUSIC THX MUSIC 2 Pro Logic llx GAME THX GAMES Neo 6 CINEMA THX THX Ultra2 GAMESb Neo 6 MUSIC THX MUSIC 2 PRO LOGIC THX CINEMAa 2 Pro Logic llx MOVIE DTS Surround As above As above Neo 6 CINEMA SACD As above N...

Страница 150: ... Surround As above As above Neo 6 CINEMA SACD As above Neo 6 MUSIC THX MUSIC 2 PRO LOGIC ll MUSIC THX MUSIC Stereo playback XM Radio 2 Pro Logic ll MOVIE 2 Pro Logic ll MUSIC 2 Pro Logic ll GAME 2 PRO LOGIC Neo 6 CINEMA Neo 6 MUSIC XM HD Surround 2 Pro Logic ll MOVIE THX 2 PRO LOGIC THX Neo 6 CINEMA THX XM HD Surround Other stereo sources 2 Pro Logic ll MOVIE 2 Pro Logic ll MUSIC 2 Pro Logic ll GA...

Страница 151: ...a2 CINEMAa THX Ultra2 MUSICa THX Ultra2 GAMESa THX MUSICb THX GAMESb Straight decoding DTS EXPRESS DTS HD DTS HD Master Audio WMA9 Pro 88 2 kHz 96 kHz 5 1 channel Straight decoding THX CINEMAb THX Ultra2 CINEMAa THX Ultra2 MUSICa THX Ultra2 GAMESa THX MUSICb THX GAMESb Straight decoding Dolby Digital EX 6 1 channel flagged Dolby Digital EX 2 Pro Logic IIx MOVIEa 2 Pro Logic llx MUSIC THX SURROUND ...

Страница 152: ...ueHD DTS HD DTS HD Master Audio WMA9 Pro PCM 6 1 7 1 channel Straight decoding THX CINEMA Straight decoding Dolby TrueHD 176 4 kHz 192 kHz 5 1 channel Straight decoding THX Ultra2 CINEMAa THX CINEMAb Maximum 5 1 channel playback with only one surround back speaker Straight decoding Dolby Digital EX 6 1 channel flagged Dolby Digital EX 2 Pro Logic llx MOVIEa THX SURROUND EX Dolby Digital EX 2 Pro L...

Страница 153: ...ro Logic llx MOVIE DTS Surround Neo 6 CINEMA Neo 6 CINEMA Other stereo sources Stereo playback Stereo playback Analog sources As above ANALOG DIRECT stereo PCM sources As above PCM DIRECT stereo DVD A sources As above PCM DIRECT stereo SACD sources As above SACD DIRECT stereo Surround Back speaker s Input signal format DIRECT PURE DIRECT Connected Dolby Digital EX 6 1 channel flagged Dolby Digital...

Страница 154: ...n a rack be sure to allow for heat dissipation Cleaning the shiny surfaces of the panel and the liquid crystal display window Use the included wiping cloth dry to gently wipe any dirt off the shiny surfaces of this receiver s panel and the liquid crystal display window Notes on handling the included wiping cloth Using the wiping cloth with dust on it may scratch this receiver s surface If the wipi...

Страница 155: ... Vp p 75 Ω Output Level Impedance 1 Vp p 75 Ω Signal to Noise Ratio 65 dB Frequency Response 5 Hz to 10 MHz Component Video Section Input Sensitivity Impedance 1 Vp p 75 Ω Output Level Impedance 1 Vp p 75 Ω Signal to Noise Ratio 65 dB Frequency Response 5 Hz to 100 MHz Network Section LAN terminal 10 BASE T 100 BASE TX USB Section USB terminal USB2 0 compatible FM Tuner Section Frequency Range 87 ...

Страница 156: ...hone measurements from a series of reference points your home theater experience can be truly customized for optimal surround sound Phase Control The Phase Control feature corrects the phase distortion as well as group delay for LFE Low Frequency Effects audio signals during multichannel playback Full Band Phase Control The Full Band Phase Control feature analyzes the frequency phase characteristi...

Страница 157: ...y Corporation You can operate this receiver in synchronization with your Pioneer component that supports the HDMI Control function by connecting your component to this receiver via HDMI Also the built in digital video converter of this receiver makes both de interlacing and up scaling possible and analog video signals being input are converted and output as digital video signals at the HDMI termin...

Страница 158: ... Set the dial and leave it there Taking a minute to do this now will help to prevent hearing damage or loss in the future After all we want you listening for a lifetime We Want You Listening For A Lifetime Used wisely your new sound equipment will provide a lifetime of fun and enjoyment Since hearing damage from loud noise is often undetectable until it is too late this manufacturer and the Electr...

Страница 159: ...st Pioneer Authorized Service Company in Canada Alternatively please contact the Customer Satisfaction Department at the following address Pioneer Electronics of Canada Inc Customer Satisfaction Department 300 Allstate Parkway Markham Ontario L3R 0P2 1 877 283 5901 905 479 4411 For warranty information please see the Limited Warranty sheet included with your product Si ce produit doit être réparé ...

Страница 160: ......

Отзывы: