background image


125 


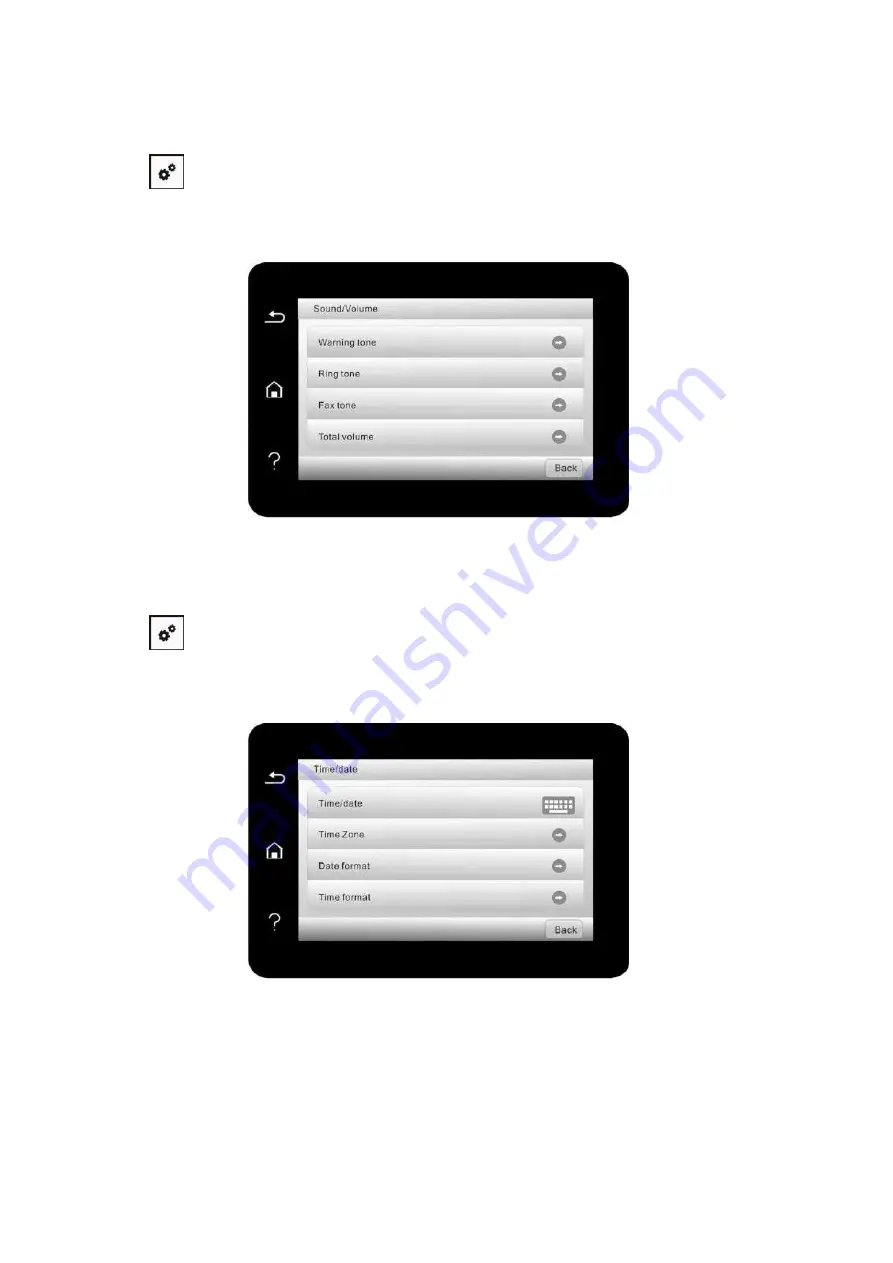
12.1.8. Sound/volume   

You may set the up and down of sound/volume or shut down.   

1. Click “

” button in control panel to enter “Menu setting” interface.


2. Click and select “System Setting”

-

“Sound/Volume” to set “Warning tone”, “Ring tone”, “Fax 

tone” and “Total volume”.


12.1.9. Time/date   

You may set the time and date with the Time/Date option.   

1. Click “

” button in control panel to enter “Menu setting” interface.


2. Click and select “System Setting”

-

“Time/date” to set “Date”, “Time”, “Time Zone”, “Date format” 

and “Time format”.


Содержание BM5100FDN Series

Страница 1: ...Pantum BM5100 Series Monochrome Laser MFP Fax model It is recommended that you read this Guide carefully before using the printer...

Страница 2: ...nding license agreement and they are referred for instructions only All other product and brand names herein may be the registered trademarks trademarks or service marks of their respective owners and...

Страница 3: ...the printer laser radiation will not leak To avoid laser radiation please do not randomly disassemble the printer The printer follows the provisions of Class 1 laser products under CFR standard The pr...

Страница 4: ...g the printer make sure the power is turned off Plugging and unplugging the power cord plug with a wet hand can result in an electric shock The fuser unit is hot when and after printing Touching the f...

Страница 5: ...and could result in fire or electric shock 10 Do not allow pets to chew on the AC power cord or the computer interface cable 11 Do not allow sharp objects piercing equipment slot so as to avoid contac...

Страница 6: ...purchase parts they need If the product sold is inconsistent with the package list please go to the specified Aftersales Service Centre to solve the problem 24 Install this product in a place with the...

Страница 7: ...wer jacks 32 REN RINGER EQUIVALENT NUMBERS STATEMENT Notice The Ringer Equivalence Number REN 0 2A assigned to each terminal device provides an indication of the maximum number of terminals allowed to...

Страница 8: ...irm or user is not allowed to change the frequency increase the power or change the characteristics and functions of the original design without approval The use of low power RF device shall not affec...

Страница 9: ...r is fully compliant with the ROHS Directive 2009 95 EC and the requirements of the revised Directive 2011 65 EU for managing toxic and hazardous substances A battery is built in the product with the...

Страница 10: ...ion and uninstallation 25 3 1 How to install Windows printer driver 25 3 1 1 One click Installation 25 3 1 2 Manual installation 40 3 1 3 Method of driver unistallation 47 3 2 macOS system driver inst...

Страница 11: ...printing parameters 72 7 3 2 Automatic Two Sided Printing 72 7 3 3 Fine mode printing 77 7 3 4 Booklet printing 77 7 3 5 Mute Printing 79 7 3 6 Auto shut off setting 80 7 3 7 Open Help Document 81 7...

Страница 12: ...Pantum APP 117 11 2 Mopria mobile print 118 11 2 1 The operating systems and applications which support Mopria mobile printing 118 11 2 2 How to download Mopria Print Service 118 11 2 3 Preliminary pr...

Страница 13: ...Installing optional tray 141 13 3 2 Removing the optional tray 143 13 3 3 Updating the optional tray status 144 14 Troubleshooting 145 14 1 Cleaning Jammed Paper 145 14 1 1 Middle jam 145 14 1 2 Paper...

Страница 14: ...pm Automatic Two Sided Printing Auto Duplex Scan NFC TAG Mute printing Copy Scan Fax Scan to U disk USB print Secure printing ADF Support Blank Unsupport Note This product series is subject to additio...

Страница 15: ...2 1 2 Supplied Accessories Name Parts Toner cartridge Drum component USB Interface Cable Power Cord CD Quick Setup Guide Pantum Warranty Note The Pantum Warranty may not be attached in some regions...

Страница 16: ...m falling off 4 Cover of scanner Open the cover of scanner to place the scanned originals on its glass plate 5 Output Bin For storing the printed paper 6 Front USB interface For USB flash disk printin...

Страница 17: ...he paper length guide to match the paper length 17 Front cover button of printer For opening and closing the front cover of the printer 18 Paper width guide of tray Slide paper width deflector to adap...

Страница 18: ...de of tray Slide paper width deflector to adapt to paper width 3 Paper length guide of tray Slide paper length deflector to adapt to paper length 4 A5 A6 stopper Install the stopper to match the A5 L...

Страница 19: ...gh volume toner cartridge About 6000 Pages Based on ISO 19752 standard Super large volume catridge About 15000 Pages Based on ISO 19752 standard Note The model is subject to increase without notice Th...

Страница 20: ...utton Go to the home screen 4 Help button Access to Help system of control panel It describes how to use each screen and eliminate faults 5 Status icon View supplies information in ready state View pr...

Страница 21: ...Functions 1 Copy Access to Copy menu and make a copy 2 Scan Access to Scan menu and scan document 3 Fax Access to Fax menu and send a fax 4 ID copy Access to ID copy menu and make an ID card copy 5 Bi...

Страница 22: ...essage bar Display the current printer status 1 5 3 Touch screen button Layout of touch screen buttons of printer control panel is shown as below No Name Functions 1 Radio button Select or delete an i...

Страница 23: ...10 1 5 4 Function of power indicator No Status displayed by power indicator Status Status Description 1 Die out Shutdown status 2 Always on Booting and ready states 3 Blink Sleep mode...

Страница 24: ...Big 16K 32K Big 32K Yougata4 Younaga3 Nagagata3 Yougata2 Custom Media weight 60 200 g m Maximum capacity of the tray 60 pages 80 g m Optional Tray 1 2 Media Type Plain paper 70 105g m thin paper 60 70...

Страница 25: ...d print type and size in the print settings so as to get the best print effect Please observe the following standards Types of Print Media Correct Practices Incorrect Practices Label Paper Use labels...

Страница 26: ...tes the non printing area and non scanning area Usage Paper Size Top and bottom margins A Left and right margins B Printing A4 4 2mm 0 165inch 4 2mm 0 165inch Letter 4 2mm 0 165inch 4 2mm 0 165inch Sc...

Страница 27: ...omatic tray 1 Slide out the automatic feeder tray from the printer 2 Slide the clip of extended tray of auto feed tray paper length deflector and paper width deflector to the slot suitable for paper s...

Страница 28: ...printed document after the printing is complete Note It is recommended that you raise the output tray to prevent the paper from slipping and falling after printing If you choose not to raise the outp...

Страница 29: ...r in multi purpose tray 1 Open the multipurpose feed tray 2 Slide the paper guide of the multipurpose feed tray to match both sides of the paper Do not apply excessive force otherwise paper jamming or...

Страница 30: ...purpose feed tray with both hands 5 Raise the output tray to avoid the printed paper from slipping and falling or immediately remove the printed document after the printing is complete Note Place the...

Страница 31: ...l tray or the Installation Guide supplied with the optional trays Before you use it please remove the A5 A6 stopper before loading paper 1 Pull out the optional tray completely from the printer 2 Slid...

Страница 32: ...y and pull out the rear end of the tray to lengthen the tray 3 Before loading paper please unfold the stacked paper to avoid a paper jam or feed error and then load the paper into the tray print side...

Страница 33: ...hat the side to be printed the blank side faces down 2 5 Paper and Manuscript Use Process Manuscript requirements Source Type Size Automatic document feeder ADF Plain paper A4 A5 B5 A6 Letter Folio Ex...

Страница 34: ...21 2 5 1 Scanning With Tablet Note Printer appearance may differ because of various models and functions so the schematic diagram is only for your reference Steps of Use 1 Lift up the scanner cover...

Страница 35: ...riate paper size Note If the manuscript does not match with any size marker please align the upper left corner of the manuscript with the arrow Make sure there is no document in the ADF If a document...

Страница 36: ...y dried Rough textured uneven oil stained and extremely smooth paper will make printing effect poor Please make sure that there is no dust fluff etc on the paper Paper shall be put on a flat surface a...

Страница 37: ...ng and automatic duplex scanning Refer to Chapter 9 for the scanning method 1 Put the original into the ADF with its front upward and top fed first 2 Adjust the document guide till it gets close to th...

Страница 38: ...omputer via USB cable power the printer and computer on 2 Place the attached installation CD in the computer CD ROM Windows XP system automatically run the installation procedure Windows 7 Vista Serve...

Страница 39: ...ter and computer on 2 Connect the computer to wired network 3 Connect network cable to the network interface of printer to make sure the printer is connected to computer network please refer to Chapte...

Страница 40: ...to the terms contained in the End User License Agreement and the Privacy Policy click the Next button in the lower right corner of the interface to enter the driver installation interface 6 Please cl...

Страница 41: ...ne click installation button to enter installation process if your software has searched only one printer The process may need some time and the duration is related to your computer configuration Plea...

Страница 42: ...not found please check if the printer and computer are in the same network Please see Chapter 5 3 for how to check When the printer IP address changes under printer driver installed with host ID you...

Страница 43: ...ndows 7 Vista Server 2008 system Pop up Autoplay interface click Autorun exe to run the installation procedure Windows 8 system When the DVD RW driver window pops up from the right top corner of Compu...

Страница 44: ...31 Click One click installation button if your software has searched only one printer and enter into installation process to complete automatic network configuration and driver installation...

Страница 45: ...also directly print without re installing the driver If you need to install the printer driver with the host ID please check the option Install the printer in the list with host ID 6 After the instal...

Страница 46: ...em configuration Please double click Computer icon find DVD RW driver then double click DVD RW driver to run the installation procedure 4 Read and agree to the terms contained in the End User License...

Страница 47: ...ne printe and the wireless network configuration interface will pop up input the SSID and password that you need then click Confirm button and enter into installation process The process may need some...

Страница 48: ...lect Configure the print via USB and install on the printer list interface and check the USB printer option Click the Confirm button and the wireless network configuration interface will pop up Input...

Страница 49: ...lize printing function 1 Turn the power of printer and computer on 2 Connect computer to the Wi Fi Direct network of the printer please refer to Chapter 5 2 2 2 for setup method 3 Place the attached i...

Страница 50: ...tallation click Print Test Page button If your printer prints the test page successfully it means that you have installed the driver correctly 3 1 1 3 2 The printer is already connected to wireless ne...

Страница 51: ...ontained in the End User License Agreement and the Privacy Policy click the Next button in the lower right corner of the interface to enter the driver installation interface 5 Click the One click inst...

Страница 52: ...39 If the software has searched several printers the printer list interface will pop up Please select the printer you need according to your printer wired network IP address or host ID...

Страница 53: ...ached installation CD in the computer CD ROM Windows XP system automatically run the installation procedure Windows 7 Vista Server 2008 system Pop up Autoplay interface click Autorun exe to run the in...

Страница 54: ...play interface click Autorun exe to run the installation procedure Windows 8 system When the DVD RW driver window pops up from the right top corner of Computer desktop click anywhere in the pop up win...

Страница 55: ...d please click Refresh to search again When the printer IP address changes under printer driver installed with host ID you can also directly print without re installing the driver If you need to insta...

Страница 56: ...Autorun exe to run the installation procedure Windows 8 system When the DVD RW driver window pops up from the right top corner of Computer desktop click anywhere in the pop up window then click Autor...

Страница 57: ...and click Next Note If the printer you need to connect is not in the list of printers searched please click Refresh to search again When the printer IP address changes under printer driver installed w...

Страница 58: ...driver window pops up from the right top corner of Computer desktop click anywhere in the pop up window then click Autorun exe to run the installation program Windows 10 system When the DVD RW driver...

Страница 59: ...printers searched please click Refresh to search again When the printer IP address changes under printer driver installed with host ID you can also directly print without re installing the driver If...

Страница 60: ...to instructions on uninstall window 4 Restart computer after finishing unloading 3 2 macOS system driver installation Driver installation under macOS system is divided into 2 steps driver installation...

Страница 61: ...ent and then click Continue 5 Click Agree on the prompt window popping out to accept the licensing agreement 6 Read the Privacy Policy and press Continue 7 In the popped up prompt window press Agree t...

Страница 62: ...twork via wireless network configuration tool refer to Chapter 5 1 1 for how to make configuration When configuration is completed unplug USB cable and then on the pop up Add Printer interface you may...

Страница 63: ...ferences Printers Scanners of computer 5 Click button to select Add Printer or Scanner 6 Select printer and then select the corresponding printer mode from the Use menu popping out 7 Click Add 3 3 3 A...

Страница 64: ...lect Add Printer or Scanner 5 Select printer and select Secure AirPrint data encryption or AirPrint no encryption in the Use option box 6 Click Add Note When the printer is connected to computer with...

Страница 65: ...ddress under the influence of network environment You can check the IP address of printer by printing Network setup page out please refer to Chapter 12 4 for printing method or check network informati...

Страница 66: ...s point wireless router connection is divided into wireless network setup and Wi Fi Protected Setup WPS Important Before wireless network installation you must learn about the service set identifier S...

Страница 67: ...for installation in the following interface Click Next 2 1 The computer has been connected to wireless network 1 The currently wireless network currently connected to computer is selected as wireless...

Страница 68: ...the SSID case sensitive and password of access point wireless router in the interface below Complete configuration according to interface prompt Note If you do not know the SSID of access point wirele...

Страница 69: ...r with wireless network through Push button configuration PBC and Personal identification number PIN 5 1 2 1 Preliminary preparations 1 The access point wireless router supports Wi Fi Protected Setup...

Страница 70: ...s network printer without using the access point wireless router 5 2 1 Preliminary preparations 1 Printer with the Wi Fi Direct feature 2 Wireless client including computer and mobile device with wire...

Страница 71: ...WLAN interface 4 Select printer SSID on direct interface to launch a connection invitation 5 When the panel inquires if connect or not click OK button for confirmation and Wi Fi Direct Note In case o...

Страница 72: ...i Fi frequency by accessing the Embedded Web Server please refer to Wireless Settings Note If the wireless network frequency is set to 2 4GHz the printer will not be able to connect to 5GHz network if...

Страница 73: ...ation might be blocked by firewall software Please refer to the user guide of firewall software to turn firewall off and then try to search the printer again Inspect if the IP address assignment of pr...

Страница 74: ...nsure that JavaScript and Cookies are always enabled Please ensure compatibility with HTTP 1 0 and HTTP 1 1 when other network browsers are used If the computer cannot visit the Web server embedded in...

Страница 75: ...t function is on by default You can set up the IPv4 address of printer manually to set up fixed IPv4 address for the printer 1 Turn on printer power to connect printer to network 2 Log in the embedded...

Страница 76: ...to Chapter 6 1 for login method 6 2 2 1 Wireless network 1 Click Settings Network settings Wireless setup Wireless Network 1 The wireless network is defaulted on please select Off option box and then...

Страница 77: ...ion prior to confirmation on panel 6 2 3 Machine setup You can add mail address contacts set up e mail notification set up sleep time and recover factory settings via machine setup page 6 2 3 1 Set up...

Страница 78: ...sult your network administrator I Set the E mail address book 1 Log in the embedded Web server please refer to Chapter 6 1 for login method 2 Click Settings Machine Settings and then E mail Address Bo...

Страница 79: ...you want to scan a file to the FTP server you need to configure the FTP address book first When scanning you may send the image scanned to the FTP server Before configuring the FTP address book you m...

Страница 80: ...k connection 1 Log in the embedded Web server please refer to Chapter 6 1 for login method 2 Click Settings Machine settings System 3 Select sleep time according to you need and then click Apply 6 2 4...

Страница 81: ...inters select corresponding printer right click set print function in Printing preferences Some functions are as follows Functions Diagram Automatic Two Sided Printing Collate Print Reverse Print N in...

Страница 82: ...he File menu in the upper left corner and select Print to enable the print driver 2 Select printer of the corresponding model 3 Click Printer Properties Preferences to configure printing 4 Enter the P...

Страница 83: ...e tray to print according to your paper settings 7 2 2 2 Automatic tray printing Before printing make sure that the print media of appropriate size is loaded in the automatic tray Note For precautions...

Страница 84: ...oading paper see Paper and Print Media Special paper such as envelope paper and film paper can only be printed through the multi purpose tray For the type of media to be printed with the multi purpose...

Страница 85: ...nd click to save the preset Select preset every time before printing or print according to default setup Note Priority of App setup is senior to printer setup 7 3 2 Automatic Two Sided Printing The pr...

Страница 86: ...73 1 Draw out duplex unit 2 Make the backside of duplex unit up 3 Adjust paper size slide to A4 or Letter position to finish setting up...

Страница 87: ...74 4 Install the duplex unit in the printer 7 3 2 2 How to carry out auto duplex printing 1 Open the print job to be printed from the application such as a Notepad 2 Select Print from the File menu...

Страница 88: ...75 3 Select printer of the corresponding model 4 Single click Preferences for printing setup 5 Select the Duplex in Basic tab and then select Long Edge or Short Edge...

Страница 89: ...76 6 Single click OK to finish printing setup Click Print to realize auto duplex printing...

Страница 90: ...ing paper types A4 Letter Legal Oficio or Folio Since Booklet always goes with duplex printing when it is selected Deplux will be checked authomatically and cannot be unchecked 1 Open the file to be p...

Страница 91: ...ft to complete print settings Click Print to print the booklet Note Documents will be re paged after selecting booklet printing It will print two pages on each side of the paper and then fold out of i...

Страница 92: ...iffer because of multiple operating systems 1 Enter the Start menu Control Panel view Devices and Printers 2 Right click printer and select Printer properties in the pull down menu 3 Enter the Seconda...

Страница 93: ...Devices and Printers 2 Right click printer select Printer properties in drop down list 3 Enter Secondary Settings option and set Auto shu off setting 4 Click OK to finish setting Note You can also set...

Страница 94: ...Open Help Document You can open the Printing preferences and click Help button for Windows Operation System only The help document contains the user guide where you can find the information on print...

Страница 95: ...d quick document print without the need of computer transmission 1 Insert the USB stick into the front USB disk interface of the printer 2 Once the USB flash disk is inserted the USB flash disk drive...

Страница 96: ...t include pdf jpeg 7 3 9 Secure printing You can save print job in the printer s memory through PC setting until you enter password in printer control panel to start such job 1 Open document click Fil...

Страница 97: ...n you have set Note The default job information is Use System Defaults and the user name of the secure printing job is the computer user account name click Start Control Panel User Account on PC to vi...

Страница 98: ...e interface of user secure printing job list will appear You can enter the password again in the password input interface All secure printing data in the USB flash disk and memory will be cleared if t...

Страница 99: ...ng effect by setting intensity Paper Size Set the paper size Receipt copying Intensity Adjust deep light copying effect by setting intensity Paper Size Set the paper size 8 2 Copying method 1 Click Co...

Страница 100: ...mode only after poster and collated copy are set 8 4 2 Intensity Adjust deep light copying effect by setting intensity 8 4 3 Resizing Through zoom setting the image to be copied can be zoomed by 25 40...

Страница 101: ...function cannot be set at the same time 8 4 5 Clone Through setting on clone feature you may print multiple original images on one piece of paper Copying with the ADF and the glass platen are both su...

Страница 102: ...s 2x2 3x3 4X4 Note The poster and resizing function cannot be set at the same time 8 4 7 Collated copy The Collated Copies feature supports only copying with the automatic document feeder ADF The coll...

Страница 103: ...dit a custom watermark as needed Watermark Settings After completion of copying operation switching the control panel button or restarting the printer the settings are restored to default Watermark ca...

Страница 104: ...ut ID card at orange left half area of glass platform Half page up and down half page left and right or A5 left and right put the ID card in the blue area in glass platen Note After setting the arrang...

Страница 105: ...y Please follow instructions on panel to put the paper vertically for printing 8 6 Receipt setting Change related setting through setting menu for better copy result 1 Select Bill copy button in print...

Страница 106: ...cation in PC via USB wired or wireless connection Please be sure the printer has been properly connected before scanning 9 1 1 1 Pantum Scan Application Operation Steps 1 Double click on Pantum Scan A...

Страница 107: ...sing the application which supports TWAIN and WIA standard users can use the scan function and directly scan the images to the open application The handbook requires Office Software Word and Excel and...

Страница 108: ...scan information in the right list of Basic Setting and Advanced Setting Click on Scan and start scan If you desire to change a scanning port please click Port at the lower part of above picture to s...

Страница 109: ...op Operation Steps 1 Launch Photoshop click on File Import on the top left corner and select TWAIN Scan as is shown below 2 After the window pops up please refer to Step 4 of 9 1 1 2 1 to see the spec...

Страница 110: ...Office Software Word and Excel Operation Steps 1 Open the Office software Word or Excel 2 Keyboard shortcuts Alt I P S to open the application s window 3 Click on Device and select WIA Scan click the...

Страница 111: ...users can set the scan After finishing the settings click on the OK button then Scan button to start scan 2 Photoshop Operation Steps 1 Launch Photoshop click File Import on the top left conrner and...

Страница 112: ...sta Windows Server 2008 and later versions Operation Steps 1 Click on Start All Programs Device and Printer on the left bottom of the desktop 2 When the pop up window appears select the printer you wa...

Страница 113: ...100 3 Click on Start Scan in the above option bar 4 After the window pops up set the scan and click Scan on the bottom right corner and start scan...

Страница 114: ...1 ICA Scan 9 1 2 1 1 Open ICA via Print and Scan Operation Steps 1 After installing the printer driver click System Preferences icon on the bottom left corner of the computer desktop 2 After the windo...

Страница 115: ...102 3 After the window pops up click on Scan 4 Click on Open Scanner and the scan window will pop up...

Страница 116: ...1 2 1 2 Call CIA through applications Operation Steps 1 Click on Finder icon on the bottom left corner of the computer desktop or use keyboard shortcuts command shift C to open the window Find Image...

Страница 117: ...on the bottom right corner and start scan 9 1 2 2 TWAIN Scan Take Photoshop as an example Operation Steps 1 Launch Photoshop click on File Import on the top left corner and select TWAIN Scan as is sho...

Страница 118: ...Click Scan Scan to Email in printer control panel 6 Select proper scan setting click Scan button to make a scan Please follow these instructions on the settings for group emails Set the group name for...

Страница 119: ...2 5 for how to put an original 3 Click Scan Scan USB in printer control panel 4 Select proper scan setting click Scan button to make a scan The printer will create a folder named PantumScan in which a...

Страница 120: ...ared folder on the Windows or Mac computer first 9 1 3 5 1 Create a shared folder Windows 7 is taken as example for description of the following steps 1 Right click the folder under Windows system you...

Страница 121: ...In the pop up Network Access window click the drop down menu select Everyone and click Add 4 Change the Everyone permission level added in Step 3 to Read Write and click Share H in the lower right co...

Страница 122: ...12 8 3 Put an original on the glass platen or into the ADF please see Chapter 2 5 for how to put an original 4 Click Scan Scan to SMB on printer control panel 5 Select proper scan setting click Scan...

Страница 123: ...he scanning parameters click Scan in the lower right corner to start scanning Note This machine also supports ADF automatic duplex scanning You can Enable or Disable this function on the Scan Setting...

Страница 124: ...can adjust the luminosity of Fax documents manually or automatically 4 Fax Name Input the fax name and save it 5 Fax Number Input the fax number and save it 6 Group Sending With the feature of multi a...

Страница 125: ...sending receiving 16 Contacts You can edit the contacts group numbers and print the contacts as well as the list of group numbers from Contacts 10 3 Fax Functions 10 3 1 Send Fax 10 3 1 1 Auto fax sen...

Страница 126: ...l panel to receive fax Phone Fax mode Automatically recognize each call from the caller When each call is regarded as a fax call if the ringing times reach the set value the fax will be received autom...

Страница 127: ...ete the printer will scan the document to the memory and get back to Ready state 3 Active Job You may check or delete the delay sending jobs stored currently with the Active Job menu 4 Receive and for...

Страница 128: ...r out or paper jam it will print all of them automatically 7 Speed dial You may edit the quick dial and group dial numbers in the address book for quickly dialing in sending a fax 1 Speed Dial Number...

Страница 129: ...sending on the Fax Settings popup 4 Click Print to present the Send Fax interface 5 Enter the Name and Fax Number then click Add to recipient list If you want to send the Fax to multiple addresses yo...

Страница 130: ...bile Printing Download and install How to download it for iOS mobile device Click the App Store icon Search interface input PANTUM or Pantum print in the search bar Download and install on the interfa...

Страница 131: ...roid device You can print photos emails webpages and files 11 2 1 The operating systems and applications which support Mopria mobile printing 1 Mopria mobile printing is suitable for Android4 4 or hig...

Страница 132: ...nter is turned on and if the printer is turned on 11 3 NFC label The NFC Near Field Communication label allows non contact point to point data transmission between electronic devices You can quickly c...

Страница 133: ...higher versions 11 4 2 Preliminary preparations 1 A printer that has wireless network function 2 iOS device mobile printing 11 4 3 How to use AirPrint mobile printing The printing steps may varied by...

Страница 134: ...r reference 12 1 System Settings 12 1 1 Ink saving setting You can select the save toner mode which can reduce toner consumption and reduce printing cost When save toner mode is on the printed color w...

Страница 135: ...uage 12 1 3 Restore Factory Settings Restore factory settings is used to recover the default settings of printer The printer will restart itself automatically after recovering factory settings 1 Click...

Страница 136: ...ck and select System Setting Sleep time set to set sleep time Note In sleep mode the printer can be woken up by pressing any key or sending printing work 12 1 5 Mute printing Set mute mode to realize...

Страница 137: ...e for Clean Fix function manually by setting up the printer panel The steps are as follows 1 Click button in control panel to enter Menu setting interface 2 Click to select System Settings Clean Fix t...

Страница 138: ...ce 2 Click and select System Setting Sound Volume to set Warning tone Ring tone Fax tone and Total volume 12 1 9 Time date You may set the time and date with the Time Date option 1 Click button in con...

Страница 139: ...erface 2 Click and select Network set to set Wired config Wireless conf and Wi Fi direct setting 12 3 Network Information You can check the network status through Network Information 1 Click button in...

Страница 140: ...reports that could be printed include Demo page information page menu structure page network configuration e mail address group e mail FTP address and Wi Fi hotspot Note The product report above is th...

Страница 141: ...etwork administrator 12 7 Configure the FTP address book 1 Click and select Scan Scan to FTP in control panel to enter Scan to FTP setting interface 2 Enter FTP Add FTP port user name and password int...

Страница 142: ...nter and then connect it to network 2 Click button in control panel to enter Menu setting interface 3 Click and select System Setting Online upgrade to upgrade firmware Note Perform upgrading accordin...

Страница 143: ...emperature within a short time after use To prevent burns please don t directly touch places labled with high temperature warning in contact with internal components after opening the printer s front...

Страница 144: ...document feeder CIS D CIS with soft cloth 3 Open the front cover and take the laser toner cartridge out along the track Note When removing the toner cartridge put the toner cartridge in a protective...

Страница 145: ...132 4 Clean the inside of the printer by gently wiping the shaded area as shown in picture with adry and lint free cloth 5 Wipe the LSU lens of printer gently with dry lint cloth...

Страница 146: ...133 6 Open the auto feed tray and wipe the pickup roller gently with dry lint cloth...

Страница 147: ...134 Note the machine with the ADF should be regularly cleaned removing dirt on the top cover of the ADF Please wipe the place as shown in figure with a soft cloth...

Страница 148: ...ar ignition sources as the toner inside it is inflammable and may cause fire Please pay attention to toner leakage while it is taking out or disassembled In case of toner leakage skin contact with ton...

Страница 149: ...ge please pay attention while taking it out to avoid spattering Please place the toner cartridge taken out on paper to avoid large scale spattering of toner When installing do not touch the surface of...

Страница 150: ...ake the toner cartridge out 4 Open the package of the new toner cartridge and hold the toner cartridge handle to shake it left and right for 5 6 times so that the toner inside can be uniformly dispers...

Страница 151: ...mponent with toner cartridge installed and install it inside the printer along the inner track of printer to finish installing 8 Close the front cover Replace the drum assembly steps are as follows 1...

Страница 152: ...ue button on the left side of drum component with left hand and lift the toner cartridge handle with right hand at the same time to take the toner cartridge out 4 Open the package of new drum componen...

Страница 153: ...nt along the inner track to finish installing toner cartridge 6 Take the drum component with toner cartridge installed and install it inside the printer along the inner track of printer to finish inst...

Страница 154: ...optional trays Each tray can hold up to 550 pieces of 80g m paper If you want to buy optional trays please contact the local dealer who has purchased the printer 1 Turn off the printer 2 Unplug the p...

Страница 155: ...nal tray you need to update the printer status again For how to update the printer status see Updating the optional tray status Note For precautions on loading paper see Paper and Print Media For the...

Страница 156: ...he electrical outlet and then unplug the power cord from the printer 3 Lift the printer body with both hands and remove the optional trays After removing the optional tray you need to update the print...

Страница 157: ...stall the printer driver please refer to How to install Windows printer driver for installation 2 Enter the Start menu Control panel view Device and Printer 3 Right click the printer icon and select P...

Страница 158: ...tridge is installed correctly The paper is correctly loaded into the tray The interface cable between the printer and the computer is connected correctly The correct printer driver has been selected a...

Страница 159: ...146 2 Gently pull the jammed paper out 3 Install paper tray...

Страница 160: ...e laser toner cartridge out along the track For the purpose of preventing printing quality from affecting by the exposure of photosensitive drum please put the laser toner cartridge inside the protect...

Страница 161: ...ll the laser toner cartridge again and close the front cover then the printer will recover printing 14 1 2 Paper Jam in the Fuser Unit Note When papers jammed in fuser unit are taken out please pay at...

Страница 162: ...149 1 Open the front cover and then remove the laser toner cartridge along the guide rail 2 Open the rear cover...

Страница 163: ...150 3 Open the fuser door using the handles on both sides 4 Gently pull the jammed paper out...

Страница 164: ...151 5 Close the back cover after removing the paper jammed 6 Install a new toner cartridge and then close the front cover then the printer will recover printing automatically...

Страница 165: ...152 14 1 3 Duplex Unit Jam 1 Remove the duplex printing unit from the back of the printer 2 Remove the jammed paper from the duplex unit...

Страница 166: ...pers jammed are taken out according to the above steps close the front cover and tidy the papers in paper tray then the printer will recover to print automatically If the printer still does not start...

Страница 167: ...154 14 1 4 A paper jam occurs on the automatic document feeder ADF 1 Open the ADF s top cover 2 Remove the paper jammed from the ADF...

Страница 168: ...ving the paper jamed close the top cover and then the printer will be back to the ready state 4 If it is difficult to remove the paper jammed please try to open the scanner cover and remove it from th...

Страница 169: ...156 14 1 5 Paper jam of auto feed tray 1 Pull out the automatic tray 2 Gently pull the jammed paper out...

Страница 170: ...er reinsert the automatic tray into the printer press the front cover button to open and close the front cover and the printer will resume printing automatically 14 1 6 Paper jam of multi purpose tray...

Страница 171: ...the jammed paper reload paper into the multi purpose tray press the front cover button to open and close the front cover and the printer will resume printing 14 1 7 Paper jam of optional tray 1 Pull o...

Страница 172: ...159 2 Gently pull out the jammed paper 3 After removing the jammed paper reinsert the optional tray into the printer and the printer will resume printing automatically...

Страница 173: ...160 If paper cannot be seen in this area stop and go to the next step 1 Pull out the automatic tray 2 Remove the jammed paper from the automatic tray...

Страница 174: ...l exists after restarting the Make sure the network cable of USB cable is connected correctly Failed to install the driver Check whether the print spooler service is enabled Check the power supply and...

Страница 175: ...ing Note once the printer detects that the toner in cartridge doesn t run low during booting or opening and closing its cover it will set the Low in Toner Continue to Print option enabled before by us...

Страница 176: ...e and User Guide of Printer is checked The printer has not recovered from an internal error such as a paper jam paper empty etc Driver program of printer is not installed correctly The LCD screen prom...

Страница 177: ...dium is used to print Paper Jam Too many papers in paper tray The print media is beyond the usage specification range There is foreign matter in the feed channel The pickup roller is dirty Internal pa...

Страница 178: ...lace the original toner cartridge Please use the print media within the specification range Clean the paper path Clean the platen glass White spots The print media that does not meet usage specificati...

Страница 179: ...background or gray background appears when copying and scanning the platen glass may be dirty Please use the print media within the specification range Clean or replace toner cartridge Clean the pape...

Страница 180: ...anuscript and then carry out copying and scanning The toner does not adhere to the paper The print media that does not meet usage specification is used For example the media is damp or too rough The i...

Страница 181: ...ity setting please see Chapter 10 3 3 The fax received is somewhat blank or of poor quality The fax sending faxes may have a fault The telephone line may have a fault due to noise Check the printer th...

Страница 182: ...nsmit with a higher resolution A prompt of Communication Failure appears in printing the fax confirmation report The telephone line may suffer from temporary noise or electrostatic interference Please...

Страница 183: ...um and package About 14 7kg Touch screen Dimension 3 5 capacitive touch screen Resolution 320 480 RGB565 Print Environment Optimal Printing Temp Range 10 32 Print humidity range 20 RH 80 RH Power Volt...

Страница 184: ...2472MHz Wi Fi 5GHz 5150MHz 5350MHz 5470MHz 5725MHz Wi Fi 5 8GHz 5745MHz 5825MHz Maximum output power Declaration for EU Compliance WLAN 2 4GHz 19 00dBm EIRP WLAN 5GHz 17 00dBm EIRP WLAN 5 8GHz 13 50d...

Страница 185: ...SMB and USB 15 5 Fax specification Fax Type Black and white Modem Speed 33 6Kbps Fax Memory 650 pages Encoding MH MR MMR JBIG Compatibility ITU T sg3 ECM Resolution Standard fine super fine picture O...

Страница 186: ...Company Name PANTUM USA CO LTD Office address 13875 Ramona Ave Chino CA 91710 TEL 626 965 6662 FCC Compliance Statement This device complies with Part 15 of the FCC Rules Operation is subject to the...

Страница 187: ......

Отзывы: