background image

– 170 –

Chapter 6 Playback — Thumbnail operation

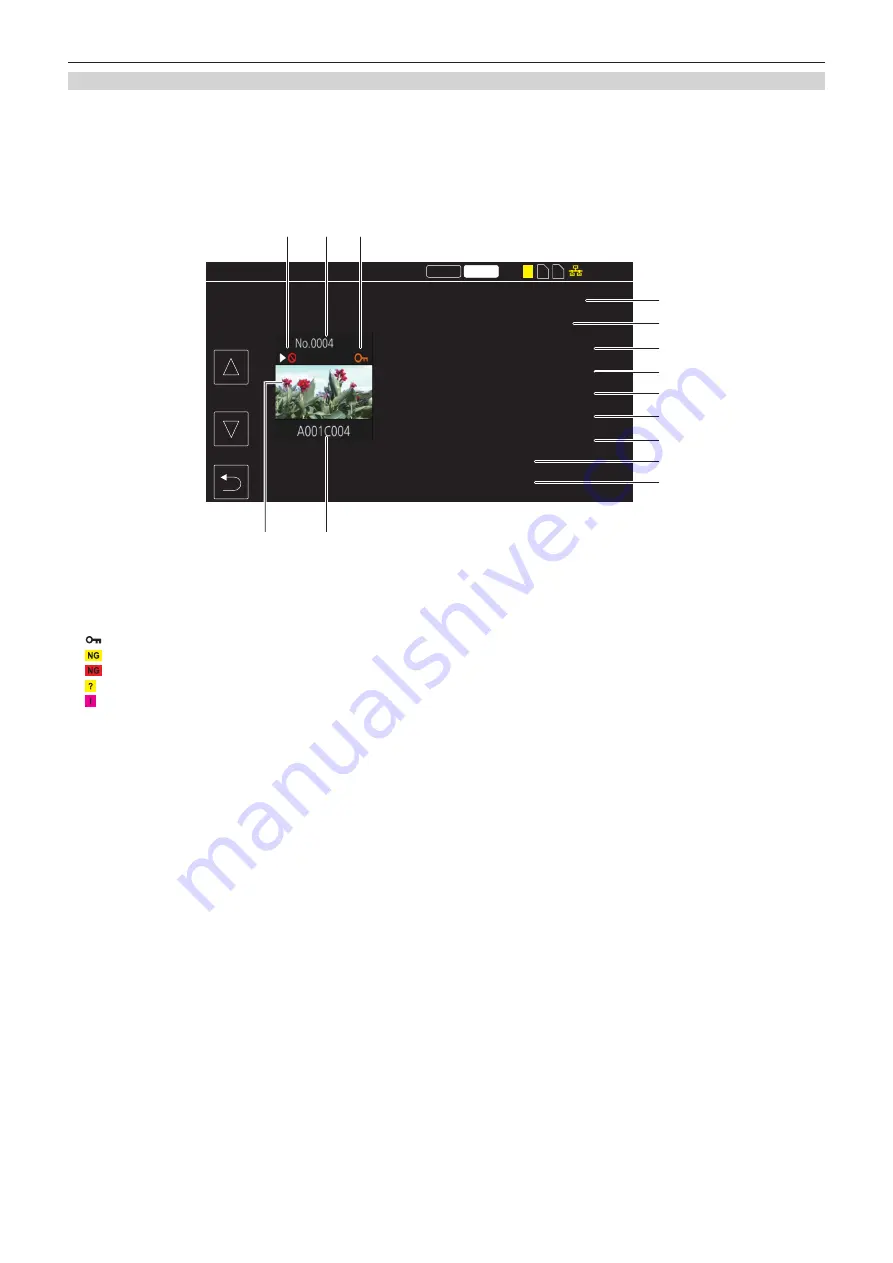
Display of clip information

Displays the information of the clip where the cursor is positioned.

Move the yellow cursor to the clip to display the clip information.

Select the [THUMBNAIL] menu 

 [CLIP] 

 [INFORMATION].

The clip information is displayed.


r

Clip information

00:01:00.17
00000000
2019 OCT 27
12:43:07(GMT+09:00)
00:00:23.15
3840x2160/29.97p
MOV HEVC LonG 150M
60fps
HD

2 3

14.6V

P2

MOV

1

1

2

3

6

4

5

7

8

9

10
11

12
13
14

START TC
START UB
DATE
TIME
DURATION
PIXEL/FREQ
CODEC
FRAME RATE
GAMMA

CLIP INFORMATION

Clip that cannot be played back

This is displayed when the clip cannot be played back with the camera because the system frequency is different, etc.

Thumbnail number

Protect status of the clip/defective clip/unknown clip/incomplete clip

This is displayed when the clip is protected.

This is displayed for a defective P2 clip that may be repaired.

This is displayed for a defective P2 clip that cannot be repaired.

:

 This is displayed for a P2 clip with a different format for P2 standard.

This is displayed for a P2 clip when the clip is recorded over multiple memory cards, and any of those memory cards are not inserted.

Thumbnail image

Clip name

6  [START TC]

Displays the time code value at the start of the recording.

[START UB]

Displays the user bits value at the start of the recording.

[DATE]

Displays the date of the recording.

[TIME]

Displays the time at the start of recording.

10 

[DURATION]

Displays the time length of the clip.

11 

[PIXEL/FREQ]

Displays the recording format of the clip.

12 

[CODEC]/[CODEC/AUDIO]

Displays the recording file format and the recording codec of the clip.
Displays the number of bits of the audio of the clip when recording format is AVC-Intra 100/AVC-Intra 50.

13 [FRAME RATE]

Displays the recording frame rate of the clip.
This camera does not support variable frame rate recording function and this item is not displayed in clips recorded by this camera.

14 [GAMMA]

Displays the gamma of the clip.

Содержание AJ-CX4000

Страница 1: ... Recorder Before using this product be sure to read Read this first pages 2 to 7 Before operating this product please read the instructions carefully and save this manual for future use ENGLISH DVQP2127YA W1219HO1040 YI Model No AJ CX4000G GJ ...

Страница 2: ... To prevent risk of fire hazard due to overheating ensure that curtains and any other materials do not obstruct the ventilation CAUTION Do not lift the unit by its handle while the tripod is attached When the tripod is attached its weight will also affect the unit s handle possibly causing the handle to break and hurting the user To carry the unit while the tripod is attached take hold of the trip...

Страница 3: ...ion against harmful interference in a residential installation This equipment generates uses and can radiate radio frequency energy and if not installed and used in accordance with the instructions may cause harmful interference to radio communications However there is no guarantee that interference will not occur in a particular installation If this equipment does cause harmful interference to ra...

Страница 4: ...nic Marketing Europe GmbH Panasonic Testing Centre Winsbergring 15 22525 Hamburg Vokietija Česky Prohlášení o shodě DoC Společnost Panasonic Corporation tímto prohlašuje že tento výrobek je ve shodě se základními požadavky a dalšími příslušnými ustanoveními směrnice 2014 53 EU Zákazníci si mohou stáhnout originál DoC pro naše produkty RE z našeho serveru DoC http www doc panasonic de Kontakt na Au...

Страница 5: ...servera http www doc panasonic de Lūdzam sazināties ar pilnvaroto parstāvi Panasonic Marketing Europe GmbH Panasonic Testing Centre Winsbergring 15 22525 Hamburg Vācijā Română Declaraţie de Conformitate DoC Panasonic Corporation declară prin prezenta că acest produs este conform cu cerinţele esenţiale şi alte prevederi relevante ale Directivei 2014 53 UE Clienţii pot descărca o copie a DoC pentru ...

Страница 6: ...llection and recycling please contact your local authority dealer or supplier Penalties may be applicable for incorrect disposal of this waste in accordance with national legislation Note for the battery symbol bottom symbol This symbol might be used in combination with a chemical symbol In this case it complies with the requirement set by the Directive for the chemical involved TO REMOVE BATTERY ...

Страница 7: ... відеокамери AJ CX4000 відповідають Технічному регламенту радіообладнання Повний текст декларації про відповідність доступний на веб сайті https service panasonic ua розділ Технічне регулювання Частота 1575 42 МГц GPS Максимальна потужність передачі N A Предупреждение Следуйте нижеприведённым правилам если иное не указано в других документах 1 Устанавливайте прибор на твёрдой плоской поверхности з...

Страница 8: ...o that was recorded by a consumer engaged in a personal and non commercial activity To play back AVC Video that was obtained from a video provider licensed to provide the video Visit the MPEG LA LLC website http www mpegla com for details f f Separate license contract with MPEG LA is required to record in a memory card with this product and to distribute that card to end users for a profit The end...

Страница 9: ...ocument are indicated by page 00 r r Terminology f f SD memory card SDHC memory card and SDXC memory card are referred to only as SD card unless distinguished otherwise f f A memory card with the expressP2 logo is referred to as a expressP2 card f f A memory card with the microP2 logo is referred to as a microP2 card f f expressP2 card and microP2 card are referred to only as a P2 card unless dist...

Страница 10: ...enu 83 RECORDING menu 95 NETWORK menu 97 SYSTEM menu 102 OTHERS menu 103 OPTION menu 107 Factory setting value of the scene file 108 SCENE FILE menu 108 Target items for scene file setup file initialization 111 THUMBNAIL menu 111 CAMERA menu 111 SCENE FILE menu 112 AUDIO menu 114 VIDEO OUT LCD VF menu 115 RECORDING menu 117 NETWORK menu 117 SYSTEM menu 118 OTHERS menu 118 OPTION menu 119 Chapter 5...

Страница 11: ...output status 186 Chapter 9 Network Connection 187 Network connection 188 Available functions 188 Preparing for connection 189 For the wireless module AJ WM50 189 For the wired LAN 189 Network settings 190 Wireless LAN settings 190 Wired LAN settings 191 Specifying the network settings using the settings tool 192 Confirming the network status 194 Connecting to the iPhone iPad or Android terminal 1...

Страница 12: ...Before using the camera read this chapter Chapter 1 Overview ...

Страница 13: ...the management of the recorded contents r r Cautions when throwing memory cards away or transferring them to others Formatting memory cards or deleting data using the functions of the camera or a computer will merely change the file management information it will not completely erase the data on the cards It is recommended to completely erase the data in following method when discarding conveying ...

Страница 14: ...d by such mischief f f Use the camera on a network where safety is secured by using a firewall etc f f When using the camera on a system where a PC is connected make sure that checking and cleaning of infection by computer virus and malicious program is performed periodically f f In order to prevent malicious attacks use the authentication system and change the default setting values by using 8 ch...

Страница 15: ... 15 Chapter 1 Overview Accessories Accessories Mount cap already attached to the product page 20 Shoulder strap page 44 NOTE t t Appropriately discard the packing materials after taking the product out ...

Страница 16: ...the confirmation message is displayed select YES The camera will be initialized in accordance to the region selected in Step 2 The camera will automatically restart Once the setting for AREA SETTINGS is completed the TIME ZONE screen is displayed NOTE t t Once this is set the AREA SETTINGS screen is not displayed from the next startup t t To change the region of use set with the OPTION menu AREA S...

Страница 17: ...n is displayed NOTE t t The setting for the date time of the camera changes together with the time zone settings t t This can also be set with the OTHERS menu CLOCK TIME ZONE CLOCK SETTING Set the year month date and time CLOCK SETTING SET 0 0 1 2019 JAN 1 Set the year month date and time 2 Select SET Once the setting is complete the camera image screen is displayed on the LCD monitor NOTE t t Thi...

Страница 18: ...d 2 microP2 card 2 Visit the support desk at the website 2 Memory cards page 52 1 A battery holder is provided as standard on the main unit 2 For the latest information not included in these Operating Instructions refer to the support desk at the following website https pro av panasonic net Expanded configuration devices The following devices are also available in addition to the basic configurati...

Страница 19: ...This chapter describes the names functions and operations of parts on the camera Chapter 2 Description of Parts ...

Страница 20: ... lever After mounting the lens to the lens mount tighten the lens lever to secure the lens 9 LIGHT switch Select how to turn on off the video light connected to the LIGHT terminal AUTO When the video light is left turned on the light is illuminated at the same time that recording starts on the camera and goes out at the same time that recording stops MANUAL The light is illuminated according to wh...

Страница 21: ... the video light etc f f Mounting hole size 1 4 20 UNC screw length 6 mm or shorter 18 LIGHT terminal Connect a video light 50 W or less The remaining battery level drops sharply when the video light is illuminated When using a video light using a battery of 90 Wh or more is recommended 19 Microphone holder mounting section Mounts the microphone holder AJ MH800G optional 20 LENS terminal Connects ...

Страница 22: ...rded to the audio channel 1 or the audio channel 3 and R CH is recorded to the audio channel 2 or the audio channel 4 respectively 4 AUDIO SELECT CH1 3 AUDIO SELECT CH2 4 switch Select the audio channel to adjust in the AUDIO menu REC CH SETTINGS VOL SELECT AUDIO SELECT CH1 3 switch Switches the method to adjust the recording level for the audio channel 1 or audio channel 3 with AUTO MANU automati...

Страница 23: ...s or microphone 11 MIC IN terminal Connects an external microphone optional f f When using the phantom microphone set to the AUDIO menu INPUT SETTINGS FRONT MIC POWER ON When it is set to ON and a microphone is not connected low frequency noise may occur This is not a problem when a microphone is connected ...

Страница 24: ... audio channel 1 and the audio channel 2 or the audio channel 3 and the audio channel 4 Set to the MIX signal in the AUDIO menu OUTPUT SETTINGS MONITOR SELECT MIX CH2 4 Outputs audio signal of the audio channel 2 or the audio channel 4 MONITOR SELECT switch Audio channel selector switch CH1 2 CH3 4 CH1 3 Audio channel 1 Audio channel 3 ST Stereo output from audio channels 1 and 2 Stereo output fro...

Страница 25: ...of light entering the MOS sensor to 1 4 3 1 16ND Reduces the amount of light entering the MOS sensor to 1 16 4 1 64ND Reduces the amount of light entering the MOS sensor to 1 64 Refer to the following table to switch the CC FILTER and ND FILTER dials according to the shooting conditions Shooting conditions CC FILTER dial ND FILTER dial Sunset sunrise inside studio A 3200 K 1 CLEAR Outdoors in the ...

Страница 26: ...signals output to the memory viewfinder and video monitor from the camera unit CAM ON Video captured on the camera is output and the auto knee function is activated Instead of the auto knee function the dynamic range stretcher DRS function can be assigned CAM OFF Video captured on the camera is output and the auto knee function is not activated The knee point is fixed to the level set in the SCENE...

Страница 27: ...stop playback 8 FWD button It will perform fast playback when this is pressed during playback It will play back from the start of the next clip when this is pressed while paused during a playback 9 PLAY PAUSE button Plays back a clip Playback is paused when this is pressed during the playback 10 SDI OUT 2 CHARACTER switch Controls the superimposing of characters into the video output from the SDI ...

Страница 28: ...uperimposing of characters is set in the VIDEO OUT LCD VF menu SDI OUT1 SDI OUT CHAR 15 SDI OUT2 terminal This is the video output terminal for the monitor Select an output signal in the VIDEO OUT LCD VF menu SDI OUT2 OUT FORMAT Superimposing of characters can be set with the SDI OUT 2 CHARACTER switch independently of the SDI OUT1 terminal NOTE t t Use 5C FB or higher cable to connect to the SDI ...

Страница 29: ...is removed while the power is on a residual image might remain in the LCD screen This is not a malfunction It will disappear if the screen is left as it is f f At lower temperatures residual images sometimes appear to increase on the screen This is not a malfunction 4 OPEN button This is used to open the LCD monitor 5 THUMBNAIL button Press this button to display the thumbnail screen on the LCD mo...

Страница 30: ...he setting position of the DISPLAY switch and the TCG switch UB Displays the user bits TC Displays the time code COUNTER Displays the counter data 4 TCG switch Sets the advance mode for the built in time code generator F RUN Use this to advance the time code continuously regardless of the memory card recording operation Set to this position to for example set the time code to the current time or e...

Страница 31: ...Flashes or illuminates if something unusual occurs in the memory 3 STREAMING lamp Illuminates in orange when the camera is streaming 4 Back tally switch Controls the action of the back tally lamp and the rear tally lamp ON Enables the back tally lamp and the rear tally lamp OFF Disables the back tally lamp and the rear tally lamp 5 Back tally lamp When the back tally switch is set to ON the lamp a...

Страница 32: ...er value is displayed Time counter display Displays the time code user bits counter data 2 Remaining memory card capacity display bar Displays the remaining memory card capacity with seven segments The remaining memory card capacity time indicated by one segment is approximately three minutes Segments go out one by one approximately every three minutes 3 Remaining battery level display bar Display...

Страница 33: ...Before you use the camera mount the battery and lens following the procedures in this chapter The mounting of accessories is also described in this chapter Chapter 3 Preparation ...

Страница 34: ...ded t t Before you use a battery charge it with a battery charger For details on charging refer to each instruction operation t t When using the light Ultralight 2 using a battery of 90 Wh or more is recommended Attaching and setting the battery Using Anton Bauer batteries Anton Bauer battery Release lever 1 Mount the Anton Bauer battery 2 Insert the battery terminal and slide in the direction of ...

Страница 35: ...ernal DC power supply if the external DC power supply has a power switch 3 Turn the power switch of the camera to j ON r r External DC power supply Connect after making sure that the output voltage of the external DC power supply is compatible with the rated voltage of the camera Select an output amperage for the external DC power supply with a margin above the total amperage of the connected devi...

Страница 36: ... switch of the camera to j ON If the operations are performed in reverse the camera may malfunction because the external DC power supply output voltage rises too slowly t t When power is supplied from the DC IN terminal the light circuit does not function The light circuit can be used only when power is supplied from the Anton Bauer battery plate t t When connecting a battery to the DC IN terminal...

Страница 37: ... of the lens to mount the lens Fig 2 3 Lower the lens lever to firmly clamp the lens Fig 3 4 Secure the cable through the cable holder and connect it to the LENS terminal Fig 4 5 Perform lens flange back adjustments For details refer to Adjusting lens flange back page 38 NOTE t t For handling the lens refer to the lens operating instructions t t For details regarding the current from the LENS term...

Страница 38: ...nce ring to bring the chart into focus 7 Set the zoom ring to the wide angle end position and turn the F f Flange focus ring to bring into focus At this time do not move the distance ring 8 Repeat steps 5 to 7 until the lens is in focus at both the telephoto and wide angle positions 9 Firmly tighten the F f Flange focus ring clamping screw NOTE t t F b Lens flange back ring may be indicated on som...

Страница 39: ...H SAW f f R H PARA f f R V SAW f f R V PARA f f G H SAW f f G H PARA f f G V SAW f f G V PARA f f B H SAW f f B H PARA f f B V SAW f f B V PARA 6 If the lens is equipped with an extender function turn on the extender function and repeat steps 2 to 5 Adjustment values are stored on the camera as a single lens file data using two patterns for when the lens is equipped and not equipped with the exten...

Страница 40: ...omatic aberration compensation function visit the support desk at the following website https pro av panasonic net Operation of chromatic aberration compensation function Operate in following steps when a chromatic aberration compensation function compatible lens is mounted to the camera 1 Mount the lens on the camera and connect the lens connector to the camera 2 Set to the CAMERA menu CAC ADJ CA...

Страница 41: ...mber to delete with LIST DELETE A confirmation screen is displayed 3 Select SET The file is deleted When the chromatic aberration compensation data is not functioning properly When the chromatic aberration compensation function is not functioning properly or when the chromatic aberration compensation data is not loaded normally an error message is displayed on the viewfinder Error message Meaning ...

Страница 42: ...nd adjusting the lens t t When an error message is also not displayed while the chromatic aberration compensation function is not functioning the software version of the lens might be old Contact the manufacturer of the lens you are using ...

Страница 43: ...3 4 Switch the AUDIO IN CH1 to AUDIO IN CH4 switches to FRONT in accordance to the audio channel to record Using the wireless microphone receiver Fig 1 1 Remove the cover to insert the wireless microphone receiver and secure it with the screws Fig 1 2 Switch the AUDIO IN CH1 to AUDIO IN CH4 switches to W L in accordance to the audio channel to record 3 When using the 2 channel wireless microphone ...

Страница 44: ...the pan head screw Removing the camera from the tripod adaptor While holding the red lever down move the black lever in the direction of the arrow and slide the camera backward to remove it Red lever Black lever NOTE t t If the tripod adaptor pin does not return to its original position after the camera has been removed hold the red lever down and move the black lever in the direction of the arrow...

Страница 45: ... 45 Chapter 3 Preparation Mounting accessories Attaching the rain cover The figure below shows an example of use of the rain cover SHAN RC700 optional Tighten the cord Secure with the surface fastener ...

Страница 46: ...e built in battery with the following procedure 1 Confirm that the power switch is set to h standby 2 Connect the battery or the external DC power supply to the camera For details on the connection of the battery or the external DC power supply refer to Power supply page 34 3 Leave the camera for approximately four hours The built in battery will be charged 4 Set the power switch to j ON and confi...

Страница 47: ...accuracy of the clock is approximately 30 seconds per month Check and reset the time when accurate time is required r r Time zone table Time difference Region Time difference Region 00 00 Greenwich 01 00 Central Europe 00 30 01 30 01 00 Azores 02 00 Eastern Europe 01 30 02 30 02 00 Mid Atlantic 03 00 Moscow 02 30 03 30 Tehran 03 00 Buenos Aires 04 00 Abu Dhabi 03 30 Newfoundland 04 30 Kabul 04 00 ...

Страница 48: ...ecording target in the RECORDING menu REC MEDIA 6 Close the slot cover Inspecting the camera unit 1 Set the zoom to the electric zoom mode and check the behavior of the electric zoom Ensure that the image changes between telescopic and wide angle 2 Set the zoom to the manual zoom mode and check the behavior of the manual zoom Rotate the manual zoom lever and ensure that the image changes between t...

Страница 49: ...UDIO SELECT CH2 4 switch to MANU 3 Turn the AUDIO LEVEL CH1 3 AUDIO LEVEL CH2 4 dial Turn to the right to increase the level display Inspecting the earphones and built in speaker 1 Turn the MONITOR dial and confirm that the built in speaker volume changes 2 Connect earphones to the PHONES terminal Confirm that the built in speaker is muted and the output from the microphone is directed to the earp...

Страница 50: ... the number in the counter display changes regardless of the recording status 7 Set the DISPLAY switch to UB Ensure that the user bits displayed in the counter display area is correct 8 Ensure that the time zone date and time are correct by selecting the OTHERS menu CLOCK TIME ZONE CLOCK SETTING ...

Страница 51: ...the memory card to use differs depending on the recording mode and the recording format Use memory cards compatible with the Speed Class UHS Speed Class or Video Speed Class The recording may stop suddenly when a memory card not compatible with the required Speed Class is used f f Speed Class UHS Speed Class and Video Speed Class are the speed specification regarding continuous writing Check the d...

Страница 52: ...rd or SD card Insert with the label side facing up f f The status of the memory card is displayed with the card access lamp of the inserted card slot Fig 2 page 53 5 Close the slot cover NOTE t t To prevent cards from falling out dust from entering and reduce the risk of exposure to static electricity close the slot cover before moving the camera t t Be sure to format P2 cards only on a P2 device ...

Страница 53: ... switch NOTE t t Set the write protected switch before inserting the card This will not operated when the write protected switch is toggled after inserting the card Status of the card access lamp and the memory card Card access lamp Memory card status Is illuminated green Recording possible Both loading writing are permitted Is illuminated orange Recording target Both loading writing are permitted...

Страница 54: ...pause will not be recorded This includes the case of special recording such as relay recording t t In the interval recording the recording is stopped once when the length of a clip reaches ten hours and recording is automatically resumed after few seconds t t The camera does not support the CPS Content Protection System function of the P2 card so a P2 card formatted with encryption with CPS passwo...

Страница 55: ...he camera t t If data is recorded to the memory card with a computer an error may occur such as an inability to recognize or record to the memory card with the camera t t The memory card to use with the camera should always be formatted on the camera t t The number of the P2 format clips that can be recorded on a single memory card is approximately 1000 Data will not be able to record when it reac...

Страница 56: ...ce it reaches 999 a folder with sequential number added is newly created Also a folder with sequential number added is newly created when the folder name is changed by changing the setting of the camera The folder name will return to 001 when the memory card is formatted 2 Number of pixels R 3840 2160 Y 1920 1080 3 Frame rate A 59 94fps B 50 00fps C 29 97fps D 25 00fps F 23 98fps 4 Video format Q ...

Страница 57: ...f date when the recording is started 5 Hashtag generated from the serial number Four digit number or alphabet NOTE t t The clip name of the card slot 3 will be the same as the clip name of the card slot 2 for the simultaneous recording t t The maximum number of folder and the folder number is 999 The recording is prohibited when it reaches 999 even if number in between is open t t The number of cl...

Страница 58: ...This chapter describes how to operate the screen of this camera how to operate the menu the structure of the menu and details of the menu Chapter 4 Operation ...

Страница 59: ... file into the camera memory and other settings r r OPTION menu A special menu is prepared considering additional functions in the future This is displayed by pressing the MENU button while holding down the SHIFT button Basic operation of the menu The setting of the camera can be changed with the menu in accordance to the shooting scene or recording contents Set data is written and saved in the ca...

Страница 60: ... button pressed and fixing it or press and hold the cursor operation button When operating by touching the LCD monitor Operate by touching the LCD monitor CAMERA SCENE FILE AUDIO VIDEO OUT LCD VF RECORDING NETWORK SYSTEM OTHERS 1 Press the MENU button when not recording The menu is displayed 2 Select the menu to set f f Touch the menu to set The lower level menu is displayed f f The confirmation s...

Страница 61: ...from the displayed menu when selected 3 Menu Moves to one level lower from the displayed menu or to the setting screen when selected 4 Level display Displays the path of the menu to the currently displayed screen 5 SET Confirms the set value when selected NOTE t t The menu displayed in gray characters cannot be changed Initializing the menu Most of the setting values of the menu can be returned to...

Страница 62: ...Protect the clip so it is not mistakenly deleted Select the clip to protect and set the protect DELETE ALL Deletes all the clips displayed in the thumbnail screen The clip that is not displayed in the thumbnail screen is not deleted SELECT Select the clip to delete and delete it COPY ALL Copies all clips to a different memory card SELECT Selects the clip to copy and copies the clip to a different ...

Страница 63: ...ack the last approximately three seconds of the previously shot clip LCD VF DETAIL Emphasizes the contour of the image in the viewfinder or LCD monitor to make it easier to focus VF COLOR Selects whether to display viewfinder images in color or in black and white This is interlocked with the setting value in the VIDEO OUT LCD VF menu VF COLOR STREAMING START Assigns the function for starting or st...

Страница 64: ...SER 3 button Factory setting DS GAIN USER4 Sets the function to assign to the USER 4 button Factory setting Y GET USER5 Sets the function to assign to the USER 5 button Factory setting WFM WHITE BALANCE MODE FILTER INH Selects whether to hold or not hold the white balance memory Ach and Bch data for each CC filter ON Holds Ach and Bch memory data two memories regardless of the CC filter OFF Holds ...

Страница 65: ...C FILTER dial is set to C 2730K 15000K f f When the CC FILTER dial is set to D 2890K 15000K Factory setting 3200K USER SW GAIN S GAIN Selects the super gain value to enable when S GAIN is assigned to the USER button f f When set to ALL the display will switch in the order of 30dB 36dB 42dB and normal gain every time the USER button is pressed The items that can be set are as follows f f 30dB 36dB ...

Страница 66: ...s that can be set are as follows f f ON OFF Factory setting OFF F16 ADJ Iris is set to F16 only when set to ON Adjusts the iris so that it becomes F16 at the lens side When moved from the F16 ADJ setting screen it is forcefully switched to OFF The items that can be set are as follows f f ON OFF Factory setting OFF LENS FILE ADJ NOTE t t Data adjusted with LENS FILE ADJ can be saved as a lens file ...

Страница 67: ...s camera gain OFF Does not perform the operation of the AGC function that automatically adjusts camera gain Factory setting OFF AGC LIMIT Sets the maximum gain value during AGC operation The items that can be set are as follows f f 3dB 6dB 12dB 18dB Factory setting 6dB AGC POINT Sets the F value to switch control from auto iris to AGC during AGC operation The items that can be set are as follows f...

Страница 68: ... file page 108 FILE SELECT Selects the scene file 1 to 6 The items that can be set are as follows f f F1 F2 F3 F4 F5 F6 NAME EDIT Edits the name of the scene file selected in the scene file menu Maximum eight characters LOAD SAVE INITIALIZE Loads saves initializes the setting values of the scene file assigned to the current scene file number any one from 1 to 6 LOAD Loads the scene file saved on t...

Страница 69: ...ollows f f 7 7 KNEE APE LEVEL Sets the detail level of high luminosity areas high brightness areas The items that can be set are as follows f f 0 5 DTL GAIN Sets the detail level of the plus direction to make brighter The items that can be set are as follows f f 31 31 DTL GAIN Sets the detail level of the minus direction to make darker The items that can be set are as follows f f 31 31 SKIN TONE D...

Страница 70: ...he skin tone detail The items that can be set are as follows f f 0 31 I CENTER Sets the center position of the upper I axis setting the area that applies the skin tone The items that can be set are as follows f f 0 255 I WIDTH Sets the width of the area that displays the skin tone of the upper I axis that focus on I CENTER The items that can be set are as follows f f 1 3 Q WIDTH Sets the width of ...

Страница 71: ...the CC FILTER dial is set to D 2890K 15000K R GAIN Displays the output of Rch when the WHITE BAL switch is A and automatic white balance is working or when it is preset In the automatic white balance operation the color can also be changed on the Rch axis by changing the output of Rch The items that can be set are as follows f f 400 400 B GAIN Displays the output of Bch when the WHITE BAL switch i...

Страница 72: ...als The items that can be set are as follows f f 99 99 OFF CHROMA PHASE Finely adjusts the chroma phase of the PR signal and PB signal The items that can be set are as follows f f 31 31 MATRIX L MATRIX TABLE Selects the color correction table when the GAIN switch is set to L The items that can be set are as follows f f A B OFF M MATRIX TABLE Selects the color correction table when the GAIN switch ...

Страница 73: ...en red and colors between red and magenta R Mg SAT Corrects the color saturation between red and magenta R Mg PHASE Corrects the hue between red and magenta Mg SAT Corrects magenta color saturation Mg PHASE Corrects the magenta hue Mg B SAT Corrects the color saturation between magenta and blue Mg B PHASE Corrects the hue between magenta and blue B SAT Corrects blue color saturation B PHASE Correc...

Страница 74: ...LE ADJ The items that can be set are as follows f f 100 100 G FLARE Adjusts the Gch flare level The adjusted value of this item is added to the flare adjustment value adjusted in the CAMERA menu LENS FILE ADJ The items that can be set are as follows f f 100 100 B FLARE Adjusts the Bch flare level The adjusted value of this item is added to the flare adjustment value adjusted in the CAMERA menu LEN...

Страница 75: ...ected in GAMMA MODE SEL knee point is set No settings are changed if an item other than VIDEO REC is selected The items that can be set are as follows f f 30 107 BLACK GAMMA Sets the gamma curves of dark areas 8 1 Compresses the dark area 0 Standard state 1 8 Expands dark areas B GAMMA RANGE Sets the maximum level of compression expansion 1 Around 20 2 Around 30 3 Around 40 KNEE SETTING MANUAL KNE...

Страница 76: ...on is ON The items that can be set are as follows f f ON OFF WHITE CLIP LEVEL Sets the white clip level The items that can be set are as follows f f 90 109 LOW SETTING MASTER GAIN Sets the gain value to be assigned to L of the GAIN switch f f 6dB 30dB H DTL LEVEL Sets the intensity of the detail level in the horizontal direction The items that can be set are as follows f f 7 7 V DTL LEVEL Sets the...

Страница 77: ...f 6dB 30dB H DTL LEVEL Sets the intensity of the detail level in the horizontal direction The items that can be set are as follows f f 7 7 V DTL LEVEL Sets the intensity of the detail level in the vertical direction The items that can be set are as follows f f 7 7 DTL CORING Sets the level of signal including noise that does not activate the detail effect The items that can be set are as follows f...

Страница 78: ...e detail level in the vertical direction The items that can be set are as follows f f 7 7 DTL CORING Sets the level of signal including noise that does not activate the detail effect The items that can be set are as follows f f 0 60 DTL FREQ Sets the thickness of the detail The items that can be set are as follows f f 7 7 LEVEL DEPEND When the detail of luminosity signal is emphasized details in t...

Страница 79: ... DNR Changes the noise reduction setting and adjusts the noise reduction effect The items that can be set are as follows f f OFF 1 2 CAMERA SETTINGS DETAIL Enables disables the detail function The items that can be set are as follows f f ON OFF GAMMA Enables disables the gamma correction The items that can be set are as follows f f ON OFF TEST SAW Enables disables the test signal The items that ca...

Страница 80: ...ay a warning when the reception status of the wireless microphone receiver is poor The items that can be set are as follows f f ON OFF Factory setting OFF WIRELESS TYPE Selects the type of wireless microphone receiver SINGLE Selects a single channel type wireless microphone receiver DUAL Selects a double channel type wireless microphone receiver Factory setting SINGLE REC CH SETTINGS VOL SELECT Se...

Страница 81: ...h OFF The F AUDIO LEVEL dial is disabled regardless of the setting of the AUDIO IN CH4 switch Factory setting OFF CH1 LEVEL Select auto manual for the method to adjust the recording level of the audio channel 1 The items that can be set are as follows f f AUTO MANUAL Factory setting AUTO CH2 LEVEL Select auto manual for the method to adjust the recording level of the audio channel 2 The items that...

Страница 82: ...cording level for audio channel 1 is manual The items that can be set are as follows f f ON OFF Factory setting OFF CH2 LIMITER Enables disables the limiter when the method to adjust the recording level for audio channel 2 is manual The items that can be set are as follows f f ON OFF Factory setting OFF CH3 LIMITER Enables disables the limiter when the method to adjust the recording level for audi...

Страница 83: ...ttery level is exhausted The items that can be set are as follows f f ON OFF Factory setting OFF MEDIA NEAR END Sets whether to sound the alarm when the remaining memory card capacity is near end The items that can be set are as follows f f ON OFF Factory setting OFF MEDIA END Sets whether to sound the alarm when the remaining memory card capacity is exhausted The items that can be set are as foll...

Страница 84: ...I OUT1 terminal ON Superimposes OFF Does not superimpose Factory setting OFF SDI OUT ZEBRA Sets whether to superimpose the zebra signal to the output from the SDI OUT1 terminal The setting of the zebra signal is in accordance with the following setting in the VIDEO OUT LCD VF menu EI ASSIST f f ZEBRA1 DETECT ZEBRA2 DETECT ZEBRA2 ON Superimposes OFF Does not superimpose Factory setting OFF SDI OUT ...

Страница 85: ...ment Factory setting OFF NOTE t t This cannot be set when set to the RECORDING menu REC FUNCTION REC MODE INTERVAL SDI OUT ZEBRA Sets whether to superimpose the zebra signal to the output from the SDI OUT2 terminal The setting of the zebra signal is in accordance with the following setting in the VIDEO OUT LCD VF menu EI ASSIST f f ZEBRA1 DETECT ZEBRA2 DETECT ZEBRA2 ON Superimposes OFF Does not su...

Страница 86: ... set when HDMI TC OUT in HDMI OUT is enabled ON Controls the recording operation of the external equipment OFF Does not control the recording operation of the external equipment Factory setting OFF NOTE t t This cannot be set when set to the RECORDING menu REC FUNCTION REC MODE INTERVAL SD DOWNCON MODE Sets the mode of the SD down converter output signal from the SDI OUT2 HDMI OUT terminal SIDE CR...

Страница 87: ...rmally status is not displayed This is displayed when the mode check screen is displayed by pressing the MARKER SEL MODE CHECK switch toward the MCK side Factory setting ON TC Displays hides the time code user bits and counter The items that can be set are as follows f f ON OFF Factory setting OFF TC ON COLOR BAR Selects whether to display the time code user bits and counter when color bar is outp...

Страница 88: ...of the device acquired from the bonding device This is not displayed when the device status cannot be acquired from the bonding device even if ON is selected The items that can be set are as follows f f ON OFF Factory setting ON REC REMOTE Displays hides the remote control status of the external equipment connected to the SDI OUT1 SDI OUT2 HDMI terminals The items that can be set are as follows f ...

Страница 89: ...atus of the super black OFF Does not display Factory setting S IRIS NOTE t t The display of the F value and the display of the iris override are linked The F value is displayed while changing the iris override even when set to S or OFF ZOOM FOCUS Switches the unit of zoom and focus values NUMBER Displays the zoom and focus in the position value between 000 00 and 999 99 mm feet Displays the zoom i...

Страница 90: ...the MARKER SEL MODE CHECK switch is pushed to the MCK side The cause for the viewfinder lamp is illuminated is displayed by with black and white inverted The items that can be set are as follows f f ON OFF Factory setting ON FUNCTION Sets whether to display the FUNCTION screen when the MARKER SEL MODE CHECK switch is pushed to the MCK side The items that can be set are as follows f f ON OFF Factor...

Страница 91: ...aspect ratio of the frame marker The frame marker is not displayed when OFF is selected The items that can be set are as follows f f 4 3 13 9 14 9 1 85 1 2 35 1 OFF Factory setting OFF FRAME COLOR Sets the color of the frame marker The items that can be set are as follows f f WHITE BLACK RED GREEN BLUE YELLOW Factory setting WHITE SDI OUT2 MARKER CENTER MARKER Switch the type of the center marker ...

Страница 92: ...e for the safety zone marker 1 Box 2 Corners OFF Does not display Factory setting 2 SAFETY AREA Sets the size of the safety zone marker It can be set in 1 steps with the ratio of length to width constant The items that can be set are as follows f f 80 100 Factory setting 90 FRAME MARKER Sets the aspect ratio of the frame marker The frame marker is not displayed when OFF is selected The items that ...

Страница 93: ...he intensity of the peaking display The items that can be set are as follows f f LOW MID HIGH Factory setting MID PEAKING COLOR Sets the color of the peaking display The items that can be set are as follows f f RED GREEN WHITE Factory setting RED BLACK WHITE Enables disables the monochrome display ON Enables the monochrome display OFF Disables the monochrome display DURING PEAKING Enables the mono...

Страница 94: ...rm monitor The items that can be set are as follows f f 0 25 50 Factory setting 25 LED GAIN 0dB Sets whether to illuminate the lamp on the viewfinder when the gain is anything other than 0 dB The items that can be set are as follows f f ON OFF Factory setting ON DS GAIN Sets whether to illuminate the lamp on the viewfinder when DS GAIN incremental gain is working The items that can be set are as f...

Страница 95: ...that can be selected are as follows f f SLOT1 SLOT2 SLOT3 CLIP NAME CAM INDEX Sets the CAM INDEX used in the name for the MOV format file to be recorded Set one upper case alphabetical character This is used as a value to be stored in the volume label of the memory card The items that can be set are as follows f f A Z Factory setting A NEXT CARD COUNT Sets the CARD COUNT used in the name for the M...

Страница 96: ... HEVC LongGOP 200M 2160 59 94p HEVC LongGOP 100M 2160 59 94p 420LongGOP 150M 2160 50 00p HEVC LongGOP 200M 2160 50 00p HEVC LongGOP 100M 2160 50 00p 420LongGOP 150M 2160 29 97p HEVC LongGOP 150M 2160 29 97p 422LongGOP 150M 2160 29 97p 420LongGOP 100M 2160 25 00p HEVC LongGOP 150M 2160 25 00p 422LongGOP 150M 2160 25 00p 420LongGOP 100M 2160 23 98p HEVC LongGOP 150M 2160 23 98p 422LongGOP 150M or 21...

Страница 97: ...REF Sets the output delay of the time code that is output from the TC IN OUT terminal RECORDING Outputs the recording time code without delay This is used when performing simultaneous recording on two cameras with the time code of this camera as the master SDI OUT1 Matches to the output image from the SDI OUT1 terminal Outputs without delay when the image is not output from the SDI OUT1 terminal F...

Страница 98: ...25fps 14M 1920 1080 25fps 6M 1920 1080 25fps 1M 1280 720 25fps 8M 1280 720 25fps 2M 1280 720 25fps 1M 640 360 25fps 4M 640 360 25fps 1 5M 640 360 25fps 0 7M 320 180 25fps 4M 320 180 25fps 1 5M 320 180 25fps 0 5M Factory setting 640 360 25fps 0 7M f f When FILE FORMAT is set to P2 or MOV and REC FORMAT is set to 1080 59 94i or 1080 29 97p 1920 1080 30fps 14M 1920 1080 30fps 6M 1920 1080 30fps 1M 12...

Страница 99: ...s settings related to NDI HX ACTIVATION Displays whether the NDI HX function is enabled Cannot be changed Not active NDI HX Active STREAMING FORMAT Specifies the streaming format The items that can be set are as follows f f When FILE FORMAT is set to P2 or MOV and REC FORMAT is set to 1080 50p 1920 1080 50fps 24M 1920 1080 50fps 16M 1920 1080 50fps 10M 1920 1080 50fps 8M 1280 720 50fps 14M 1280 72...

Страница 100: ...P The address from 192 168 0 10 through 192 168 0 255 is automatically assigned when the IP address cannot be acquired automatically within one minute SERVER Enables the DHCP server function of the camera Factory setting OFF IP ADDRESS Sets the IP address f f Cannot be set when LAN PROPERTY IPv4 SETTING DHCP CLIENT is selected Factory setting 192 168 0 1 SUBNET MASK Sets the subnet mask f f Cannot...

Страница 101: ... follows f f AUTO CH1 CH6 CH11 Factory setting AUTO CHANNEL 5GHz Sets the channel to be used when connected to the wireless LAN with following items set f f The NETWORK menu WLAN PROPERTY TYPE DIRECT f f The NETWORK menu WLAN PROPERTY BAND 5GHz The items that can be set are as follows f f AUTO CH36 CH40 CH44 CH48 CH100 CH104 CH108 CH112 CH116 CH132 CH136 CH140 CH149 CH153 CH157 CH161 CH165 Factory...

Страница 102: ...NITIALIZE Restores the network setting status to the factory settings EASY IP SETTING Sets the time to accept EASY IP Setup Software The items that can be set are as follows f f DISABLE 20 MIN UNLIMITED Factory setting DISABLE NOTE t t This is fixed to UNLIMITED when NDI HX is selected in NETWORK FUNC EASY IP CAMERA TITLE Configure the individual device names to display in EASY IP Setup Software 1...

Страница 103: ...I 100M 1080 23 98p 422LongGOP 50M 1080 23 98p 422ALL I 100M AUDIO SAMPLE RES Sets the number of bits of the audio to record when recording format is AVC Intra 100 AVC Intra 50 In other recording formats audio is recorded with number of bits fixed to 16 bits or 24 bits The items that can be set are as follows f f 16BIT 24BIT Factory setting 16BIT SHOOTING MODE Sets the shooting mode according to th...

Страница 104: ...g the battery Voltage to display full near end end remaining capacity can be set in the OTHERS menu BATTERY DC IN BATTERY Factory setting DC POWER SUPPLY DC IN BATTERY FULL VOLT Sets the voltage to display full remaining capacity when inputting an external battery from the DC IN terminal The items that can be set are as follows f f 13 0V 17 0V 0 1 V steps Factory setting 15 5V NEAR END VOLT Sets t...

Страница 105: ...lding a system The items that can be set are as follows f f 100 100 Factory setting 0 H PHASE FINE Performs fine adjustment to match horizontal synchronization phase when building a system The items that can be set are as follows f f 100 100 Factory setting 0 COLOR BARS COLOR BARS TYPE Sets the color bar to be used SMPTE Uses the color bars in SMPTE standard FULL Uses the full color bars Factory s...

Страница 106: ...cation of the metadata The position information is not recorded in the metadata if the position information cannot be acquired The items that can be set are as follows f f ON OFF Factory setting ON USB DEVICE CARD READER MODE Switches the camera to the card reader mode A computer or other device can be connected via USB to use as a card reader of the memory card The LCD monitor turns off after app...

Страница 107: ... English Français French Español Spanish Factory setting English f f When AREA SETTINGS is set to AREA 3 English English Français French Deutsch German Español Spanish Italiano Italian Factory setting English f f When AREA SETTINGS is set to AREA 4 English English Français French Español Spanish Factory setting English MENU INITIALIZE Most of the setting values of the menu is returned to the facto...

Страница 108: ... LEVEL 0 DTL FREQ 0 LEVEL DEPEND 0 KNEE APE LEVEL 2 DTL GAIN 0 DTL GAIN 0 SKIN TONE DTL A OFF SKIN TONE DTL B OFF SKIN TONE DTL C OFF SKIN TONE ZEBRA ON SKIN TONE DTL SETTING DETECT TABLE A SKIN DTL EFFECT 16 I CENTER 35 I WIDTH 2 Q WIDTH 2 Q PHASE 0 RB GAIN CONTROL SETTING R GAIN AWB PRE 0 B GAIN AWB PRE 0 R GAIN AWB A 0 B GAIN AWB A 0 R GAIN AWB B 0 B GAIN AWB B 0 AWB A GAIN OFFSET OFF AWB B GAI...

Страница 109: ... 0 V REC KNEE SLOPE 500 V REC KNEE POINT 30 BLACK GAMMA 0 B GAMMA RANGE 1 KNEE SETTING MANUAL KNEE ON KNEE MASTER POINT 93 0 KNEE MASTER SLOPE 99 A KNEE POINT 90 A KNEE LEVEL 107 A KNEE RESPONSE 4 HLG KNEE SW OFF HLG KNEE POINT 55 HLG KNEE SLOPE 10 HI COLOR SW ON WHITE CLIP SETTING WHITE CLIP ON WHITE CLIP LEVEL 109 LOW SETTING MASTER GAIN 0dB H DTL LEVEL 0 V DTL LEVEL 0 DTL CORING 15 DTL FREQ 0 L...

Страница 110: ... GAMMA 0 55 BLACK GAMMA 0 B GAMMA RANGE 1 MATRIX TABLE A COLOR CORRECT ON DRS OFF DRS EFFECT DEPTH 1 DNR 1 CAMERA SETTINGS DETAIL ON GAMMA ON TEST SAW OFF FLARE ON H F COMPE ON 1 When the SCENE FILE menu SYNC SCAN TYPE sec is set and the SYSTEM menu FREQUENCY 59 94Hz is set 2 When the SCENE FILE menu SYNC SCAN TYPE sec is set and the SYSTEM menu FREQUENCY 50 00Hz is set 3 When the SCENE FILE menu ...

Страница 111: ... CONNECT INFORMATION DISPLAY DATA l l CAMERA menu Item SCENE SETUP INITIALIZE SHUTTER SPEED SYNCHRO SCAN l l POSITION1 l l POSITION2 l l POSITION3 l l POSITION4 l l POSITION5 l l POSITION6 l l SW MODE RET SW l l S BLK LEVEL l l AUTO KNEE SW l l SHD ABB SW CTL l l S GAIN OFF l l DS GAIN OFF l l D ZOOM l l USER SW USER1 l l USER2 l l USER3 l l USER4 l l USER5 l l WHITE BALANCE MODE FILTER INH l l SH...

Страница 112: ... SAW l B H PARA l B V SAW l B V PARA l CAC ADJ CAC CONTROL l l LIST DELETE SCENE FILE menu Item SCENE SETUP INITIALIZE FILE SELECT l NAME EDIT l l LOAD SAVE INITIALIZE SYNC SCAN TYPE l l SYNC SCAN l l MASTER DTL l l DTL CORING l l DETAIL SETTING DETAIL l l H DTL LEVEL l l V DTL LEVEL l l DTL FREQ l l LEVEL DEPEND l l KNEE APE LEVEL l l DTL GAIN l l DTL GAIN l l SKIN TONE DTL A l l SKIN TONE DTL B ...

Страница 113: ... R l l G B l l B R l l B G l l COLOR CORRECTION L COLOR CORRECT l l M COLOR CORRECT l l H COLOR CORRECT l l 16 axis independent color correction item PARAMETER l l MASTER PED l l RGB BLACK CONTROL SETTING R PED l l G PED l l B PED l l PEDESTAL OFFSET l l R FLARE l l G FLARE l l B FLARE l l GAMMA MODE SEL l l GAMMA SETTING MASTER GAMMA l l F REC DYNAMIC LEVEL l l F REC BLACK STR LEVEL l l V REC KNE...

Страница 114: ...MATRIX TABLE l l COLOR CORRECT l l HIGH SETTING MASTER GAIN l l H DTL LEVEL l l V DTL LEVEL l l DTL CORING l l DTL FREQ l l LEVEL DEPEND l l MASTER GAMMA l l BLACK GAMMA l l B GAMMA RANGE l l MATRIX TABLE l l COLOR CORRECT l l DRS l l DRS EFFECT DEPTH l l DNR l l CAMERA SETTINGS DETAIL l l GAMMA l l TEST SAW l l FLARE l l H F COMPE l l AUDIO menu Item SCENE SETUP INITIALIZE INPUT SETTINGS FRONT MI...

Страница 115: ...R END l l BATTERY NEAR END CANCEL l l BATTERY END l l MEDIA NEAR END l l MEDIA END l l WARNING l l VIDEO OUT LCD VF menu Item SCENE SETUP INITIALIZE SDI OUT1 OUTPUT SW l l OUT FORMAT l l 3G SDI OUT l l SDI REC REMOTE l l SDI OUT CHAR l l SDI OUT ZEBRA l l SDI OUT HDR l l MARKER SW l l SDI OUT2 OUTPUT SW l l OUT FORMAT l l 3G SDI OUT l l SD SDI EDH l l SDI REC REMOTE l l SDI OUT ZEBRA l l SDI OUT H...

Страница 116: ...LANCE l l DATE TIME l l SHOOTING MODE l l EXTENDER l l D ZOOM l l PLAYBACK STATUS l l MODE CHECK INDICATOR STATUS l l LED l l FUNCTION l l AUDIO l l CAC l l USER SW STATUS l l NETWORK l l SDI OUT1 MARKER CENTER MARKER l l SAFETY MARKER l l SAFETY AREA l l FRAME MARKER l l FRAME COLOR l l SDI OUT2 MARKER CENTER MARKER l l SAFETY MARKER l l SAFETY AREA l l FRAME MARKER l l FRAME COLOR l l LCD VF MAR...

Страница 117: ... SETUP INITIALIZE FORMAT MEDIA CLIP NAME CAM INDEX l NEXT CARD COUNT l REC MEDIA l l FILE SPLIT l l 2 SLOTS FUNC l l PRE REC l l REC FUNCTION REC MODE l l REC MODE HOLD l l INTERVAL TIME l l TC UB DF NDF l l UB MODE l l TC IN OUT SEL l l TC OUT REF l l REC COUNTER l l NETWORK menu Item SCENE SETUP INITIALIZE DEVICE SEL l l NETWORK FUNC l l IP REMOTE ENABLE DISABLE l l USER ACCOUNT l ACCOUNT LIST l...

Страница 118: ...YPE l l SSID l BAND l l CHANNEL 2 4GHz l l CHANNEL 5GHz l l ENCRYPTION l l ENCRYPT KEY l IPv4 SETTING DHCP l l IP ADDRESS l l SUBNET MASK l l DEFAULT GATEWAY l l PRIMARY DNS l l SECONDARY DNS l l INFORMATION STATUS UTILITY NETWORK INITIALIZE EASY IP SETTING l EASY IP CAMERA TITLE l l SYSTEM menu Item SCENE SETUP INITIALIZE FREQUENCY l l FILE FORMAT l l REC FORMAT l l AUDIO SAMPLE RES l l SHOOTING ...

Страница 119: ...l l END INFO l l GENLOCK GENLOCK l l H PHASE COARSE l l H PHASE FINE l l COLOR BARS COLOR BARS TYPE l l TEST TONE l l LED REC TALLY l l ACCESS LED l l LAN LED l l STREAMING LED l l CLOCK CLOCK SETTING TIME ZONE DATE FORMAT l l GPS l l USB DEVICE CARD READER MODE SERVICE MODE INFORMATION VERSION OPERATION TIME UPDATE LANGUAGE l l MENU INITIALIZE OPTION menu Item SCENE SETUP INITIALIZE AREA SETTINGS...

Страница 120: ...This chapter describes the basic procedure for recording This chapter also describes the special recording method Chapter 5 Shooting ...

Страница 121: ...croP2 cards are inserted into two slots the cards are used in the order of card slot 2 3 However if the microP2 card in the card slot 2 is removed and then re inserted the cards will be used in the order of card slot 3 2 The card slot number to be recorded to is held even if the camera is turned off When the camera is next turned on recording can be continued to the memory card inserted in the sam...

Страница 122: ...123 2 Press the AUTO W B BAL switch towards the ABB side to adjust the black balance page 125 3 Press the AUTO W B BAL switch towards the AWB side to re adjust the white balance 3 Point the camera at the subject and adjust the focus and zoom 4 When using the electronic shutter set the shutter mode and shutter speed page 126 NOTE t t When highly bright subjects e g sun or lighting are shot the peri...

Страница 123: ... then release it The switch returns to the central position and the white balance will be automatically adjusted r r White pattern f f A white object cloth or wall near the subject may also be used for the white pattern f f Required size of white pattern is as follows 1 4 or more of the screen width 1 4 or more of the screen height f f Keep bright spotlights out of the screen f f The white pattern...

Страница 124: ...yed Viewfinder and LCD monitor screen displays relating to white balance For details refer to Screen display during shooting page 143 Setting the auto tracking white balance function ATW The camera is equipped with the Auto Tracking White Balance ATW function that automatically tracks the white balance of images according to the lighting conditions Assigns the auto tracking white balance function ...

Страница 125: ...alue is automatically stored in memory NOTE t t Make sure that the lens connector is connected and that the lens aperture is in the close mode t t During black balance adjustment the aperture is set to automatically shut out light t t During recording black balance cannot be adjusted t t Video is not recorded to the memory card even if the REC button is pressed while executing the automatic black ...

Страница 126: ... speed is saved even after the camera is turned off 1 Press the SHUTTER switch positioned at OFF towards ON POSITION1 is enabled 2 Press the SHUTTER switch from ON towards SEL and repeat this operation until the desired shutter mode or shutter speed is displayed on the viewfinder screen f f If all shutter modes and shutter speeds are available the display changes in the following order POSITION1 P...

Страница 127: ...n the video when the flash strobe lights Flash bands may appear only in images shot at the time the flash is fired Using the flash band compensation function The flash band compensation function is activated when there are large changes in brightness at the bottom of the screen regardless of whether there is flash strobe light The flash band compensation function may be activated depending on the ...

Страница 128: ...l Outputs in high dynamic range HDR or standard dynamic range SDR according to the setting of the VIDEO OUT LCD VF menu SDI OUT1 SDI OUT HDR SDI OUT2 terminal Outputs in high dynamic range HDR or standard dynamic range SDR according to the setting of the VIDEO OUT LCD VF menu SDI OUT2 SDI OUT HDR HDMI terminal When set to the VIDEO OUT LCD VF menu HDMI OUT SIGNAL SEL SDI OUT1 2160p outputs accordi...

Страница 129: ...ion when pressing again Y GET Assigns the function for displaying the luminance level of the image at the position indicated by the square marker displayed near the center D ZOOM Assigns the digital zoom function Zooms in on the field angle by 2x 3x and 4x vertically and horizontally DS GAIN Assigns the digital super gain function f f The digital super gain function is activated only during shooti...

Страница 130: ...signs the function for switching the viewfinder screen to color display monochrome display This is interlocked with the setting value in the VIDEO OUT LCD VF menu VF COLOR INDICATOR SW Assigns the function for enabling disabling the status display LOAD SETUP FILE Assigns the function to display the list of setup files saved in the SD card This does not function in the thumbnail screen LCD BACKLIGH...

Страница 131: ...he factory setting CH1 2 Assigns the AUDIO LEVEL CH1 3 AUDIO LEVEL CH2 4 dial to audio channels 1 and 2 The AUDIO SELECT CH1 3 AUDIO SELECT CH2 4 switches are also enabled for channels 1 and 2 The audio channel 3 and 4 are automatically adjusted Automatic adjustment will be disabled when the AUDIO menu REC CH SETTINGS CH3 LEVEL CH4 LEVEL MANUAL is set Recording level can also be adjusted by CH3 LE...

Страница 132: ...era alone using the F AUDIO LEVEL dial to adjust the recording level is recommended r r Adjusting recording level of audio channels 1 and 2 Automatic adjustment will be enabled when the AUDIO menu REC CH SETTINGS CH1 LEVEL CH2 LEVEL AUTO is set When these items are set to MANUAL automatic adjustment stops functioning and the recording level can be adjusted in the AUDIO menu REC CH SETTINGS CH1 LEV...

Страница 133: ...ter playing back the recorded video Immediately after closing the thumbnail screen During the time from recording stop until completion of writing to the memory card t t It will be fixed to free run regardless of the TCG switch position when pre recording is enabled t t The pre recording is canceled once when three hours has past without starting the recording t t For recording limitations of the ...

Страница 134: ...REC button is pressed without replacing the memory card standard recording is performed to the memory card with remaining capacity NOTE t t Use of memory cards with the same Speed Class or capacity for simultaneous recording is recommended The recording may stop due to insufficient speed when memory cards with different Speed Classes or capacities are used If the recording is stopped the video rig...

Страница 135: ...a memory card make sure that there is at least one minute of remaining recording capacity on the memory card to be recorded to NOTE t t Hot swap playback is not supported t t Hot swap recording cannot be performed between card slot 1 and card slot 2 or 3 Recording check function f f After recording ends pressing the RET button on the lens automatically plays back the last few seconds of the latest...

Страница 136: ...z 720 50 00p AVC I200 720 50 00p AVC I100 720 50 00p AVC I50 720 50 00p AVC G50 720 50 00p AVC G25 720 50 00p AVC G12 r r Audio Codec Number of audio channels Number of quantizing bits Sampling frequency LPCM 4ch 24 bit anything other than AVC G12 16 bit AVC I100 AVC I50 AVC G12 48 kHz When FILE FORMAT is set to MOV r r Video Resolution FREQUENCY REC FORMAT 3840 2160 59 94Hz 2160 59 94p 420LongGOP...

Страница 137: ...422ALL I 100M 1080 29 97p 422LongGOP 50M 1080 29 97p 422ALL I 100M 1080 23 98p 422LongGOP 50M 1080 23 98p 422ALL I 100M 50 00Hz 1080 50 00p 422LongGOP 100M 1080 50 00p 422ALL I 200M 1080 50 00i 422LongGOP 50M 1080 50 00i 422ALL I 100M 1080 25 00p 422LongGOP 50M 1080 25 00p 422ALL I 100M r r Audio Codec Number of audio channels Number of quantizing bits Sampling frequency LPCM 4ch 24 bit 48 kHz ...

Страница 138: ...plied from the GENLOCK IN terminal The HD Y signal or a composite signal matching the system frame frequency is supplied to the GENLOCK IN terminal To enable the reference signal input to the GENLOCK IN terminal it must be set to the OTHERS menu GENLOCK GENLOCK GL IN Adjust the horizontal phase of the reference signal and output signal at H PHASE COARSE and H PHASE FINE Reference signal System fre...

Страница 139: ...following settings can be set in the RECORDING menu REC COUNTER f f TOTAL The count is continuously cumulated until it is reset by pressing the RESET button The counter value will be maintained even if the memory card is replaced or the power is turned off f f CLIP Clears the counter value and starts counting from 0 each time recording starts You can shoot while always checking the recording time ...

Страница 140: ...to SET 3 Set to the RECORDING menu TC UB DF NDF f f Set DF to advance the time code in the drop frame mode and set NDF to advance it in the non drop frame mode However note that the time code runs by NDF at all times in the 23 98p mode 4 Set the time code by the cursor operation buttons f f Screen display I The digit to be set flashing moves to the right Y The digit to be set flashing moves to the...

Страница 141: ... RECORDING menu TC UB TC IN OUT SEL TC IN 5 Input a reference time code and reference video signal that are in a phase relationship that conforms to time code specifications to the TC IN OUT and GENLOCK IN terminals The built in time code generator is locked to the reference time code When approximately ten seconds has elapsed after locking the externally locked status will be held even if the ref...

Страница 142: ...LCD VF menu LED are enabled 4 BATT battery lamp Starts flashing few minutes before the battery voltage drops and the battery charge runs out It is illuminated after the battery is completely flat To prevent operation from being interrupted replace the battery before it is nearly flat For details refer to Warning system page 205 5 SAVE lamp The lamp is always out Configuration of status display on ...

Страница 143: ...g is enabled f f No display It is in one of the following conditions Recording is stopped with pre recording is disabled It is set to the NETWORK menu NETWORK FUNC NDI HX 4 Recording media Setting status of the RECORDING menu REC MEDIA is displayed f f eP2 Displays when set to the RECORDING menu REC MEDIA expressP2 f f mP2 Displays when set to the RECORDING menu REC MEDIA microP2 SD f f No display...

Страница 144: ... two minutes or less The remaining capacity of the memory card available for simultaneous recording remaining capacity for the memory card of the two memory cards with less remaining capacity is displayed when simultaneous recording is performed f f WP It is write protected The write protected switch of the memory card is set to the LOCK side f f END Memory card has no remaining capacity f f ERR M...

Страница 145: ...ENE FILE menu FILE SELECT is displayed 21 Waveform monitor Displays the video status in waveform or vector Displayed only on the LCD monitor and the viewfinder 22 Type of marker Displays the type of currently displayed marker in the STATUS screen of the mode check MKR A Displays the marker type A MKR B Displays the marker type B MKR OFF Marker is not displayed 23 Digital zoom Displays the digital ...

Страница 146: ...menu CLOCK DATE FORMAT f f Y M D Displays in yyyy mmm dd hh mm ss format f f M D Y Displays in mmm dd yyyy hh mm ss format f f D M Y Displays in dd mmm yyyy hh mm ss format mmm Month JAN January FEB February MAR March APR April MAY May JUN June JUL July AUG August SEP September OCT October NOV November DEC December dd Date yyyy Year hh Hour mm Minute ss Second 35 Digital super gain Displays the di...

Страница 147: ... display of auto white balance Displays the status when the adjustment result of the auto white balance was abnormal 45 Message display area Displayed when there is a message or warning about the camera status 46 Message for invalid filter position Message is displayed when power is turned on if the ND FILTER CC FILTER dial is not set correctly Message is displayed when performing the auto white b...

Страница 148: ... Direct playback bar Displays the general position that is being played back 6 Playback navigation icon Operates by touching the icon f f Fast forward playback f f Fast reverse playback f f Stop f f Playback pause Checking and displaying shooting status Setting and status of each function is always displayed in the camera image screen but they can be set to be displayed only when required Most of ...

Страница 149: ...YBACK STATUS l l 1 13 Flash band compensation function FBC l l l 14 Streaming status STREAMING l l l 15 High dynamic range function dynamic range stretcher function HDR DRS l l l 16 Connection status of the wireless LAN wired LAN NETWORK l l l 17 Remaining battery level BATTERY REMAIN l l 4 l 18 Chromatic aberration compensation function CAC l l l 19 Gamma mode GAMMA MODE l l l 20 Scene file name ...

Страница 150: ...sed to the MCK side Press the EXIT button while each screen is displayed to return to the camera image screen ON OFF display in each screen can be selected in the VIDEO OUT LCD VF menu MODE CHECK INDICATOR For details on STATUS screen displays refer to Checking and displaying shooting status page 148 LED screen Displays the items to cause the lamp of the viewfinder to illuminate f f is displayed f...

Страница 151: ... remaining capacity minutes total recording time of the memory card inserted in card slot 1 It is not displayed when set to the NETWORK menu NETWORK FUNC NDI HX The status of the memory card that is displayed are following types f f NO CARD Memory card is not inserted f f UNSUPPORTED Memory card is not supported f f FORMAT ERROR Memory card cannot be used Format error f f PROTECTED It is write pro...

Страница 152: ...d in each channel f f ON Enabled f f OFF Disabled Settings in the AUDIO IN CH1 to AUDIO IN CH4 switch and the AUDIO menu REC CH SETTINGS FRONT VOL CH1 to FRONT VOL CH4 does not match f f Disabled The channel is not selected in the AUDIO menu REC CH SETTINGS VOL SELECT LIMITER CH1 to CH4 Displays enable disable of limiter for each channel with ON OFF Displays when recording level adjustment method ...

Страница 153: ...ng white balance function is assigned Color temperature and VAR are displayed when VAR is assigned NETWORK screen Displays the settings of the network function Item Description NETWORK DEVICE SEL Displays the setting value of the NETWORK menu DEVICE SEL NETWORK FUNC Displays the setting value of the NETWORK menu NETWORK FUNC STRM FORMAT Displays the streaming format It is not displayed when set to...

Страница 154: ...F menu LCD VF MARKER FRAME MARKER 4 3 Displaying zebra pattern The camera can display two types of zebra patterns When the ZEBRA switch of the viewfinder is set to ON the zebra pattern currently set in the menu is displayed on the viewfinder screen Zebra patterns can also be displayed in the video output from SDI OUT1 SDI OUT2 HDMI terminals according to settings The level for displaying zebra pat...

Страница 155: ...ase of the jog dial button Turn the jog dial button to move the enlarged position It will return to center when the jog dial button is pressed It can also be operated by pressing the cursor operation button In case of touching the LCD monitor The enlarged position will move by touching the vertical and horizontal arrow markers on the LCD monitor Peaking display focus square display The peaking dis...

Страница 156: ...r can be adjusted in the VIDEO OUT LCD VF menu FOCUS ASSIST DETAIL DETAIL FREQ NOTE t t The enlarged display peaking display focus square display cannot be recorded t t The enlarged display peaking display focus square display is not displayed while displaying the color bars t t Some of the displays such as marker will be hidden temporarily during enlarged display focus square display Waveform mon...

Страница 157: ...sation sometimes forms on the LCD panel of the LCD monitor in locations subject to extreme temperature differences If this happens wipe with a soft dry cloth t t The LCD monitor will be slightly darker than normal immediately after the power is turned on when the camera is very cold The brightness will return to normal when the internal temperature increases Mirror shooting When recording with the...

Страница 158: ...iewfinder For details about the attachment to the camera and adjustment refer to the Operating Instructions for each viewfinder Set the items of the VIDEO OUT LCD VF menu to specify the information to display in the viewfinder For details on method of use refer to the Operating Instructions for each viewfinder ...

Страница 159: ... files are provided Eight of these files can be saved together as a single file on SD card CAC file This area stores 32 chromatic aberration compensation data r r Setup file and scene file Number of files 1 Number of files 6 Factory data Scene file memory Setup file memory OTHERS FILE SETUP FILE MEMORY LOAD SCENE FILE LOAD SAVE INITIALIZE SAVE SCENE FILE LOAD SAVE INITIALIZE INITIALIZE OTHERS MENU...

Страница 160: ...es menu content Use of this data allows you to reproduce optimum setup states Operating SD cards Select in the OTHERS menu FILE SLOT FOR LOAD SAVE SLOT2 SLOT3 If a SD card that was formatted in a standard other than SDHC SDXC standards on a device other than this camera is inserted file cannot be loaded or saved Reformat the SD card Formatting the SD card 1 Select the RECORDING menu FORMAT MEDIA S...

Страница 161: ...d is displayed Fig 2 2 Select the file to overwrite from the list of setup files The file name entry screen and the keyboard are displayed Leave it as is when overwriting 3 Select Enter A confirmation screen is displayed 4 Select SET The file is saved Saving the setup file to the camera memory Saves the current setting value of the camera into the camera memory 1 Select OTHERS menu FILE SETUP FILE...

Страница 162: ... can be individually saved in the camera body Also the scene files saved in the camera memory can be loaded Select the SCENE FILE menu LOAD SAVE INITIALIZE LOAD SAVE 3 The scene file can be saved in a SD card Also the scene file saved in the SD card can be loaded Saving the scene file Saving the scene file into the camera memory Saves the current setting value of the camera into the camera memory ...

Страница 163: ...isplayed For details about the error message refer to Warning system page 205 Initialization of the scene file Initializes the scene file saved in the camera memory 1 Select the scene file to return to the factory setting in the SCENE FILE menu FILE SELECT 2 Select the SCENE FILE menu LOAD SAVE INITIALIZE INITIALIZE The confirmation screen is displayed 3 Select YES The selected scene file returns ...

Страница 164: ...r creating the lens file 8 Fine adjust the lens aperture so that the signal level of Gch becomes the same as the signal level obtained in step 6 9 Set to the CAMERA menu LENS FILE ADJ LENS FILE ADJ MODE ON 10 Adjust so that the signal level of Rch becomes the same as Gch in the CAMERA menu LENS FILE ADJ LENS R GAIN OFFSET 11 Likewise adjust LENS B GAIN OFFSET so that the signal level of Bch become...

Страница 165: ...O VIDEO OUT LCD VF RECORDING NETWORK SYSTEM OTHERS EXIT FILE BATTERY GENLOCK COLOR BARS LED CLOCK GPS SETUP FILE SD CARD SETUP FILE MEMORY LENS FILE MEMORY SLOT FOR LOAD SAVE SCENE FILE SD CARD EXIT CAC FILE SD CARD LOAD SAVE SAVE AS EXIT LENS FILE SD CARD Saving a lens file as a new file on a SD card Current setting values of the camera is saved as a new file in a SD card by specifying the card f...

Страница 166: ...gins 4 When the completion message is displayed press the jog dial button or SET button f f An error message may be displayed For error message refer to Warning system page 205 NOTE t t Titles of lens files included in the card file saved in the SD card are not displayed in the LENS FILE SD CARD screen Load the file each time and confirm them in the LENS FILE MEMORY screen Lens file in the interna...

Страница 167: ...a including additional information such as image audio and meta data that are recorded by single shooting is saved as a clip Playback copy etc of the clip can be performed on the camera Chapter 6 Playback ...

Страница 168: ...rded in the same format means that each item of the SYSTEM menu FREQUENCY FILE FORMAT REC FORMAT AUDIO SAMPLE RES matches the current setting status Following items are also displayed when set to the SYSTEM menu FILE FORMAT P2 SLOT1 SLOT2 Displayed when copying from the memory card in card slot 1 to the memory card in card slot 2 SLOT1 SLOT3 Displayed when copying from the memory card in card slot...

Страница 169: ...lips in the thumbnail screen 2 7 1 8 9 3 4 6 5 11 12 10 1 Thumbnail number Displays the thumbnail number in 0001 to 9999 Normally the number assigned to the clip in the order of recording is displayed 2 Resume play status 3 Number of recording pixels system frequency 4 Recording file format recording codec 5 Protection status of the clip This is displayed when the clip is protected 6 Standard time...

Страница 170: ... that may be repaired This is displayed for a defective P2 clip that cannot be repaired This is displayed for a P2 clip with a different format for P2 standard This is displayed for a P2 clip when the clip is recorded over multiple memory cards and any of those memory cards are not inserted 4 Thumbnail image 5 Clip name 6 START TC Displays the time code value at the start of the recording 7 START ...

Страница 171: ...The menu is displayed 3 Select the THUMBNAIL menu CLIP COPY 4 Select SELECT Fig 1 f f All clips can be copied between the memory cards when ALL is selected 5 Select the card slot for the copy destination Fig 2 The clips on the memory card of the copy source is displayed in the thumbnail screen Fig 3 f f SLOT1 SLOT2 Copies clips from the memory card in card slot 1 to the memory card in card slot 2 ...

Страница 172: ... memory card Deleting clips Deletes the clip DEL DEL MOV 14 6V 14 6V 14 6V 1 2 3 1 2 3 1 2 3 P2 MOV P2 MOV ALL SLOT OTHERS ALL SLOT DELETE ALL SLOT DELETE Fig 1 Fig 2 Fig 3 AUDIO VIDEO OUT LCD VF RECORDING NETWORK SYSTEM OTHERS THUMBNAIL COPY CLIP DISPLAY PLAYBACK EXIT COPY REPAIR INFORMATION DELETE PROTECT EXIT ALL SELECT EXIT 1 Press the THUMBNAIL button The thumbnail screen is displayed 2 Press...

Страница 173: ...lashing is removed f f When the power is turned off by removing the battery or the external DC power supply while recording or performing record completion process Restoring a clip P2 format An error message is not displayed when P2 is selected as the recording file format is displayed in the thumbnail screen when there is at least one defective P2 clip that may be repaired in the thumbnail screen...

Страница 174: ...when the thumbnail information is repaired Linking the incomplete clips The linked P2 clips recorded over multiple memory cards may become incomplete clips due to being copied separately from each memory card These can be restored to original linked clips by using the link function Only the P2 clips can be linked 1 Press the THUMBNAIL button The thumbnail screen is displayed 2 Press the MENU butto...

Страница 175: ...ayback Touch or press the REV button Touch twice to increase the speed Fast forward playback Touch or press the FWD button Touch twice to increase the speed Stop return to thumbnail screen Touch or press the STOP button Skip playback cue up of the clip Touch the LCD monitor while playing back and slide from right to left left to right When sliding from left to right the clip skips to the beginning...

Страница 176: ... of all the memory cards are displayed Playback is not possible across two memory cards t t If selecting P2 as recording file format and playing back a clip that was recorded by relay recording and spans between two memory card playback will pause and a black screen will be displayed when switching the card slot Playback will automatically restart after the switch t t Playback stops when the memor...

Страница 177: ... playback when it is played back the next time 1 Select the THUMBNAIL menu PLAYBACK RESUME PLAY ON When the playback of a clip is stopped midway L is displayed on the clip in the thumbnail screen NOTE t t Resume playback is canceled in following cases When the power is turned off When the thumbnail screen is canceled by pressing the THUMBNAIL button When the SYSTEM menu REC FORMAT is changed ...

Страница 178: ...ching or pressing the jog dial button at the scene to be recorded as a still image while playing back The still image is recorded in the memory card being played back NOTE t t The playback will pause when a still image is recorded t t Recorded still image cannot be displayed in thumbnail played back copied or deleted in the camera t t INVALID is displayed when the still image cannot be recorded in...

Страница 179: ...This chapter describes about the output image Chapter 7 Output ...

Страница 180: ...0 1080 25 00PsF 1280 720 50 00p 1280 720 50 00p NOTE t t OUT FORMAT restores the factory settings when the settings of FREQUENCY and REC FORMAT change and the current setting values of OUT FORMAT cannot be acquired t t The output format when playing back from the thumbnail screen is as follows It will be the value set in OUT FORMAT when the recording resolution of the playback clip is the same as ...

Страница 181: ...I OUT2 OUT FORMAT Item Output format FREQUENCY REC FORMAT SIGNAL SEL SDI OUT2 OUT FORMAT Resolution Frequency 59 94Hz 3840 2160 59 94p SDI OUT1 2160p 1920 1080 59 94p 1920 1080 59 94i 3840 2160 59 94p SDI OUT2 Factory setting 1920 1080 59 94p 1920 1080 59 94p 1920 1080 59 94i 1920 1080 59 94i 29 97p SDI OUT1 2160p 1920 1080 29 97PsF 3840 2160 29 97p SDI OUT2 Factory setting 1920 1080 29 97PsF 1920...

Страница 182: ... OUT2 Factory setting 1280 720 50 00p 1280 720 50 00p 720 576 50 00i 720 576 50 00p NOTE t t The audio output from the HDMI terminal is two channels The audio channel to output can be selected in the AUDIO menu OUTPUT SETTINGS HDMI OUT CH t t The VIDEO OUT LCD VF menu HDMI OUT SIGNAL SEL SDI OUT1 2160p SDI OUT2 can be selected only when set to the VIDEO OUT LCD VF menu SDI OUT1 OUT FORMAT 3840 216...

Страница 183: ...This chapter describes the external devices that can be connected to the camera Chapter 8 Connecting to External Devices ...

Страница 184: ...by f f Press the EXIT button After exiting the card reader mode returns to camera shooting status in approximately five seconds NOTE t t A USB type C cable is not supplied with this camera Prepare a commercial USB type C cable double shielded for noise suppression t t Using a USB cable 1 5 m or shorter is recommended t t When connecting the camera to a computer via USB ensure that no other device ...

Страница 185: ...RA Link of other device may not properly operate when connected to the VIERA Link compatible device with a HDMI cable optional t t The SD resolution signal output from the HDMI terminal is output as a progressive signal 480P 576P t t Use a double shielded cable equivalent to 5C FB for the BNC cable optional that is connected to the SDI OUT1 terminal or the SDI OUT2 terminal t t Use the double shie...

Страница 186: ... REC REMOTE ON NOTE t t The tally lamp is illuminated even when recording only on the external record t t When the OTHERS menu LED REC TALLY GREEN CHAR is set recording status of the camera is indicated with the green tally lamp on the viewfinder or with characters With this setting it can be distinguished from the control status of the external device indicated by the tally lamp t t The SDI and H...

Страница 187: ...This chapter describes how to use the camera by connecting to a network Chapter 9 Network Connection ...

Страница 188: ... the support desk at the following website https pro av panasonic net Attach the wireless module optional to the USB2 0 HOST terminal to use a wireless LAN Connect a LAN cable to the LAN terminal on the rear side to use wired LAN 1000BASE T 100BASE TX 10BASE T IEEE802 11a g n ac NOTE t t For the cable to be connected to the LAN terminal use a category 7 LAN cable Available functions When the camer...

Страница 189: ...dule to the USB2 0 HOST terminal Insert it all the way NOTE t t When removing the wireless module pull it out straight Cautions when using the wireless module AJ WM50 Read the operating instruction of the wireless module thoroughly and understand it before using For the latest information visit the following website https pro av panasonic net For the wired LAN Connect a LAN cable 1000BASE T 100BAS...

Страница 190: ...z Factory setting 2 4GHz CHANNEL 2 4GHz Channel to be used when BAND is set to 2 4GHz Factory setting AUTO CHANNEL 5GHz Channel to be used when BAND is set to 5GHz Factory setting AUTO ENCRYPTION Setting the encryption method Factory setting WPA2 AES ENCRYPT KEY WPA2 encryption key Factory setting 01234567890123456789abcdef IPv4 SETTING DHCP Setting the DHCP function f f OFF Does not use DHCP f f ...

Страница 191: ... with the DHCP when connected by setting TYPE to INFRA SELECT or INFRA MANUAL f f SERVER When connecting by setting TYPE to DIRECT enable the DHCP server function of the camera Cannot be selected Factory setting OFF IP ADDRESS IP address of the camera Factory setting 192 168 0 1 SUBNET MASK Subnet mask Factory setting 255 255 255 0 DEFAULT GATEWAY Default gateway Factory setting 192 168 0 254 PRIM...

Страница 192: ...Factory setting PRIMARY DNS Primary DNS server Factory setting SECONDARY DNS Secondary DNS server Factory setting NOTE t t Some items cannot be selected depending on the settings such as DHCP t t The startup time after turning on the power may be longer due to starting of the network t t When changing the settings of DEVICE SEL the changes will not be reflected until the camera is restarted Settin...

Страница 193: ...erly after the network settings are specified if the IP address is the same as another device on the same network Set a unique IP address for the camera t t EASY IP Setup Software cannot be used from a different subnet via a router t t Use Ver 4 25R00 or later for EASY IP Setup Software Setting procedure Fig 1 Fig 3 Fig 2 1 Start EASY IP Setup Software 2 Click Search Fig 1 3 Click the MAC address ...

Страница 194: ...f the ports for UDP when implementing a firewall including software t t Some of the items cannot be set on this camera t t View Camera Screen displayed on Fig 1 and Fig 2 does not function on this camera Confirming the network status The status of the camera network can be checked using the following operations 1 Select the NETWORK menu INFORMATION STATUS ...

Страница 195: ...ration is the same as entering with a keyboard Icon Description of operation A a Switches between upper case and lower case Displayed during the text entry mode Switches the type of the symbols Displayed during the symbol entry mode Returns to the previous screen Entered character is not reflected Switches the character to symbol number Enters space blank BS Deletes the character Previous characte...

Страница 196: ... download page Connecting to the CX ROP application Connect to the camera following the CX ROP app guide NOTE t t The camera cannot connect with the CX ROP app while the menu or thumbnail screen is displayed Operation while the CX ROP app is connected r r Operation of the camera that is connected Following buttons and dial cannot be used f f MENU button f f THUMBNAIL button r r Recording and playb...

Страница 197: ...ed t t When the SCENE FILE menu GAMMA MODE SEL is set to HLG video is streamed after converting from high dynamic range to standard dynamic range r r Settings when using the streaming function SYSTEM menu NETWORK menu STREAMING FREQUENCY REC FORMAT STREAMING FORMAT 59 94Hz 1080 59 94p AVC I100 1080 59 94p AVC I422 1080 59 94p AVC G25 1080 59 94p AVC G12 1080 59 94p 422LongGOP 100M 1080 59 94p 422A...

Страница 198: ...ication software as follows and start streaming rtsp IP address stream NOTE t t Perform an operation from the application software to stop streaming t t Only RTSP is available when starting streaming with an operation from application software t t For details about the operations to start streaming from the application software please refer to the manual for each application software t t Streaming...

Страница 199: ...menu STREAMING DATA TYPE P2CAST Set this after performing the operation for CLEAR MEMORY once Referring to the memory card for the destination of streaming 1 Insert the memory card with the destination information saved into the card slot selected in the OTHERS menu FILE SLOT FOR LOAD SAVE 2 Select the NETWORK menu STREAMING CONNECTION INFO SD CARD Management of destination information Destination...

Страница 200: ...e following website https pro av panasonic net Creating the SDXC memory card for setting using the P2 Network Setting software The SDXC memory card created with this software can be used as the reference destination when loading into the camera menu or when the NETWORK menu STREAMING CONNECTION INFO SD CARD is selected Setting procedure Fig 1 Fig 2 1 Start the P2 Network Setting software Fig 1 2 S...

Страница 201: ...re disabled t t When the NDI HX function is enabled it is switched to the NETWORK menu UTILITY EASY IP SETTING UNLIMITED t t When the SCENE FILE menu GAMMA MODE SEL is set to HLG video is streamed after converting from high dynamic range to standard dynamic range r r Settings when using the NDI HX function SYSTEM menu NETWORK menu NDI HX FREQUENCY REC FORMAT STREAMING FORMAT 59 94Hz 1080 59 94p AV...

Страница 202: ...o enable the NDI HX function of the camera using the tool from NewTek it is necessary to select NDI HX in the NETWORK menu NETWORK FUNC Streaming with multicast One streaming can be distributed to multiple NDI HX compatible switchers via supported router etc when the multicast function is used 1 Select the NETWORK menu NDI HX MULTICAST ENABLE 2 Select the NETWORK menu NDI HX and specify MULTICAST ...

Страница 203: ...amera with one of the following f f Select the NETWORK menu STREAMING CONNECTION INFO MEMORY and load the content of SD with the NETWORK menu STREAMING LOAD SD CARD f f Select the NETWORK menu STREAMING CONNECTION INFO SD CARD 5 Register NETWORK ID MAC ADDRESS of the camera in P2 Cast 1 Check the NETWORK ID MAC ADDRESS by displaying OTHERS INFORMATION VERSION in the camera 2 Register NETWORK ID MA...

Страница 204: ...Maintenance of the camera and error message are described Chapter 10 Maintenance ...

Страница 205: ... in the clips on the ejected card and repair the clips as necessary 3 Battery end low voltage input Status display Seven battery charge level bars flash Warning lamp Lights Tally lamp Flashes four times per second Card access lamp All card access lamps flash four times per second in orange Viewfinder The BATT lamp is illuminated if the viewfinder has the BATT lamp EMP flashes in the battery charge...

Страница 206: ...s not sound when it occurs during playback Warning content A memory card error occurred during recording or playback Recording or playback operation The current operation will stop The memory card with the error is write protected after it is stopped Action to take Replace the memory card 8 Reduced wireless audio reception Status display Does not display Warning lamp Flashes four times per second ...

Страница 207: ... inserting a memory card FORMAT ERROR CARD SLOT 1 FORMAT ERROR CARD SLOT 2 FORMAT ERROR CARD SLOT 3 A memory card with management information out of specifications has been inserted A message is displayed for approximately five seconds f f Insert a memory card that can record NOT SDXC CARD SLOT 2 NOT SDXC CARD SLOT 3 A SDHC memory card that cannot record the MOV format data or a 32 GB microP2 card...

Страница 208: ...re the top menu has been created A message is displayed f f Delete the top menu CANNOT RECORD UNTIL TOP MENU IS DELETED DELETE TOP MENU RECORDED DATA WILL NOT BE DELETED The memory card where the top menu was created has been inserted A message is displayed f f Delete the top menu THUMBNAIL DATA ERROR IS DETECTED An error occurred in the thumbnail information of the memory card A message is displa...

Страница 209: ...d f f Insert a memory card into the card slot REINSERT OR CHECK CARD SLOT 1 REINSERT OR CHECK CARD SLOT 2 REINSERT OR CHECK CARD SLOT 3 It has tried to copy to an error card A message is displayed f f Check the memory card CANNOT RECORD Cannot be recorded A message is displayed f f Perform recording after making it possible REC PAUSE INVALID The camera tried to stop the next recording before the p...

Страница 210: ...ording function to additionally set Pre recording 1 2 Relay recording Simultaneous recording Interval recording 3 4 5 6 Pre recording 1 2 l l Relay recording l Simultaneous recording l l Interval recording 3 4 5 6 l 1 Time code is fixed to free run 2 The pre recording is canceled once when three hours has passed without starting the recording 3 Time code is fixed to recording run 4 The time code i...

Страница 211: ...e as necessary https pro av panasonic net NOTE t t Update is completed by loading the downloaded file to the camera via the memory card Insert the memory card that stores the update file into card slot 2 and select the OTHERS menu INFORMATION UPDATE For update method refer to the support desk at the following website https pro av panasonic net t t Do not turn off the power while updating the firmw...

Страница 212: ...This chapter describes the dimensions specifications and connector signals Chapter 11 Specification ...

Страница 213: ... 213 Chapter 11 Specification Dimensions Dimensions 143 mm 5 5 8 inches 267 mm 10 1 2 inches 209 mm 8 7 32 inches 102 mm 4 1 32 inches 348 mm 13 23 32 inches ...

Страница 214: ...1 500 sec 1 1000 sec 1 2000 sec HALF f f When the SYSTEM menu FREQUENCY 50 00Hz is set 1 60 sec 1 120 sec 1 250 sec 1 500 sec 1 1000 sec 1 2000 sec HALF Synchro scan shutter When the SCENE FILE menu SYNC SCAN TYPE sec is set f f When the SYSTEM menu FREQUENCY 59 94Hz is set 59 94i 59 94p mode 1 60 0 sec to 1 7200 sec 29 97p mode 1 30 0 sec to 1 7200 sec 23 98p mode 1 24 0 sec to 1 7200 sec f f Whe...

Страница 215: ... 100 Approx 1 hour 4 minutes f f 1080 59 94i 50i AVC LongG50 Approx 2 hours 8 minutes f f 1080 59 94i 50i AVC LongG25 Approx 4 hours 16 minutes When using a 64 GB SDXC memory card f f 3840 2160 420LongGOP 150M 59 94p 50p Approx 55 minutes f f 1920 1080 420LongGOP 100M 59 94p 50p Approx 1 hour 20 minutes f f 1920 1080 420LongGOP 50M 29 97p 25p 23 98p Approx 2 hours 40 minutes Two slot function Simu...

Страница 216: ...emote control supported f f Output format 4 2 2 10 bit output 1920 1080 59 94p 50p 59 94i 50i 29 97PsF 25PsF 23 98PsF 1280 720 59 94p 50p 720 480 59 94i 720 576 50i HDMI terminal f f HDMI type A 1 not compatible with VIERA Link f f HDMI remote control supported f f Output format 4 2 2 10 bit output 3840 2160 59 94p 50p 29 97p 25p 23 98p 1920 1080 59 94p 50p 59 94i 50i 29 97p 25p 23 98p 1280 720 59...

Страница 217: ...12 pin VF terminal 20 pin LAN terminal RJ 45 XLRnet connector 1000BASE T 100BASE TX 10BASE T USB2 0 HOST terminal Type A connector 4 pin 5 V 0 5 A for attaching the wireless module optional USB DEVICE terminal USB 3 1 GEN1 type C connector with USB mass storage function without USB bus powered function LIGHT terminal 2 pin DC12 V DC11 0 V 17 0 V maximum output current 4 5 A up to 50 W equivalent M...

Страница 218: ... IN 1 GND 2 AUDIO IN H 3 AUDIO IN C Panasonic Parts No K1AY103A0001 Manufacturer Parts No HA16PRM 3SG 72 Hirose Electric Co AUDIO OUT 1 GND 2 L CH OUT H 3 L CH OUT C 4 R CH OUT H 5 R CH OUT C Panasonic Parts No K1AA105H0016 Manufacturer Parts No HA16RD 5P 76 Hirose Electric Co NOTE t t The AUDIO OUT terminal on the camera is the XLR terminal and outputs balanced audio signals To make unbalanced co...

Страница 219: ...l conversion data 10 VF DATA Serial data signal for serial parallel conversion 11 UNREG GND GND 12 ZEBRA SW Zebra signal ON OFF 13 PEAKING Peaking control not used 14 SPARE Spare not used 15 VF PR Viewfinder PR signal output 16 VF PB Viewfinder PB signal output 17 MARKER SW Marker ON OFF not used 18 FRONT VR F AUDIO LEVEL adjustment not used 19 VR GND F AUDIO LEVEL GND not used 20 UNREG GND GND Pa...

Страница 220: ... Not used 10 SPARE 1 Not used 11 SPARE 2 Not used 12 EXT CLK Not used 13 CLK SHIELD Not used 14 CH 2 SHIELD GND 15 CH 2 HOT Audio input from the wireless microphone receiver CH2 HOT 16 CH 2 COLD Audio input from the wireless microphone receiver CH2 COLD 17 5 6 V Power supply to the wireless microphone receiver 18 VIDEO OUT Not used 19 VIDEO RET Not used 20 VIDEO EN Not used 21 RM 1 RM CLK Not used...

Страница 221: ...gh dynamic range function 128 Hot swap recording 135 I Initialization Menu 61 Scene files 163 Target items 111 Interval recording 134 L LCD monitor 157 Lens 37 Adjusting 38 Lens files 164 M Maker display 154 Memory card 51 Folder structure 55 Recording time 54 Use 52 Menu Basic operation 59 Configuration 59 Display 61 Initialization 61 Setting 62 Menu items AUDIO 79 CAMERA 62 NETWORK 97 OPTION 107...

Страница 222: ...files 164 Scene file 162 Setup file 160 Setup file 160 User data 159 Shooting Inspection 48 Procedures 121 Standard recording 122 Shoulder strap 44 Simultaneous recording 134 Specifications 214 Still image recording function 178 Streaming function 197 Synchro scan mode 126 T Thumbnail 168 Time code 139 Time data 139 Tripod 44 U User bits 139 USER button 129 User file 159 W Warning system 205 Alert...

Страница 223: ...Web Site https www panasonic com Panasonic Corporation 2019 ...

Отзывы: