background image

User’s Manual 


2


The DVR can be set up to alert you when the hard disk drive is full, or it can be set to record over the oldest 
video once the disk is full. 
 
Your DVR uses a proprietary encryption scheme making it nearly impossible to alter video. 


You can view video and control your DVR remotely by connecting via Ethernet.  There are two USB ports 
that can be used to upgrade the system or copy video clips to external hard disk, CD-RW and flash drives. 
 

NOTE:  This manual covers the 8- and 16-channel digital video recorders.  The DVRs are identical except 
for the number of cameras and alarms that can be connected and the number of cameras that can 
be displayed.  For simplicity, the illustrations and descriptions in this manual refer to the 16-camera 
model. 


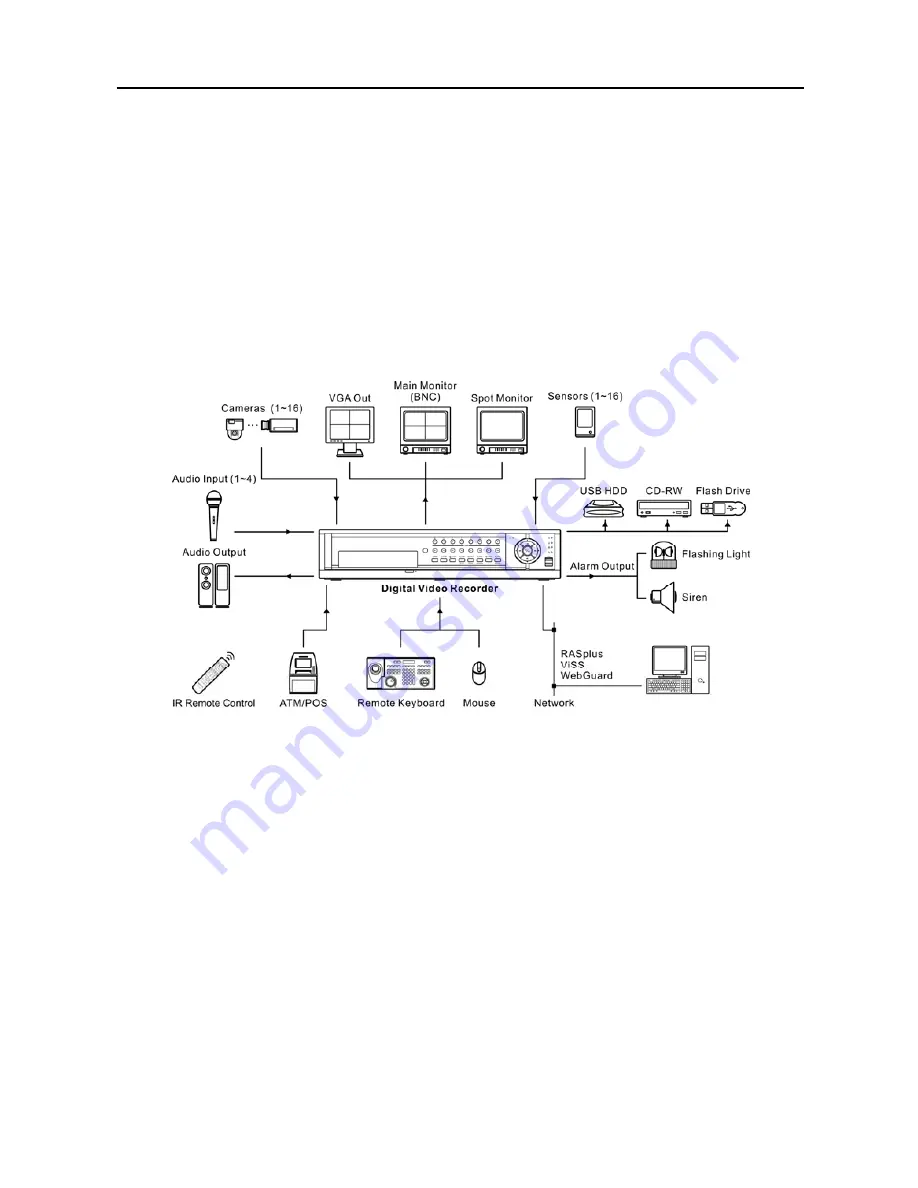
Figure 1 

 Typical DVR installation. 

Содержание PDR960H-8RT

Страница 1: ......

Страница 2: ......

Страница 3: ...PROVIDE REASONABLE PROTECTION AGAINST HARMFUL INTERFERENCE WHEN THE EQUIPMENT IS OPERATED IN A COMMERCIAL ENVIRONMENT THIS EQUIPMENT GENERATES USES AND CAN RADIATE RADIO FREQUENCY ENERGY AND IF NOT IN...

Страница 4: ...e and will often require extensive work by a qualified technician to restore the equipment to its normal operation E If the equipment has been dropped or the cabinet damaged F When the equipment exhib...

Страница 5: ...ctor 6 Chapter 3 Configuration 7 Front Panel Controls 7 Camera Buttons 1 to 16 8 Power LED 8 HDD LED 8 Alarm Out LED 8 Network LED 8 Clip Copy LED 8 PANIC Button 8 ALARM Button 8 CLIP COPY Button 9 ZO...

Страница 6: ...etup DEVICE Camera Tab 35 Audio Setup DEVICE Audio Tab 36 Remote Control Setup DEVICE Remote Control Tab 37 Display Menu 37 OSD Setup DISPLAY OSD Tab 38 Main Monitor Setup DISPLAY Main Monitor Tab 39...

Страница 7: ...p of Screens 68 Appendix G System Log Notices 69 Appendix H Error Code Notices 70 Appendix I Specifications 71 List of Illustrations Figure 1 Typical DVR installation 2 Figure 2 16 Channel DVR rear pa...

Страница 8: ...r screen 39 Figure 33 Spot Monitor screen 40 Figure 34 Live Monitoring menu 41 Figure 35 PTZ Select Camera menu 43 Figure 36 PTZ Preset screen 44 Figure 37 Preset View screen 44 Figure 38 PTZ menu 44...

Страница 9: ...or Recorded Video Access via Ethernet Time Synchronization using industry standard protocol Built in DVD RW Drive Self diagnostics with automatic notification including hard disk drive S M A R T prot...

Страница 10: ...y by connecting via Ethernet There are two USB ports that can be used to upgrade the system or copy video clips to external hard disk CD RW and flash drives NOTE This manual covers the 8 and 16 channe...

Страница 11: ...ired to install the DVR Refer to the installation manuals for the other items that make up part of your system Figure 2 16 Channel DVR rear panel Video Input Video Loop Through RS232C Port Factory Res...

Страница 12: ...screen appears 4 Release the reset switch All of the DVR s settings are now at the original settings it had when it left the factory Alarm Input Output NOTE To make connections on the Alarm Connector...

Страница 13: ...t Pressing and holding the PANIC button for 5 seconds or longer again returns to the previous video output mode Audio In Out The DVR can be controlled remotely by an external device or control system...

Страница 14: ...Power Cord Connector WARNING ROUTE POWER CORDS SO THAT THEY ARE NOT A TRIPPING HAZARD MAKE CERTAIN THE POWER CORD WILL NOT BE PINCHED OR ABRADED BY FURNITURE DO NOT INSTALL POWER CORDS UNDER RUGS OR C...

Страница 15: ...on Front Panel Controls Figure 3 16 Channel DVR front panel Camera Buttons Power LED HDD LED Alarm Out LED Network LED Clip Copy LED Panic Button Alarm Button Clip Copy Button Zoom PTZ Button Display...

Страница 16: ...n pressing the button 3 focuses near and button 4 focuses far and pressing the button 5 moves to the preset and button 6 saves the preset Power LED The POWER LED is lit when the unit is On HDD LED The...

Страница 17: ...ger displays live channels sequentially PLAYBACK Button Pressing the PLAYBACK button enters the playback mode and pressing the button again exits the playback mode When entering the playback mode vide...

Страница 18: ...aying video Pressing the button selects a highlighted item or completes an entry that you have made during system setup USB Port Two USB ports on the front panel are provided to connect external hard...

Страница 19: ...he screen and then select Login in the Live Monitoring menu to display the Login screen To enter a password click the button and the virtual keyboard displays See instructions below for using the virt...

Страница 20: ...the case all will be controlled at the same time when using the infrared remote control Highlight the box beside Language and press button A drop down menu displays the available languages Highlight...

Страница 21: ...The User Management setup screen displays the authorized groups and users You can add and delete users and assign authority levels to the group The screen displays the upgrade package file names that...

Страница 22: ...me Change The user can change the system date and time on a local system or a PC running RAS Data Clear The user can clear all video data or format disks on a local system or a PC running RAS The colu...

Страница 23: ...hutdown and press the button The Shutdown screen displays asking you to confirm whether or not you want to shut the system down After you are finished with the System Screen you can highlight Save and...

Страница 24: ...on Pressing the button toggles between On and Off When it is On the DVR you are setting up will run as a time server Highlight Holiday and press the button You can set up holidays by highlighting and...

Страница 25: ...e Bad message displays replacing the hard disk drive is recommended usually within 24 hours The box beside Information displays whether the device is being used or not Other indicates the device has b...

Страница 26: ...utton to exit the screen Recording Menu Your DVR offers a variety of flexible recording modes You can set it up to record all the time or to only record events It can be set up to continue recording o...

Страница 27: ...t are turned On is two or less No of cameras set to On and High or Very High resolution 0 1 2 3 to 16 30 ips 25 ips PAL 30 ips 25 ips PAL 15 ips 12 5 ips PAL Highlighting Record Audio and pressing the...

Страница 28: ...ding When the DVR is in the Time Event mode the DVR will follow the Time settings and the icon displays The DVR follows the Event settings and the icon displays Highlight the box beside Record Schedul...

Страница 29: ...eside Post Event Record Dwell and press the button to set the length of time you would like to record for the associated event You can set the Dwell from 5 seconds to 1 minute Highlight and press the...

Страница 30: ...ng settings You will be asked to confirm that you want to delete the settings Highlight Default and press the button The Default screen appears After you are finished with the Schedule Screen you can...

Страница 31: ...ion Zone screen is laid over the video for the selected camera You can set up motion detection zones by selecting or clearing blocks NOTE You can set up motion zones one block at a time in groups of 8...

Страница 32: ...POT monitor and cameras appears A SPOT monitor can be associated with a camera The DVR will display the associated camera on the SPOT monitor whenever it detects motions on the selected camera You can...

Страница 33: ...an e mail to the address set during NETWORK Mail setup whenever the DVR detects an input on the associated alarm input Highlight OK and press the button to accept your changes NOTE For the Notify act...

Страница 34: ...onfigure the DVR for each text in device Highlight the box under the Setup heading and press the button Selecting the Setup heading changes all the parameters excluding Port settings of all the text i...

Страница 35: ...ice manufacturer s documentation for Line Delimiter character s Highlight the box beside Ignore String and press the button Use the virtual keyboard to enter any strings of text that you want the DVR...

Страница 36: ...ight Save and press the button to save the changes and exit the screen If you do not wish to save the changes highlight Cancel and press the button to exit the screen System Event Setup EVENT System T...

Страница 37: ...p actions the DVR will take whenever it detects each system event System events can sound the DVR s internal buzzer and or notify a number of different devices NOTE The Beep action cannot be set to Sy...

Страница 38: ...ons The DVR supports two way audio communication between a local system and a PC running RAS Highlighting the box beside Remote Audio Channel and pressing the button allows you to select the audio cha...

Страница 39: ...Highlight Port Number Setup and press the button The Port Number Setup screen appears NOTE You will need to get the appropriate Port Numbers for each RAS and WebGuard related program Admin Watch Sear...

Страница 40: ...ppears allowing you to enter the password for ADSL connection NOTE Entering the ID and Password and highlighting OK reads the current IP address of the DVR configured by the ADSL network NOTE If the D...

Страница 41: ...de Port and press the button Set the port number of the DVRNS server using the Up and Down arrow buttons to increase or decrease the numbers Highlight Enable NAT and press the button to toggle between...

Страница 42: ...or The default port number is 25 Highlight Enable SSL TLS and press the button to toggle between On and Off When it is On the DVR can send an email via an SMTP server requiring SSL Secure Sockets Laye...

Страница 43: ...OTE When selecting the Covert 1 the DVR displays the camera title and status icons on the covert video When selecting the Covert 2 the DVR displays only camera title on the covert video NOTE A user wh...

Страница 44: ...the screen Audio Setup DEVICE Audio Tab Figure 28 Audio screen The DVR can record up to four audio inputs Highlight the box beside the input and press the button A list of cameras appears and you can...

Страница 45: ...oard cannot be configured Highlight Setup and select the correct Baud Rate Parity Data Bits and Stop Bits for the device you are connecting to the DVR Highlight the box beside Remote Control Product a...

Страница 46: ...amera No The camera number displays at the top left corner of each camera screen Camera Title The camera title displays at the top left corner of each camera screen Record The record related icons dis...

Страница 47: ...display one camera or a group of cameras all the time while cycling through the remaining cameras in a cameo window This can be done with one camera displayed full screen while displaying the cameo w...

Страница 48: ...display sequentially on the Spot Monitor Highlight the box in the Channels column and press the button After you are finished with the Spot Monitor Screen you can highlight Save and press the button t...

Страница 49: ...guration Turning on the Power Once you have installed the DVR following the instructions in Chapter 2 Installation it is ready to record Live Monitoring As soon as the DVR completes its initialization...

Страница 50: ...quence for the cameo sequence monitoring should be selected in the Display setup screen Main Monitor tab Camera Menu Selecting Camera Menu in the Live Monitoring menu displays the following Camera Men...

Страница 51: ...oring menu displays the Logout screen asking you to confirm whether or not you want to log out the current user PTZ Mode If a user who has PTZ Control authority logs into the system the user can contr...

Страница 52: ...in the direction you want Once you have the camera at the desired settings press the button and the PTZ Preset dialog box will appear Select the number you want to assign to the preset and press the...

Страница 53: ...e cameo After setting the camera number to active cameo the DVR moves the active cameo to the next cameo When the camera number exists on the current screen the active cameo is changed with the existi...

Страница 54: ...a user who has Covert Camera View authority logs into the system the user can view video from cameras set to Covert 1 or Covert 2 including the camera titles and status icons Using a Mouse You can use...

Страница 55: ...e factory default resolution is Standard When set to Standard the DVR has a maximum recording speed of 120 ips 100 ips PAL When set to High the DVR has a maximum recording speed of 60 ips 50 ips PAL W...

Страница 56: ...age Play Pause Button Pressing the button plays back images at regular speed or pauses playing video Cameo Button Pressing and holding the button for two seconds or longer enters the cameo mode The ye...

Страница 57: ...Camera Menu Alarm Reset Panic Data Source Exit Figure 41 Search menu NOTE The Search menu also can be displayed by moving the mouse pointer to the top of the screen Search Menu Search Selecting Searc...

Страница 58: ...r second 50 fields for PAL When recording video with Very High D1 resolution video is made up of frame units combining two fields one odd field and one even field This can cause horizontal scan lines...

Страница 59: ...Pause button will extract the event video and display the first image of the event Pressing the button will start playing the event video segment Pressing PLAYBACK button returns to live monitoring N...

Страница 60: ...ection Highlight the box beside Video Loss and press the button You can select the cameras for which you want any reports of lost video Highlight the box beside Text In and press the button You can se...

Страница 61: ...ute based and selecting displays 24 hours 3 minute based at once To move to earlier or later times that are not shown in the current record table screen select the arrows located at the end of the tim...

Страница 62: ...ition Figure 46 Motion Search Option screen You can search video from the first to last recorded images or you can set the start and stop times and dates Highlight the box beside From and press the bu...

Страница 63: ...light Search and press the button to display the search results in the Motion Search screen Selecting Cancel exits the screen without saving the changes When you search for motion events of another ca...

Страница 64: ...ch parameter or entire sets of search parameters Highlight Case Sensitive and press the button This will toggle between On and Off When this feature is On the search will find only those text strings...

Страница 65: ...set to On the search will be from the last recorded image Highlight the box beside Channels and press the button You can select the cameras that you would like to include in your video clip Highlight...

Страница 66: ...use other functions on the DVR while video is being backed up To do this highlight the Close button and press the button You can return to the Clip Copy screen at any time to check the progress You d...

Страница 67: ...isk drive in Windows 98 NOTE Preparing a USB hard disk drive under Windows ME is almost identical to Windows 98 1 Connect the USB hard disk drive to your computer using the USB Cable 2 Turn on your co...

Страница 68: ...Unit price mark will be ignored automatically 28th Qty and 40th amount characters including spaces from the left In this case you can enter 17 28 and 40 in each Column box For example if you want to...

Страница 69: ...haracters including spaces from the left but the value of amount category is located on a different line from Item In this case you can enter 17 28 and 40 in each Column box and enter 1 in the Line bo...

Страница 70: ...number of the program Entering ID and PASSWORD and clicking the LOGIN button logs in using the selected mode Selecting Save ID saves the ID you entered You will need to enter the DVR IP address in the...

Страница 71: ...netsh int tcp set global autotuninglevel disable and hit the enter key Restart your computer to apply the changes If you want to enable the Auto Tuning capability again enter netsh int tcp set global...

Страница 72: ...d from the remote site Selecting a camera on the screen and clicking the right mouse button allows you to change the camera name and the image aspect ratio displayed on each camera screen and to enhan...

Страница 73: ...ic time displays the image recorded at that time on the screen Selecting the allows you to display an image from a specific time Click the to enter the event search mode which allows you to search for...

Страница 74: ...rminated device No Live Video on the VGA Monitor If the DVR does not detect a VGA monitor automatically press and hold the PANIC button on the front panel or remote control for 5 seconds or longer to...

Страница 75: ...ctor Pin Outs AI 1 to 16 Alarm Inputs 1 to 16 GND Chassis Ground 5 connectors NC Relay Alarm Outputs Normally Closed NO Relay Alarm Outputs Normally Open C Relay Common ARI Alarm Reset In RS485 Connec...

Страница 76: ...User s Manual 68 Appendix F Map of Screens...

Страница 77: ...me Zone Change Disk Full Time Sync Auto Deletion Time Sync Fail Search Begin Disk Bad Search End Login Clip Copy Begin Logout Clip Copy End Setup Begin Clip Copy Cancel Setup End Clip Copy Fail Remote...

Страница 78: ...failed 8 Opening disk failed 104 Rebooting failed 9 Formatting disk failed 105 Invalid package 10 Database has been changed 106 ODD firmware upgrade failed 11 Appending failed 300 Remote connection fa...

Страница 79: ...uzzer 80dB at 10cm Network Connectivity 10 100 Mbps Ethernet RJ 45 Audio Input RCA Input 4 Line In Audio Output RCA Output 1 Line Out Text Input POS Interface ATM Interface CONNECTORS Video Input Comp...

Страница 80: ...emperature 41 F to 104 F 5 C to 40 C Operating Humidity 0 to 90 Power 100 240 VAC 1 2 0 6 A 60 50Hz Power Consumption Max 35W Approvals FCC UL CB CE CAUTION Risk of Explosion if Battery is replaced by...

Отзывы: