- 155 -
7. Fax
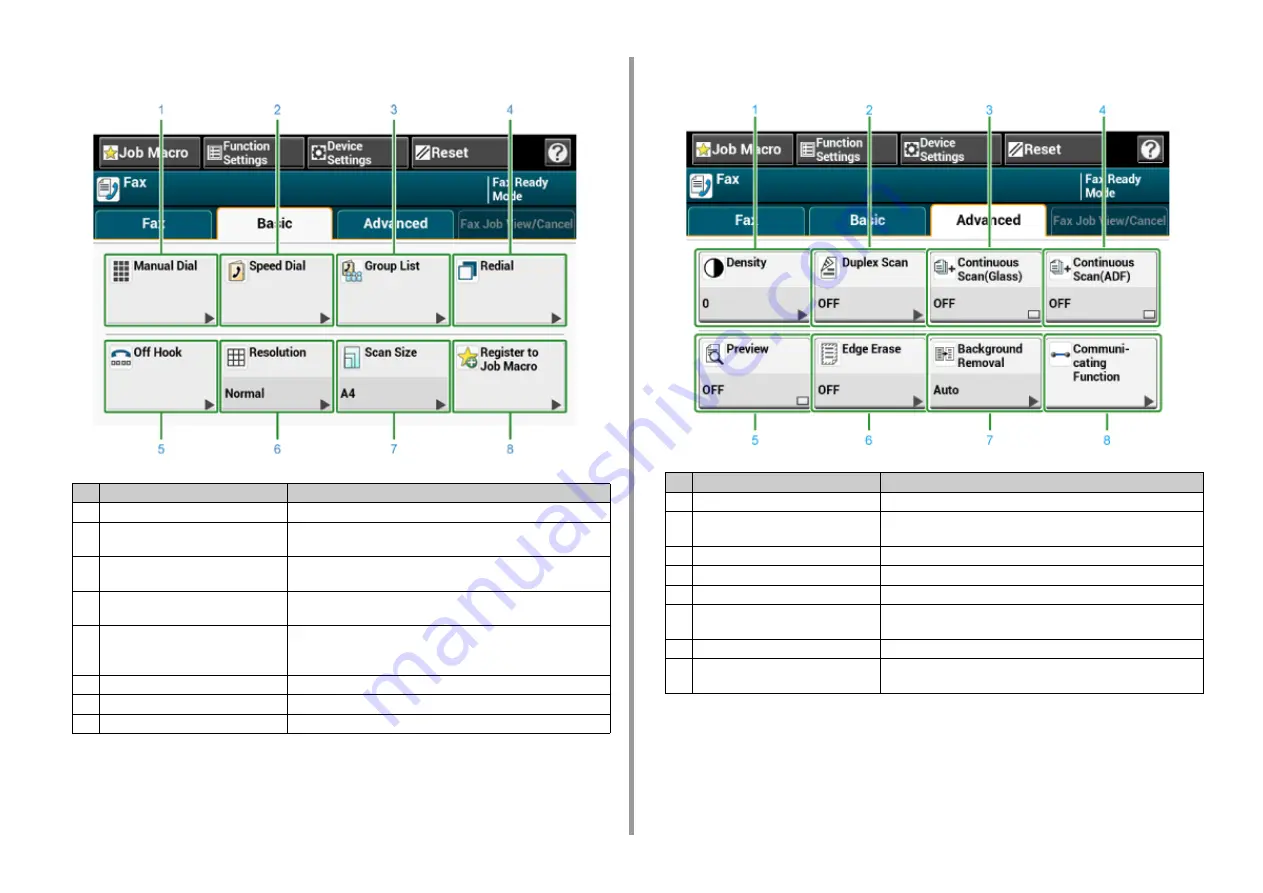
• [Basic] Tab
• [Advanced] Tab
Item
Description
1
Manual Dial
Enter a fax number manually to use it as a destination.
2
Speed Dial
Displays destinations registered in the speed dial list.
Select a destination from the speed dial list.
3
Group List
Displays a list of groups in which fax destinations are registered.
Select a group as a destination from the Group List.
4
Redial
Displays a list of recently used destinations.
Select a destination from the recent records.
5
Off Hook
Sends a fax by Off Hook dialing.
Call the destination, and start sending a fax manually when you hear
a receiving tone (beep) of the destination machine.
6
Resolution
Specifies the resolution to scan a document.
7
Scan Size
Specifies the scan size when scanning a document.
8
Register to Job Macro
Registers current settings to Job Macro.
Item
Description
1
Density
Adjusts a level of scan density.
2
Duplex Scan
Specifies duplex scanning.
Set this function when scanning both sides of a document.
3
Continuous Scan (Glass)
Scans multiple documents as a single job using the document glass.
4
Continuous Scan (ADF)
Scans multiple documents as a single job using the ADF.
5
Preview
Displays fax images to send on the touch panel.
6
Edge Erase
Eliminates a black shadow that may appear around the edges on the
scanned file when scanning, for example, a book.
7
Background Removal
Removes background.
8
Communicating Function
Specifies the following settings: TTI, TTI Select, Transmit
Confirmation, Delayed Tx, Fcode Polling, Fcode Tx.
Содержание MC573dn
Страница 1: ...MC573 ES5473 MFP User s Manual...
Страница 12: ...12 1 Before starting ENVIRONMENTAL INFORMATION...
Страница 17: ...17 2 Setting Up Side view when the additional tray unit is installed...
Страница 22: ...22 2 Setting Up 13 Hold the handle B to close the scanner unit...
Страница 35: ...35 2 Setting Up 1 Plug the power cord into the power connector 2 Plug the power cord into the outlet...
Страница 41: ...41 2 Setting Up 7 Replace the paper cassette into the machine Push the paper cassette until it stops...
Страница 80: ...80 2 Setting Up 10 Click Complete 11 Click Next If the following dialog is displayed click Yes...
Страница 108: ...4 Copy Copying Cancelling Copying Specifying the Number of Copies Descriptions of Screens for Copy...
Страница 132: ...132 6 Print 5 Change the settings in each tab to suit your needs 6 Click OK 7 Click Print on the Print screen...
Страница 145: ...7 Fax Basic Operations of Fax Functions Setting for Receptions Descriptions of Screens for Fax...
Страница 148: ...148 7 Fax A fax that is being sent is displayed on the top of the list 5 Press Yes on a confirmation screen...
Страница 227: ...46472402EE Rev5...


