


- 112 -
4. Copy
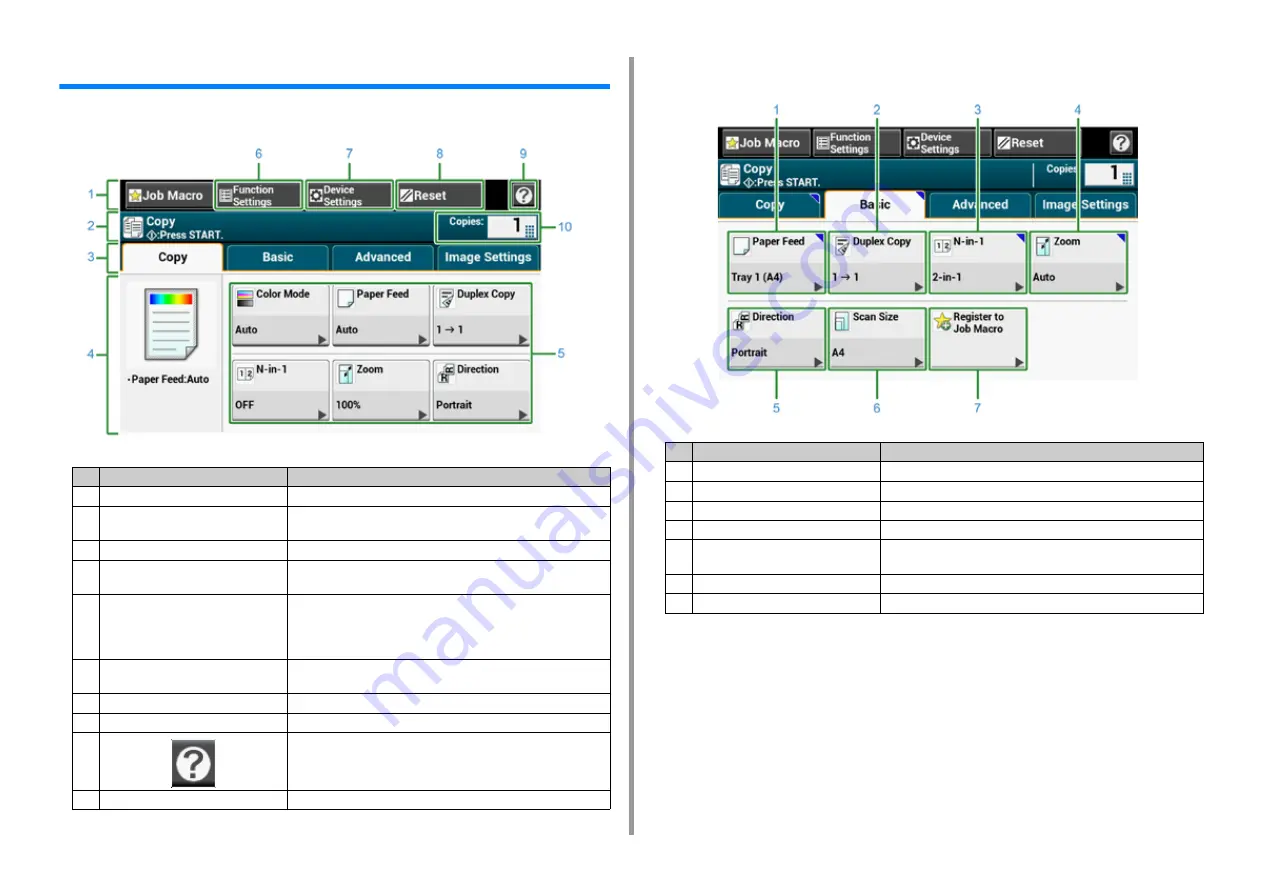
Descriptions of Screens for Copy
• [Copy] Tab
• [Basic] Tab
Item
Description
1
Stationary button area
Displays buttons that appear on the screen at all times.
2
Title and operation guide area
Displays the title of the current screen and provides guide for
possible operations.
3
Tab labels
Displays labels for tabs. Press a label to switch between tabs.
4
Main area
Displays a preview of copy output that will be produced with the
current settings.
5
Shortcut buttons
Displays shortcut buttons for using certain copy functions.
The screen image shows the factory default setting. Shortcut buttons
on the screen can be customized to fit your needs. Refer to "How to
Customize the Touch Panel (Advanced Manual)".
6
Function Settings
Displays the current settings.
The setting can be changed for certain functions.
7
Device Settings
Specifies various settings such as Administrator Setting.
8
Reset
Returns the settings for the current copy job to their default settings.
9
Displays Help topics.
10
Copies
Specifies the number of copies to make.
Item
Description
1
Paper Feed
Specifies the tray to set the copy paper.
2
Duplex Copy
Makes copies on both sides of paper.
3
N-in-1
Combines multiple pages on one sheet of paper.
4
Zoom
Specifies the zoom rate for making enlarged or reduced copies.
5
Direction
Specifies the orientation according to the document, Top Edge On
Top or Top Edge On Left.
6
Scan Size
Specifies the scan size according to the size of the document.
7
Register to Job Macro
Registers current settings to Job Macro.
Содержание MC573dn
Страница 1: ...MC573 ES5473 MFP User s Manual...
Страница 12: ...12 1 Before starting ENVIRONMENTAL INFORMATION...
Страница 17: ...17 2 Setting Up Side view when the additional tray unit is installed...
Страница 22: ...22 2 Setting Up 13 Hold the handle B to close the scanner unit...
Страница 35: ...35 2 Setting Up 1 Plug the power cord into the power connector 2 Plug the power cord into the outlet...
Страница 41: ...41 2 Setting Up 7 Replace the paper cassette into the machine Push the paper cassette until it stops...
Страница 80: ...80 2 Setting Up 10 Click Complete 11 Click Next If the following dialog is displayed click Yes...
Страница 108: ...4 Copy Copying Cancelling Copying Specifying the Number of Copies Descriptions of Screens for Copy...
Страница 132: ...132 6 Print 5 Change the settings in each tab to suit your needs 6 Click OK 7 Click Print on the Print screen...
Страница 145: ...7 Fax Basic Operations of Fax Functions Setting for Receptions Descriptions of Screens for Fax...
Страница 148: ...148 7 Fax A fax that is being sent is displayed on the top of the list 5 Press Yes on a confirmation screen...
Страница 227: ...46472402EE Rev5...


