background image

Scanning documents

3

CS230 (Phase3)

3-23

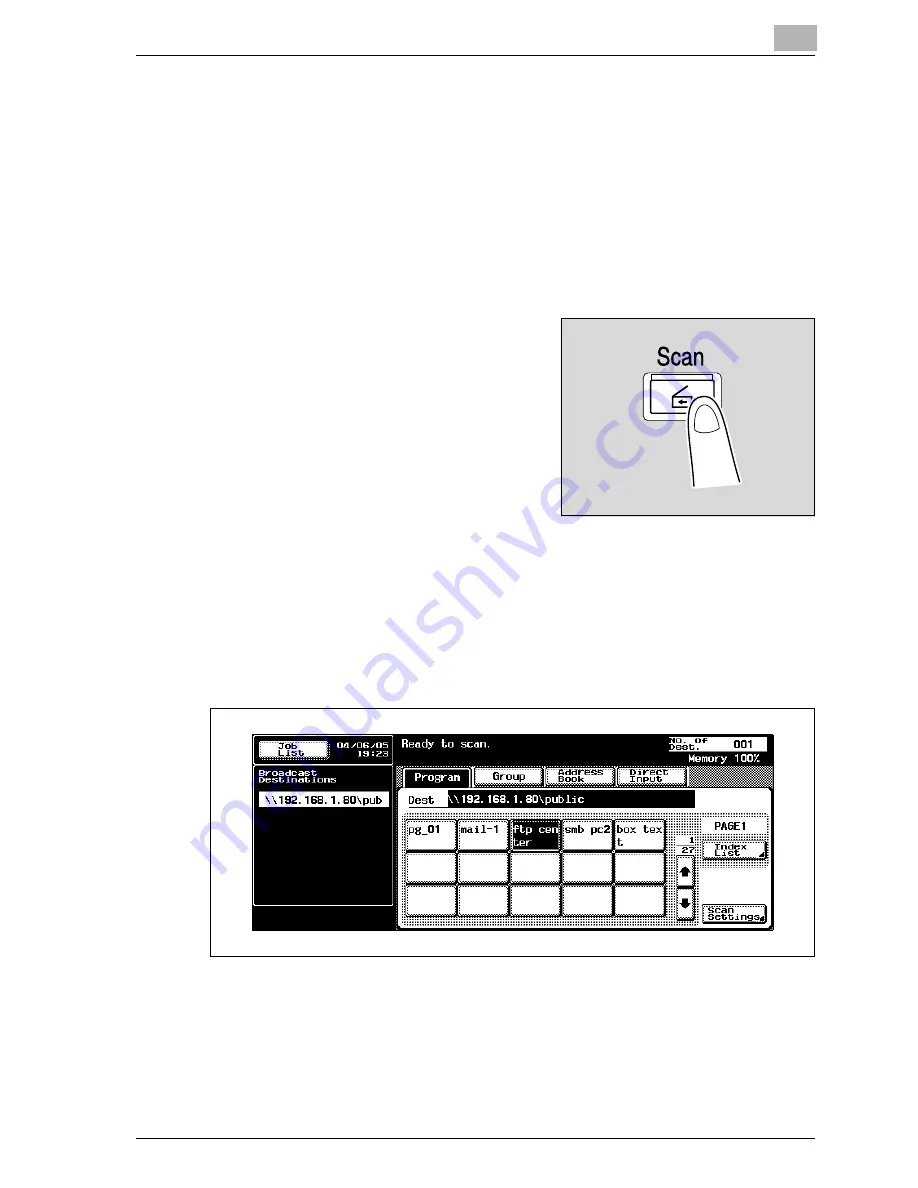
Using programs

"Program" refers to a set of destination FTP servers and scan settings that 
are registered together. The following procedure describes how to send data 
by selecting a program that has been registered in advance.

If a proxy server is available on the network, FTP servers on the Internet can 
be accessed via a proxy server.

For details on registering programs, refer to "Registering program 
destinations" on page 4-27.

1

Press the [Scan] key on the control 
panel.

The Scan mode screen appears.

2

Touch [Program].

The selected destinations are listed under "Broadcast Destinations". 
Other destination addresses can be added using the address book or 
through direct input.


Only the destinations that can be specified are displayed. For example, 
fax destinations are not displayed.


Содержание CS230

Страница 1: ...Oc CS230 Phase 3 User s Guide Network Scanner...

Страница 2: ...B V makes no representation or warranties with respect to the contents hereof and specifically disclaims any implied warranties of merchantability or fitness for any particular purpose Further Oc Tech...

Страница 3: ...erations 1 12 User manual Enlarge Display Operations 1 12 User manual FK 502 Facsimile Operations 1 12 User manual Network Facsimile Operations 1 12 User manual Print Operations 1 13 2 Before using th...

Страница 4: ...9 3 4 Sending data to a server Scan to FTP 3 22 Scan to FTP 3 22 Using programs 3 23 Selecting group addresses 3 25 Selecting destinations from the address book 3 28 Entering the addresses directly 3...

Страница 5: ...the e mail settings 3 85 3 8 Checking the scanner transmission log 3 86 Displaying the current jobs list 3 86 Displaying the job history list 3 87 Displayed information 3 88 4 Specifying settings from...

Страница 6: ...egistration list 4 46 Address book list 4 46 Group list 4 48 Program list 4 50 E mail subject text list 4 52 4 10 Creating annotation user boxes 4 54 To create annotation user boxes 4 56 4 11 TCP IP s...

Страница 7: ...fy e mail TX SMTP settings 4 108 SMTP server address 4 110 SMTP detail 4 112 SMTP authentication 4 113 4 21 E mail RX POP settings 4 116 E mail RX POP parameters 4 116 To specify e mail RX POP setting...

Страница 8: ...tings 4 146 4 31 SNMP settings 4 148 SNMP parameters 4 148 To specify SNMP settings 4 149 v1 v2c setting 4 150 v3 setting 4 151 To specify the v3 settings 4 152 4 32 Bonjour setting 4 154 To specify t...

Страница 9: ...ministrator 5 15 Logging on to administrator mode 5 17 To log on to administrator mode 5 17 5 4 User authentication user mode 5 20 Changing the user password 5 20 To change the user password 5 20 Chec...

Страница 10: ...egistration administrator mode 5 60 Account track registration 5 60 To register an account 5 61 Checking or changing the registered account information 5 63 To check or change the registered account i...

Страница 11: ...30 SSL TLS 5 118 SSL TLS setting 5 120 To create a certificate 5 122 SSL TLS setting Install a certificate 5 124 Set an encryption strength 5 125 Remove a certificate 5 127 Set mode using SSL 5 129 Pr...

Страница 12: ...Product specifications 7 3 Scanning functions 7 3 Network function 7 4 Status indicators 7 5 10 100Base T UTP cable specifications 7 5 7 2 Entering text 7 6 To type text 7 8 List of available charact...

Страница 13: ...1 Introduction...

Страница 14: ......

Страница 15: ...e and basic troubleshooting procedures In order to ensure that this machine is used correctly and efficiently carefully read this user manual before using the machine After reading the manual store it...

Страница 16: ...RGY STAR Guidelines for energy efficiency What is an ENERGY STAR Product An ENERGY STAR product has a special feature that allows it to automatically switch to a low power mode after a period of inact...

Страница 17: ...ed in part on the work of the Independent JPEG Group Compact VJE Copyright 1986 2003 VACS Corp RC4 is a registered trademark or trademark of RSA Security Inc in the United States and or other countrie...

Страница 18: ...ssl org 5 Products derived from this software may not be called OpenSSL nor may OpenSSL appear in their names without prior written permission of the OpenSSL Project 6 Redistributions of any form what...

Страница 19: ...de must retain the copyright notice this list of conditions and the following disclaimer 2 Redistributions in binary form must reproduce the above copyright notice this list of conditions and the foll...

Страница 20: ...OF SUCH DAMAGE The licence and distribution terms for any publically available version or derivative of this code cannot be changed i e this code cannot simply be copied and put under another distrib...

Страница 21: ...apter 1 Introduction Chapter 2 Before using the scan functions Chapter 3 Scanning documents Chapter 4 Specifying settings from the control panel Chapter 5 Specifying settings Using Web Connection Chap...

Страница 22: ...to prevent injuries and to ensure safe use of the machine 7 CAUTION Failure to observe instructions highlighted in this manner may result in slight injuries or property damage Observe all cautions in...

Страница 23: ...machine 2 Reminder Text highlighted in this manner contains information that should be reminded Detail Text highlighted in this manner contains references for more detailed information Special text m...

Страница 24: ...E Mail Scan to FTP and Scan to SMB User manual Box Operations This manual contains details on operating procedures for using the boxes Refer to this user manual for details on operating procedures for...

Страница 25: ...1 13 User manual Print Operations This manual contains details on operating procedures using the standard built in printer controller For details on the printing functions refer to user manual PDF fi...

Страница 26: ...1 Introduction 1 14 CS230 Phase3...

Страница 27: ...2 Before using the scan functions...

Страница 28: ......

Страница 29: ...a TCP IP network For details on the connection refer to Connecting to the network on page 2 13 Also network parameters such as the IP address of this machine must be specified in order to use the mach...

Страница 30: ...n the data can be stored on the internal hard disk of this machine This function can be used from the Box mode which is described in the User manual Box Operations Furthermore this machine can be used...

Страница 31: ...rver The FTP server address login password and other information are entered from the touch panel of this machine The data files uploaded to the FTP server can be downloaded from a computer on the net...

Страница 32: ...ata can be sent to a shared folder on a specified computer The name of the destination computer login password and other information are entered from the touch panel of this machine For details refer...

Страница 33: ...be entered from the touch panel of the machine In addition if the scanned data is saved in Annotation User box you can deliver it over the Internet by adding any domain name and the delivery date and...

Страница 34: ...ne can be used as a scanner The scanner can be controlled from a computer connected to the network and the scanned image can be loaded into an application on the computer to be processed For details r...

Страница 35: ...network settings refer to the chapters listed below TCP IP settings on page 4 59 E mail TX SMTP settings on page 4 106 5 Specifying settings Using Web Connection Specifying network settings An IP add...

Страница 36: ...e The destination can also be entered before scanning This is called direct input For details refer to Entering the addresses directly on page 3 19 Detail For details on registering destinations and s...

Страница 37: ...Specifying the scan settings The following scan settings can be specifying when scanning a document These settings are specified from the touch panel of the machine Detail For details on the scan sett...

Страница 38: ...ocuments and sending data under the same conditions These settings are specified from the touch panel of the machine Detail For details refer to Registering program destinations on page 4 27 Specifyin...

Страница 39: ...nnected to the network 2 Reminder The machine can be connected via a parallel or USB connection optional However be sure to connect to the network to use the scanner function Network connection Connec...

Страница 40: ...g Up LDAP settings on page 4 95 Search default setting on page 4 105 E mail TX SMTP settings on page 4 106 E mail RX POP settings on page 4 116 Device settings on page 4 121 Time adjustment settings o...

Страница 41: ...e Some settings that can be specified on the control panel can also be specified from a computer over a network using Web Connection For details refer to Chapter 4 Specifying Settings Using Web Connec...

Страница 42: ...2 Before using the scan functions 2 16 CS230 Phase3...

Страница 43: ...3 Scanning documents...

Страница 44: ......

Страница 45: ...ser authentication or account track settings have been applied press this key after entering the user name and password for user authentication or the account name and password for account track in or...

Страница 46: ...s to start scanning When this machine is ready to begin scanning the indicator on the Start key lights up in green If the indicator on the Start key lights up in orange scanning cannot begin Press to...

Страница 47: ...Also do not push down on the touch panel using hard or sharp objects 23 Accessibility key Press to display the screen for specifying user ac cessibility functions 24 Help key Press to display the Hel...

Страница 48: ...ime display area Displays the current date time 4 Message display area Displays the machine status and details on operations that must be performed 5 Program button Displays destinations that are regi...

Страница 49: ...Scanning documents 3 CS230 Phase3 3 7 10 Address number display area Shows the number of specified addresses 11 Scan Settings button Used to specify scan settings No Name Description...

Страница 50: ...direct input 2 Note For the procedure for sending e mail refer to Sending the scanned data in an e mail message on page 2 4 Using programs Program refers to a set of destination addresses and scan set...

Страница 51: ...an be added using the address book or through direct input Only the destinations that can be specified are displayed For example fax destinations are not displayed 3 Touch Scan Settings to check the s...

Страница 52: ...touch OK 5 Load the document into the ADF or position it on the original glass of the machine 6 Press the Start key on the control panel The document is scanned and the data is sent 2 Note Do not tur...

Страница 53: ...rocedure describes how to send data by selecting a group that has been registered in advance For details on registering groups refer to Registering program destinations on page 4 27 1 Press the Scan k...

Страница 54: ...e3 3 Select the desired destinations and then touch OK 4 Touch Scan Settings and then specify the scan settings For details on the scan settings refer to Specifying the scan settings on page 3 48 5 Af...

Страница 55: ...document into the ADF or position it on the original glass of the machine 7 Press the Start key on the control panel The document is scanned and the data is sent 2 Note Do not turn off the machine un...

Страница 56: ...age 4 12 1 Press the Scan key on the control panel The Scan mode screen appears 2 Touch Address Book The address book is displayed and registered address names are displayed by touching the correspond...

Страница 57: ...ct it The selected buttons are highlighted and the selected destinations are listed under Broadcast Destinations Other destination addresses can be added through direct input If necessary you can sear...

Страница 58: ...rch Searches the address by entering a section of the name or description of the address LDAP search Searches the address that meets the conditions from the addresses registered on the LDAP server A B...

Страница 59: ...3 CS230 Phase3 3 17 Detail To perform LDAP searches the LDAP server settings that are specified in Administrator Setting are required For details refer to Enabling LDAP settings on page 4 93 Advanced...

Страница 60: ...s refer to Specifying the scan settings on page 3 48 2 After specifying the settings touch OK 3 Load the document into the ADF or position it on the original glass of the machine 4 Press the Start key...

Страница 61: ...the Scan key on the control panel The Scan mode screen appears 2 Touch Direct Input then Scan to E Mail A screen for entering the destination address appears Why is the Direct Input tab not displayed...

Страница 62: ...n additional address touch Next Dest and then specify the address Frequently entered user names and domain names can be registered to be recalled and used again First prefixes and suffixes must be reg...

Страница 63: ...ecifying the scan settings on page 3 48 5 After specifying the settings touch OK 6 Load the document into the ADF or position it on the original glass of the machine 7 Press the Start key on the contr...

Страница 64: ...ion then adding other destinations through direct input Transmission may not be possible if the destination server has placed limitations on the document name Because the document name becomes the fil...

Страница 65: ...ork FTP servers on the Internet can be accessed via a proxy server For details on registering programs refer to Registering program destinations on page 4 27 1 Press the Scan key on the control panel...

Страница 66: ...an settings refer to Specifying the scan settings on page 3 48 4 After specifying the settings touch OK 5 Load the document into the ADF or position it on the original glass of the machine 6 Press the...

Страница 67: ...cting a group that has been registered in advance For details on registering groups refer to Registering group destinations on page 4 25 1 Press the Scan key on the control panel The Scan mode screen...

Страница 68: ...on and then touch OK The selected destinations are listed under Broadcast Destinations 4 Touch Scan Settings and then specify the scan settings For details on the scan settings refer to Specifying the...

Страница 69: ...document into the ADF or position it on the original glass of the machine 7 Press the Start key on the control panel The document is scanned and the data is sent 2 Note Do not turn off the machine un...

Страница 70: ...cting destinations from the address book Multiple addresses can be specified simultaneously from the address book For details on registering addresses in the address book refer to Registering abbrevia...

Страница 71: ...Touch Detail Search to search for addresses The address book can be searched for names or addresses 3 Touch the button for a destination to select it The buttons are highlighted and the selected desti...

Страница 72: ...ecifying the scan settings on page 3 48 5 After specifying the settings touch OK 6 Load the document into the ADF or position it on the original glass of the machine 7 Press the Start key on the contr...

Страница 73: ...ddress 1 Press the Scan key on the control panel The Scan mode screen appears 2 Touch Direct Input then Scan to FTP A screen for entering the destination host name destination folder and other informa...

Страница 74: ...ecify the path to the destination folder and then touch OK User Name Use the keyboard that appears in the touch panel to specify the login user name and then touch OK Password Use the keyboard that ap...

Страница 75: ...destination Information and then touch OK To specify an additional address touch Next Dest and then specify the address The addresses that were entered are listed under Broadcast Destinations 7 Touch...

Страница 76: ...page 3 48 8 After specifying the settings touch OK 9 Load the document into the ADF or position it on the original glass of the machine 10 Press the Start key on the control panel The document is sca...

Страница 77: ...indows File Sharing Mac OS X Samba Linux Unix When performing SMB transmission to Mac OS X Linux or Unix the conditions described below must be meet for the network settings and user name Change the s...

Страница 78: ...an settings that are registered together The following procedure describes how to send data by selecting a program that has been registered in advance For details on registering programs refer to Regi...

Страница 79: ...can settings refer to Specifying the scan settings on page 3 48 4 After checking the settings touch OK 5 Load the document into the ADF or position it on the original glass of the machine 6 Press the...

Страница 80: ...cting a group that has been registered in advance For details on registering groups refer to Registering group destinations on page 4 25 1 Press the Scan key on the control panel The Scan mode screen...

Страница 81: ...39 3 Select the desired destinations and then touch OK 4 Touch Scan Settings and then specify the scan settings For details on the scan settings refer to Specifying the scan settings on page 3 48 5 Af...

Страница 82: ...document into the ADF or position it on the original glass of the machine 7 Press the Start key on the control panel The document is scanned and the data is sent 2 Note Do not turn off the machine un...

Страница 83: ...cting destinations from the address book Multiple addresses can be specified simultaneously from the address book For details on registering addresses in the address book refer to Registering abbrevia...

Страница 84: ...Detail Search to search for addresses The address book can be searched for names or addresses 3 Touch the button for a destination to select it The selected buttons are highlighted and the selected d...

Страница 85: ...ecifying the scan settings on page 3 48 5 After specifying the settings touch OK 6 Load the document into the ADF or position it on the original glass of the machine 7 Press the Start key on the contr...

Страница 86: ...control panel The Scan mode screen appears 2 Touch Direct Input then Scan to SMB A screen for entering the destination host name destination folder and other information appears Why is the Direct Inp...

Страница 87: ...e keyboard that appears in the touch panel to specify the login user name and then touch OK Password Use the keyboard that appears in the touch panel to specify the password and then touch OK Referenc...

Страница 88: ...or details on the scan settings refer to Specifying the scan settings on page 3 48 6 After specifying the settings touch OK 7 Load the document into the ADF or position it on the original glass of the...

Страница 89: ...off the machine until the scanned jobs disappear from the job list Detail When a work group and computer that exceed the numbers described below exist browsing over the network subnet of this machine...

Страница 90: ...s the image type of the scanned document Original type on page 3 56 Scan Size Sets the paper size to be scanned Scan size on page 3 59 Color Sets whether to scan in color or black and white Color on p...

Страница 91: ...e loaded into the ADF or when placing the document on the original glass In addition the documents can be scanned separately according to their type such as when single sid ed documents are mixed with...

Страница 92: ...or details on the Color settings refer to Color on page 3 62 Item Description PDF Saves to the PDF format Compact PDF Saves to the compressed PDF format Used for full color scan data etc TIFF Saves to...

Страница 93: ...of the saved data can be specified Scan Setting Auto Full Color Gray Scale Black PDF Yes Yes Yes Yes Compact PDF No Yes No No TIFF No No No Yes JPEG Yes Yes Yes No Item Description Single Page A file...

Страница 94: ...3 Scanning documents 3 52 CS230 Phase3 To specify the file type settings 1 Touch Scan Settings in the Scan mode screen 2 Touch File Type 3 Select the file type...

Страница 95: ...uments 3 CS230 Phase3 3 53 4 If PDF or Compact PDF is selected touch Encryption 5 Specify the encryption settings 6 Touch OK 7 Select the scan setting 8 Touch OK and then touch OK in the next screen t...

Страница 96: ...hase3 Resolution Set the scanning resolution to 200 dpi 300 dpi 400 dpi or 600 dpi 1 Touch Scan Settings in the Scan mode screen 2 Touch Resolution 3 Select the resolution 4 Touch OK and then touch OK...

Страница 97: ...Settings in the Scan mode screen 2 Touch Simplex Duplex 3 Select the scan type 4 Touch OK and then touch OK in the next screen that appears Item Description 1 Sided Scans one side of the document 2 Si...

Страница 98: ...Text Select for a document consisting only of text Text Photo Select for a document containing text and photo half tone Photo Select for a document containing only photos half tone Dot Matrix Select...

Страница 99: ...Scanning documents 3 CS230 Phase3 3 57 To specify the original type setting 1 Touch Scan Settings in the Scan mode screen 2 Touch Original Type 3 Select the image type...

Страница 100: ...3 Scanning documents 3 58 CS230 Phase3 4 If Text Photo or Photo is selected select the photo type and then touch OK 5 Touch OK and then touch OK in the next screen that appears...

Страница 101: ...e 3 Select the size and direction Item Description Auto Detects the size of the first page of the loaded document Standard sizes Select a standard size and direction Custom Size Use to enter the dimen...

Страница 102: ...anned Touch Custom Size to display a screen for specifying the size Use the keypad or touch and to specify the size Touch to switch between the integer and the fraction The integer can be specified in...

Страница 103: ...3 CS230 Phase3 3 61 Touch Photo Size to display a screen for specifying the size Select the size and direction of the photo to be Scanned and then touch OK 4 Touch OK and then touch OK in the next sc...

Страница 104: ...s on the File Type settings refer to File type on page 3 50 Item Description Auto Automatically detects the color of the document and scans accordingly Full Color Scans at full color Gray Scale Select...

Страница 105: ...ng documents 3 CS230 Phase3 3 63 To specify the color setting 1 Touch Scan Settings in the Scan mode screen 2 Touch Color 3 Select the color type 4 Touch OK and then touch OK in the next screen that a...

Страница 106: ...kground may be dark in the scan In such cases the background density can be adjusted 1 Touch Scan Settings in the Scan mode screen 2 Touch Background Removal Touch Auto to adjust the background densit...

Страница 107: ...ng a thick document Original Direction Specifies the orientation of the document The data is proc essed so that the top and bottom ends are correctly posi tioned when the document is scanned Bind Spec...

Страница 108: ...ify the original settings 1 Touch Scan Settings in the Scan mode screen 2 Touch Original Setting 3 Specify the original settings If Original Direction is selected a screen for selecting the direction...

Страница 109: ...67 To select the default settings touch Reset If Bind is selected a screen for selecting the document binding position appears Select the binding position and then touch OK 4 Touch OK and then touch...

Страница 110: ...rase function on the Application screen Item Description Book Spread Scans a spread as one page Book Separation Scans a spread as separate left and right pages 2 pages Front Cover Scans the first page...

Страница 111: ...Scanning documents 3 CS230 Phase3 3 69 To use the Book Scan function 1 Touch Scan Settings in the Scan mode screen 2 Touch Application 3 Touch Book Scanning...

Страница 112: ...s 3 70 CS230 Phase3 4 Specify the Book Scanning settings If Book Separation Front Cover and Front and Back Cover are selected select the binding direction 5 Touch OK and then touch OK in the next two...

Страница 113: ...fied separately for the top left right and bottom sides within the range of 1 16 in to 2 in If the width to be erased is specified using the Book Erase functions in the Book Scanning screen the same v...

Страница 114: ...enter the value To specify the width separately for the top left right and bottom sides touch the corresponding button and enter the value To specify that no area is erased touch None For North Americ...

Страница 115: ...73 Annotation Application When saving a scanned document add the preset domain name sequence number date and time and then save the document in a box 1 Touch Scan Settings in the Scan mode screen 2 T...

Страница 116: ...tinations is added Detail Only the PDF file format can be saved When saving data in an annotation user box e mail transmission FTP transmission and SMB transmission can be specified at the same time 2...

Страница 117: ...documents Touch Separate Scan in the Scan Settings screen The function is enabled when its button appears selected File name You can change the file name to be saved Detail If a file name is not spec...

Страница 118: ...6 CS230 Phase3 To change the file name 1 In the Scan mode screen touch Scan Settings 2 Touch File Name 3 Type in the new file name using the keyboard that appears 4 Touch OK and then touch OK in the n...

Страница 119: ...ystem Setting Restrict User Access Restrict Access to job Setting is specified as restricted direct input cannot be performed Item Description Type Displays the type of transmission Name Displays the...

Страница 120: ...78 CS230 Phase3 To check a job 1 Press the Mode Check key in the control panel while the Scan mode screen is displayed The Mode Check screen appears 2 Select the desired job from the list of register...

Страница 121: ...splay the direct input screen on which the address can be corrected After correcting the destination touch OK How do you specify the notification destination Touch Set Dest to display the address book...

Страница 122: ...3 Scanning documents 3 80 CS230 Phase3 Can an address that is directly entered be registered in the address book To register the address to the address book touch Save in Add Book...

Страница 123: ...the address book Touch Name and then enter the name that is to be registered in the address book After entering the name check it and then touch Yes 5 After checking the information touch Close 6 Touc...

Страница 124: ...ons The selected destination can be deleted 1 Press the Mode Check key in the control panel while the Scan mode screen is displayed The Mode Check screen appears 2 Select the desired job from the list...

Страница 125: ...Scanning documents 3 CS230 Phase3 3 83 4 Touch Yes to delete the job 5 Touch Close...

Страница 126: ...displayed Touch Direct Input to change the information Up to 256 characters can be entered Item Description S Indicates the mode when the file was saved C Copy F Fax S Scan P Printer KMBT_C450 The na...

Страница 127: ...e Mode Check key in the control panel while the Scan mode screen is displayed The Mode Check screen appears 2 Touch E Mail Setting A confirmation message appears 3 Check the information and change it...

Страница 128: ...ach button refer to the User manual Copy Operations Displaying the current jobs list 1 Touch Job List on the control panel The Print tab of the Job List screen appears 2 Touch Scan The Current Jobs li...

Страница 129: ...The Active Jobs list appears in the Job History list of the Scan tab The first screen that appears when Job History is touched contains the Active Jobs list 4 Touch the button corresponding to the des...

Страница 130: ...job ID number that is assigned when a job is reg istered Type Displays the transmission type Status only on the Current Jobs list Displays the job status Dest Displays the destination Time Stored Dis...

Страница 131: ...4 Specifying settings from the control panel...

Страница 132: ......

Страница 133: ...lity settings covered in this manual are as follows Item Description Reference One Touch Registra tion Sets the scanner destinations Destinations such as programs groups and abbreviated destina tions...

Страница 134: ...6 AppleTalk settings on page 4 91 Enabling LDAP settings on page 4 93 Setting Up LDAP settings on page 4 95 Search default setting on page 4 105 E mail TX SMTP settings on page 4 106 E mail RX POP set...

Страница 135: ...er to the corresponding section in the User manual Copy Operations Item Description Reference Administrator Regis tration Scanned data cannot be sent by E mail if the administrator s E mail address is...

Страница 136: ...ns To display the scan screen 1 Press the Utility Counter key In Utility mode an item can also be selected by pressing the key in the keypad for the number beside the desired button For 1 One Touch Re...

Страница 137: ...Scan screen appears 2 Note To quit specifying the Utility mode setting touch Exit in the sub display area or press the Utility Counter key Otherwise cancel the Utility mode by touching Close in each...

Страница 138: ...user setting screen 1 Press the Utility Counter key 2 Touch 2 User Setting In Utility mode an item can also be selected by pressing the key in the keypad for the number beside the desired button For...

Страница 139: ...ase3 4 9 2 Note To quit specifying the Utility mode setting touch Exit in the sub display area or press the Utility Counter key Otherwise cancel the Utility mode by touching Close in each screen until...

Страница 140: ...ting screen 1 Press the Utility Counter key 2 Touch 3 Administrator Setting In Utility mode an item can also be selected by pressing the key in the keypad for the number beside the desired button For...

Страница 141: ...quit specifying the Utility mode setting touch Exit in the sub display area or press the Utility Counter key Otherwise cancel the Utility mode by touching Close in each screen until the screen for the...

Страница 142: ...to 2000 destinations can be registered E mail destinations E mail addresses can be registered 1 In the Scan screen touch 1 Address Book Refer to page 4 6 for more details 2 Touch 1 E Mail The E Mail s...

Страница 143: ...ters used to index the destination For destinations that are often used specify Main at the same time and it will be easier to search If the first character of the name is a letter the first character...

Страница 144: ...for the desired destination and then touch Delete 2 Note If Registering and Changing Address is restricted use One Touch Registration in Administrator Setting 2 Note To cancel changes to the setting t...

Страница 145: ...P destinations can be registered 1 In the Scan screen touch 1 Address Book Refer to page 4 6 for more details 2 Touch 2 FTP The FTP screen appears 3 Touch New The Register FTP screen appears 4 Touch N...

Страница 146: ...or to move the cursor to the desired position and then type in the desired value If IP Address Input is touched after entering the host address the host address is cleared If the IP address is entered...

Страница 147: ...screen 12 Touch OK 13 Touch Password and type in the password using the keyboard that appears on the screen 14 Touch OK If the first character of the name is a letter the first character is automatic...

Страница 148: ...dress File Path User ID and Password Detail To check the registered destination touch the button for the destination and then touch Check Setting To change the registered destination settings touch th...

Страница 149: ...B destinations can be registered 1 In the Scan screen touch 1 Address Book Refer to page 4 6 for more details 2 Touch 3 SMB The SMB screen appears 3 Touch New The Register SMB screen appears 4 Touch N...

Страница 150: ...e desired value If IP Address Input is touched after entering the host address the host address is cleared If the IP address is entered first then Host Name Input is touched the IP address that was en...

Страница 151: ...ed as the indexing character The registration cannot be completed unless settings have been specified for Name Host Address and File Path 16 Touch OK and then touch OK in the next screen that appears...

Страница 152: ...o quit specifying the Utility mode setting touch Exit in the sub display area or press the Utility Counter key Otherwise cancel the Utility mode by touching Close in each screen until the screen for t...

Страница 153: ...ered 1 In the Scan screen touch 1 Address Book Refer to page 4 6 for more details 2 Touch 4 User Box The User Box screen appears 3 Touch New The Register User Box screen appears 4 Touch Name and type...

Страница 154: ...registered destination touch the button for the destination and then touch Check Setting To change the registered destination settings touch the button for the desired destination and then touch Edit...

Страница 155: ...roup destinations can be registered To register a group destination 1 In the Scan screen touch 2 Group Refer to page 4 6 for more details The Group screen appears 2 Touch New The Register Group screen...

Страница 156: ...the registered destination touch the button for the destination and then touch Check Setting To change the registered destination settings touch the button for the desired destination and then touch E...

Страница 157: ...ons can be registered To register a program destination 1 In the Scan screen touch 3 Program Refer to page 4 6 for more details 2 Touch the button for the desired program number 3 Touch Edit The Progr...

Страница 158: ...gs refer to Specifying the scan settings on page 3 48 To register communication settings touch Yes beside Communication Setting Specify the file name for saving the file and e mail notification settin...

Страница 159: ...o quit specifying the Utility mode setting touch Exit in the sub display area or press the Utility Counter key Otherwise cancel the Utility mode by touching Close in each screen until the screen for t...

Страница 160: ...registered Subject E Mail subjects can be registered 1 In the Scan screen touch 4 Subject Text for E mail Refer to page 4 6 for more details 2 Touch 1 Subject The E Mail Title screen appears 3 Touch N...

Страница 161: ...touch Details To delete the registered setting touch the button for the desired subject and then touch Delete 2 Note To cancel changes to the setting touch Cancel To quit specifying the Utility mode...

Страница 162: ...data was sent can be selected 1 In the Scan screen touch 4 Subject Text for E mail Refer to page 4 6 for more details 2 Touch 2 Text The E Mail Text screen appears 3 Touch New The E Mail Text Registra...

Страница 163: ...the registered setting touch the button for the desired text and then touch Delete 2 Note To cancel changes to the setting touch Cancel To quit specifying the Utility mode setting touch Exit in the s...

Страница 164: ...een Default tab The default screen that appears in Scan mode can be specified Default setting Program 1 In the User Setting screen touch 2 Display Setting Refer to page 4 8 for more details 2 Touch 2...

Страница 165: ...can mode can be specified Default setting PAGE1 1 In the User Setting screen touch 2 Display Setting To display the User Setting screen refer to page 4 8 2 Touch 2 Scan Basic Screen Default Setting 3...

Страница 166: ...4 Specifying settings from the control panel 4 36 CS230 Phase3 2 Note To cancel changes to the setting touch Cancel...

Страница 167: ...t index You can select the index type that is displayed in the address book Default setting Main 1 In the User Setting screen touch 2 Display Setting 2 Touch 2 Scan Basic Screen Default Setting 3 Touc...

Страница 168: ...fying settings from the control panel 4 38 CS230 Phase3 2 Note To display the User Setting screen refer to To display the user setting screen on page 4 8 2 Note To cancel changes to the setting touch...

Страница 169: ...the symbol of the address type Default setting ON 1 In the User Setting screen touch 2 Display Setting 2 Touch 2 Scan Basic Screen Default Setting 3 Touch Address Type Symbol Display 4 Touch the butt...

Страница 170: ...ty The data size is large but the image is of high quality Standard The size and quality are between High Quality and High Compression High Compression The data size is small but the image is of low q...

Страница 171: ...se3 4 41 2 Note To quit specifying the Utility mode setting touch Exit in the sub display area or press the Utility Counter key Otherwise cancel the Utility mode by touching Close in each screen until...

Страница 172: ...data size is small To specify the compression level 1 In the User Setting screen touch 5 Scanner Setting To display the User Setting screen refer to page 4 8 2 Touch Black Compression Level 3 Touch th...

Страница 173: ...control panel 4 CS230 Phase3 4 43 by touching Close in each screen until the screen for the Copy Fax Scan or Box mode appears When opening the saved data on a computer MMR compressed data may not open...

Страница 174: ...In the User Setting screen touch 5 Scanner Setting To display the User Setting screen refer to page 4 8 2 Touch TWAIN Lock Time 3 Press the C clear key to erase the value and then use the keypad to ty...

Страница 175: ...ility mode setting touch Exit in the sub display area or press the Utility Counter key Otherwise cancel the Utility mode by touching Close in each screen until the screen for the Copy Fax Scan or Box...

Страница 176: ...or Setting screen touch 3 One Touch Registration 2 In the One Touch Registration screen touch 4 One Touch Registration List Item Description Address Book List Selects the address book type and outputs...

Страница 177: ...l 4 CS230 Phase3 4 47 3 Touch 1 Address Book List 4 Select the registration number and destination type and then touch Print 2 Note To display the Administrator Setting screen refer to To display the...

Страница 178: ...gs from the control panel 4 48 CS230 Phase3 Group list 1 In the Administrator Setting screen touch 3 One Touch Registration 2 In the One Touch Registration screen touch 4 One Touch Registration List 3...

Страница 179: ...gs from the control panel 4 CS230 Phase3 4 49 4 Select the registration number and then touch Print 2 Note To display the Administrator Setting screen refer to To display the administrator setting scr...

Страница 180: ...from the control panel 4 50 CS230 Phase3 Program list 1 In the Administrator Setting screen touch 3 One Touch Registration 2 In the One Touch Registration screen touch 4 One Touch Registration List 3...

Страница 181: ...e control panel 4 CS230 Phase3 4 51 4 Select the registration number and destination type and then touch Print 2 Note To display the Administrator Setting screen refer to To display the administrator...

Страница 182: ...ntrol panel 4 52 CS230 Phase3 E mail subject text list 1 In the Administrator Setting screen touch 3 One Touch Registration 2 In the One Touch Registration screen touch 4 One Touch Registration List 3...

Страница 183: ...ontrol panel 4 CS230 Phase3 4 53 4 Select the paper size and simplex or duplex printing and then press Start key 2 Note To display the Administrator Setting screen refer to To display the administrato...

Страница 184: ...ox number Name Touch Name and then use the keyboard that appeared to type in the box name Password Touch Password and then use the keyboard that ap peared to type in the password Item Description Coun...

Страница 185: ...ss than 8 characters has already been registered change the password so that it contains 8 characters before setting Password Rules to ON For details on the password rules refer to the User manual Cop...

Страница 186: ...s from the control panel 4 56 CS230 Phase3 To create annotation user boxes 1 In the Administrator Setting screen touch 3 One Touch Registration 2 Touch 3 User Box The User Box screen appears 3 Touch 4...

Страница 187: ...Specifying settings from the control panel 4 CS230 Phase3 4 57 4 Touch New The registration screen appears 5 Specify the various settings for the box 6 Touch Fwd Registration screen 2 3 appears...

Страница 188: ...ing settings from the control panel 4 58 CS230 Phase3 7 Specify the desired settings 8 Touch Fwd Registration screen 3 3 appears 9 Specify the desired settings 10 Touch OK 11 Touch Close The box is re...

Страница 189: ...y are not available When a DHCP server is used the IP address subnet mask and default gateway are assigned from the DHCP server Therefore there is no need to specify these settings manually However no...

Страница 190: ...Use the keypad to type in the address Subnet Mask Set the subnet mask of the network to which the machine is to be connected Use the keypad to type in the address Default Gateway Set the default gate...

Страница 191: ...he name up to 253 characters DNS Search Domain Name1 3 Enter the DNS search domain name Use the keyboard that appears in the touch panel to type in the name up to 253 characters Item Description Dynam...

Страница 192: ...In the Administrator Setting screen touch 5 Network Setting Refer to page 4 10 for more details 2 In the Network Setting screen touch 1 TCP IP Setting TCP IP Setting screen 1 5 appears 3 Specify the d...

Страница 193: ...Phase3 4 63 If Auto Input was selected under IP Definition Method specify the automatic acquisition procedure and then touch OK 6 Touch Fwd TCP IP Setting screen 3 5 appears 7 Specify the desired sett...

Страница 194: ...e desired settings 12 Touch OK The TCP IP settings are applied 2 Note To cancel changes to the setting touch Cancel To quit specifying the Utility mode setting touch Exit in the sub display area or pr...

Страница 195: ...ecifying settings from the control panel 4 CS230 Phase3 4 65 2 Reminder In order to apply the changes made to IP Address Subnet Mask Default Gateway and DHCP the machine must be turned off then on aga...

Страница 196: ...to Set 5 and then use the keypad to type in the address range The range setting cannot include 0 0 0 0 For example to specify all addresses before 192 168 1 20 specify the range from 0 0 0 1 to 192 1...

Страница 197: ...Specifying settings from the control panel 4 CS230 Phase3 4 67 4 Touch OK IP filtering is set 2 Note To cancel changes to the setting touch Cancel...

Страница 198: ...the button for the desired port 3 Touch ON or OFF 4 To use the selected port press the C clear key to erase the value and then use the keypad to type in the RAW port number between 1 and 65535 If a va...

Страница 199: ...the print mode to be used Status The NetWare status can be verified For details on specify ing the setting refer to Status on page 4 74 Item Description Print Server Name Sets the printer server name...

Страница 200: ...ext name Use the keyboard that ap pears in the touch panel to type in the NDS context name up to 191 characters NDS Tree Name Sets the NDS tree name Use the keyboard that appears in the touch panel to...

Страница 201: ...ing screen touch 5 Network Setting Refer to page 4 10 for more details 2 In the Network Setting screen touch 2 NetWare Setting NetWare Setting screen 1 5 appears 3 Specify the desired settings 4 Touch...

Страница 202: ...ttings from the control panel 4 72 CS230 Phase3 7 Specify the desired settings 8 Touch Fwd Pserver Setting screen 4 5 appears 9 Specify the desired settings 10 Touch Fwd Nprinter Rprinter Setting scre...

Страница 203: ...are settings are applied 2 Note To cancel changes to the setting touch Cancel To quit specifying the Utility mode setting touch Exit in the sub display area or press the Utility Counter key Otherwise...

Страница 204: ...trol panel 4 74 CS230 Phase3 Status The NetWare status can be verified 1 In NetWare Setting screen 2 5 touch Status The NetWare Status screen appears 2 Touch or to select the server to verify 3 Verify...

Страница 205: ...closed Web Connection Setting Select whether to use Web Connection Item Description IPP Setting Specify whether to enable the IPP print function Accept IPP job Set whether to accept IPP jobs Support...

Страница 206: ...ing screen touch 5 Network Setting Refer to page 4 10 for more details 2 In the Network Setting screen touch 3 http Server Setting The http Server Setting screen appears 3 Specify the desired settings...

Страница 207: ...desired settings 10 Touch OK The IPP settings are applied 2 Note To cancel changes to the setting touch Cancel To quit specifying the Utility mode setting touch Exit in the sub display area or press t...

Страница 208: ...sponds as not supported ON Responds to communication No response is returned for Cancel Job Open Job and Open Job Attributes 1 On the IPP Setting screen touch Support Operation The Support Operation s...

Страница 209: ...uch Printer Information Printer Information screen 1 2 appears 2 Touch Printer Name The Printer Name screen appears 3 Type in the printer name up to 127 characters 4 Touch OK To cancel changes to the...

Страница 210: ...0 CS230 Phase3 6 Type in the printer location up to 127 characters 7 Touch OK To cancel changes to the setting touch Cancel The printer location is set the Printer Information screen appears again 8 T...

Страница 211: ...e printer information up to 127 characters To cancel changes to the setting touch Cancel 11 Touch OK The printer information is set the Printer Information screen appears again 12 In Printer Informati...

Страница 212: ...4 Specifying settings from the control panel 4 82 CS230 Phase3 15 Touch Close Detail For the procedure to enter characters refer to Entering text on page 7 6...

Страница 213: ...municate with the FTP server To change the value press the C clear key and then use the keypad to type in the value between 1 and 65535 Connection Timeout If the transmission stops while uploading dat...

Страница 214: ...r Setting screen touch 5 Network Setting Refer to page 4 10 for more details 2 In the Network Setting screen touch 4 FTP Setting FTP Setting screen 1 3 appears 3 Specify the desired settings 4 Touch F...

Страница 215: ...Touch OK The FTP settings are applied 2 Note To cancel changes to the setting touch Cancel To quit specifying the Utility mode setting touch Exit in the sub display area Otherwise cancel the Utility m...

Страница 216: ...appears in the touch panel to type in the NetBIOS name up to 15 characters Print Service Name Sets the printer service name Use the keyboard that ap pears in the touch panel to type in the print servi...

Страница 217: ...ssion settings Item Description User Authentication NTLM Select whether to use the user authentication with NTLM SMB TX Setting Select whether to use the SMB transmission setting NTLM Select the NTLM...

Страница 218: ...Setting screen touch 5 Network Setting Refer to page 4 10 for more details 2 In the Network Setting screen touch 5 SMB Setting The SMB Setting screen 1 4 appears 3 Specify the desired settings 4 Touch...

Страница 219: ...Specifying settings from the control panel 4 CS230 Phase3 4 89 7 Specify the desired settings 8 Touch Fwd SMB Setting screen 4 4 appears 9 Specify the desired settings...

Страница 220: ...pplied 2 Note To cancel changes to the setting touch Cancel To quit specifying the Utility mode setting touch Exit in the sub display area or press the Utility Counter key Otherwise cancel the Utility...

Страница 221: ...the Network Setting screen touch 6 AppleTalk Setting The AppleTalk Setting screen appears 3 Specify the desired settings Item Description AppleTalk Setting Specify whether to turn on the AppleTalk set...

Страница 222: ...applied 2 Note To cancel changes to the setting touch Cancel To quit specifying the Utility mode setting touch Exit in the sub display area or press the Utility Counter key Otherwise cancel the Utili...

Страница 223: ...DAP parameters are as follows To specify enabling LDAP settings 1 In the Administrator Setting screen touch 5 Network Setting Refer to page 4 10 for more details 2 In the Network Setting screen touch...

Страница 224: ...the Utility mode setting touch Exit in the sub display area Otherwise cancel the Utility mode by touching Close in each screen until the screen for the Copy Fax Scan or Box mode appears 2 Reminder If...

Страница 225: ...ching To change the value press the C clear key and then use the keypad to type in the value between 5 and 1000 destinations Timeout Set the maximum wait time for the search operation To change the va...

Страница 226: ...he touch panel to type in the address up to 255 characters Check Connection Checks the connection to the LDAP server Reset All Settings The LDAP server settings can be reset to their factory de fault...

Страница 227: ...dows Kerberos authenti cation NTLM v1 and NTLM v2 Standard authentication meth ods that can be used with Windows NT Used for logging on when sharing files and printers Item Description Select Server A...

Страница 228: ...ts the login name used to connect to the LDAP server Use the keyboard that appears in the touch panel to type in the name up to 255 characters Password Sets the password used to connect to the LDAP se...

Страница 229: ...g settings from the control panel 4 CS230 Phase3 4 99 5 Specify the desired settings 6 Touch Fwd Setting Up LDAP screen 2 6 appears 7 Specify the desired settings 8 Touch Fwd Setting Up LDAP screen 3...

Страница 230: ...g settings from the control panel 4 100 CS230 Phase3 9 Specify the desired settings 10 Touch Fwd Setting Up LDAP screen 4 6 appears 11 Specify the desired settings 12 Touch Fwd Setting Up LDAP screen...

Страница 231: ...ettings 16 Touch OK The LDAP server registration and authentication are set 2 Note To cancel changes to the setting touch Cancel To quit specifying the Utility mode setting touch Exit in the sub displ...

Страница 232: ...one that is used by the LDAP server For details refer to the manual of the LDAP server being used If the authentication method is specified as GSS SPNEGO enter the domain name for Active Directory Det...

Страница 233: ...First Name City Company Name and Department 1 On the Setting Up LDAP screen touch Initial Setting for Search Details The Initial Setting for Search Details screen appears 2 Touch Condition The Select...

Страница 234: ...ppears again 2 Note To cancel changes to the setting touch Cancel To quit specifying the Utility mode setting touch Exit in the sub display area or press the Utility Counter key Otherwise cancel the U...

Страница 235: ...Network Setting screen touch 7 LDAP Setting 3 In the LDAP Setting screen touch 3 Search Default Setting The Detect Default Setting screen appears 4 Select the LDAP server that is to perform searches...

Страница 236: ...tting Specify whether to use an e mail transmission Scan Send Specify whether to use a scan transmission Status Notification Function Specify whether to use the status notification function Total Coun...

Страница 237: ...ption SSL Settings Specify whether to use SSL during e mail transmission When SSL is used the content that is sent is encrypted Port Number SSL Specify the port number for using SSL To change the val...

Страница 238: ...twork Setting Refer to page 4 10 for more details 2 In the Network Setting screen touch 8 E Mail Setting 3 In the E Mail Setting screen touch 1 E Mail TX SMTP E Mail TX SMTP screen 1 4 appears 4 Speci...

Страница 239: ...desired settings 11 Touch OK The SMTP server information is set 2 Note To cancel changes to the setting touch Cancel To quit specifying the Utility mode setting touch Exit in the sub display area or...

Страница 240: ...ress Input To specify the host address with the host name touch Host Name Input If selecting Host Name Input check that the DNS settings are specified correctly before making the selection For details...

Страница 241: ...he Host Address Detail screen with the rest of the host addresses If the DNS setting is not specified correctly the function does not work properly even when the SMTP server name is entered Refer to T...

Страница 242: ...1 In the E Mail TX SMTP screen touch Detail Setting The SMTP Detail screen appears 2 Specify the desired settings Detail To perform user authentication with POP Before SMTP the settings that will allo...

Страница 243: ...TP Authentication touch ON The SMTP Authentication screen appears 2 In the SMTP Authentication screen touch User ID The User ID screen appears 3 Type in the user ID up to 63 characters 4 Touch OK To c...

Страница 244: ...ord is set and the SMTP Authentication screen appears again 8 In the SMTP Authentication screen touch Domain Name The Domain Name screen appears 9 Type in the domain name up to 255 characters 10 Touch...

Страница 245: ...Specifying settings from the control panel 4 CS230 Phase3 4 115 Detail For the procedure to enter characters refer to Entering text on page 7 6...

Страница 246: ...etails on specifying the settings refer to POP server address on page 4 119 Login Name Sets the login name used to connect to the POP server Use the keyboard that appears in the touch panel to type in...

Страница 247: ...tail screen appears Item Description APOP Authentication Sets whether to turn on authentication Port No Set the port number used to communicate with the POP server To change the value press the C clea...

Страница 248: ...ify the desired settings 7 Touch OK To cancel changes to the setting touch Cancel The POP details are set and the E Mail RX POP screen appears again 8 Touch Fwd E Mail RX POP screen 2 2 appears 9 Spec...

Страница 249: ...ting Host Name Input check that the DNS settings are specified correctly before making the selection For details refer to TCP IP settings on page 4 59 3 Enter the host address IP address or host name...

Страница 250: ...4 Specifying settings from the control panel 4 120 CS230 Phase3 Detail For the procedure to enter characters using the keyboard that appears on the screen refer to Entering text on page 7 6...

Страница 251: ...main power switch OFF then ON wait for 10 seconds or longer before turning it ON again otherwise the copier may not function normally The MAC address of this machine s network card is displayed under...

Страница 252: ...n the Detail Setting screen touch 1 Device Setting The Device Setting screen appears 4 Specify the desired settings 5 Touch OK The device information is set 2 Note To cancel changes to the setting tou...

Страница 253: ...inistrator Setting touch 3 Date Time Setting and then set the date Periodic automatic adjustment is not performed Item Description NTP Setting Specify whether to turn on the NTP NTP Server Address Set...

Страница 254: ...Detail Setting screen touch 2 Time Adjustment Setting The Time Adjustment Setting screen appears 4 Specify the desired settings 5 Touch OK The device information is set 2 Note To cancel changes to th...

Страница 255: ...IP Address Input To specify the host address with the host name touch Host Name Input 3 Enter the host address IP address or host name up to 255 characters To edit the values that you entered with IP...

Страница 256: ...from the control panel 4 126 CS230 Phase3 2 Note To cancel changes to the setting touch Cancel Detail For the procedure to enter characters using the keyboard that appears on the screen refer to Ente...

Страница 257: ...eb Connection For details refer to IPP on page 5 96 Item Description Notification Address Setting Sets the e mail address where notification of the machine s status is to be sent Use the keyboard that...

Страница 258: ...uch 9 Detail Setting 3 In the Detail Setting screen touch 3 Status Notification Setting To quit specifying the Utility mode setting touch Exit in the sub display area Otherwise cancel the Utility mode...

Страница 259: ...s status is to be sent by e mail can be specified 1 In the Status Notification Setting screen touch 2 Notification Item Setting The Notification Item Setting screen appears 2 Touch ON or OFF for each...

Страница 260: ...an be specified For details on specifying the setting refer to Schedule setting on page 4 132 Set notification addresses Specify the e mail address of the notification destination The schedule can als...

Страница 261: ...nter Report Setting The Total Counter Report Setting screen appears 4 Specify the desired settings 5 Touch Close 2 Note To display the Administrator Setting screen refer to To display the administrato...

Страница 262: ...When Weekly is specified as the notification period Item Description Interval of Day s Enter the days each month for sending the schedule To change the value press the C clear key and then use the key...

Страница 263: ...nter the interval of months for sending the schedule To change the value touch Input press the C clear key and then use the keypad to type in the value between 1 and 6 Date of the Month Enter the date...

Страница 264: ...To cancel changes to the setting touch Cancel Notification address setting You can specify the e mail addresses for sending the total counter You can specify up to three addresses An example for spec...

Страница 265: ...Phase3 4 135 5 Select whether you want to use this schedule to send to this address 6 Touch OK and then touch OK in the next screen that appears The Total Counter Report Setting screen appears again 2...

Страница 266: ...Administrator Setting screen touch 5 Network Setting Refer to page 4 10 for more details 2 In the Network Setting screen touch 9 Detail Setting 3 In the Detail Setting screen touch 5 PING Confirmatio...

Страница 267: ...CS230 Phase3 4 137 5 Touch Close 2 Note To quit specifying the Utility mode setting touch Exit in the sub display area Otherwise cancel the Utility mode by touching Close in each screen until the scre...

Страница 268: ...ame Input If selecting Host Name Input check that the DNS settings are specified correctly before making the selection For details refer to TCP IP settings on page 4 59 3 Enter the host address IP add...

Страница 269: ...rom the control panel 4 CS230 Phase3 4 139 2 Note To cancel changes to the setting touch Cancel Detail For the procedure to enter characters using the keyboard that appears on the screen refer to Ente...

Страница 270: ...Refer to page 4 10 for more details 2 In the Network Setting screen touch 9 Detail Setting 3 In the Detail Setting screen touch 6 SLP Setting The SLP Setting screen appears 4 Touch Enable or Disable...

Страница 271: ...ing screen touch 9 Detail Setting 3 In the Detail Setting screen touch 7 LPD Setting The LPD Setting screen appears 4 Touch Enable or Disable 5 Touch OK The use of LPD is enabled or disabled 2 Note To...

Страница 272: ...touch 5 Network Setting Refer to page 4 10 for more details 2 In the Network Setting screen touch 9 Detail Setting 3 In the Detail Setting screen touch 8 Prefix Suffix Setting The Prefix Suffix Setti...

Страница 273: ...et If ON is selected continue with the registration of prefixes suffixes 2 Note To quit specifying the Utility mode setting touch Exit in the sub display area or press the Utility Counter key Otherwis...

Страница 274: ...fix input function can be registered 1 In the Prefix Suffix Setting screen touch 2 Prefix Suffix Setting The Prefix Suffix Setting screen appears 2 Touch Prefix The Prefix screen appears 3 Enter the c...

Страница 275: ...used as a suffix up to 64 characters For the procedure to enter characters refer to Entering text on page 7 6 7 Touch OK To cancel changes to the setting touch Cancel The suffix is set 8 Touch Close 2...

Страница 276: ...LDAP over SSL To specify the job for the disable proof settings 1 In the Administrator Setting screen touch 5 Network Setting 2 In the Network Setting screen touch 9 Detail Setting 3 In the Detail Se...

Страница 277: ...he administrator setting screen on page 4 10 2 Note To cancel changes to the setting touch Cancel To quit specifying the Utility mode setting touch Exit in the sub display area or press the Utility Co...

Страница 278: ...then use the keypad to type in the value between 1 and 65535 v1 v2c Setting Specify when you want to select v1 or v2c For details on specifying the setting refer to v1 v2c setting on page 4 150 v3 Se...

Страница 279: ...o specify SNMP settings 1 In the Administrator Setting screen touch 5 Network Setting Refer to page 4 10 for more details 2 In the Network Setting screen touch 0 SNMP Setting The SNMP Setting screen a...

Страница 280: ...fying settings from the control panel 4 150 CS230 Phase3 v1 v2c setting 1 In the Network Setting screen touch v1 v2c Setting 2 Specify the settings for v1 v2c 3 Touch OK The SNMP Setting screen appear...

Страница 281: ...to type in the read user name up to 32 characters Security Level Select the authentication security level Read User Password Specify the authentication password Use the keyboard that appears in the to...

Страница 282: ...o specify the v3 settings 1 In the Network Setting screen touch v3 Setting SNMP v3 Setting screen 1 3 appears 2 Specify the desired settings 3 Touch Fwd SNMP v3 Setting screen 2 3 appears 4 Specify th...

Страница 283: ...tting screen appears again 2 Note To cancel changes to the setting touch Cancel To quit specifying the Utility mode setting touch Exit in the sub display area or press the Utility Counter key Otherwis...

Страница 284: ...screen touch Fwd and then touch 1 Bonjour Setting The Bonjour Setting screen appears 3 Specify the desired settings 4 Touch OK Item Description Bonjour Setting Select whether to enable the Bonjour se...

Страница 285: ...he administrator setting screen on page 4 10 2 Note To cancel changes to the setting touch Cancel To quit specifying the Utility mode setting touch Exit in the sub display area or press the Utility Co...

Страница 286: ...t Setting TCP Socket Setting screen 1 2 appears 3 Specify the desired settings Item Description TCP Socket Setting Select whether to use the TCP socket setting If OFF is selected under TCP Socket Sett...

Страница 287: ...g the Utility mode setting touch Exit in the sub display area or press the Utility Counter key Otherwise cancel the Utility mode by touching Close in each screen until the screen for the Copy Fax Scan...

Страница 288: ...er to permit access from other systems that use OpenAPI Default setting Allow 1 In the Administrator Setting screen touch System Connection Refer to page 4 10 for more details 2 In the System Connecti...

Страница 289: ...en touch Port No The OpenAPI Port Setting screen appears 4 Press the C clear key to erase the value and then use the keypad to type in the value between 1 and 65535 If a value outside of the allowable...

Страница 290: ...the Administrator Setting screen touch System Connection Refer to page 4 10 for more details 2 In the System Connection screen touch 1 OpenAPI Setting 3 In the OpenAPI Setting screen touch SSL 4 Touc...

Страница 291: ...ator Setting screen touch System Connection Refer to page 4 10 for more details 2 In the System Connection screen touch 1 OpenAPI Setting 3 In the OpenAPI Setting screen touch Authentication The OpenA...

Страница 292: ...The login name is set 7 Touch Password 8 Enter the password up to 8 characters and then touch OK The user password is set 9 Touch OK The authentication function when OpenAPI is used is set 2 Note To...

Страница 293: ...of the operating system Using active directory Before specifying the settings prepare the information described below Administrator password required MFP IP address required Subnet mask required Defa...

Страница 294: ...ver ask the network administrator If Password Rules is enabled a password with less than 8 characters cannot be registered For details on the password rules refer to User manual Copy Operations To per...

Страница 295: ...en 2 In TCP IP Setting screen 2 5 from the Network Setting screen specify the following settings IP Address Subnet Mask Default Gateway 3 In TCP IP Setting screen 3 5 from the Network Setting screen s...

Страница 296: ...0 Phase3 4 In TCP IP Setting screen 4 5 from the Network Setting screen specify the following settings DNS Default Domain Name 5 In TCP IP Setting screen 5 5 from the Network Setting screen specify th...

Страница 297: ...r Authentication Account Track Authentication Method specify the following settings Specify On External Server in User Authentication Specify Active Directory in External Server Type Specify the domai...

Страница 298: ...inistrator setting screen on page 4 10 For the TCP IP setting procedure refer to TCP IP settings on page 4 59 For the user authentication and account track setting procedure refer to User manual Copy...

Страница 299: ...uired Detail Do not use and in the external server password For details on the operating conditions of an external server ask the network administrator If Password Rules is enabled a password with les...

Страница 300: ...rnal Server Type Enter the NDS server tree name and context name 2 Note To display the Administrator Setting screen refer to To display the administrator setting screen on page 4 10 For the user authe...

Страница 301: ...word For details on the operating conditions of an external server ask the network administrator If Password Rules is enabled a password with less than 8 characters cannot be registered For details on...

Страница 302: ...e Enter the default domain name 2 Note To display the Administrator Setting screen refer to To display the administrator setting screen on page 4 10 For the user authentication and account track setti...

Страница 303: ...5 Specifying settings Using Web Connection...

Страница 304: ......

Страница 305: ...fied by the administrator Item Description System tab User Authentication User Password Change The setting can be specified when logged in with user authentication The password of the currently logged...

Страница 306: ...settings IP Filtering Sets the IP address filter function NetWare Setting Specifies NetWare settings NetWare Status Used to check the NetWare status IPP Setting Specifies IPP print settings FTP Setti...

Страница 307: ...al Facsimile Operations SSL TLS Specifies SSL TLS settings The procedure to create certificates is also explained SSL TLS Processing Method Specifies the job processing method when SSL certificate is...

Страница 308: ...this machine and then press the Enter key Detail Below is the URL after SSL TLS is enabled https IP_address_of_the_machine Redirected to https even if http is entered 2 Note If user authentication is...

Страница 309: ...gin mode Displays the current login mode public registered user administrator Displays the current login mode public registered user Account name administrator box ad ministrator 2 Logout button Click...

Страница 310: ...update the displayed page 7 Device Name Displays the device name that is currently being ac cessed 8 Tabs Select the category of the page to be displayed The fol lowing tabs are displayed in User mode...

Страница 311: ...is accessed again In addition since the machine s control panel remains locked and cannot be used the machine must be restarted In order to avoid this problem disable the cache 2 Note The menus and co...

Страница 312: ...when user authentication is performed it is necessary to log off first then log on again Logging off 2 Note When logged on a timeout occurs and you will automatically be logged off if no operation is...

Страница 313: ...Specifying settings Using Web Connection 5 CS230 Phase3 5 11 To log off 1 Click Logout at the upper left of the window...

Страница 314: ...5 Specifying settings Using Web Connection 5 12 CS230 Phase3 The user is logged off and the Login page appears...

Страница 315: ...r mode public user There are two procedures for logging on to User mode one for a registered user and one for a public user If user authentication is not performed log on as a public user 1 In the Log...

Страница 316: ...format the following will appear using the Flash feature Flash Player is required to use the Flash feature Status icons and messages Page display when Input Tray is selected in the menu below Device...

Страница 317: ...erform user authentication and log on with a specific user name 2 Note Click the icon to the right of the User Name box and then select a user name from the list To log on as a registered user box adm...

Страница 318: ...set to Mode 2 and a user enters an incorrect password the specified number of times that user is locked out and can no longer use the machine Contact the administrator to cancel operation restriction...

Страница 319: ...n to Administrator mode 2 Note When logged on to Administrator mode the control panel of this machine is locked and cannot be used Depending on the status of the machine you may not be able to log on...

Страница 320: ...5 Specifying settings Using Web Connection 5 18 CS230 Phase3 2 Type in the password for the machine s administrator and then click OK The Administrator mode page appears...

Страница 321: ...t to Mode 2 and an incorrect administrator password is entered the specified number of times it is no longer possible to enter Administrator mode For details on the Prohibit Functions when Auth Error...

Страница 322: ...ntly logged in user can be changed The settings that can be specified are described below To change the user password 1 On the System tab click User Authentication 2 Enter the required settings 3 Clic...

Страница 323: ...se3 5 21 Checking the user registration information The user information can be viewed when logged in with user authentication The information of the currently logged in user can be checked 1 On the S...

Страница 324: ...ck user mode You can check the account information when performing account track authentication The information of the currently logged in account can be checked To check the account track information...

Страница 325: ...earching destinations E Mail Address Enter the destination e mail address up to 320 characters Item Description Name Enter the name of the destination up to 24 characters Index Select the search word...

Страница 326: ...entering the host name select the Please check to enter host name check box File Path Enter the destination file path using capital letters up to 255 characters User ID Enter the user ID of the destin...

Страница 327: ...Specifying settings Using Web Connection 5 CS230 Phase3 5 25 A setting edit page appears and the settings can be changed The items are the same as those used in registration...

Страница 328: ...ion 5 26 CS230 Phase3 To register new destinations 1 Click New Registration A page for selecting the transmission mode appears 2 Select the transmission mode and click Next The registration page appea...

Страница 329: ...onnection 5 CS230 Phase3 5 27 Editing abbreviated destinations Click of the address you want to change Deleting the address book 1 Click of the address you want to delete A confirmation page appears 2...

Страница 330: ...ng settings Using Web Connection 5 28 CS230 Phase3 5 7 Group destination Click the Scan tab and then click Group Multiple destinations registered in the abbreviated destination list can be registered...

Страница 331: ...ing settings Using Web Connection 5 CS230 Phase3 5 29 To register group destinations 1 Click New Registration The registration page appears 2 Select Store Scanner and then click Next button 3 Enter th...

Страница 332: ...ngs Using Web Connection 5 30 CS230 Phase3 4 For each transmission mode select the destinations Click Select the desired destinations to be registered to the group from the Abbreviated Destination Lis...

Страница 333: ...Cover 2 Sided Original Type Select the quality of the original such as text or photo Color Select the color mode The file formats that can be saved may be lim ited depending on the color settings For...

Страница 334: ...may be lim ited depending on the color settings For details refer to File type on page 3 50 Separate Scan Select ON or OFF Background Removal Adjust the background density Scan Size Select the origina...

Страница 335: ...Specifying settings Using Web Connection 5 CS230 Phase3 5 33 Erase Specify the width of the perimeter of the document to be erased Item Description...

Страница 336: ...saved may be limited depending on the color settings For details refer to File type on page 3 50 Separate Scan Select ON or OFF Background Removal Adjust the background darkness Scan Size Select the...

Страница 337: ...Specifying settings Using Web Connection 5 CS230 Phase3 5 35 Erase Specify the width of the perimeter of the document to be erased Item Description...

Страница 338: ...Adjust the background darkness Scan Size Select the original size Auto Standard Size Custom Size For Custom Size specify the horizontal and vertical scan ning sizes E Mail Notification The upload dest...

Страница 339: ...olor settings For details refer to File type on page 3 50 Separate Scan Select ON or OFF Background Removal Adjust the background darkness Scan Size Select the original size Auto Standard Size Custom...

Страница 340: ...size Auto Standard Size Custom Size For Custom Size specify the horizontal and vertical scan ning sizes E Mail Notification The upload destination of the file can be notified to the spec ified address...

Страница 341: ...Specifying settings Using Web Connection 5 CS230 Phase3 5 39 Multiple destinations registered in the abbreviated destination list can be registered as a program...

Страница 342: ...Using Web Connection 5 40 CS230 Phase3 To register new destinations 1 Click New Registration A page for selecting the transmission mode appears 2 Select the transmission mode and click Next The regis...

Страница 343: ...Specifying settings Using Web Connection 5 CS230 Phase3 5 41 3 Enter the settings and click Apply...

Страница 344: ...5 Specifying settings Using Web Connection 5 42 CS230 Phase3 5 9 Temporary one touch registration Click the Scan tab and then click Temporary One Touch Temporary destinations can be registered...

Страница 345: ...t the transmission mode and click Next The registration page appears 3 Enter the settings and click Apply The details of the settings are the same as those for program registrations For details see Pr...

Страница 346: ...Specifying settings Using Web Connection 5 44 CS230 Phase3 5 10 Subject registration Click the Scan tab and then click Subject Up to 10 subjects that can be used when sending e mail can be registered...

Страница 347: ...5 CS230 Phase3 5 45 To register the subject When sending e mail with a fixed subject 0 Click E Mail Default to select it 1 Click beside the subject to be registered or edited The registration page app...

Страница 348: ...5 Specifying settings Using Web Connection 5 46 CS230 Phase3 5 11 Text registration Click the Scan tab and then click Text Up to 10 text messages that can be used when sending e mail can be registered...

Страница 349: ...ion 5 CS230 Phase3 5 47 To register text When sending e mail with a fixed text message 0 Click E Mail Default to select it 1 Click beside the text to be registered or edited The registration page appe...

Страница 350: ...em Job Box Print Scan and Network are available For the procedure to log on to Administrator mode refer to Logging on to administrator mode on page 5 17 Basic operation 1 Click the appropriate tab and...

Страница 351: ...etwork TWAIN administrator mode Setting the operation lock time for TWAIN The machine s operation lock time of the control panel during scanning excluding PUSH scan can be specified Enter the lock tim...

Страница 352: ...ck and select the name from the list Function Permission Specify whether to allow the operations described below Copy Scan Fax Print User Box Print Scan Fax from Box Output Permission Print Specify wh...

Страница 353: ...Specifying settings Using Web Connection 5 CS230 Phase3 5 51 To register a user 1 On the System tab click User Authentication 2 Click the New Registration button...

Страница 354: ...5 Specifying settings Using Web Connection 5 52 CS230 Phase3 3 Specify the required settings 4 Click the Apply button 5 Click the OK button...

Страница 355: ...and select the name from the list Function Permission Specify whether to allow the operations described below Copy Scan Fax Print User Box Print Scan Fax from Box Output Permission Print Specify whet...

Страница 356: ...fying settings Using Web Connection 5 54 CS230 Phase3 To check or change the registered user information 1 On the System tab click User Authentication 2 Click in the user list for the user you want to...

Страница 357: ...Specifying settings Using Web Connection 5 CS230 Phase3 5 55 3 Check the registration information and change it as necessary 4 Click the Apply button...

Страница 358: ...5 Specifying settings Using Web Connection 5 56 CS230 Phase3 To delete a registered user 1 On the System tab click User Authentication 2 Click in the user list for the user you want to delete...

Страница 359: ...Specifying settings Using Web Connection 5 CS230 Phase3 5 57 3 Check the message and then click the OK button...

Страница 360: ...ings that can be specified are described below Item Description Copy Specify whether to allow the copy function Scan Specify whether to allow the scan function Print Specify whether to allow the print...

Страница 361: ...ion 5 CS230 Phase3 5 59 To specify the default function permission settings 1 On the System tab click User Authentication 2 Click Default Function Permission 3 Specify the required settings 4 Click th...

Страница 362: ...Retype Password Reenter the password for confirmation Output Permission Print Specify whether to allow the output of the documents de scribed below Color Black Output Permission Transmis sion Specify...

Страница 363: ...Specifying settings Using Web Connection 5 CS230 Phase3 5 61 To register an account 1 On the System tab click Account Track Registration 2 Click the New Registration button...

Страница 364: ...5 Specifying settings Using Web Connection 5 62 CS230 Phase3 3 Specify the desired settings 4 Click the Apply button 5 Click the OK button...

Страница 365: ...ssword for confirmation Output Permission Print Specify whether to allow the output of the documents de scribed below Color Black Output Permission Transmis sion Specify whether to allow the transmiss...

Страница 366: ...g settings Using Web Connection 5 64 CS230 Phase3 To check or change the registered account information 1 On the System tab click User Authentication 2 Click in the account list for the account you wa...

Страница 367: ...Specifying settings Using Web Connection 5 CS230 Phase3 5 65 3 Check the registration information and change it as necessary 4 Click the Apply button...

Страница 368: ...ing Web Connection 5 66 CS230 Phase3 To delete registered accounts 1 On the System tab click User Authentication 2 Click in the account list for the account you want to delete 3 Check the message and...

Страница 369: ...external server you can register the settings and server address of the application By registering an application and server you can automatically connect to and use the server of the application tha...

Страница 370: ...lly For walk up fax For fax with account No Button name Function name Keyboard type Default value Option setting 1 Sender Name CS Name ASCII Walkup 2 FAX Number CS PersonalFaxNumber ASCII 3 TEL Number...

Страница 371: ...ASCII 6 Billing Code 2 BillingCode2 ASCII 7 CoverSheet Type CoverSheet ASCII 8 Document PW DocumentPassword ASCII 9 Delivery Method Delivery Secure No Button name Function name Keyboard type Default...

Страница 372: ...ess of the server that is registered to the application up to 15 characters File Path Enter the application file path up to 96 characters User ID Enter the user ID for logging in to the server up to 4...

Страница 373: ...illingCode1 BillingCode2 CoverSheet DocumentPassword Delivery HoldForPreview or TimeoutDateTime as the function name Message on Panel Enter the name to be displayed on the MFP panel up to 32 character...

Страница 374: ...CS230 Phase3 To register an application 1 Select the application to be registered and click the Registration Edit button Not Registered is displayed for applications that are not registered 2 Select t...

Страница 375: ...Specifying settings Using Web Connection 5 CS230 Phase3 5 73 3 Specify the application settings and then click the Next button...

Страница 376: ...5 Specifying settings Using Web Connection 5 74 CS230 Phase3 4 Specify the settings of the button custom items...

Страница 377: ...fying settings Using Web Connection 5 CS230 Phase3 5 75 5 Click to specify the details of each function When the settings are specified click the Apply button 6 Click the Apply button 7 Click the OK b...

Страница 378: ...specified in edit application You can specify the settings for each item described below in Edit Application Application Setting Item Description No Displays the application registration number that...

Страница 379: ...File Path Enter the application file path up to 96 characters User ID Enter the user ID for logging in to the server up to 47 charac ters Password Enter the password for logging in to the server up t...

Страница 380: ...ings Using Web Connection 5 78 CS230 Phase3 Custom Setting Item Description Custom Item List Displays the custom items button name and default value if a template was selected Click of the item to be...

Страница 381: ...ion 5 CS230 Phase3 5 79 Scan Setting Item Description Resolution Select to enable the resolution setting and select Normal or Fine as the resolution File Type Select to enable the file type setting an...

Страница 382: ...e name up to 32 characters Notification Event Select Error Success or Always as the notification event type E Mail Address Select to perform e mail notifications and enter the destina tion e mail addr...

Страница 383: ...Specifying settings Using Web Connection 5 CS230 Phase3 5 81 To edit a registered application 1 Select the application to be edited and click the Registration Edit button...

Страница 384: ...5 Specifying settings Using Web Connection 5 82 CS230 Phase3 2 Select the type of item to be edited and then click the Next button 3 Specify the settings...

Страница 385: ...Specifying settings Using Web Connection 5 CS230 Phase3 5 83 4 Click the Apply button 5 Click the OK button...

Страница 386: ...eb Connection 5 84 CS230 Phase3 To delete a registered application 1 Select the application to be deleted and click the Delete button 2 Check the setting and then click the OK button The application n...

Страница 387: ...n 5 CS230 Phase3 5 85 5 17 Prefix Suffix The prefix and suffix that are provided as destination information when sending e mail can be registered If address book registration by users is disabled the...

Страница 388: ...ixes and suffixes 1 Click beside the prefix suffix to be registered or edited The registration page appears 2 Specify the prefix suffix and click Apply Item Description Prefix Registers a prefix setti...

Страница 389: ...18 Import Export Used to import address book data from the computer or export the machine s address book Importing Click Browse select the address book data to be imported and click Import Exporting C...

Страница 390: ...pecifying settings Using Web Connection 5 88 CS230 Phase3 5 19 Other Specify address book restrictions Item Description Prohibit User Operation Specify whether to permit destination registration by us...

Страница 391: ...89 5 20 TCP IP 2 Reminder To activate all network setting changes turn the main power off and then back on When turning the main power switch OFF then ON wait for 10 seconds or longer before turning i...

Страница 392: ...5 Specifying settings Using Web Connection 5 90 CS230 Phase3 TCP IP Specify TCP IP settings...

Страница 393: ...Port Number 5 RAW Port Number 6 Dynamic DNS Setting Specify whether to use the dynamic DNS setting Host Name Enter the host name up to 63 characters DNS Domain Auto Obtain Specify whether to enable th...

Страница 394: ...d by specifying the host IP address Item Description Permit Access Enables disables the access permission address setting and enter the addresses to be permitted syntax where the input range for is 0...

Страница 395: ...Specifying settings Using Web Connection 5 CS230 Phase3 5 93 5 21 NetWare Specify NetWare settings...

Страница 396: ...up to 63 characters Polling Interval Enter the print queue scan rate input range 1 to 65535 sec onds Bindery NDS Setting Select NDS or NDS Bindery File Server Name Enter the Bindery file server name u...

Страница 397: ...Specifying settings Using Web Connection 5 CS230 Phase3 5 95 NetWare status The NetWare server and queue names can be displayed to show the NetWare connection status...

Страница 398: ...5 Specifying settings Using Web Connection 5 96 CS230 Phase3 5 22 IPP Specify the IPP print settings...

Страница 399: ...tion e mails For the status notification details refer to Status notification settings on page 4 127 Printer Information Enter the printer information up to 127 characters Printer URI Displays the UR...

Страница 400: ...achine as an FTP server Proxy Server Address Enter the proxy server address syntax where the input range of is 0 to 255 Select to enter the host name Proxy Server Port Number Enter the proxy server po...

Страница 401: ...Specifying settings Using Web Connection 5 CS230 Phase3 5 99 FTP server Specify FTP server settings Item Description FTP Server Specify the FTP server setting to ON or OFF...

Страница 402: ...5 Specifying settings Using Web Connection 5 100 CS230 Phase3 5 24 SNMP Specify SNMP settings...

Страница 403: ...IP SNMPv3 IP SNMPv1 IPX UDP Port Setting Enter the UDP port number input range 1 to 65535 SNMP v1 v2c Setting Enter the community name for reading and writing up to 15 characters SNMP v3 Setting Speci...

Страница 404: ...ting via a router specify the WINS settings according to the SMB transmission settings in SMB Setting Client Setting Item Description WINS Specify whether to use WINS Auto Obtain Setting Specify wheth...

Страница 405: ...r to use SMB transmission NTLM Setting Select the NTLM version to be used Select v1 v2 or v1 when using a computer over a network that is running a Windows 98 SE or Windows Me operating system Select...

Страница 406: ...ngs Using Web Connection 5 104 CS230 Phase3 2 Note To use the SMB NTLM of the external server authentication Scan Setting or Print Setting must be turned ON 2 Note NTLMv2 is available from Windows NT...

Страница 407: ...print settings Item Description SMB Print Specify whether to use the SMB printing Windows printing service NetBIOS Name Enter the NetBIOS name up to 15 characters Print Service Name Enter the print s...

Страница 408: ...se3 5 26 AppleTalk Specify AppleTalk settings Item Description AppleTalk Specify whether to use AppleTalk Printer Name Enter the print name up to 31 characters excluding Zone Name Enter the zone name...

Страница 409: ...ction 5 CS230 Phase3 5 107 5 27 Bonjour setting You can specify the Bonjour settings Item Description Bonjour Specify whether to use the Bonjour setting Bonjour Name Specify the device name that is us...

Страница 410: ...5 Specifying settings Using Web Connection 5 108 CS230 Phase3 5 28 LDAP setting LDAP setting Specify whether to use the LDAP setting...

Страница 411: ...ings Using Web Connection 5 CS230 Phase3 5 109 LDAP server registration 1 On the Network tab click LDAP Setting 2 Click LDAP Server Registration 3 Click of the server to be registered You can specify...

Страница 412: ...5 Specifying settings Using Web Connection 5 110 CS230 Phase3 4 Specify the desired settings...

Страница 413: ...rd are not required 2 Reminder If the LDAP server settings are not specified correctly network failure may occur The server administrator should specify LDAP settings 2 Note Be sure to use an authenti...

Страница 414: ...1000 Authentication Method Set the LDAP authentication method Login Name Enter the login name if authentication is not set to anony mous up to 255 characters Password Enter the password if authenticat...

Страница 415: ...r address syntax or FQDN where the input range of is 0 to 255 When enter ing the host name select the Please check to enter host name check box Login Name Enter the user name used to log on to the POP...

Страница 416: ...e selection For details refer to TCP IP on page 5 89 Use SSL TLS Port No SSL TLS Select to use SSL TLS Also enter the port number to be used Auto Receive Check Select whether to enable Auto Receive Ch...

Страница 417: ...Specifying settings Using Web Connection 5 CS230 Phase3 5 115 E mail TX SMTP Specify e mail send settings...

Страница 418: ...her to limit the size of e mail transmissions Server Capacity Enter the SMTP server capacity when mail size restriction is enabled input range 1 to 100 MB Admin E Mail Address Enter the From address f...

Страница 419: ...separated e mail is required Note that even if separated e mail is received it may not be combined depending on the e mail client being used 2 Note If selecting Host Name Input check that the DNS set...

Страница 420: ...n SSL TLS is enabled the communication between the machine and the client computer is encrypted to prevent information leakage such as passwords and transmitted data If a certificate is installed the...

Страница 421: ...ificate is not installed the following page appears If you create a self signed certificate or obtain and install a certificate from a Certificate Authority SSL TLS is enabled Click Setting to change...

Страница 422: ...Enter the city name used to create a city certificate up to 127 ASCII characters State Province Enter the state province name used to create a state province certificate up to 127 ASCII characters Co...

Страница 423: ...ertificate up to 63 ASCII characters Organization Unit Enter the department name used to create a department cer tificate up to 63 ASCII characters Locality Enter the city village name used to create...

Страница 424: ...b Connection 5 122 CS230 Phase3 To create a certificate 1 Click Setting A page for selecting the function appears 2 Select Create a self signed Certificate or Request a Certificate and then click Next...

Страница 425: ...ate a self signed Certificate 4 Click Apply or Next A certificate can be registered or obtained If a request was made for a certificate proceed to step 5 If a self signed certificate was created the p...

Страница 426: ...ing A page for selecting the function appears 2 Select Install a Certificate and then click Next A text input page appears 3 Copy the issued certificate information and paste in the text Then click Ne...

Страница 427: ...Specifying settings Using Web Connection 5 CS230 Phase3 5 125 Set an encryption strength 1 In the SSL TLS page select Set an Encryption Strength and then click the Next button...

Страница 428: ...5 Specifying settings Using Web Connection 5 126 CS230 Phase3 2 Select the encryption strength and then click the Apply button...

Страница 429: ...Specifying settings Using Web Connection 5 CS230 Phase3 5 127 Remove a certificate 1 In the SSL TLS page select Remove a Certificate and then click the Next button...

Страница 430: ...5 Specifying settings Using Web Connection 5 128 CS230 Phase3 2 Check the message and then click the OK button...

Страница 431: ...Specifying settings Using Web Connection 5 CS230 Phase3 5 129 Set mode using SSL Select the mode using SSL 1 In the SSL TLS page select Set Mode using SSL and then click the Next button...

Страница 432: ...5 Specifying settings Using Web Connection 5 130 CS230 Phase3 2 Select the mode using SSL and then click the Apply button...

Страница 433: ...method when the validation of the SSL server certificate has expired 2 Note The functions that can be specified are described below SMTP over SSL POP over SSL LDAP over SSL Item Description Continue...

Страница 434: ...ying settings Using Web Connection 5 132 CS230 Phase3 To specify the mode using SSL 1 On the Network tab click SSL TLS 2 Click Processing Method 3 Select the processing method and then click the Apply...

Страница 435: ...ame for Active Directory NTLM Default Domain Name Enter the default domain name for NTLM NDS Default NDS Tree Name Enter the default NDS tree name for NDS NDS Default NDS Context Name Enter the defaul...

Страница 436: ...ng settings Using Web Connection 5 134 CS230 Phase3 To specify the user authentication and account track settings 1 On the Network tab click Authentication 2 Enter the required settings 3 Click the Ap...

Страница 437: ...and User mode If no operation is performed within the specified time the administrator or user is automatically logged out Item Description Admin Mode Logout Time Enter the auto logout time input ran...

Страница 438: ...5 136 CS230 Phase3 5 32 OpenAPI Specify OpenAPI Item Description Port No Enter the port number input range 1 to 65535 Use SSL TLS Port Number SSL TLS Specifies whether to use SSL TLS To use select the...

Страница 439: ...power switch to OFF then to ON wait 10 seconds or more before turning the switch to ON again otherwise this machine may not function normally Item Description TCP Socket Specify whether to use a TCP...

Страница 440: ...5 Specifying settings Using Web Connection 5 138 CS230 Phase3 To specify the TCP socket settings 1 On the Network tab click TCP Socket Setting 2 Enter the required settings 3 Click the Apply button...

Страница 441: ...6 Scan function troubleshooting...

Страница 442: ......

Страница 443: ...t des tinations or send the transmission in multiple batches Image could not be saved in User Box due to insufficient capacity in HDD Please check Job History The hard disk is full Delete unnecessary...

Страница 444: ...6 Scan function troubleshooting 6 4 CS230 Phase3...

Страница 445: ...7 Appendix...

Страница 446: ......

Страница 447: ...te A4 Scannable Range Same as the copier 11 17 maximum Functions Scan to E Mail Scan to FTP Scan to SMB Save in User BOX Scanner Resolution 200 300 400 600 dpi Scannable Paper Size 11 17 w to 8 1 2 11...

Страница 448: ...IPX SPX Apple Talk EtherTalk and LDAP Compatible LDAP Servers OpenLDAP 2 0 27 Active Directory Exchange5 5 Netscape iPlanet Directory Server Novell Netware5 NDS Novell eDirectory 8 6 8 7 and LotusDomi...

Страница 449: ...e length Indicator lit off Network status Green indicator lit Link established Green indicator blinking Transmitting receiving data Orange indicator lit Network data rate at 100 Mbps Orange indicator...

Страница 450: ...se the keyboard that appears in the touch panel for typing in the names of registered accounts and custom paper sizes The keypad can also be used to type in numbers Any of the following keyboards may...

Страница 451: ...Appendix 7 CS230 Phase3 7 7 Touching Shift switches the keyboard display between lowercase letters numbers and uppercase letters symbols...

Страница 452: ...in with the keypad The entered characters appear in the text box 2 Note To cancel changes to the settings touch Cancel To clear all entered text press the C clear key Detail To change a character in t...

Страница 453: ...ap A file format for saving image data which uses the bmp extension Commonly used on Windows platforms You can specify the color depth from monochrome 2 values to full color 16 777 216 colors Images a...

Страница 454: ...or connecting to the LDAP server from the multifunctional product Select this option if the name and password for logging on to the LDAP server must be entered each time by the user when referencing t...

Страница 455: ...ed to devic es including computers which are connected to the Internet J2RE Abbreviation for Java 2 Runtime Environment One type of JavaVir tual Machine Java VM in a program operating environment writ...

Страница 456: ...ocuments containing mostly text are compressed to about 1 10 their original size MIB Abbreviation for Management Information Base In a TCP IP trans mission this uses SNMP to define the management info...

Страница 457: ...a computer on the network The same port cannot be used by multiple processes Proxy Server A server that is installed to act as an intermediary connection be tween each client and different servers to...

Страница 458: ...ddress TCP IP Abbreviation for Transmission Control Protocol Internet Protocol The de facto standard protocol used by the Internet that uses IP ad dresses to identify each network device TCP Socket In...

Страница 459: ...5 15 Box destination registration 4 23 C Cache setting 5 9 Certificate creation 5 122 Certificate installation 5 124 Checking job details 3 78 Color settings 3 62 Compact PDF 3 51 Connecting to networ...

Страница 460: ...95 Network connection 2 13 Network error list 6 3 Network settings 2 9 Network TWAIN 5 49 Notification item settings 4 129 NTP server address setting 4 125 O One Touch registration list 4 46 OpenAPI a...

Страница 461: ...ission log 3 86 Scanning functions 2 4 Scanning page spreads 3 68 Scanning separately 3 75 Search conditions 4 103 Search default setting 4 105 Sending data to FTP server 2 5 3 22 Sending data via e m...

Страница 462: ...P server 2 5 3 22 User authentication 5 20 5 50 User manuals 1 12 User mode auto logout 5 135 User mode settings via Web Connection 5 3 User setting screen 4 8 W Web browser cache setting 5 9 Web Conn...

Страница 463: ...de sufficient background information O Yes O No Is the format of this manual convenient in size readability and arrangement page layout chapter order etc O Yes O No Could you find the information you...

Страница 464: ...ent sheet is completed by If you prefer to remain unknown please do fill in your occupation Name Occupation Company Phone Address City Country Please return this sheet to Oc Technologies B V For the a...

Страница 465: ...aulo SP 04578 000 Brasil http www oce brasil com br Oc Canada Inc 4711 Yonge Street Suite 1100 Toronto Ontario M2N 6K8 Canada http www oce ca Oc Office Equipment Beijing Co Ltd Xu Mu Cheng Chaoyang Di...

Страница 466: ...a Padana Superiore 2 B 20063 Cernusco sul Naviglio MI Italia http www oce it Oc Japan Corporation 3 25 1 Nishi Shinbashi Minato Ku Tokyo 105 0003 Japan http www ocejapan co jp Oc Belgium S A Rue Astri...

Страница 467: ...nia 2128 South Africa Oc Espa a SA Business Park Mas Blau Osona 2 08820 El Prat de Llobregat Barcelona Spain http www oce es Oc Svenska AB Sollentunav gen 84 191 27 Sollentuna Sweden http www oce se O...

Страница 468: ...ses of local Oc organisations for information about the Wide Format Printing Systems and the Production Printing Systems can be different from the addresses above Refer to the web site http www oce co...

Отзывы: