S p e c if y in g s e tt in g s U s in g W e b C o n n e c tio n
5
CS230 (Phase3)
5-71
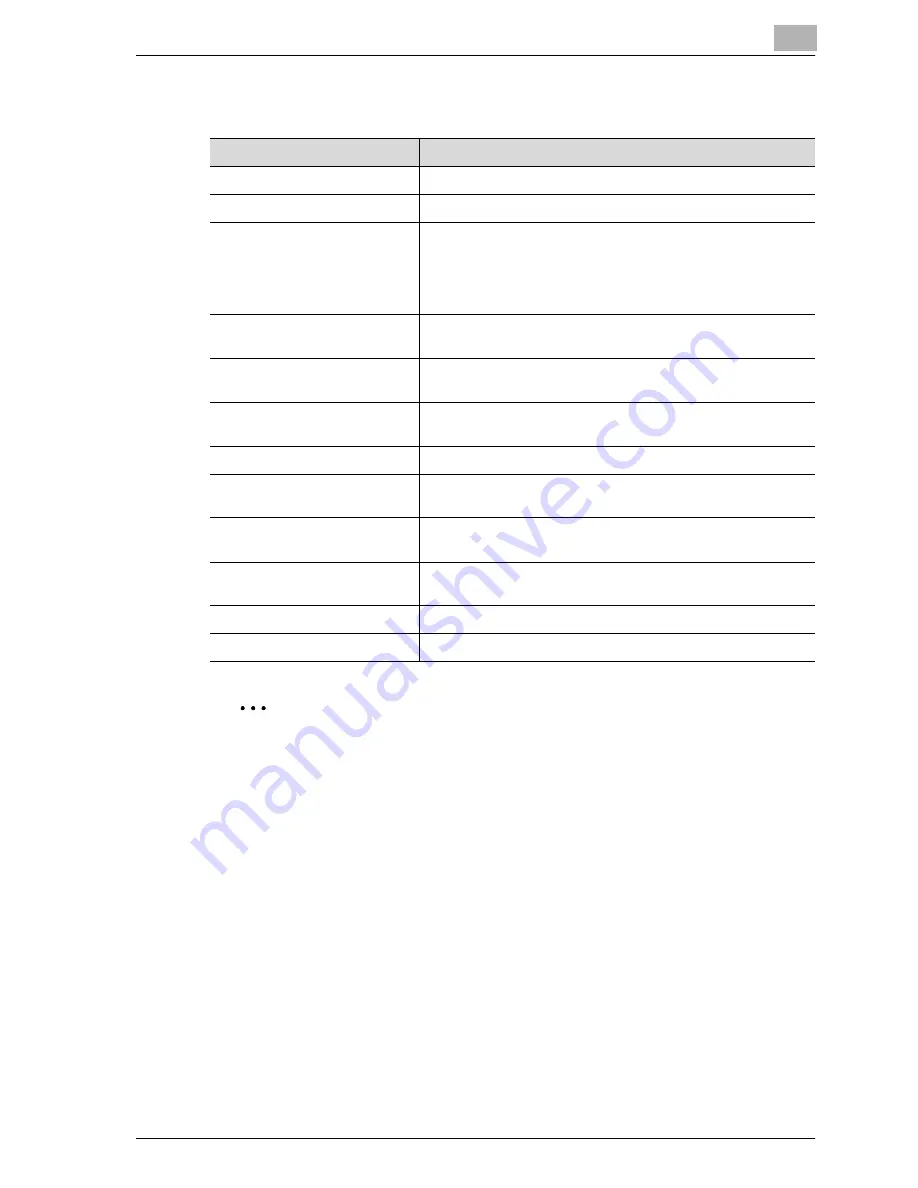
You can specify the details of each function button as described below.
2
Note
The number of characters that can be input in the default value may vary
depending on the function that was selected.
Item
Description
No.
Displays the number of the item that was selected.
Button Name
Enter the button name (up to 16 characters).
Function Name
Select ID, Name, GeneralFaxNumber, GeneralVoiceNumber,
PersonalFaxNumber, PersonalVoiceNumber, Password, Au-
thentication, Subject, DelaySendDateTime, BillingCode1,
BillingCode2, CoverSheet, DocumentPassword, Delivery,
HoldForPreview, or TimeoutDateTime as the function name.
Message on Panel
Enter the name to be displayed on the MFP panel (up to 32
characters).
Display Method
Select Enable, Enable Function (MFP Panel Input Required),
Disable, or Do Not Display as the display method.
Default Value
Enter the default value. To hide the default value, select "Input
string shown as ****".
Keyboard Type
Select ASCII as the keyboard type.
Options (When Authentication
is enabled.)
Select None or Password.
Options (When Delivery is ena-
bled.)
Select Normal, Secure, Certified, and Secure Certified.
Options (When Hold For Pre-
view is enabled.)
Select Yes or No.
Input Type
Select Year/Month/Day/Hour/Minute.
Default
Select Device Time or Not Specify.
Содержание CS230
Страница 1: ...Oc CS230 Phase 3 User s Guide Network Scanner...
Страница 13: ...1 Introduction...
Страница 14: ......
Страница 26: ...1 Introduction 1 14 CS230 Phase3...
Страница 27: ...2 Before using the scan functions...
Страница 28: ......
Страница 42: ...2 Before using the scan functions 2 16 CS230 Phase3...
Страница 43: ...3 Scanning documents...
Страница 44: ......
Страница 125: ...Scanning documents 3 CS230 Phase3 3 83 4 Touch Yes to delete the job 5 Touch Close...
Страница 131: ...4 Specifying settings from the control panel...
Страница 132: ......
Страница 166: ...4 Specifying settings from the control panel 4 36 CS230 Phase3 2 Note To cancel changes to the setting touch Cancel...
Страница 303: ...5 Specifying settings Using Web Connection...
Страница 304: ......
Страница 313: ...Specifying settings Using Web Connection 5 CS230 Phase3 5 11 To log off 1 Click Logout at the upper left of the window...
Страница 314: ...5 Specifying settings Using Web Connection 5 12 CS230 Phase3 The user is logged off and the Login page appears...
Страница 343: ...Specifying settings Using Web Connection 5 CS230 Phase3 5 41 3 Enter the settings and click Apply...
Страница 359: ...Specifying settings Using Web Connection 5 CS230 Phase3 5 57 3 Check the message and then click the OK button...
Страница 376: ...5 Specifying settings Using Web Connection 5 74 CS230 Phase3 4 Specify the settings of the button custom items...
Страница 385: ...Specifying settings Using Web Connection 5 CS230 Phase3 5 83 4 Click the Apply button 5 Click the OK button...
Страница 392: ...5 Specifying settings Using Web Connection 5 90 CS230 Phase3 TCP IP Specify TCP IP settings...
Страница 395: ...Specifying settings Using Web Connection 5 CS230 Phase3 5 93 5 21 NetWare Specify NetWare settings...
Страница 398: ...5 Specifying settings Using Web Connection 5 96 CS230 Phase3 5 22 IPP Specify the IPP print settings...
Страница 402: ...5 Specifying settings Using Web Connection 5 100 CS230 Phase3 5 24 SNMP Specify SNMP settings...
Страница 412: ...5 Specifying settings Using Web Connection 5 110 CS230 Phase3 4 Specify the desired settings...
Страница 417: ...Specifying settings Using Web Connection 5 CS230 Phase3 5 115 E mail TX SMTP Specify e mail send settings...
Страница 430: ...5 Specifying settings Using Web Connection 5 128 CS230 Phase3 2 Check the message and then click the OK button...
Страница 441: ...6 Scan function troubleshooting...
Страница 442: ......
Страница 444: ...6 Scan function troubleshooting 6 4 CS230 Phase3...
Страница 445: ...7 Appendix...
Страница 446: ......


