


4
Specifying settings from the control panel
4-98
CS230 (Phase3)
Setting Up LDAP screen 6/6
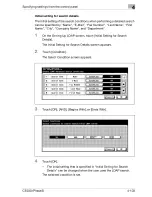
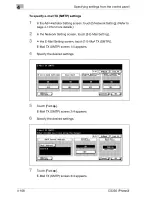
To specify setting up LDAP settings
1
In the Administrator Setting screen, touch [5 Network Setting]. (Refer to
page 4-10 for more details.)
2
In the Network Setting screen, touch [7 LDAP Setting].
3
In the LDAP Setting screen, touch [2 Setting Up LDAP].
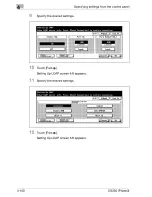
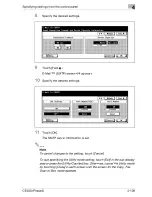
4
Touch the LDAP server button to register and specify the setting.
Setting Up LDAP screen 1/6 appears.
Item
Description
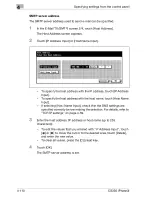
Login Name
Sets the login name used to connect to the LDAP server.
Use the keyboard that appears in the touch panel to type in
the name (up to 255 characters).
Password
Sets the password used to connect to the LDAP server.
Use the keyboard that appears in the touch panel to type in
the password (up to 128 characters).
Domain Name
Sets the domain name used to connect to the LDAP server
as necessary. Use the keyboard that appears in the touch
panel to type in the name (up to 64 characters).
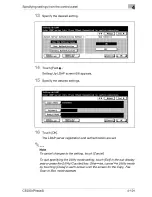
Check Connection
Checks the connection to the LDAP server.
Reset All Settings
The LDAP server settings can be reset to their factory de-
fault.
When a reset confirmation message appears, touch [Yes].
Содержание CS230
Страница 1: ...Oc CS230 Phase 3 User s Guide Network Scanner...
Страница 13: ...1 Introduction...
Страница 14: ......
Страница 26: ...1 Introduction 1 14 CS230 Phase3...
Страница 27: ...2 Before using the scan functions...
Страница 28: ......
Страница 42: ...2 Before using the scan functions 2 16 CS230 Phase3...
Страница 43: ...3 Scanning documents...
Страница 44: ......
Страница 125: ...Scanning documents 3 CS230 Phase3 3 83 4 Touch Yes to delete the job 5 Touch Close...
Страница 131: ...4 Specifying settings from the control panel...
Страница 132: ......
Страница 166: ...4 Specifying settings from the control panel 4 36 CS230 Phase3 2 Note To cancel changes to the setting touch Cancel...
Страница 303: ...5 Specifying settings Using Web Connection...
Страница 304: ......
Страница 313: ...Specifying settings Using Web Connection 5 CS230 Phase3 5 11 To log off 1 Click Logout at the upper left of the window...
Страница 314: ...5 Specifying settings Using Web Connection 5 12 CS230 Phase3 The user is logged off and the Login page appears...
Страница 343: ...Specifying settings Using Web Connection 5 CS230 Phase3 5 41 3 Enter the settings and click Apply...
Страница 359: ...Specifying settings Using Web Connection 5 CS230 Phase3 5 57 3 Check the message and then click the OK button...
Страница 376: ...5 Specifying settings Using Web Connection 5 74 CS230 Phase3 4 Specify the settings of the button custom items...
Страница 385: ...Specifying settings Using Web Connection 5 CS230 Phase3 5 83 4 Click the Apply button 5 Click the OK button...
Страница 392: ...5 Specifying settings Using Web Connection 5 90 CS230 Phase3 TCP IP Specify TCP IP settings...
Страница 395: ...Specifying settings Using Web Connection 5 CS230 Phase3 5 93 5 21 NetWare Specify NetWare settings...
Страница 398: ...5 Specifying settings Using Web Connection 5 96 CS230 Phase3 5 22 IPP Specify the IPP print settings...
Страница 402: ...5 Specifying settings Using Web Connection 5 100 CS230 Phase3 5 24 SNMP Specify SNMP settings...
Страница 412: ...5 Specifying settings Using Web Connection 5 110 CS230 Phase3 4 Specify the desired settings...
Страница 417: ...Specifying settings Using Web Connection 5 CS230 Phase3 5 115 E mail TX SMTP Specify e mail send settings...
Страница 430: ...5 Specifying settings Using Web Connection 5 128 CS230 Phase3 2 Check the message and then click the OK button...
Страница 441: ...6 Scan function troubleshooting...
Страница 442: ......
Страница 444: ...6 Scan function troubleshooting 6 4 CS230 Phase3...
Страница 445: ...7 Appendix...
Страница 446: ......