48
EN
11 Appendix
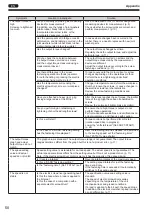
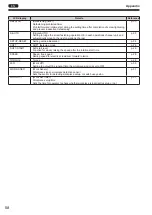
When abnormalities have occurred (Troubleshooting)
Symptoms
Location to investigate
Solution
Controller power won't
turn on
Is the power plug inserted into an outlet?
Is the power cord slipped out of the inlet?
Has the rated voltage been input?
Is the power switch set to OFF (
¡
side)?
Check the power supply.
Firmly insert the power cord, and set the power
switch to ON ( I side).
An error is displayed
in the controller
Is the electric screwdriver and controller
correctly connected?
Use the connection cord to connect the electric
screwdriver and controller, and then re-insert the
power source.
Controller button
operation cannot be
performed
Is the keylock input signal set to ON?
Set the external signal key lock input signal to
OFF. (p. 46)
The electric
screwdriver does not
operate
Is the [WORK] LED lighted up?
If using the workpiece signal, either set up the
workpiece (workpiece signal ON) or set the
“workpiece signal” (No.12 WORK-SNSR) to
“OFF”. (p. 31)
Is the workpiece signal set to “ON”?
Either set up the workpiece (workpiece signal
ON) or set the “workpiece signal” (No.12 WORK-
SNSR) to “OFF”. (p. 31)
Is the changeover switch set to “○”
(neutral)?
Slide the changeover switch to the
(forward
rotation side) or
(reverse rotation side).
If starting up with external input signal, is
there a mistake or error in cabling, or a
disconnection?
Is 0 V DC connected to the input signal
negative common wire (terminal No.10)?
Is the input signal (switch or PLC output
signal) firmly set to ON?
Check the wiring. (p. 35)
Check the external input signal.device being used.
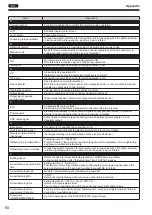
Is the setting value for the workpiece setup
time too long?
Even if the workpiece signal is set to ON, the tool
does not operate during the workpiece setup time.
Set the “workpiece setup time” (No.14 WORK-
S-T) to a shorter time. (p. 31)
Is the refastening prohibited timer active
immediately after screw tightening?
While the “refastening prohibited timer” (No.10
REFSTN-T) is active, forward rotation cannot be
started. (p. 30)
Is the electric screwdriver in error mode
and displays an error message on the
LCD?
Check the error message content. (p. 47)
Has each setting been set according to the
instruction manual?
Review each of the settings. (p. 25)
To initialize the settings, execute “setting value
initialization” (No.25 SETTING RESET). (p. 24)
Count not performed
Is the count function setting set to “ON”?
If the “count function” (No.11 COUNT-FNC) is set
to ON, you can use the count function.
Is the torque-up condition for count-up
satisfied?
Check the count conditions and activation.
(p. 30)
When a screw is
loosened (reverse-
rotated), the count
number does not
return
Is the “count return function” (No.21
COUNT-RTN) setting set to “ON1” or
“ON2”?
Review the settings. (p. 33)
Is the current count number less than the
setting number?
Return cannot be performed if the count is not 1
unit or higher. (p. 33)
Is the current count number and the setting
number the same?
If at the setting number or higher it cannot be
returned. (p. 33)
If the “count return function” (No.21
COUNT-RTN) is set to “ON2”, is it in count
return mode?
Check the count return mode procedure. (p. 33)
TV07783-1_DLV10C_en.indb 48
2017/06/27 17:41:42

