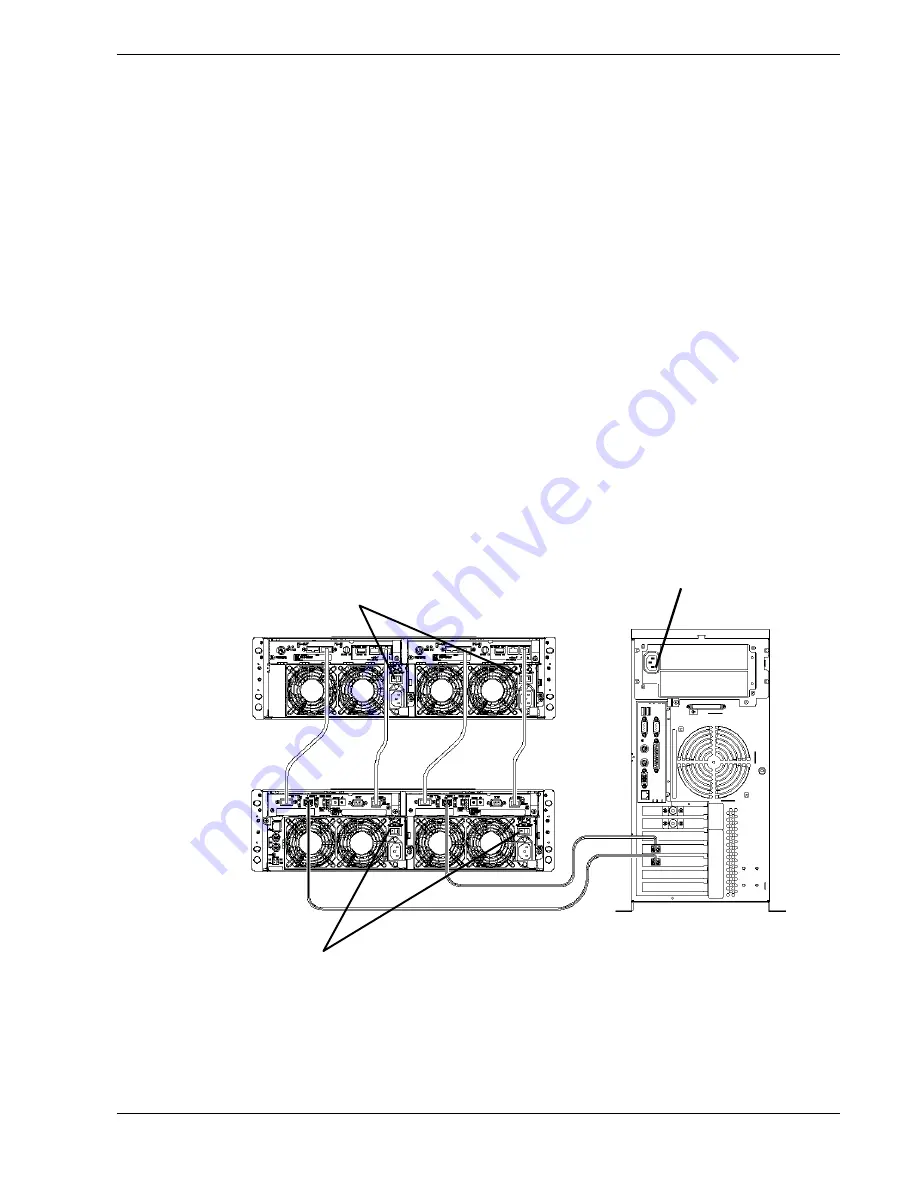
Powering On the Disk Array Unit
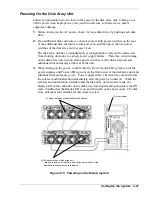
Follow the procedure below to turn on the power of the disk array unit. Turning on or
off the power in an improper way may result in data loss, software errors, and/or
equipment damage.
1.
Before turning on the AC power, check for loose disk drives by pushing each disk
drive.
2.
If an additional disk enclosure is connected, press both power switches on the rear
of the additional disk enclosure to turn power on, and then press the two power
switches of the disk array unit to power it on.
The disk array unit has a redundant power configuration to prevent the entire unit
from shutting down due to a single power supply failure. Therefore, when turning
on the disk array unit, turn on all the power switches (of the disk array unit and
additional disk enclosure) at the rear of the unit.
3.
When turning on the power, confirm that the Power Good LEDs (green) on all the
power supplies and Power LEDs (green) on the front panel of the disk array unit and
additional disk enclosure go on. Power supply starts. The disk array unit performs
the self-test and initialization immediately after the power is turned on. When the
self-test and initialization terminate and the disk array unit becomes ready, the
Ready LED of the controller on the disk array unit stops flashing and enters the ON
state. Confirm that the Ready LED is on, and then turn on the host system. The disk
array unit takes four minutes (at maximum) to start.
(3) Host system
(1) Power switches of additional disk enclosure
(2) Power switches of disk array unit
(May be turned on at the same time the power switches of the
additional disk enclosure are turned on.)
Figure 2-15 Powering on the Disk Array Unit
Setting Up the System
2-21
Содержание VERSA S1300 Series
Страница 1: ... U s e r s G u i d e NEC Storage S1300 ...
Страница 2: ......
Страница 4: ......
Страница 8: ...vi Contents ...
Страница 18: ...xvi Using This Guide ...
Страница 19: ...1 System Overview Overview System Chassis System Features ...
Страница 54: ...A B Figure 2 3 Installing the Rack Mounting Kit 2 6 Setting Up the System ...
Страница 73: ...3 Upgrading the System Overview Adding Hard Disk Drives Adding Disk Enclosures ...
Страница 86: ...3 14 Upgrading the System ...
Страница 107: ...A Appendix Technical Specifications Creating a Logical Disk How to Change the Topology and Data Transfer Rate ...
Страница 114: ...A 8 Appendix ...
Страница 117: ...xx ...
Страница 118: ... ...

