background image

Disassembly and Reassembly 3-77

Removing the Power Supply — Desktop

Remove the power supply from a desktop system by following these steps.

!

WARNING

Before removing the system unit cover, turn off the power
and unplug the system power cable. Power is removed only
when the power cable is unplugged.

1. 

Turn off the system and disconnect the system power cord.

2. 

Ensure that all external cables are disconnected from the front and rear of
the system.

3. 

Remove the system unit cover (see “Removing the Small Desktop or
Desktop Cover”).

4. 

Label and disconnect every power cable connected to a device or board
within the system.

5. 

Remove the internal hard drive (see “Removing the 3 1/2-Inch Internal Hard
Drive — Desktop”).

6. 

Remove the internal hard drive bracket (see “Removing the Bracket for the
3 1/2-Inch Internal Hard Drive”).

7. 

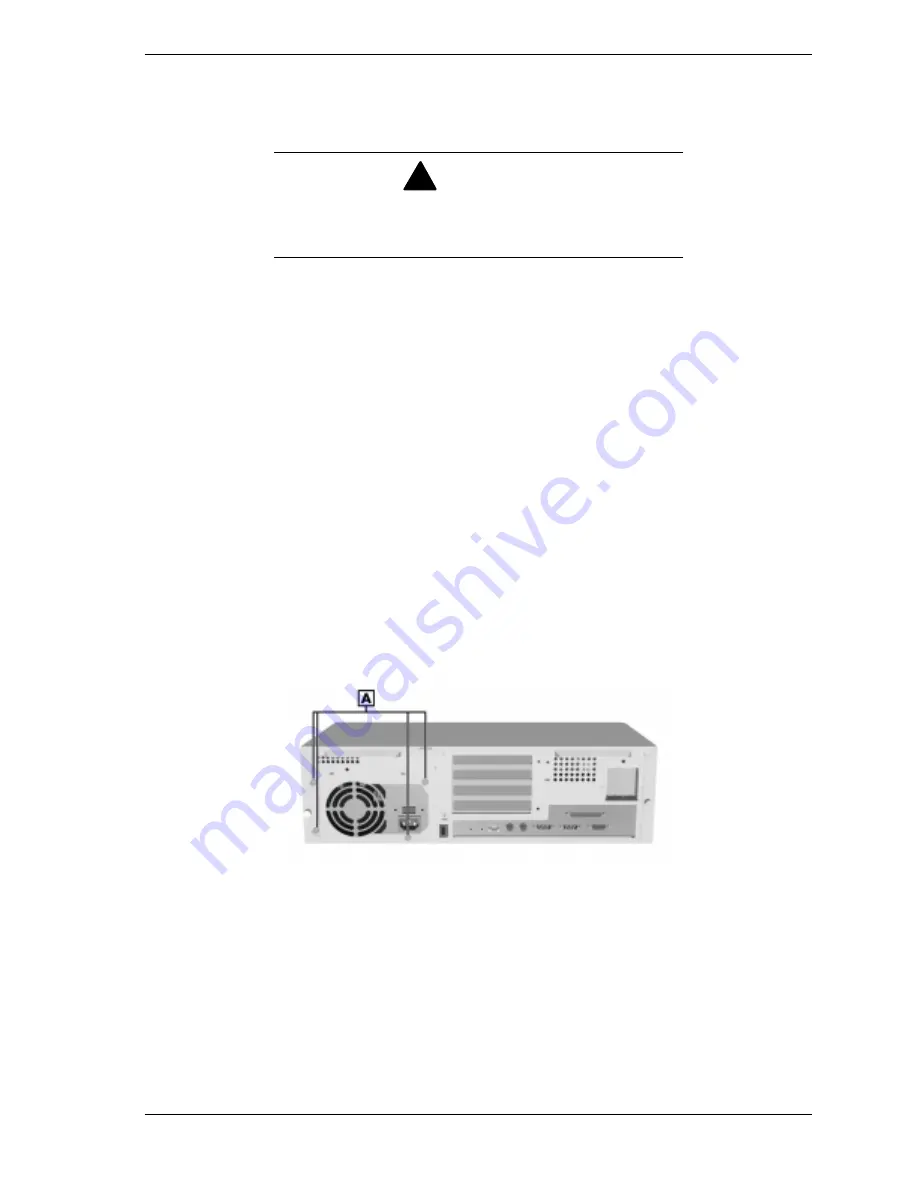
Remove the four screws holding the power supply to the chassis (see the
following figure).

Locating the Power Supply Screws — Desktop

A – Desktop Power Supply Screws

8. 

Gently lift the power supply out of the chassis.

Содержание POWERMATE ES 5200 - SERVICE

Страница 1: ...Value and Comprehensive Manageability POWERMATE ES 5200 SERIES S E R V I C E A N D R E F E R E N C E M A N U A L ...

Страница 2: ...his document are warranted in accordance with the terms of the Warranty Statement accompanying each product However actual performance of each such product is dependent upon factors such as system configuration customer data and operator control Since implementation by customers of each product may vary the suitability of specific product configurations and applications must be determined by the c...

Страница 3: ...1 18 Sound Board 1 18 Network Support 1 18 PC Adapter Device 1 19 Tape Backup Unit 1 19 Zip Drive 1 19 Speakers 1 20 2 System Configuration Interrupt Requests 2 2 System Interrupts 2 2 Jumper Settings 2 3 System Board Configuration Settings 2 4 Setting Onboard VGA 2 5 Clearing CMOS 2 5 Setting the Power On Mode 2 5 NEC 32X CD ROM Drive Jumper Settings 2 6 Lite ON 32X CD ROM Drive Jumper Settings 2...

Страница 4: ... 2 24 Installing ToolTelligent Utilities 2 25 NEC WebTelligent 2 25 NEC WebTelligent Features 2 26 NEC WebTelligent Requirements 2 27 NEC WebTelligent Installation 2 28 NEC SNMP Agent 2 30 Installing the NEC SNMP Agent 2 31 Configuring the NEC SNMP Agent for Windows 95 or Windows 98 2 31 Configuring the NEC SNMP Agent for Windows NT 2 32 NEC Configuration Change Notification 2 33 NEC Auto Backup U...

Страница 5: ... Minitower 3 20 Diskette Drive Removal and Installation 3 21 Removing a Diskette Drive Small Desktop 3 21 Installing a Diskette Drive Small Desktop 3 22 Removing a Diskette Drive Desktop 3 23 Installing a Diskette Drive Desktop 3 23 Removing a Diskette Drive Minitower 3 24 Installing a Diskette Drive Minitower 3 25 5 1 4 Inch Device Removal and Installation 3 26 Removing a 5 1 4 Inch Device Small ...

Страница 6: ... Cartridge 3 58 Internal Bracket Removal and Replacement Desktop 3 60 Removing the Internal Drive Bracket 3 60 Removing the Additional Drive Bracket 3 61 Removing the Left Side Brace 3 62 Replacing the Left Side Brace 3 63 Riser Board Removal 3 64 Removing the Riser Board Small Desktop 3 64 Removing the Riser Board Desktop 3 65 Removing the Riser Board Minitower 3 66 Front Control Board Removal 3 ...

Страница 7: ...12 Parallel Interface 4 12 Serial Interface 4 13 USB Interface 4 13 Graphics Controller 4 13 Motion Video Controller 4 14 Integrated Audio 4 14 Resources 4 14 Memory Map 4 14 DMA Settings 4 15 I O Addresses 4 16 5 Riser Board Riser Board Connectors Small Desktop 5 3 Riser Board Connectors Desktop 5 4 Riser Board Connectors Minitower 5 5 6 Illustrated Parts Breakdown Parts and Options 6 2 Documenta...

Страница 8: ...EC CSD FTP Site 9 4 NEC CSD Bulletin Board System 9 5 10 Specifications System Board Specifications 10 3 Riser Board Specifications 10 4 Keyboard Specifications 10 4 Mouse Specifications 10 5 Speaker Specifications 10 5 System Unit Specifications 10 6 Diskette Drive Specifications 10 7 IDE Hard Drive Specifications 10 7 Power Supply Specifications 10 7 Fax Modem Board Specifications 10 7 Sound Sys...

Страница 9: ...10 Front Panel Audio Support A 10 LS 120 SuperDisk Copy Utility A 10 NEC OS Restore CD A 11 Using the Fix OS Restore Option A 11 Fixing the Operating System A 11 SCSI Drive Limitations A 12 Booting from a CD A 12 Using the NEC OS Restore CD with a SCSI Drive A 12 PIIX4 Limitations A 13 Reconfiguring Ultra DMA Support A 13 Determining IDE Device Compatibility A 13 Intel Processor Serial Number Cont...

Страница 10: ...op 3 5 Releasing the Small Desktop Cover 3 5 Releasing the Desktop Cover 3 6 Aligning the Small Desktop Cover 3 7 Aligning the Desktop Cover 3 7 Locating the Top and Left Side Cover Screws Minitower 3 9 Locating the Right Side Cover Screw Minitower 3 9 Releasing the Minitower Left Side Cover 3 10 Positioning the Minitower Left Side Cover 3 11 Lifting the Minitower Top Cover 3 13 Releasing the Chas...

Страница 11: ...Processor Cartridge 3 57 Positioning the Pentium II Processor Cartridge 3 59 Locating the Internal Drive Bracket Desktop 3 60 Locating the Additional Drive Bracket Desktop 3 61 Freeing the Left Side Brace Desktop 3 62 Positioning the Left Side Brace Desktop 3 63 Locating the Riser Board Screws Small Desktop 3 64 Locating the Riser Board Screws Desktop 3 65 Locating the Riser Board Screws Minitower...

Страница 12: ...PB 6 13 Removing the Keyboard Enclosure 7 3 Removing the Mouse Ball Cover 7 4 List of Tables PowerMate ES 5200 Series System Configurations 1 4 System Components 1 14 Interrupt Level Assignments 2 3 Onboard VGA Jumper Settings 2 5 CMOS Clear Jumper Settings 2 5 Power On Mode Jumper Settings 2 5 NEC 32X CD ROM Drive Jumper Settings 2 6 Lite ON 32X CD ROM Drive Jumper Settings 2 6 Zip Drive Jumper S...

Страница 13: ...fications 10 3 Riser Board Specifications 10 4 Keyboard Specifications 10 4 Mouse Specifications 10 5 Speaker Specification 10 5 Desktop System Unit Specifications 10 6 Sound Board 10 8 PC Adapter Device Specifications 10 10 Tape Backup Unit Specifications 10 10 Zip Drive Specification 10 11 Specifications 10 12 System Compliance 10 12 ...

Страница 14: ...eassembly provides computer disassembly and reassembly procedures Procedures are supported by detailed illustrations Section 4 System Board includes information on cable and board connectors jumper settings and upgrade sockets Information on board components and the memory map is also provided Section 5 Riser Board provides cable connector information for the riser board installed in the system Se...

Страница 15: ...y CPU central processing unit DAC digital to analog converter DACK DMA acknowledge dB decibels DC direct current DCC direct cable connection DCE data communications equipment DDC Display Data Channel DIMM Dual In Line Memory Module DIP dual in line package DMA direct memory access DMAC DMA controller DMI Desktop Management Interface DOS disk operating system DRAM dynamic RAM DVD digital versatile ...

Страница 16: ...n M mega million mA milliamps max maximum MB megabyte MFM modified frequency modulation MHz megahertz MIDI musical instrument digital interface mm millimeter MMX multimedia extensions modem modulator demodulator MOS metal oxide semiconductor MPEG Motion Picture Experts Group ms millisecond MSB most significant bit NC not connected NIC networked information center NIC network interface card NMI Non...

Страница 17: ...ccess memory SRS Sound Retrieval System SSI small scale integration SVGA Super Video Graphics Array SW switch T D test and diagnostics TSC Technical Support Center TTL transistor transistor logic tpi tracks per inch UART universal asynchronous receiver transmitter UHF ultra high frequency UL Underwriter s Laboratories UMA unified memory architecture UPS uninterruptible power supply URL uniform res...

Страница 18: ...1 System Overview Configurations Features Components ...

Страница 19: ... ports a parallel port and an infrared port Ultra direct memory access DMA remote wakeup Wake On LAN the accelerated graphics port AGP standard and power management are supported Build choices include intelligent device electronics IDE hard drives ranging from 4 3 gigabytes GB to 12 9 GB System memory is provided in 32 megabyte MB minimum and as available 64 MB 128 MB and 256 MB DIMM modules Memor...

Страница 20: ...PowerMate ES 5200 Series Components Small Desktop A Monitor D Keyboard B Speaker E Mouse C Small Desktop System Unit PowerMate ES 5200 Series Components Desktop A Monitor D Keyboard B Speaker E Mouse C Desktop System Unit ...

Страница 21: ...B 128 KB cache Celeron 366 MHz 66 MHz FSB 128 KB cache Pentium II 350 MHz 100 MHz FSB 512 KB cache Pentium II 400 MHz 100 MHz FSB 512 KB cache Pentium II 450 MHz 100 MHz FSB 512 KB cache Pentium III 450 MHz 100 MHz FSB 512 KB cache Pentium III 500 MHz 100 MHz FSB 512 KB cache Cache 512 KB Pipeline Burst SRAM integrated on processor cartridge Pentium II and Pentium III processors 128 KB full speed ...

Страница 22: ...icane 3C905B TX L 100 Fax Modem Board U S Robotics 56 6 Kbps Python V 90 MDM100 PCI Winmodem Windows 95 and Windows 98 Sound Board Creative Labs SoundBlaster Live PCI Sound Board IDE Controller Dual 2 port UDMA 33 IDE controller via Intel 82371EB PIIX4E dual 2 port available on riser board AGP Support AGP integrated on system board ATI 3D RagePro AGP 2X Graphics Memory System board 4 MB synchronou...

Страница 23: ... desktop and minitower systems Brief descriptions of the components follow the figures PowerMate ES 5200 Series Front View Small Desktop A USB Port E Sleep Button Lamp B Headphone Connector F Power Button Lamp C Volume Control G CD ROM Drive D Disk Activity Lamp H Diskette Drive PowerMate ES 5200 Series Front View Desktop A Device Bay Cover F Disk Activity Lamp B Diskette Drive G Sleep Button Lamp...

Страница 24: ...Power lamp indicates if system power is on or off Sleep button suspends system operation for saving power Pressing the Sleep button pressing any key or moving the mouse resumes system operation Sleep lamp indicates when the system is in suspend power saving mode Disk activity lamp when lit indicates that the hard drive is active When the drive is active it is reading or writing data Diskette drive...

Страница 25: ...small desktop desktop and minitower systems Brief descriptions of each connector follow the figures PowerMate ES 5200 Series Back View Small Desktop A PCI Slot H Keyboard Port B PCI ISA Shared Slot I Mouse Port C USB Port J Serial Port 2 D Power Supply K Serial Port 1 E Line Out Jack L VGA Monitor Connector F Microphone In Jack M Printer Port G LAN Connector PowerMate ES 5200 Series Back View Desk...

Страница 26: ...IN connector to this port VGA monitor connector Attach a video graphics array VGA compatible monitor NEC MultiSync monitor or other VGA compatible monitor with a 15 pin connector to this AGP compatible connector Printer port Attach a parallel printer with a 25 pin connector to this port Serial ports Serial port 1 COM1 and serial port 2 COM2 allow the connection of serial devices with 9 pin connect...

Страница 27: ...t Some systems come with a 56 Kbps fax modem board in an expansion board slot The board allows the connection of a phone line to the system for fax and data communications Expansion board slots Use these slots to install up to three optional boards graphics fax modem SCSI in the system Inside Features The following figures show the interior of the small desktop desktop and minitower systems with c...

Страница 28: ... Slots E Accessible Device Bays B Riser Board F Internal or Accessible Device C Internal Hard Drive G System Board D Power Supply Inside the System Minitower A Expansion Board Slots D Accessible Device Bays B Power Supply E System Board C Riser Board F Chassis Floor ...

Страница 29: ...ay s one bay in the small desktop system two bays in the desktop system three bays in the minitower system 3 1 2 inch internal device bay s for the standard hard drive one bay in the small desktop system one bay in the desktop system plus a 3 1 2 inch accessible device bay that accommodates either a diskette drive or an internal hard drive two bays in the minitower system Expansion board connector...

Страница 30: ...for further information on setting and using passwords and the unattended start feature Windows Network Security Features The Windows Network Security feature is available through the Windows operating system Check the Windows documentation for details Chassis Intrusion Notification Whenever the chassis cover is removed LANDesk Client Manager logs the incident and reports it on screen the next tim...

Страница 31: ...18 PC Adapter Device 1 19 Tape Backup Unit 1 19 Zip Drive 1 19 Speakers 1 20 Component varies by system Built to order component System Board The system board contains the Celeron Pentium II or Pentium III processor system memory Intel 440BX PCI AGP chipset Winbond 83977 ATF AW Super I O controller the Intel 82371EB PIIX4E UDMA 33 IDE controller the Intel 82558 10BASE T 100BASE TX LAN controller c...

Страница 32: ... and secondary IDE connectors diskette drive connector expansion board connectors front panel connector for power and disk activity header for one of the USB channels small desktop and minitower or external USB connector desktop NLX connector for the system board CD audio in modem in Wake On LAN and chassis intrusion connectors power connectors For further information on the riser board see Sectio...

Страница 33: ...r setting guidelines are given in Section 2 System Configuration Connector locations for the IDE hard drive connectors on the riser board are given in Section 5 Riser Board Section 6 Illustrated Parts Breakdown lists the NEC CSD parts for the hard drives Hard drive specifications are given in Section 10 Specifications Power Supply The power supply is mounted inside the system unit It supplies powe...

Страница 34: ...erts Group 3 D and 2 D graphics and video accelerator for exceptional graphics and superior quality full screen full motion video Included on the system board is a standard VGA output connector for connecting a VGA compatible monitor Graphics modes are given in Section 2 System Configuration CD ROM Drive Some systems come with a 32X or 40X CD ROM drive The drive features up to 32 or 40 speed techn...

Страница 35: ...ection 2 System Configuration for information on setting Windows NT jumpers Section 4 System Board and Section 5 Riser Board include cable connection information for the fax modem Fax modem board specifications are provided in Section 10 Specifications Sound Board Some systems come with a Creative Labs Sound Blaster Live sound board The board incorporates the EMU10K1 Sound Engine and includes the ...

Страница 36: ...e backed up to a tape cartridge Files backed up to a tape backup unit are compressed to conserve space and to speed up the backup process The tape backup unit installs in a 5 1 4 inch accessible bay The installed tape backup unit is connected to an IDE cable that connects to the riser board The PCI IDE channel and the master slave configuration of the unit depend on the specific configuration of t...

Страница 37: ...d connecting cables Speaker sets feature a volume control power on off switch power lamp and treble control Some speaker sets also include a subwoofer output jack The speaker set connects to the speaker line out jack on the back of the system Speaker specifications are given in Section 10 Specifications ...

Страница 38: ...terrupt Requests Jumper Settings CMOS Setup Utility Video Modes Resolutions for NEC VistaScan USB Monitors Utilities NEC OS Restore CD NEC Application and Driver CD NEC Help Center Intel Processor Serial Number Control Utility ...

Страница 39: ...eyenne Backup NEC ToolTelligent Suite NEC WebTelligent NEC SNMP Agent NEC Configuration Change Notice NEC Auto Backup Utility Interrupt Requests The following paragraphs list the system interrupts IRQs Section 4 System Board includes information on system resources memory map I O addresses and DMA settings System Interrupts The system has 16 IRQs IRQ 0 through 15 assigned to different devices for ...

Страница 40: ...CSI configurations IRQ11 YAMAHA DS XG PCI Audio CODEC Intel 82371AB EB PCI to USB Universal Host Controller Intel 82558 based Integrated Fast Ethernet for WfM RagePro Turbo AGP English IRQ Holder for PCI Steering IRQ12 Mouse IRQ13 Reserved Math Coprocessor IRQ14 Primary IDE Intel 82371AB EB PCI Bus Master IDE Controller IRQ15 Secondary IDE Intel 82371AB EB PCI Bus Master IDE Controller In Plug and...

Страница 41: ...s to configure the system for a graphics board by disabling the onboard VGA restore the CMOS settings to their factory state prepare the system for the installation of a slower processor configure the system to power on when the power cable is plugged in instead of when the power button is pushed CAUTION Jumpers are set correctly at the factory for your configuration If your system requires a jump...

Страница 42: ...jumper back to pins 1 2 to keep future CMOS changes after waiting approximately five seconds CMOS Clear Jumper Settings JBAT1 Function 1 2 Keeps CMOS changes 2 3 Clears CMOS changes Setting the Power On Mode Your system can be jumpered to start up in two ways when the power button is pressed or when the power cable is connected Immediate Boot Up To change the way your system starts up change the j...

Страница 43: ...ce on the secondary channel Specifications for the CD ROM drive are included in Section 10 Lite ON 32X CD ROM Drive Jumper Settings Jumper Jumper Pin Settings Cable Select CS Not used Slave Present SL Disabled unjumpered factory default Enabled jumpered Master Select MA Enabled jumpered factory default Disabled unjumpered Zip Drive Jumper Settings The factory settings for the jumpers on the Zip dr...

Страница 44: ...eatures that customize your system such as power management and security features System configuration information is stored in nonvolatile memory A nonvolatile memory device retains its data when system power is turned off Nonvolatile memory in your system is stored in a complementary metal oxide semiconductor CMOS chip backed up by a battery on the system board The battery supplies continuous po...

Страница 45: ...iction virus check reminder and system backup reminder set system parameters after the CMOS battery is replaced Note If a Power On mode is set in the CMOS Setup Utility it overrides the JP1 jumper setting How to Start CMOS Setup To start the CMOS Setup Utility follow these steps 1 Turn on or reboot the system 2 Press F2 as soon as you see this message Press ESC to show POST F2 to enter SETUP You h...

Страница 46: ...nt Then press Enter Main Menu The CMOS Setup Utility comes up displaying the Main menu See How to Start CMOS Setup for a look at a typical Main menu screen The Main menu provides menu items for ten setup functions and two exit choices Use the arrow keys to select a menu item A brief description of the option appears along the bottom of the Main menu screen when a menu item is selected The followin...

Страница 47: ...emory Extended Memory Other Memory Total Memory BIOS Features Setup Choose the BIOS Features Setup menu by selecting it from the Main menu and pressing Enter CAUTION Setting items on this menu to incorrect values can cause your system to malfunction This menu provides access to enhanced BIOS features The following features are available from the BIOS Features Setup menu Anti Virus Protection CPU L...

Страница 48: ...lable from the Chipset Features Setup menu DRAM Data Integrity Mode for example Non ECC or ECC Memory Hole at 15M 16M AGP Aperture Size MB Power Management Setup Choose the Power Management Setup menu by selecting it from the Main menu and pressing Enter CAUTION Setting items on this menu to incorrect values can cause your system to malfunction Note If a Power On mode is set in the CMOS Setup Util...

Страница 49: ... When Suspend Soft Off by PWR BTTN instant off delay 4 seconds CPUFAN Off In Suspend PWRFAN Off In Suspend Resume by Ring Resume by Alarm Date of Month Alarm appears only when Resume by Alarm is enabled Time hh mm ss Alarm appears only when Resume by Alarm is enabled Wake Up On LAN Restore AC Power Loss IRQ 3 7 9 15 NMI Primary IDE 0 Primary IDE1 Secondary IDE 0 Secondary IDE 1 Floppy Disk Serial ...

Страница 50: ...and 15 with settings for PCI ISA PnP or Legacy ISA Reset Configuration Data Assign IRQ For VGA Assign IRQ For USB Load Setup Defaults Choose the Load Setup Defaults menu by selecting it from the Main menu and pressing Enter A dialog box appears so you can confirm this choice or abort the process CAUTION Setting items on this menu to incorrect values can cause your system to malfunction Special Fea...

Страница 51: ...CPU Fan Detected Chassis Intrusion Detect Voltage Detected under CPU PLUG PLAY CPU Speed Disable Manual 200 MHz 66 x 3 233 MHz 66 x 3 5 266 MHz 66 x 4 300 MHz 66 x 4 5 333 MHz 66 x 5 366 MHz 66 x 5 5 400 MHz 66 x 6 500 MHz 66 x 7 5 under System Monitor Chassis Fan RPM Power Fan RPM CPU Fan RPM System Temperature CPU Temperature CPU Critical Temp Shutdown Temp ...

Страница 52: ...o enabled IDE Primary Slave PIO only appears when On Chip Primary PCI IDE is set to enabled IDE Secondary Master PIO only appears when On Chip Secondary PCI IDE is set to enabled IDE Secondary Slave PIO only appears when On Chip Secondary PCI IDE is set to enabled IDE Primary Master UDMA IDE Primary Slave UDMA IDE Secondary Master UDMA IDE Secondary Slave UDMA On Chip Primary PCI IDE On Chip Secon...

Страница 53: ...the Main menu and pressing Enter CAUTION Setting items on this menu to incorrect values can cause your system to malfunction Follow the prompts in the dialog box to set up change or disable the User password Save Exit Setup Choose the Save Exit Setup menu by selecting it from the Main menu and pressing Enter CAUTION Setting items on this menu to incorrect values can cause your system to malfunctio...

Страница 54: ... colors and refresh rates 640 by 480 pixels 256 65K 16 7 million colors 200 Hz maximum 800 by 600 pixels 256 65K 16 7 million colors 200 Hz maximum 1024 by 768 pixels 256 65K 16 7 million colors 150 Hz maximum 1152 by 864 pixels 256 65K 16 7 million colors 120 Hz maximum 1280 by 1024 pixels 256 65K 16 7 million colors 100 Hz maximum 1600 by 1200 pixels 256 65K colors with 4 MB SGRAM 85 Hz maximum ...

Страница 55: ...ed in the following table generates a black monitor screen Resolutions for 15 and 17 Inch NEC VistaScan USB Monitors Mode Resolution Horizontal Frequency KHz Vertical Frequency Hz 1 720 x 400 31 47 70 2 640 x 480 31 47 60 3 800 x 600 35 16 56 4 1024 x 768 35 52 87 5 640 x 480 37 50 75 6 800 x 600 37 88 60 7 640 x 480 43 3 85 8 800 x 600 46 88 75 9 1024 x 768 48 36 60 10 800 x 600 53 67 85 11 1024 ...

Страница 56: ...IOS flash diskette The diskette contains the latest version of the BIOS code You can get the diskette from NEC CSD or download the BIOS from the NEC CSD website or Bulletin Board System BBS Update the BIOS from the BIOS flash diskette as follows CAUTION Perform a flash ROM update with the guidance of a NEC CSD support technician See Section 9 for information about getting support 1 Write down the ...

Страница 57: ...ndard to manage components network interface cards memory software applications within a client local or remote workstation PC system It provides features for managing the resources of a local PC and can be used by system administrators to manage groups of computer systems With Client Manager the following tasks can be performed using the Wake On LAN feature get remote systems on the network up an...

Страница 58: ...hy workstation is fixed the screen can be refreshed to view the new correct PC health The monitor can also be set to report only unhealthy workstations The PC Health meter is a traffic signal that provides a visual indicator of workstation health A red light indicates that a critical system event has occurred The user is required to fix the problem immediately A yellow light or noncritical system ...

Страница 59: ...work applications system files user information The user can also view the current system configuration edit user information and create or restore file snapshots DMI As a part of the LANDesk Client Manager the Desktop Management Interface DMI is the standard interface used to manage system components on the computer Examples of system components are network interface cards and software applicatio...

Страница 60: ...e detected when out of range conditions occur User prompts are displayed to alert the user to a potentially harmful condition Using the Chassis Intrusion Notification Feature LANDesk Client Manager allows the user to monitor the system against chassis intrusion Whenever the chassis is opened LANDesk Client Manager logs the intrusion and reports the incident in a screen message the next time the sy...

Страница 61: ...can also do regularly scheduled backups and scan files for viruses during a backup operation NEC ToolTelligent Suite NEC ToolTelligent is a suite of desktop management utilities that allow local and remote resources to be administered over a network NEC ToolTelligent Utilities NEC ToolTelligent includes the following utilities NEC WebTelligent management software for server systems NEC WebTelligen...

Страница 62: ...low the screen prompts to install utilities Restart the system after the installation is complete NEC WebTelligent NEC WebTelligent is a web based desktop management system that works with Intel LANDesk Client Manager LDCM version 3 32 or later Desktop Management Interface DMI version 2 0 and the world wide web to perform administrative tasks across multiple platforms either locally or remotely ov...

Страница 63: ...asswords Disable user accounts Asset Management Discovery of networked DMI desktops Display system and hardware component attributes System Health Monitoring Set threshold limits for voltage and system temperature Generate alert for high voltage temperature or fan speed Generate alert for chassis intrusion Session Management Online help View system and log events Security Intranet user authenticat...

Страница 64: ...eb Server version 1 0 or later Microsoft Windows NT with Peer Web Server version 2 0 or later Microsoft Windows NT with Microsoft Internet Information Server version 3 0 or later Microsoft Windows NT with Netscape FastTrack Server version 2 0 or later or Netscape Enterprise version 3 01 or later One or more Internet Browsers Microsoft Internet Explorer 4 0 or later Netscape Navigator Gold 3 03 or ...

Страница 65: ...ser does not start click the Startup tab click Start click the Administration tab and click Administration to start the browser 3 Install the WebTelligent software on the web server Note WebTelligent software is available on the NEC Application and Driver CD on some system models The software can also be downloaded from the NEC CSD website www nec computers com For systems with WebTelligent on the...

Страница 66: ... is already installed Look for the directory C Program files PBNEC WebTelligent Discovery Agent If it is not there install the software from the NEC Application and Driver CD or download it from the NEC CSD website www nec computers com 6 Open WebTelligent as follows Note LDCM 3 32 or later must be installed on every client At a managed desktop computer start a web browser Set the URL to the web s...

Страница 67: ...l Screen NEC SNMP Agent The NEC Desktop Simple Network Management Protocol SNMP Agent is an extension to the Microsoft SNMP Agent The NEC SNMP Agent permits a network administrator to manage NEC PowerMate clients The NEC SNMP Agent performs the following major functions Assets Management displays system serial number product model and more Configuration Management displays memory size and more Hel...

Страница 68: ...llation instructions 2 For systems without NEC SNMP Agent on the NEC Application and Driver CD download the software from the NEC CSD website www nec computers com Save the download file in your C Temp directory or other appropriate directory Double click setup exe and follow the prompts Configuring the NEC SNMP Agent for Windows 95 or Windows 98 The SNMP Agent is configured with the Windows 95 Po...

Страница 69: ...y name For Communities Traps and Permitted Managers click Show and configure the policy as appropriate Highlighting the Internet MIB policy opens the contact name and location fields in the Policy window for editing Click File and click Save Click File and click Exit Configuring the NEC SNMP Agent for Windows NT Configure the NEC SNMP Agent for Windows NT as follows 1 In the Windows taskbar click ...

Страница 70: ...p A message appears on the screen when a change is detected Install NEC Configuration Change Notification from the NEC Application and Driver CD For installation information see Installing ToolTelligent Utilities NEC Auto Backup Utility The NEC Auto Backup utility works with LANDesk Client Manager and Cheyenne Backup to detect predicted hard drive failures and to automatically back up the data fro...

Страница 71: ...pplications optional drivers and online documents Note The computer also comes with the NEC Application and Driver CD This CD contains applications and online documents as well as a full suite of optional drivers that are compatible with hardware options offered by NEC CSD See NEC Application and Driver CD for information about installing or restoring applications optional drivers and online docum...

Страница 72: ... the NEC Application and Driver CD and reinstall any application that came with your system See NEC Application and Driver CD for directions on running this program Launching the NEC OS Restore CD CAUTION The OS Restore program can delete all the data on your hard drive If possible back up your data before performing an OS restore Follow these steps to launch the NEC OS Restore CD 1 Power on or re...

Страница 73: ...low the prompts to get to the Restore Mode screen see Launching the NEC OS Restore CD 2 Click Auto to repartition and reformat your hard drive If you are running Windows NT 4 0 skip to step 4 If you are running Windows 95 or Windows 98 the Partition Information screen appears Note Clicking Auto repartitions and reformats your hard drive before reinstalling the operating system 3 The Partition Info...

Страница 74: ...emove the CD from the CD tray 7 Click OK to reboot This completes the Auto Rebuild and Restore procedure See NEC Application and Driver CD for instructions on installing any of the applications or online documents or to install device drivers that did not come with your system Restore any application or driver that was not provided by NEC by using the vendor diskette s or CD ROM s included in its ...

Страница 75: ...the Formatting Drive s screen appears with a status bar showing the progress of the formatting After the drive has been reformatted the Installing Applications screen appears indicating the status as the operating system loads from the CD The drivers and other software components required for the operating system are also loaded from the CD After the OS finishes loading the Operating System Restor...

Страница 76: ...EC Application and Driver CD for instructions on installing any of the applications or online documents or to install device drivers that did not come with your system Restore any application or driver that was not provided by NEC by using the vendor diskette s or CD ROM s included in its original packaging Fixing the Operating System Follow these steps to restore the operating system to a state f...

Страница 77: ...ta can be backed up System settings previously located in the C windows directory are now in a backup directory c windows org CAUTION Some or all applications might not exhibit full functionality after the Fix OS is performed To restore the system to its factory installed state perform another OS restore using the Auto or Custom option See Auto Rebuild and Restore or Custom Rebuild and Restore Som...

Страница 78: ...rruption you can restore these files to your computer using one of the programs on the CD Launching the Application and Driver CD Use the Application and Driver CD to install applications drivers utilities Internet browsers and the online NEC Help Center Follow this procedure to launch the Application and Driver CD CAUTION Do not select and install drivers for any hardware that is not currently in...

Страница 79: ...pears follow these steps to install the desired software 1 Click the selection tab of your choice 2 Click the desired application driver or utility CAUTION Do not select and install drivers for any hardware that is not currently installed on the system Doing so can damage the operating system 3 Click the Install button to install your selection Follow the on screen instructions to install your sel...

Страница 80: ... steps 1 Access the C Program Files nechlpct directory 2 Double click the Unwise exe icon All files related to the NEC Help Center and the C Program Files nechlpct directory are removed from the system To reinstall the NEC Help Center use the NEC Application and Driver CD and follow the instructions in Installing the NEC Help Center Intel Processor Serial Number Control Utility The Intel Processor...

Страница 81: ...r is an identifier for the processor The processor serial number is designed to be unique and when used in conjunction with other identification methods can be used to identify the system or user This number can be used in a wide variety of applications that benefit from stronger forms of system and user identification The processor serial number is analogous to a conventional serial number with t...

Страница 82: ...o download a program that can read the processor serial number Almost all browsers are configured to warn users whenever they download executable software Unless you disable the warning in the browser you should receive a notification Does Intel track serial numbers Generally not other than related to the manufacturing process Intel does not in the absences of advance and express consent of a user...

Страница 83: ... day technical support please visit the Intel support website at http support intel com Email support intel com In the United States call 800 628 8686 from 5 00 a m to 5 00 p m Pacific Standard Time For world wide phone contacts please see http support intel com support feedback htm ...

Страница 84: ...ront Panel Diskette Drive 5 1 4 Inch Device Internal Hard Drive DIMM System Board Expansion Board Processor Internal Brackets Desktop Riser Board Front Control Board USB Board Intrusion Switch Power Supply CMOS Battery Chassis Foot System Board Rail ...

Страница 85: ...e follow the table and procedures in reverse order Individual removal procedures do not require the total disassembly of the workstation Each of the following subsections lists the parts that must be removed before beginning the removal procedure PowerMate ES 5200 Series Disassembly Sequence Sequence Part Name See Page 1 System unit cover 3 3 2 Front panel 3 15 3 Diskette drive 3 21 4 5 1 4 inch d...

Страница 86: ...t the reassembly was performed correctly CAUTION Before handling boards or chips ground yourself to release static System Unit Cover Removal and Replacement The following sections describe how to remove and replace the system unit covers Small Desktop or Desktop System Unit Cover The following sections describe how to remove and replace the system unit cover for the small desktop and desktop syste...

Страница 87: ... off and unplug the system unit 2 Disconnect the keyboard mouse monitor and any other external options such as speakers or a printer from the rear of the system unit CAUTION Electrostatic discharge can damage computer components Discharge static electricity by touching a metal object before removing the system unit cover 3 Remove any lock or security cable if one has been installed 4 Remove the co...

Страница 88: ...ides and slide the cover about an inch away from the front Note The cover fits tightly Press against the rear panel to slide the cover one inch away from the front panel 6 Lift the cover up and away from the system unit see the following figure Releasing the Small Desktop Cover A Slots C Tabs B Tabs D Metal Securing Rail ...

Страница 89: ...the cover 1 Position the cover over the chassis with its front edge about one inch behind the front of the chassis 2 Lower the cover onto the chassis taking care to align the tabs and slots on the cover and the chassis frame 3 Slide the cover forward to meet the front panel see the following figure Note The cover fits tightly If the cover does not slide off all the way to the front panel place one...

Страница 90: ...ng Rail Aligning the Desktop Cover A Slots C Slots B Tabs D Tabs 4 Secure the cover with the cover screw s See the previous section Removing the Small Desktop or Desktop Cover 5 Replace any lock or security cable if one has been installed 6 Reconnect all external peripherals 7 Plug in the power cables ...

Страница 91: ...ING Before removing the side cover turn off system power and unplug the system power cable Power is removed only when the power cable is unplugged Note If the side cover is removed LANDesk Client Manager logs the intrusion and reports it in a screen message the next time the system is booted This message appears every time the system is rebooted until the report is cleared For more information on ...

Страница 92: ...o the chassis bracket see the second figure below Position the screwdriver through the hole in the back left edge of the chassis to gain access to the screw If necessary remove the hard drive bracket to access to the right side cover screw see Removing a 3 1 2 Inch Hard Drive Minitower Locating the Top and Left Side Cover Screws Minitower A Top Cover Screw B Left Side Cover Screw Locating the Righ...

Страница 93: ...ing the Minitower Left Side Cover A Slide Lock C Left Side Cover B Recess Replacing the Minitower Side Covers Always replace the right side cover before replacing the left side cover Replace the right and left side covers as follows CAUTION Ensure that all cables are positioned to prevent kinking crimping abrasion or cutting while installing the side cover Check that the ribbon cables are folded a...

Страница 94: ...gn the tab on the inside of the cover with its slot on the back of the chassis Positioning the Minitower Left Side Cover A Cover Tabs under cover C Side Cover Flanges B Tab Slots D Securing Rails 4 Press the top and bottom of the side cover against the chassis and slide the cover toward the front of the chassis until it locks in place Note If the cover does not slide all the way to the front of th...

Страница 95: ...op cover if you are replacing the diskette drive or need to unplug the diskette drive cable from the back of the riser board Remove the top cover as follows WARNING Before removing the top cover turn off system power and unplug the system power cable Power is removed only when the power cable is unplugged Note Both side covers must be removed before the top cover can be removed 1 Remove both side ...

Страница 96: ...it over the back of the chassis 5 Secure the top cover to the rear of the chassis with the screw previously removed 6 Replace the front panel see Replacing the Front Panel Minitower 7 Replace the side covers see Replacing the Minitower Side Covers Opening the Chassis Floor Before replacing the system memory processor system board or expansion boards you may need to open the hinged chassis floor an...

Страница 97: ...oot C Left Chassis Foot Closing the Chassis Floor To close the chassis floor proceed as follows 1 If the system board was partially slid out for access to board components slide it back into the chassis using the two board handles If the system board was removed see Installing the System Board Minitower for replacement procedures 2 Pivot the floor up against the chassis and press until the floor l...

Страница 98: ...lling a device in one of the 5 1 4 inch accessible device bays Remove the front panel as follows 1 Remove the system unit cover see Removing the Small Desktop or Desktop Cover 2 Locate the three locking tabs inside the front panel near the upper edge Squeeze the right two tabs together to release them from the slots in the chassis Then press the left most locking tab out of its slot Note The three...

Страница 99: ...the Front Panel Desktop Remove the desktop front panel before installing a device in one of the 5 1 4 inch accessible device bays or the middle 3 1 2 inch device bay You might also need to remove the blank panel that covers the bay on the front panel and or the metallic shield on the chassis Remove the front panel blank panels and shields as follows 1 Remove the system unit cover see Removing the ...

Страница 100: ...being installed 5 Remove the blank plastic panel from the selected bay by pressing the panel tabs from inside the front panel and pushing the blank panel out see the following figure 6 If a metallic shield covers the opening in the chassis remove it 7 Install the device see Installing a 5 1 4 Inch Device Small Desktop or Desktop or Installing an Additional 3 1 2 Inch Device Desktop Locating the Bl...

Страница 101: ... place over the bay 2 If necessary replace the blank plastic panel to cover the bay opening in the front panel From the inside fit the blank panel into bay opening and press it until the tabs lock in place 3 Align the eight front panel locking tabs with the slots in the front of the system unit see the following figure Align the front USB port with the cutout on the front panel 4 Press along the e...

Страница 102: ...nt panel proceed as follows 1 Remove the left side cover see Removing the Minitower Side Covers 2 From inside the chassis squeeze the two front panel locking tabs in the lower left and right corners see the following figure 3 Carefully push the tabs out until they release the bottom of the front panel 4 Grasp the side edges of the front panel Carefully pull the front panel away from the system uni...

Страница 103: ... to cover the opening in the chassis and the front panel 1 If necessary replace the metallic shield by pressing it into place over the bay 2 Replace the blank plastic panel if necessary Press the blank panel into the inside of the front panel over the empty bay Press until the four tabs lock the panel in place 3 Align the four front panel plugs and the two locking tabs with the mounting holes in t...

Страница 104: ...ing the Small Desktop or Desktop Cover 2 Remove the front panel see Removing the Front Panel Small Desktop 3 Disconnect and label the diskette drive cables 4 Remove the two screws on the right side of the drive see the following figure Removing Diskette Drive Screws Small Desktop A Diskette Drive B Diskette Drive Screws 5 Pull the drive out of the drive bay making sure that the offset screw on the...

Страница 105: ... Front Panel Small Desktop 4 From the front of the system insert the drive connector end first into the drive bay Note To easily access drive connectors for cabling do not insert a diskette drive all the way into the bay 5 Connect the drive cables 6 Insert the drive the rest of the way into the drive bay making sure that the catch on the left side of the drive bracket engages the offset screw on t...

Страница 106: ...n the right side of the drive See the figure showing the small desktop model in Removing a Diskette Drive Small Desktop The screw holes on the diskette drive are found in the same place for the both models 5 Pull the drive out of the drive bay 6 If you are installing a new drive see Installing a Diskette Drive Desktop Installing a Diskette Drive Desktop Use the following procedure to install a dis...

Страница 107: ...Utility in Section 2 Removing a Diskette Drive Minitower Use the following procedure to remove a diskette drive from a 3 1 2 inch accessible drive bay in a minitower system 1 Remove the left side cover see Removing the Minitower Side Covers 2 Remove the front panel see Removing the Front Panel Minitower 3 If necessary remove the top cover for better access to the drive connectors see Removing the ...

Страница 108: ... bay Slide it in far enough for access to the connectors at the rear of the drive If necessary remove the top cover for better access to the drive connectors see Removing the Minitower Top Cover 5 Connect the drive cables 6 If necessary slide the drive toward the back of the chassis until it snaps in place 7 Secure the drive in the bay with two screws see the figure in Removing a Diskette Drive Mi...

Страница 109: ...emove a 5 1 4 inch device from a 5 1 4 inch accessible device bay 1 Remove the system unit cover see Removing the Small Desktop or Desktop Cover 2 Remove the front panel For a small desktop system see Removing the Front Panel Small Desktop For a desktop system see Removing the Front Panel Desktop 3 Label and disconnect the device cables 4 Remove the two screws on the right side of the device see t...

Страница 110: ...follow the instructions in this section 1 Follow the preinstallation instructions that come with your device such as setting jumpers 2 Remove the system unit cover see Removing the Small Desktop or Desktop Cover 3 Remove the front panel For a small desktop system see Removing the Front Panel Small Desktop For a desktop system see Removing the Front Panel Desktop 4 From the front of the system inse...

Страница 111: ...m unit cover see Replacing the Small Desktop or Desktop Cover 10 Run the Setup program to set the new configuration see CMOS Setup Utility in Section 2 Removing a 5 1 4 Inch Device Minitower Use the following procedure to remove a 5 1 4 inch device from a 5 1 4 inch accessible device bay 1 Remove the left side cover see Removing the Minitower Side Covers 2 Remove the front panel see Removing the F...

Страница 112: ...ont panel see Removing the Front Panel Minitower 4 From the front of the system slide the device connector end first into the device bay Slide it in far enough for access to the connectors at the rear of the device If necessary remove the top cover for better access to the device connectors see Removing the Minitower Top Cover 5 Connect the device cables 6 If necessary slide the device toward the ...

Страница 113: ...D To replace a 3 1 2 inch internal hard drive proceed as follows 1 Remove the system unit cover see Removing the Small Desktop or Desktop Cover 2 Label the IDE device signal and power cables connected to the drive and then disconnect them 3 Remove the two screws securing the internal hard drive bracket to the braces on the top of the chassis see A in the following figure 4 Lift the internal hard d...

Страница 114: ... the chassis braces and align the screw holes 7 Insert and tighten the two screws to secure the bracket to the chassis braces 8 Connect the device cables 9 Replace the system unit cover see Replacing the Small Desktop or Desktop Cover 10 Run the Setup program to set the new configuration see CMOS Setup Utility in Section 2 Removing a 3 1 2 Inch Hard Drive Desktop To remove a 3 1 2 inch device from...

Страница 115: ...h device in the 3 1 2 inch internal device bay proceed as follows 1 Follow the preinstallation instructions that come with your device such as setting jumpers 2 Remove the system unit cover see Removing the Small Desktop or Desktop Cover 3 If a currently installed hard drive is being replaced see Removing a 3 1 2 Inch Hard Drive Desktop 4 With the cable connectors toward the interior of the system...

Страница 116: ...t the device cables 4 Remove the two screws securing the drive in the bracket see the following figure Locating 3 1 2 Inch Accessible Device Screws Desktop 5 Pull the device out of the device bay 6 If you are installing a new device see Installing an Additional 3 1 2 Inch Device Desktop If no new device is going in the bay place the blank plastic panel into the opening on the front panel and then ...

Страница 117: ...evice Bay Cover Desktop 6 Insert the device connector end first into the bay Align the screw holes in the drive with the holes in the drive bracket 7 Insert and tighten the two screws to secure the drive in the bracket see the figure in Removing the Additional 3 1 2 Inch Device Desktop 8 Connect the device cables 9 Replace the front panel see Replacing the Front Panel Desktop 10 Replace the system...

Страница 118: ...new hard drive see Installing a 3 1 2 Inch Hard Drive Minitower Installing a 3 1 2 Inch Hard Drive Minitower You can upgrade your system by replacing an existing hard drive or by adding a second drive Hard drive s install in an internal drive bracket located at the top rear of the chassis Note You can also install a 3 1 2 inch hard drive in a 5 1 4 inch accessible device bay Place the device in a ...

Страница 119: ... the chassis until it clicks in place 10 Replace the top cover see Replacing the Minitower Top Cover 11 Replace the left side cover see Replacing the Minitower Side Covers 12 Run the Setup program to set the new configuration see CMOS Setup Utility in Section 2 DIMM Removal and Installation Remove or install a DIMM using the following procedures Removing a DIMM If your memory configuration require...

Страница 120: ... the System Board Desktop For a minitower system see Installing the System Board Minitower 6 Replace the cover s For a small desktop or desktop system see Replacing the Small Desktop or Desktop Cover For a minitower system see Replacing the Minitower Side Covers Installing a DIMM Install a memory module by performing the following steps 1 Remove the system board to access DIMM sockets For a small ...

Страница 121: ...For a small desktop system see Installing the System Board Small Desktop For a desktop system see Installing the System Board Desktop For a minitower system see Installing the System Board Minitower Positioning a DIMM A Plastic Clips B Notches 7 Replace the cover s For a small desktop or desktop system see Replacing the Small Desktop or Desktop Cover For a minitower system see Replacing the Minito...

Страница 122: ...ee the following figure This releases the system board and slides it partway out of the system 3 Carefully slide the board the rest of the way out taking care not to lift the board before it is free of the chassis 4 Set the board on an antistatic surface System Board Latch Small Desktop A System Board Latch B System Board Installing the System Board Small Desktop Take care when replacing the syste...

Страница 123: ...way into the system unit along the chassis rail guides Stop sliding the board when the outside edge of the system board aligns with the outside edge of the chassis see the following figures Correct Alignment of the System Board Small Desktop A Rail C Edge of Chassis B Latch Open D Edge of System Board Incorrect Alignment of the System Board Small Desktop A Latch in Incorrect Position C Edge of Cha...

Страница 124: ...m board is aligned correctly you might need to push the outside edges of the board to fully seat it into the connector on the riser board Check the position of the chassis latch The system board is secured when the latch is parallel with the outside edge of the board Secured Position of Latch Small Desktop A Rail C Edge of Chassis B Latch Closed D Edge of System Board 5 Replace the cover see Repla...

Страница 125: ...e 5 Pull the system board latches away from the system unit see the following figure This releases the system board and slides it partway out of the system Preparing to Remove the System Board Desktop A System Board C Side Bracket B System Board Latches D Side Bracket Tabs 6 Carefully slide the board the rest of the way out taking care not to lift the board before it is free of the chassis 7 Set t...

Страница 126: ...CAUTION To prevent damage to the latches align the system board with the outside edge of the chassis before closing the latches 4 Push the latches closed This slides the board the rest of the way into the system unit and secures it into the connector on the riser board CAUTION If the board does not slide when you push the latches slide the board out of the unit a bit and check the alignment positi...

Страница 127: ... Floor 5 Grasp the two handles on the board and carefully pull the board straight out of the chassis 6 Set the board on an antistatic surface Locating System Board Rail Handles Minitower A Chassis Floor D Riser Board B System Board E System Board Connector C Handles Installing the System Board Minitower Use the following procedure to replace the system board 1 Align the system board rails with the...

Страница 128: ...edge of the chassis floor 6 Slowly close the chassis floor to slide the board into the connector on the riser board CAUTION If the board does not slide in when you attempt to close the chassis floor pull the board out of the chassis a bit check the alignment and correct as necessary Close the chassis floor 7 Close the chassis floor see Closing the Chassis Floor 8 Place the system unit upright and ...

Страница 129: ...lowing figures show the locations of the expansion board slots on each chassis and the expansion board connectors on each riser board Expansion Board Slots and Connectors Small Desktop A Slot for PCI or ISA Board C Shared PCI ISA Connector B Slot for PCI Board D PCI Connector Expansion Board Slots and Connectors Desktop A Slots for PCI Boards D PCI Connectors B Slot for PCI or ISA Board E Shared P...

Страница 130: ...ollowing steps 1 Remove the system unit cover see Removing the Small Desktop or Desktop Cover 2 Remove the screw securing an expansion board slot cover see the figure on the following page Set the screw aside it is used to secure the expansion board 3 Remove the slot cover Save it to cover the slot again in case the expansion board is removed 4 Install an expansion board see Installing an Expansio...

Страница 131: ...over 4 Pull the board out of the connector and the expansion board slot 5 Replace the slot cover removed when the expansion board was installed Secure the cover with the screw 6 Replace the system unit cover see Replacing the Small Desktop or Desktop Cover Installing an Expansion Board Small Desktop or Desktop To install an expansion board in a small desktop or desktop system use the following ste...

Страница 132: ...board firmly into the expansion board connector on the riser board 5 Use the slot cover screw removed earlier to secure the expansion board Securing an Expansion Board Small Desktop 6 Attach any signal cables required by the expansion board 7 Replace the system unit cover see Replacing the Small Desktop or Desktop Cover Removing a Slot Cover Minitower To remove a slot cover from a minitower system...

Страница 133: ...lowing steps 1 Remove the left side cover see Removing the Minitower Side Covers 2 Swivel the two feet inward out of the way 3 Position the system unit on its side with the open left side facing up 4 If necessary slide the system board partway out of the chassis to reach the expansion board see Opening the Chassis Floor 5 Label and remove any cables connected to the board 6 Remove the screw that s...

Страница 134: ... the open left side facing up 4 If necessary slide the system board partway out of the chassis to reach the expansion board slot see Opening the Chassis Floor 5 Follow any preinstallation instructions that come with the expansion board such as setting jumpers on the board 6 Remove and save the screw securing the expansion board locking bracket see the figure in Removing a Slot Cover Minitower Tilt...

Страница 135: ...r or NEC service center for assistance in upgrading your processor Incorrect installation of the processor cartridge and heat sink can damage the processor system board or both Carefully follow all installation instructions provided with your upgrade processor and the procedures in the following sections Ensure that you have the correct heat sink for the processor being installed Celeron Pentium I...

Страница 136: ...10 minutes before removing the processor WARNING If the system has been running any processor or heat sink already installed on the board will be hot To avoid the possibility of a burn let the components cool for 10 minutes before continuing with the procedures described here 3 Remove the system board to access processor socket For a small desktop system see Removing the System Board Small Desktop...

Страница 137: ...r Cartridge Installing the Celeron or Pentium III Upgrade Processor Cartridge Install a Celeron or Pentium III upgrade processor cartridge as follows Note NEC CSD recommends that you print out or write down your current CMOS Setup parameters and store the information in a safe place before installing a processor Note If you are upgrading from a Pentium II processor to a Celeron or Pentium III proc...

Страница 138: ...n the bar until it snaps in place on the cartridge see the following figure Positioning the Celeron or Pentium III Processor Cartridge A Retaining Bar C Retention Mechanism B Processor Cartridge D Slot 1 Connector 5 Replace the system board For a small desktop system see Installing the System Board Small Desktop For a desktop system see Installing the System Board Desktop For a minitower system se...

Страница 139: ...ce before removing your processor 1 Make sure that Restore AC Power Loss in the Power Management Setup menu of the CMOS Setup Utility is set to Last State default or Power On before removing the processor Note Verify that Restore AC Power Loss in the Power Management Setup menu of the CMOS Setup Utility is set to Last State default or Power On before replacing any processor 2 Turn off the system a...

Страница 140: ...ure Improper removal of the processor may damage the processor retention mechanism or system board 7 Grasp the cartridge lock lever on one side of the retention mechanism with one hand and the end of the cartridge with the other hand see the following figure 8 Pull the lock lever away from the cartridge while pulling up on the end of the cartridge The lever is stiff and requires some effort to pul...

Страница 141: ...mation in a safe place before installing a processor 1 If you are replacing the Pentium II processor cartridge currently in your system remove the cartridge see Removing the Pentium II Processor Cartridge CAUTION Before picking up the processor cartridge reduce static discharge by touching the metal chassis of the system unit 2 Align the cartridge with the guides in the retention mechanism see the...

Страница 142: ... the Small Desktop or Desktop Cover For a minitower system see Replacing the Minitower Side Covers 7 Press the power button to start the system Press F2 to enter the CMOS Setup Utility If the system does not boot as might be the case if you are replacing one processor with a slower one press the power button a second time If the system still does not boot clear CMOS see Clearing the CMOS and Chang...

Страница 143: ...brace the additional drive bracket and the internal hard drive bracket are included in the following sections Removing the Internal Drive Bracket You need to remove the internal drive bracket before you can remove the power supply Remove the internal drive bracket by following these steps 1 Remove the 3 1 2 inch internal drive from the bracket see Removing a 3 1 2 Inch Hard Drive Desktop 2 Remove ...

Страница 144: ... the riser board Remove the additional drive bracket by following these steps 1 If the system has a drive in the additional 3 1 2 inch drive bay remove it first see Removing the Additional 3 1 2 Inch Drive Desktop 2 Remove the screw that holds the bracket to the front of the chassis see the following figure 3 Lift the bracket up slightly to free it from the four tabs on the chassis 4 Pull the brac...

Страница 145: ...chassis see the following figure 2 Push the freed end of the brace horizontally to the interior of the chassis The hooked tab on the other end of the brace disengages from the chassis 3 Lift the brace out of the chassis taking care not to knock or scrape components within the system Freeing the Left Side Brace Desktop A Screw D Hooked Tab B Left Side Bracket E Front of Chassis C Left Side Brace ...

Страница 146: ...ght See the following figure 2 Place the hooked tab into the slot on the front edge of the chassis 3 Once the right end of the brace is hooked in place slide the left end horizontally toward the left rear corner of the chassis 4 Align the screw holes in the left end of the brace and the left rear corner of the chassis 5 Secure the brace with the screw Positioning the Left Side Brace Desktop A Left...

Страница 147: ...see Removing the Small Desktop or Desktop Cover 4 Remove the internal hard drive see Removing a 3 1 2 Inch Hard Drive Small Desktop 5 Remove the system board see Removing the System Board Small Desktop 6 Remove any expansion boards see Removing an Expansion Board Small Desktop 7 Label and disconnect any cables connected to the front or back of the riser board 8 Remove the six screws securing the r...

Страница 148: ...oard Small Desktop or Desktop 6 If the system has a drive in the additional 3 1 2 inch drive bay remove it see Removing the Additional 3 1 2 Inch Device Desktop 7 Remove the bracket for the additional drive see Removing the Additional Drive Bracket Desktop 8 Label and disconnect any cables connected to the front or back of the riser board 9 Remove the three screws securing the riser board to the c...

Страница 149: ...over see Removing the Minitower Side Covers 4 Remove the system board see Removing the System Board Minitower 5 Remove any expansion boards see Removing an Expansion Board Minitower 6 Label and disconnect any cables connected to the riser board 7 Remove the four screws securing the riser board to the chassis see the following figure Locating the Riser Board Screws Minitower A Minitower Riser Board...

Страница 150: ...l see Removing the Front Panel Small Desktop or Removing the Front Panel Desktop 5 Label and disconnect the front feature connector from the riser board See one of the appropriate figures for the location of the connector Riser Board Auxiliary Cable Connectors Small Desktop Riser Board Auxiliary Cable Connectors Desktop For small desktop system it may be helpful to remove the hard drive for easier...

Страница 151: ...e Front Control Board Screws Small Desktop Locating the Front Control Board Screws Desktop 7 Pull the front control board off the front of the chassis and gently pull the front connector cable through the cutaway in the front wall of the chassis ...

Страница 152: ...nel Minitower 5 Remove the top cover see Removing the Minitower Top Cover 6 Label and disconnect the front feature connector from the riser board for the location of the connector see the figure Riser Board Auxiliary Cable Connectors Minitower in Section 5 7 Remove the cable from the clips that secure it within the chassis 8 Remove the five screws securing the front control board to the front of t...

Страница 153: ...e Small Desktop or Desktop Cover 4 Remove the front panel see Removing the Front Panel Small Desktop or Removing the Front Panel Desktop 5 Label and disconnect the USB cable connector from the riser board For the location of the connector see one of these figures Riser Board Auxiliary Cable Connectors Small Desktop Riser Board Auxiliary Cable Connectors Desktop In the small desktop system it may b...

Страница 154: ... these steps 1 Turn off the system and disconnect the system power cord 2 Ensure that all external cables are disconnected from the front and rear of the system 3 Remove the left and right system unit covers see Removing the Minitower Side Covers 4 Remove the front panel see Removing the Front Panel Minitower 5 Remove the top cover see Removing the Minitower Top Cover 6 Label and disconnect the US...

Страница 155: ... the front of the chassis pinch the sides of the plastic post together so the post can slide through its hole in the chassis see the following figure 9 Pull the USB board back to free the USB port from the cutaway in the front of the chassis Locating the USB Board Post Minitower ...

Страница 156: ...ure that all external cables are disconnected from the front and rear of the system 3 Remove the system unit cover see Removing the Small Desktop or Desktop Cover 4 Label and disconnect the chassis intrusion cable connector from the riser board for the location of the connector see the figure Riser Board Auxiliary Cable Connectors Small Desktop in Section 5 5 Spread the locking tabs holding the ch...

Страница 157: ...wer cord 2 Ensure that all external cables are disconnected from the front and rear of the system 3 Remove the system unit cover see Removing the Small Desktop or Desktop Cover 4 Remove the plastic collar from the intrusion switch on the riser board see 1 in the following figure 5 Remove the switch from its connector on the riser board see 2 in the following figure Freeing the Chassis Intrusion Sw...

Страница 158: ...trusion cable connector from the riser board for the location of the connector see the figure Riser Board Auxiliary Cable Connectors Minitower in Section 5 5 Locate the chassis intrusion switch inside the rear left edge of the minitower chassis It is located next to the expansion slot area about halfway down the chassis See the following figure The push switch itself extends through a slot in the ...

Страница 159: ...em unit cover turn off the power and unplug the system power cable Power is removed only when the power cable is unplugged 1 Turn off the system and disconnect the system power cord 2 Ensure that all external cables are disconnected from the front and rear of the system 3 Remove the system unit cover see Removing the Small Desktop or Desktop Cover 4 Label and disconnect every power cable connected...

Страница 160: ... the front and rear of the system 3 Remove the system unit cover see Removing the Small Desktop or Desktop Cover 4 Label and disconnect every power cable connected to a device or board within the system 5 Remove the internal hard drive see Removing the 3 1 2 Inch Internal Hard Drive Desktop 6 Remove the internal hard drive bracket see Removing the Bracket for the 3 1 2 Inch Internal Hard Drive 7 R...

Страница 161: ...and rear of the system 3 Remove the left and right system unit covers see Removing the Minitower Side Covers 4 Remove the front panel see Removing the Front Panel Minitower 5 Remove the top cover see Removing the Minitower Top Cover 6 Label and disconnect every power cable connected to a device or board within the system 7 Remove the four screws holding the power supply to the chassis see the foll...

Страница 162: ...tem after replacing the battery 2 Ensure that all external cables are disconnected from the front and rear of the system 3 Label and disconnect any cables connected to the system board 4 Remove the system board For a small desktop system see Removing the System Board Small Desktop For a desktop system see Removing the System Board Desktop For a minitower system see Removing the System Board Minito...

Страница 163: ... parameters see Section 2 System Configuration Chassis Foot Removal The minitower chassis has two feet that are designed to prevent the system unit from tipping Keep the feet turned out unless you are upgrading or repairing the system The right chassis foot is longer than the left chassis foot to distribute the weight of the system unit components evenly The right chassis foot lock a disk that is ...

Страница 164: ...nitower 6 Remove the screws from the left and right foot locks see the following figure Locating the Chassis Foot Screws A Left Chassis Foot Lock C Right Chassis Foot Lock B Left Chassis Foot D Right Chassis Foot 7 Access the inside chassis floor and locate the chassis foot locks Locating the Chassis Foot Locks A Left and Right Chassis Foot Locks on Chassis Floor ...

Страница 165: ...e other tab up to free it from its slot see arrow 4 in the figure below Label the foot and the foot lock for use on the right side of the system Removing the Left and Right Chassis Foot Locks A Tab Left Chassis Foot Lock D Locking Tab Right Chassis Foot Lock B Locking Tab Left Chassis Foot Lock E Inside of Chassis Floor C Tab Right Chassis Foot Lock WARNING Replace the feet before reassembling or ...

Страница 166: ...llowing these steps 1 Turn off the system and disconnect the system power cord 2 Ensure that all external cables are disconnected from the front and rear of the system 3 Remove the system board For a small desktop system see Removing the System Board Small Desktop For a desktop system see Removing the System Board Desktop For a minitower system see Removing the System Board Minitower 4 Pinch the s...

Страница 167: ...l cables are disconnected from the front and rear of the system 3 Remove the system board For a small desktop system see Removing the System Board Small Desktop For a desktop system see Removing the System Board Desktop For a minitower system see Removing the System Board Minitower 4 Remove the two screws holding each rail to the system board see the following figure System Board Rails Secured wit...

Страница 168: ...4 System Board Connectors Jumpers and Sockets Components Resources ...

Страница 169: ...al cable connector locations internal board connector locations jumper locations and upgrade sockets Included are procedures for setting jumpers on the system board and a table showing the upgrade path for the DIMM sockets External Cable Connectors Locations of the external cable connectors on the system board at the back of the system unit are shown in the following figures For descriptions of th...

Страница 170: ... D Line Out Jack J Serial Port 1 E Microphone In Jack K Printer Port F LAN Connector L VGA Monitor Connector System Board External Cable Connector Locations Minitower A Power Supply G Serial Port 1 B Line Out Jack H VGA Monitor Connector C Microphone In Jack I USB Port D LAN Connector J Printer Port E Keyboard Port K Serial Port 2 F Mouse Port L Expansion Board Slots ...

Страница 171: ...h use of a Single Edge Contact S E C cartridge The cartridge contains the processor second level cache thermal plate and back cover In addition a heat sink is connected to the cartridge The 242 pin edge connector socket Slot 1 on the system board holds the processor S E C cartridge The cartridge is held in place in the socket by a retention mechanism With the cartridge plugged into the socket the ...

Страница 172: ...ngle and double sided DIMMs can be mixed See the following tables for supported DIMMs and for sample DIMM upgrade paths To determine the memory needed for a memory upgrade see Checking System Memory To remove or install a DIMM see Section 3 Disassembly and Reassembly Supported DIMMs DIMM Size Non ECC Configuration 32 MB 4 Mbit x 64 64 MB 8 Mbit x 64 128 MB 16 Mbit x 64 256 MB 32 Mbit x 64 Sample D...

Страница 173: ...is found in the amount of memory displayed at the Power On Self Test or in Windows with the amount of memory installed check that the memory modules were installed correctly System Board Jumpers The system board contains three jumper blocks System board jumpers are used to configure the system as follows JVGA1 block enables or disables onboard video JBAT1 block resets CMOS settings JP1 block confi...

Страница 174: ...28 MB or 256 MB increments through DIMM sockets on system board 512 KB write back secondary cache memory on Pentium II and Pentium II processors 128 KB secondary cache memory on Celeron processor CMOS Setup Utility built into the BIOS 4 Mb Flash ROM for fast economical BIOS upgrades PCI local bus for fast data transfer Winbond ASIC monitoring chip integrated sound Yamaha audio system power managem...

Страница 175: ...B per second 82371EB PCI ISA IDE Xcelerator PIIX4E Functions as a PCI to ISA bridge PCI IDE functionality a USB controller integrated dual channel enhanced IDE interface with support for Ultra DMA 33 enhanced DMA controller interrupt controller based on 82C59 with support for 15 interrupts power management logic sleep resume and remote wake on LAN real time clock with 256 byte battery backed CMOS ...

Страница 176: ...advanced pipelined 32 bit addressing 64 bit data processor designed to optimize multitasking operating systems The 64 bit registers and data paths support 64 bit addresses and data types To use the Pentium processor s power the system features an optimized 64 bit memory interface and 512 KB of secondary write back cache on the processor Celeron Processor Intel Celeron processors in the PowerMate E...

Страница 177: ...economical BIOS upgrades The Flash ROM is a reprogrammable EPROM containing both the system and video BIOS Using the Flash ROM to change the ROM BIOS provides the following advantages the BIOS upgrade is performed quickly and easily the expense of replacing ROM BIOS chips is eliminated so system maintenance costs are reduced there is less chance of inadvertently damaging the system board than when...

Страница 178: ...ure or voltage are exceeded an interrupt is activated The hardware monitor component connects to the ISA bus as an 8 bit I O mapped device Plug and Play The system comes with a Plug and Play BIOS in support of Plug and Play technology Plug and Play simplifies setup procedures for installing Plug and Play expansion boards With Plug and Play adding a Plug and Play expansion board is done by turning ...

Страница 179: ... high performance PCI IDE ports a primary port and a secondary port the port connectors are located on the riser board which plugs into the system board Each port supports up to two devices for a total of four IDE devices although the number of devices the system can house depends on how many bays there are in the chassis and the capacity of the power supply The primary PCI IDE port has an enhance...

Страница 180: ...pin D subconnectors The connectors are located at the back of the system unit USB Interface The Universal Serial Bus USB ports allow new Plug and Play serial devices to be added without having to open the system One USB device may be plugged into each USB port for direct system connection Up to 127 USB devices can be daisy chained to one USB port The USB determines system resources for each periph...

Страница 181: ...ystem provides all the digital and analog mixing functions required for playing and recording audio on personal computers Features include stereo analog to digital and digital to analog converters analog mixing anti aliasing and reconstruction filters line and microphone level inputs digital audio compression and full digital control of all mixer and volume control functions Resources The system m...

Страница 182: ...h xE6000000 xE6FFFFFF RAGE PRO TURBO AGP English xE6000000 xE6FFFFFF Intel 82443BX Pentium II Processor to AGP controller xE8000000 xE80FFFFF Intel 82558 based Integrated Fast Ethernet for WfM xE8100000 xE8107FFF YAMAHA DS XG PCI Audio CODEC xE8108000 xE8108FFF Intel 82558 based Integrated Fast Ethernet for WfM xFFFE0000 xFFFFFFFF System board extension for PnP BIOS DMA Settings The system s DMA s...

Страница 183: ...ss controller x0087 x0087 Direct memory access controller x0089 x008B Direct memory access controller x008F x0091 Direct memory access controller x00A0 x00A1 Programmable interrupt controller x00C0 x00DF Direct memory access controller x00F0 x00FF Numeric data processor x0170 x0177 Intel 82371AB EB PCI Bus Master IDE Controller x0170 x0177 Secondary IDE controller dual fifo x01F0 x01F7 Intel 82371...

Страница 184: ...f RAGE PRO TURBO AGP English x07F6 x07F6 Alias of Intel 82371AB EB PCI Bus Master IDE Controller x07F6 x07F6 Alias of Primary IDE controller dual fifo x0970 x0977 Alias of Intel 82371AB EB PCI Bus Master IDE Controller x0970 x0977 Alias of Secondary IDE controller dual fifo x09F0 x09F7 Alias of Intel 82371AB EB PCI Bus Master IDE Controller x09F0 x09F7 Alias of Primary IDE controller dual fifo x0B...

Страница 185: ...2371AB EB PCI Bus Master IDE Controller x13F6 x13F6 Alias of Primary IDE controller dual fifo x1570 x1577 Alias of Intel 82371AB EB PCI Bus Master IDE Controller x1570 x1577 Alias of Secondary IDE controller dual fifo x15F0 x15F7 Alias of Intel 82371AB EB PCI Bus Master IDE Controller x15F0 x15F7 Alias of Primary IDE controller dual fifo x1776 x1776 Alias of Intel 82371AB EB PCI Bus Master IDE Con...

Страница 186: ...77 Alias of Secondary IDE controller dual fifo x21F0 x21F7 Alias of Intel 82371AB EB PCI Bus Master IDE Controller x21F0 x21F7 Alias of Primary IDE controller dual fifo x2376 x2376 Alias of Intel 82371AB EB PCI Bus Master IDE Controller x2376 x2376 Alias of Secondary IDE controller dual fifo x23B0 x23BB Alias of RAGE PRO TURBO AGP English x23C0 x23DF Alias of RAGE PRO TURBO AGP English x23F6 x23F6...

Страница 187: ...Alias of Intel 82371AB EB PCI Bus Master IDE Controller x2F76 x2F76 Alias of Secondary IDE controller dual fifo x2FB0 x2FBB Alias of RAGE PRO TURBO AGP English x2FC0 x2FDF Alias of RAGE PRO TURBO AGP English x2FF6 x2FF6 Alias of Intel 82371AB EB PCI Bus Master IDE Controller x2FF6 x2FF6 Alias of Primary IDE controller dual fifo x3170 x3177 Alias of Intel 82371AB EB PCI Bus Master IDE Controller x3...

Страница 188: ...3BDF Alias of RAGE PRO TURBO AGP English x3BF6 x3BF6 Alias of Intel 82371AB EB PCI Bus Master IDE Controller x3BF6 x3BF6 Alias of Primary IDE controller dual fifo x3D70 x3D77 Alias of Intel 82371AB EB PCI Bus Master IDE Controller x3D70 x3D77 Alias of Secondary IDE controller dual fifo x3DF0 x3DF7 Alias of Intel 82371AB EB PCI Bus Master IDE Controller x3DF0 x3DF7 Alias of Primary IDE controller d...

Страница 189: ...of Primary IDE controller dual fifo x4970 x4977 Alias of Intel 82371AB EB PCI Bus Master IDE Controller x4970 x4977 Alias of Secondary IDE controller dual fifo x49F0 x49F7 Alias of Intel 82371AB EB PCI Bus Master IDE Controller x49F0 x49F7 Alias of Primary IDE controller dual fifo x4B76 x4B76 Alias of Intel 82371AB EB PCI Bus Master IDE Controller x4B76 x4B76 Alias of Secondary IDE controller dual...

Страница 190: ...condary IDE controller dual fifo x55F0 x55F7 Alias of Intel 82371AB EB PCI Bus Master IDE Controller x55F0 x55F7 Alias of Primary IDE controller dual fifo x5776 x5776 Alias of Intel 82371AB EB PCI Bus Master IDE Controller x5776 x5776 Alias of Secondary IDE controller dual fifo x57B0 x57BB Alias of RAGE PRO TURBO AGP English x57C0 x57DF Alias of RAGE PRO TURBO AGP English x57F6 x57F6 Alias of Inte...

Страница 191: ...Alias of Intel 82371AB EB PCI Bus Master IDE Controller x6376 x6376 Alias of Secondary IDE controller dual fifo x63B0 x63BB Alias of RAGE PRO TURBO AGP English x63C0 x63DF Alias of RAGE PRO TURBO AGP English x63F6 x63F6 Alias of Intel 82371AB EB PCI Bus Master IDE Controller x63F6 x63F6 Alias of Primary IDE controller dual fifo x6570 x6577 Alias of Intel 82371AB EB PCI Bus Master IDE Controller x6...

Страница 192: ... PRO TURBO AGP English x6FF6 x6FF6 Alias of Intel 82371AB EB PCI Bus Master IDE Controller x6FF6 x6FF6 Alias of Primary IDE controller dual fifo x7170 x7177 Alias of Intel 82371AB EB PCI Bus Master IDE Controller x7170 x7177 Alias of Secondary IDE controller dual fifo x71F0 x71F7 Alias of Intel 82371AB EB PCI Bus Master IDE Controller x71F0 x71F7 Alias of Primary IDE controller dual fifo x7376 x73...

Страница 193: ...ias of Intel 82371AB EB PCI Bus Master IDE Controller x7D70 x7D77 Alias of Secondary IDE controller dual fifo x7DF0 x7DF7 Alias of Intel 82371AB EB PCI Bus Master IDE Controller x7DF0 x7DF7 Alias of Primary IDE controller dual fifo x7F76 x7F76 Alias of Intel 82371AB EB PCI Bus Master IDE Controller x7F76 x7F76 Alias of Secondary IDE controller dual fifo x7FB0 x7FBB Alias of RAGE PRO TURBO AGP Engl...

Страница 194: ... Alias of Intel 82371AB EB PCI Bus Master IDE Controller x89F0 x89F7 Alias of Primary IDE controller dual fifo x8B76 x8B76 Alias of Intel 82371AB EB PCI Bus Master IDE Controller x8B76 x8B76 Alias of Secondary IDE controller dual fifo x8BB0 x8BBB Alias of RAGE PRO TURBO AGP English x8BC0 x8BDF Alias of RAGE PRO TURBO AGP English x8BF6 x8BF6 Alias of Intel 82371AB EB PCI Bus Master IDE Controller x...

Страница 195: ... x9776 Alias of Secondary IDE controller dual fifo x97B0 x97BB Alias of RAGE PRO TURBO AGP English x97C0 x97DF Alias of RAGE PRO TURBO AGP English x97F6 x97F6 Alias of Intel 82371AB EB PCI Bus Master IDE Controller x97F6 x97F6 Alias of Primary IDE controller dual fifo x9970 x9977 Alias of Intel 82371AB EB PCI Bus Master IDE Controller x9970 x9977 Alias of Secondary IDE controller dual fifo x99F0 x...

Страница 196: ...2371AB EB PCI Bus Master IDE Controller xA3F6 xA3F6 Alias of Primary IDE controller dual fifo xA570 xA577 Alias of Intel 82371AB EB PCI Bus Master IDE Controller xA570 xA577 Alias of Secondary IDE controller dual fifo xA5F0 xA5F7 Alias of Intel 82371AB EB PCI Bus Master IDE Controller xA5F0 xA5F7 Alias of Primary IDE controller dual fifo xA776 xA776 Alias of Intel 82371AB EB PCI Bus Master IDE Con...

Страница 197: ...77 Alias of Secondary IDE controller dual fifo xB1F0 xB1F7 Alias of Intel 82371AB EB PCI Bus Master IDE Controller xB1F0 xB1F7 Alias of Primary IDE controller dual fifo xB376 xB376 Alias of Intel 82371AB EB PCI Bus Master IDE Controller xB376 xB376 Alias of Secondary IDE controller dual fifo xB3B0 xB3BB Alias of RAGE PRO TURBO AGP English xB3C0 xB3DF Alias of RAGE PRO TURBO AGP English xB3F6 xB3F6...

Страница 198: ...Alias of Intel 82371AB EB PCI Bus Master IDE Controller xBF76 xBF76 Alias of Secondary IDE controller dual fifo xBFB0 xBFBB Alias of RAGE PRO TURBO AGP English xBFC0 xBFDF Alias of RAGE PRO TURBO AGP English xBFF6 xBFF6 Alias of Intel 82371AB EB PCI Bus Master IDE Controller xBFF6 xBFF6 Alias of Primary IDE controller dual fifo xC170 xC177 Alias of Intel 82371AB EB PCI Bus Master IDE Controller xC...

Страница 199: ...as of RAGE PRO TURBO AGP English xCBF6 xCBF6 Alias of Intel 82371AB EB PCI Bus Master IDE Controller xCBF6 xCBF6 Alias of Primary IDE controller dual fifo xCD70 xCD77 Alias of Intel 82371AB EB PCI Bus Master IDE Controller xCD70 xCD77 Alias of Secondary IDE controller dual fifo xCDF0 xCDF7 Alias of Intel 82371AB EB PCI Bus Master IDE Controller xCDF0 xCDF7 Alias of Primary IDE controller dual fifo...

Страница 200: ...2371AB EB PCI Bus Master IDE Controller xD7F6 xD7F6 Alias of Primary IDE controller dual fifo xD970 xD977 Alias of Intel 82371AB EB PCI Bus Master IDE Controller xD970 xD977 Alias of Secondary IDE controller dual fifo xD9F0 xD9F7 Alias of Intel 82371AB EB PCI Bus Master IDE Controller xD9F0 xD9F7 Alias of Primary IDE controller dual fifo xDB76 xDB76 Alias of Intel 82371AB EB PCI Bus Master IDE Con...

Страница 201: ... 82371AB EB PCI to USB Universal Host Controller xE570 xE577 Alias of Intel 82371AB EB PCI Bus Master IDE Controller xE570 xE577 Alias of Secondary IDE controller dual fifo xE5F0 xE5F7 Alias of Intel 82371AB EB PCI Bus Master IDE Controller xE5F0 xE5F7 Alias of Primary IDE controller dual fifo xE776 xE776 Alias of Intel 82371AB EB PCI Bus Master IDE Controller xE776 xE776 Alias of Secondary IDE co...

Страница 202: ... Secondary IDE controller dual fifo xF170 xF177 Alias of Intel 82371AB EB PCI Bus Master IDE Controller xF170 xF177 Alias of Secondary IDE controller dual fifo xF1F0 xF1F7 Alias of Intel 82371AB EB PCI Bus Master IDE Controller xF1F0 xF1F7 Alias of Primary IDE controller dual fifo xF376 xF376 Alias of Intel 82371AB EB PCI Bus Master IDE Controller xF376 xF376 Alias of Secondary IDE controller dual...

Страница 203: ... PRO TURBO AGP English xFBC0 xFBDF Alias of RAGE PRO TURBO AGP English xFBF6 xFBF6 Alias of Intel 82371AB EB PCI Bus Master IDE Controller xFBF6 xFBF6 Alias of Primary IDE controller dual fifo xFD70 xFD77 Alias of Intel 82371AB EB PCI Bus Master IDE Controller xFD70 xFD77 Alias of Secondary IDE controller dual fifo xFDF0 xFDF7 Alias of Intel 82371AB EB PCI Bus Master IDE Controller xFDF0 xFDF7 Ali...

Страница 204: ...5 Riser Board Riser Board Connectors Small Desktop Riser Board Connectors Desktop Riser Board Connectors Minitower ...

Страница 205: ...er board connector locations subsystem cable connectors CD audio in connector modem in connector chassis intrusion connector NLX connector IDE and diskette drive cable connectors PCI and ISA cable connectors power supply connectors main power optional power ...

Страница 206: ...nector C Secondary IDE Connector B Diskette Drive Connector Riser Board Auxiliary Cable Connectors Small Desktop A CD Audio In Connector F NLX Connector System Board B Modem In Connector G Wake On Remote Connector C Chassis Intrusion Connector H Wake ON LAN Connector D Jumper Block JP5 not used I Front Feature Connector E USB Connector Riser Board Power Cable Connectors Small Desktop A Auxiliary P...

Страница 207: ...le Connectors Desktop A Secondary IDE Connector C Diskette Drive Connector B Primary IDE Connector Riser Board Auxiliary Cable Connectors Desktop A Chassis Intrusion Connector D Front Feature Connector B Fan Connector E USB Connector C CD Audio In Connector F NLX Connector System Board Riser Board Power Cable Connectors Desktop A Main Power Connector B Auxiliary Power Connector ...

Страница 208: ...e Connectors Minitower A Secondary IDE Connector C Diskette Drive Connector B Primary IDE Connector Riser Board Auxiliary Cable Connectors Minitower A Not Used G CD Audio In Connector B Chassis Intrusion Connector H Fan Connector C Power Connector I USB Connector D Power 6 Connector J Front Features Connector E Wake ON LAN Connector K NLX Connector F Telephony Connector not supported ...

Страница 209: ...entation and Packaging Field Replaceable Unit List Small Desktop Illustrated Parts Breakdown Small Desktop Field Replaceable Unit List Desktop Illustrated Parts Breakdown Desktop Field Replaceable Unit List Minitower Illustrated Parts Breakdown Minitower ...

Страница 210: ...e parts and options Ordering Parts and Options Items Telephone Number To order spare parts Dealers 1 800 632 4525 To order spare parts Customers In the U S 1 800 233 6321 In Canada 1 800 727 2787 Documentation and Packaging The following documentation and packaging may also be ordered from NEC CSD depending on availability PowerMate ES 5200 Series Documentation and Packaging Description User s Gui...

Страница 211: ... System board latch 1 12a 12b 12c 12d 32 MB SDRAM DIMM 64 MB SDRAM DIMM 128 MB SDRAM DIMM 256 MB SDRAM DIMM 13a 13b 13c Retention mechanism for Celeron processors Retention mechanism for Pentium II processors Retention mechanism for Pentium III processors 14 Retaining arm for Celeron and Pentium III processors 15a 15b 15c Heat sink for Celeron processors Heat sink for Pentium II processors Heat si...

Страница 212: ...ansing Speaker AC adapter Harman Kardon 28 Power supply 145 watt 29 Internal hard drive bracket 30a 30b 30c 30d 4 3 GB IDE 5400 RPM hard drive 8 4 GB IDE 5400 RPM hard drive 12 9 GB IDE 5200 RPM hard drive 12 9 GB IDE 7200 RPM hard drive as available 31 Diskette drive w o bezel 32a 32b 32c 32X IDE CD ROM Lite On 32X IDE CD ROM NEC 40X IDE CD ROM Lite On 33 DVD ROM 34 LS 120 cradle 35 LS 120 drive ...

Страница 213: ...all Desktop The following figure shows the illustrated parts breakdown IPB for PowerMate ES 5200 Series small desktop computers Each item in the IPB is identified with a number that is a cross reference to the small desktop FRU list PowerMate ES 5200 Small Desktop IPB ...

Страница 214: ...tches 2 12a 12b 12c 12d 32 MB SDRAM DIMM 64 MB SDRAM DIMM 128 MB SDRAM DIMM 256 MB SDRAM DIMM 13a 13b 13c Retention mechanism for Celeron processors Retention mechanism for Pentium II processors Retention mechanism for Pentium III processors 14 Retaining arm for Celeron and Pentium III processors 15a 15b 15c Heat sink for Celeron processors Heat sink for Pentium II processors Heat sink for Pentium...

Страница 215: ...c Lansing 9 watt Speakers Harman Kardon 10 watt 31a 31b Speaker AC adapter Altec Lansing Speaker AC adapter Harman Kardon 32 Power supply 200 Watt 33 Internal hard drive bracket 34a 34b 34c 34d 4 3 GB IDE 5400 RPM hard drive 8 4 GB IDE 5400 RPM hard drive 12 9 GB IDE 5200 RPM hard drive 12 9 GB IDE 7200 RPM hard drive as available 35 Diskette drive w o bezel 36a 36b 36c 32X IDE CD ROM Lite On 32X ...

Страница 216: ...ional 3 1 2 inch drive bracket 48 Front panel 49 Logo NEC PowerMate 50 Plastic blank panel for additional 3 5 accessible device bay 51 Plastic blank panel 5 25 not shown Headset w microphone not shown not shown Tape cartridge not shown not shown Zip disk not shown not shown LS 120 diskette not shown ...

Страница 217: ...kdown IPB Desktop The following figure shows the illustrated parts breakdown IPB for PowerMate ES 5200 Series desktop computers Each item in the IPB is identified with a number that is a cross reference to the desktop FRU list PowerMate ES 5200 Desktop IPB ...

Страница 218: ...AM DIMM 12a 12b 12c 12d 12e 12f 12g 12h 300 MHz Celeron processor 333A MHz Celeron processor 366A MHz Celeron processor 350 MHz Pentium II processor 400 MHz Pentium II processor 450 MHz Pentium II processor 450 MHz Pentium III processor 500 MHz Pentium III processor 13a 13b 13c Heat sink for Celeron processors Heat sink for Pentium II processors Heat sink for Pentium III processors 14 Retaining ar...

Страница 219: ...8 Left chassis side minitower 29 Chassis top minitower 30 Right chassis side minitower 31a 31b Speakers Altec Lansing 9 watt Speakers Harman Kardon 10 watt 32a 32b Speaker AC adapter Altec Lansing Speaker AC adapter Harman Kardon 33 Power supply 200 Watt 34 Diskette drive w o bezel 35a 35b 35c 32X IDE CD ROM Lite On 32X IDE CD ROM NEC 40X IDE CD ROM Lite On 36 8 GB IDE tape backup Seagate 37 100 M...

Страница 220: ...n 50 Plastic blank panel 5 25 51 Metal bay cover 5 25 52 Front panel PCB switch includes Power Sleep minitower 53 Front USB port board and cable assembly not shown Headset w microphone not shown not shown Tape cartridge not shown not shown Zip disk not shown not shown LS 120 diskette not shown ...

Страница 221: ...n IPB Minitower The following figure shows the illustrated parts breakdown IPB for PowerMate ES 5200 Series minitower computers Each item in the IPB is identified with a number that is a cross reference to the minitower FRU list PowerMate ES 5200 Minitower IPB ...

Страница 222: ...7 Preventive Maintenance System Cleaning Keyboard Cleaning Mouse Cleaning ...

Страница 223: ...leaning the system 1 Power off the system and unplug all power cables 2 Wipe the outside of the system keyboard mouse and monitor with a soft clean cloth Remove stains with a mild detergent Do not use solvents or strong abrasive cleaners on any part of the system 3 Clean the monitor screen with a commercial monitor screen cleaning kit As an alternative use a glass cleaner then wipe with a clean li...

Страница 224: ...Therefore disassembly of the keyboard is necessary only when cleaning the inside Removing the Keyboard Enclosure A Screw one of twelve 2 Separate the two halves of the enclosure 3 Clean the enclosure and keys with a damp cloth A small soft bristle brush may be used to clean between the keys Do not wet or dampen the keyboard s printed circuit board If the board gets wet thoroughly dry it before rea...

Страница 225: ...e system 2 Turn the mouse upside down and locate the ball cover see the following figure 3 Turn the ball cover counterclockwise and remove the cover Removing the Mouse Ball Cover A Mouse Ball Cover 4 Turn the mouse over and remove the ball 5 Clean the mouse as follows Clean the mouse ball with tap water and a mild detergent then dry it with a lint free cloth Remove any dust and lint from the mouse...

Страница 226: ...8 Troubleshooting Checklist Diagnostics ...

Страница 227: ...d see the possible cause and solution System Problems No power and power lamp not lit Check that all power switches are on Check that the power cable is plugged into the system power socket and that the other end is plugged into a live properly grounded AC power outlet or surge protector Check the outlet or surge protector by plugging in a lamp Non System Disk error message displays when the syste...

Страница 228: ...ediately after hard drive spins up The Delay for HDD in the CMOS Setup Utility BIOS Features Setup menu can be changed to a lower setting If a message operating system not found appears after changing the setting the delay is at too low Set the delay slightly higher System performance appears sluggish Check that the system is set for optimal operation See the operating system documentation Check t...

Страница 229: ...magnetic fields away from the monitor The screen display is fuzzy or flickering graphics characters or garbage appears on the screen Check that the monitor is set up correctly and that all connections have been made Check that the video refresh rate and video driver are correct Click the right mouse button anywhere on the Windows desktop and a menu appears Click Properties and the Display Properti...

Страница 230: ...e the possible cause and solution The system does not see the CD ROM drive The drive designation is wrong and should be changed The drive designation for the CD ROM drive depends upon the storage device configuration in the system To find out what drive designation letter is assigned to the CD ROM drive double click My Computer on the Windows 95 or Windows NT 4 0 desktop The drive designation is b...

Страница 231: ...e following problems to see the possible cause and solution No sound from the speakers Check that the speaker power is on Verify that all speaker cable connections are correct and secure Speaker volume is too low Adjust the volume control on the speaker If the volume is still too low adjust the volume through the system software See the Windows Multimedia online help Sound is only coming from one ...

Страница 232: ... Check the 5 and 12 power supply voltages Measure voltages with the system board installed 5 Replace the power switch assembly 6 Replace the power supply 7 Replace the system board Power supply malfunction Any of the following conditions could occur Front panel lamps out diskette and or hard drives do not spin monitor blank interface ports not working and keyboard lamp out and or cannot input from...

Страница 233: ... work Lamp on drive panel does not light when diskette is loaded 1 Check power and signal cable connections between diskette drive riser board and power supply 2 Check diskette drive cable Replace as necessary 3 Check power supply 4 Replace diskette drive 5 Replace riser board 6 Replace system board Hard drive malfunction Hard drive lamp does not light but hard drive can be accessed 1 Check cable ...

Страница 234: ...se 1 Check keyboard mouse plugged in 2 Check password see sections 2 4 3 Disable password see sections 2 4 4 Replace keyboard or mouse 5 Replace system board Monitor malfunction Blank display 1 Press any key or move the mouse to ensure power management has not blanked the display 2 Check that the monitor power ON OFF switch is ON 3 Check that the monitor cable is attached to the video connector at...

Страница 235: ...vy display 1 Check that the computer and monitor are not near motors or electric fields CD ROM drive malfunction System power not on 1 Turn system power on Disc tray does not open 1 System power not on Turn system power on 2 System power failed Insert the tip of a straightened paper clip into the emergency eject hole then gently press inward until the tray opens No sound from CDs 1 Check that spea...

Страница 236: ...ettings see Section 2 4 Check the IDE cable Replace as necessary 5 Check the power supply Replace as necessary 6 Check the system board Replace as necessary 7 Check the riser or sound board Replace as necessary Communication error Bad data or no data when communicating 1 Check cable connections between riser board and device 2 Check that the interface port is selected 3 Test or replace the device ...

Страница 237: ...9 NEC CSD Information Services Service Telephone Numbers Technical Support Product Information ...

Страница 238: ...nada call 1 800 632 4525 To order spare parts Dealers Call 1 800 632 4525 To order spare parts Customers In the U S call 1 800 233 6321 In Canada call 1 800 727 2787 To contact Customer Service about service and contract warranty issues Call 1 888 632 9128 To log onto the NEC CSD Electronic Bulletin Board System BBS to download software drivers and the latest BIOS for ROM flashing Call 1 916 379 4...

Страница 239: ...s and Setup Disk files to download contact information including telephone numbers for Technical Support and links to vendor websites an automated email form for your technical support questions a Reseller s area password accessible To access the NEC CSD website enter the following Internet Uniform Resource Locator URL in your browser www nec computers com Email Fax Technical Support Service The N...

Страница 240: ... your first call to the NEC CSD Technical Support Center After the initial 90 days get preinstalled software support for a fee Please have available your system s name model number serial number and as much information as possible about your system s problem before calling For callers outside the U S and Canada please contact your local NEC CSD sales provider Product Information In addition to the...

Страница 241: ...inal program appears 4 Follow the instructions on the screen to set up your modem Click the HyperTerminal help button for information about dialing the phone number If you need to check communications settings check that the settings match the following BBS parameters Baud rate select any baud rate that matches your modem Parity none Data bits 8 Stop bits 1 Flow control Xon Xoff select Hardware if...

Страница 242: ...s Follow the prompts to select a file for downloading CAUTION Executable files automatically format your diskette when you download files from the BBS Formatting destroys any data on the diskette Before you download files from the BBS check that you do not have information on the diskette that you need After you complete downloading your file log off the BBS as follows 1 Press Enter to continue 2 ...

Страница 243: ...er Board Keyboard Mouse Speaker System Unit Diskette Drive IDE Hard Drives Power Supply Fax Modem Board Sound System Sound Board CD ROM Drive DVD ROM Drive PC Adapter Device Tape Backup Unit Zip Drive Environmental and Safety Compliance ...

Страница 244: ...ions can be found System Specifications Specification Go to Page System Board 10 3 Riser Board 10 4 Keyboard 10 4 Mouse 10 5 Speaker 10 5 System Unit 10 6 Diskette Drive 10 7 IDE Hard Drive 10 7 Power Supply 10 7 Fax Modem Board 10 7 Sound System 10 8 Sound Board 10 8 CD ROM Drive 10 9 DVD ROM Drive 10 9 PC Adapter Device 10 10 Tape Backup Unit 10 10 Zip Drive 10 11 Environmental and Safety 10 12 ...

Страница 245: ... of primary cache 16 KB data 16 KB instruction integrated in the processor 512 KB of secondary cache built in on processor Pentium II Pentium III 128 KB of secondary cache built in on processor Celeron Flash ROM 4 Mb Flash ROM Chip Set Intel 440BX Chipset I O Controller Winbond 83977 ATF AW Super I O controller Monitoring ASIC Winbond 83782D System Memory 32 MB to 512 MB in two DIMM sockets on sys...

Страница 246: ...ot Slots Minitower 3 PCI slots 2 ISA slots Industry Standard Interfaces Two PCI IDE connectors primary and secondary Diskette drive connector Feature connector power and signal to front control board CD Audio In connector Modem In connector Intrusion connector Wake On LAN connector Fan connector Power connectors Keyboard Specifications The specifications for the keyboard are included in the follow...

Страница 247: ...mal stabilization 1 hour minimum Physical Features Length 4 53 inches Width 2 6 inches Height 1 52 inches Weight 170 grams 1 20 grams Temperature Range Operating 5 to 35 C Storage 20 to 60 C Speaker Specifications The specifications for the speaker are included in the following table Speaker Specification Feature Specification Speakers Altec Lansing 9 watt ASC 90 Magnetically shielded 10 watt ster...

Страница 248: ...cessible bays One 3 1 2 inch accessible bay One 3 1 2 inch additional bay for an internal or external drive One 3 1 2 inch internal bay Device Bays Minitower Three 5 1 4 inch accessible bays One 3 1 2 inch accessible bay Two 3 1 2 inch internal bays Expansion Board Slots Small Desktop One PCI slot One PCI ISA shared slot Expansion Board Slots Desktop Two PCI slots One PCI ISA shared slot One ISA s...

Страница 249: ...ra DMA 7200 RPM as available Power Supply Specifications The following information applies to the power supplies that may come in the system Small desktop system 145 Watt switch selectable for 115 230 Volt 50 60 Hz support NLX compatible Desktop system 200 Watt switch selectable for 115 230 Volt 50 60 Hz support NLX compatible Minitower system 200 Watt switch selectable for 115 230 Volt 50 60 Hz s...

Страница 250: ...ication Model Creative Labs Sound Blaster Live CT4670 Wave Table Synthesis E mu Systems EMU10K1 music synthesis engine 64 voice polyphone with 8 point interpolation technology 192 voice polyphony PCI wave table synthesis capable of 512 voice polyphony with download from Live Ware Program 48 MIDI channels with 128 GM GS compatible instruments and 10 drum kits SoundFont technology for user definable...

Страница 251: ...Telephone Answering Device in RCA SPDIF in RCA SPDIF out Mini MIDI DIN in Mini MIDI DIN out Digital DIN out for future expansion to multi speaker systems Auxiliary in Digital CD in Standards Supported Windows 95 Windows 98 Windows NT 4 0 General MIDI MPC 3 Plug and Play Sound Blaster PCI Environmental Audio Extensions Microsoft DirectSound DirectSound 3D PCI 2 1 compliant CD ROM Drive Specificatio...

Страница 252: ...ll compression and PC utilities software Single drive letter designator for all memory cards Graphical installation and formatting utilities Functionality Supports ISA Plug and Play Supports mixed voltage 3V cards Vcc and Vpp Matrix Micrel MTC2563 Tape Backup Unit Specifications The specifications for the tape backup unit are included in the following table Tape Backup Unit Specifications Feature ...

Страница 253: ...20 to 80 non condensing Non operating 5 to 95 non condensing Altitude Operating 1 000 to 15 000 feet Non operating 1 000 to 50 000 feet Zip Drive Specifications The specifications for the Zip drive are included in the following table Zip Drive Specification Feature Specification Zip Drive Iomega Zip 100 ATA Drive Sustained Data Transfer Rate Up to 11 2 Mbits sec Burst Transfer Rate Up to 26 7 Mbit...

Страница 254: ...20 to 80 Administrative Compliance UL 1950 safety CSA C22 2 No 950 m89 TUV EN60950 1988 FCC part 15 Subpart J Class B emissions FCC part 68 IEC 950 safety VDE 0871 6 78 Class B emissions Compliance The system meets the compliance standards listed in the following table System Compliance Usage Standard Domestic FCC CFR 47 Part 15 Subpart B UL 1950 3 rd edition EPA Energy Star compliant Canadian C U...

Страница 255: ...e Notes General Notes LS 120 SuperDisk Copy Utility NEC OS Restore CD SCSI Drive Limitations PIIX4 Limitations Intel Processor Serial Number Control Utility Windows 95 Issues Windows 98 Issues Windows NT Issues ...

Страница 256: ...CD for systems with the Windows 95 or Windows NT operating system See the guidelines in the following sections to install applications the NEC Help Center online documentation and the Healthy Environment online brochure Installing Applications in the Correct Order Follow these guidelines when you install applications and the NEC Help Center For systems with the Windows 95 or Windows NT operating s...

Страница 257: ...nd the NEC WebTelligent software are each installed using a Setup exe program launched from a subdirectory on the NEC Application and Driver CD You can install these applications without regard to the order in which other applications are installed Load applications other than LANDesk Client Manager Internet Explorer NEC SNMP Agent or NEC WebTelligent software during the same installation session ...

Страница 258: ...fter your first logon to Windows NT For systems running the Windows 95 or Windows 98 operating system insert the NEC Application and Driver CD after the system reboots The CD autorun feature loads the NEC Application and Driver Installation Utility program Installing WebTelligent Installation of WebTelligent on a Windows 95 Windows 98 or Windows NT web server requires the installation of Intel Lan...

Страница 259: ... same computer When Both NEC SNMP Agent and LANDesk Client Manager Are Installed If both applications have been installed LANDesk Client Manager does not function correctly and cannot display ASIC related tabs for temperature fan voltage and chassis intrusion status In addition each time the computer is restarted a Service Control Manager window displays an error message and prompts the user to pr...

Страница 260: ...to perform a full operating system restore After the full restore you must reinstall all appropriate applications from the NEC Driver CD using the Selective Application Restore program or a Setup exe program Configuring the System for the NEC SNMP Agent TCP IP must be enabled before you can use the NEC SNMP Agent See Changing Network Settings in this document to enable TCP IP See Installing NEC SN...

Страница 261: ...nsport and click Remove A warning window appears asking for confirmation to continue 5 Click Yes The NWLink IPXSPX Compatible Transport and NWLink NetBIOS lines disappear from the Protocols display 6 Repeat steps 4 and 5 to remove the NetBEUI Protocol 7 Click Add The Select Network Protocol window appears 8 Highlight TCP IP Protocol and click OK The TCP IP Setup window appears If there is a DHCP s...

Страница 262: ...Select the PartitionMagic software from the Applications tab in the Installation utility menu The utility loads files from the NEC Application and Driver CD to C Program Files PowerQuest PartitionMagic4 You can find setup and documentation files in the following folders Btmagic Diskette Setup Userinfo If the PartitionMagic setup program asks you for a serial number enter the following number PM400...

Страница 263: ... systems with the Intel Pentium III processor come equipped with the most advanced Intel Pentium processor available Because the new Pentium III processor was introduced after the release of Microsoft Windows 98 Windows 95 and Windows NT operating systems these operating systems are not able to correctly identify the processor These operating systems might identify the Pentium III processor as a P...

Страница 264: ...d diskette eject failures This condition only occurs when you use the SuperDisk Copy utility supplied with the SuperDisk Tools diskette shipped with the system To safely copy a 1 44 MB diskette NEC CSD recommends using the standard Microsoft Disk Copy program supplied with the Microsoft Windows operating system You can find the Microsoft Disk Copy program by double clicking My Computer and right c...

Страница 265: ...p data without repartitioning or reformatting the hard drive Once all data is backed up perform another NEC OS Restore using the Auto or Custom mode CAUTION The Auto and Custom OS Restore programs delete all the data on your hard drive If possible back up your data before performing an OS Restore with these options 1 Launch the NEC OS Restore CD and follow the prompts to get to the Restore Mode sc...

Страница 266: ...tate perform another NEC OS Restore using the Auto or Custom option see Launching the OS Restore CD in Chapter 3 of the PowerMate ES 5200 Series User s Guide SCSI Drive Limitations The following procedures and operating limitations apply to systems whose only hard drive is a SCSI device Booting from a CD In systems with only a SCSI hard drive it is not possible to boot from an IDE CD ROM drive Usi...

Страница 267: ...dition of these files These INF files can be added to a new install of Windows 95 by using the NEC OS Restore CD This results in full ULTRA DMA 33 support Determining IDE Device Compatibility The new PIIX4 component contains a small change in the IDE interface This change to lower voltage levels on one signal has no effect on most of the IDE hard drives on the market A small number of older drives...

Страница 268: ...which does not contain a Pentium III processor generates an error message Looking at Serial Number Features The Intel processor serial number a new feature of the Pentium III processor is an identifier for the processor The processor serial number is designed to be unique and when used in conjunction with other identification methods can be used to identify the system or user This number can be us...

Страница 269: ...ocessor Serial Number Control utility is installed Once the Processor Serial Number Control utility is installed it turns the processor serial number off by default You can use the utility to turn on the processor serial number Can a website read my serial number without my knowledge No generally not Websites cannot read serial numbers unless you allow them to download a program which can read the...

Страница 270: ...upport intel com support feedback htm Windows 95 Issues The following material describes information specific to systems running the Microsoft Windows 95 operating system Controlling CD Audio CD audio volume is not controlled by the Windows 95 taskbar Volume Control To control CD audio volume access your CD player program Move the volume slider bars up or down to increase or decrease CD audio volu...

Страница 271: ... instructions in Installing Applications and Online Documents in this document Select the US Robotics 56K modem from the appropriate Operating System section of the NEC Application and Driver CD Windows 98 Issues The following material describes information specific to systems running the Microsoft Windows 98 operating system Ejecting the NEC Application and Driver CD from a DVD ROM Drive If your ...

Страница 272: ...gic is a utility included in the PowerQuest PartitionMagic software See Installing PartitionMagic earlier in this document for general installation information If you have a Windows NT operating system use the information in the following section to correctly configure BootMagic If you already installed BootMagic and the configuration resulted in an error message see Correcting the BootMagic Confi...

Страница 273: ...hing should be listed under the MENU NAME heading in the center of the box 2 Click ADD The Bootmagic Add OS box appears This is the only option listed and it is already highlighted 3 Click OK Click OK again The main BootMagic Configuration screen appears with Windows NT listed under MENU NAME 4 Check the BootMagic configuration If you want to use BootMagic Click the ENABLE BOOTMAGIC button The Boo...

Страница 274: ...on as you touch the keyboard adapter An expansion board or component on the system board that communicates with peripherals such as the display monitor or network devices address A hexadecimal number that represents a location in storage or memory Also used to identify communication ports To communicate with a storage device AGP Accelerated Graphics Port A high speed high performance video standar...

Страница 275: ...arly hardware but also operating systems and networks The circuitry within a chip is called its architecture for example Intel architecture can refer to a computer based on the Intel Celsior or other Pentium II chips archive Copying one or more files to a different location for long term data storage especially for backup and security purposes Files can then be added to or deleted from the archive...

Страница 276: ...megabits per second Mbps base RAM Area of system memory between 0 and 640 kilobytes available to the user for operating system and application programs batch file A file that contains a series of DOS commands Batch files have the extension bat If you execute a batch file DOS attempts to carry out all the commands in the file in order baud A unit of measure for modem speed Literally the number of v...

Страница 277: ...tiguous section of bits considered as a whole especially in memory On a disk the data in one sector in modem data transfer the bits between checksums board Printed circuit board Board onto which computer components are soldered and thin wires are printed to connect the components boot To start up a computer The computer is generally booted in one of three ways by turning on the power switch cold b...

Страница 278: ...ansmitting data or electrical power from one device to another Typically the lines in a bus are dedicated to specific functions such as control lines address lines and data lines Different bus architectures have different numbers and arrangements of these lines and different names for example ISA PCI The most useful way of distinguishing bus architectures is by the number of simultaneous data bits...

Страница 279: ...red in MHz The faster the clock the faster the computer can compute CMOS Complementary Metal Oxide Semiconductor A chip on the system board that contains nonvolatile memory CMOS is backed up by an internal lithium battery that preserves clock calendar data and system configuration parameters stored in CMOS codec Coder decoder Used primarily with Internet phone and video conferencing products this ...

Страница 280: ...ith capacities of from 4 7 GB to 17 GB and access rates of 600 Kbps to 1 3 Mbps One of the features of DVD drives is that they are backward compatible with CD ROM disks This means that DVD players can play old CD ROMs CD I disks and video CDs as well as new DVD ROMs Newer DVD players can also read CD R disks DVD uses MPEG 2 to compress video data See MPEG E ECC memory Error Checking and Correcting...

Страница 281: ...e Allocation Table A table near the beginning of a drive that identifies the location of everything on the drive flash ROM Method in which a computer s BIOS ROM can be upgraded without replacing the ROM BIOS chip FTP File Transfer Protocol A method of transferring files between two computers on a TCP IP network such as the Internet Anonymous FTP the most common usage on the Internet allows a user ...

Страница 282: ...change The Universal Serial Bus see USB external bus standard supports hot plugging This is also a feature of PCMCIA Hot plugging is also called hot swapping I IDE Intelligent Drive Electronics A hard drive type that has controller electronics built into the drive and delivers high throughput interface A connection that enables two devices to communicate interrupt A signal from part of a system su...

Страница 283: ...erformance In 1993 Intel and Microsoft introduced a new version of the ISA specification called Plug and Play ISA Plug and Play ISA enables the operating system to configure expansion boards automatically so that users do not need to fiddle with DIP switches and jumpers See plug and play isochronous A form of data transmission in which individual characters are only separated by a whole number of ...

Страница 284: ...D graphics modem MOdulator DEModulator A device that links computers over a telephone line MPC Multimedia Personal Computer a software and hardware standard developed by a consortium of computer firms led by Microsoft There are three MPC standards called MPC MPC2 and MPC3 respectively Each specifies a minimum hardware configuration for running multimedia software MPEG Motion Pictures Expert Group ...

Страница 285: ...ect A self configuring personal computer local bus designed by Intel Most modern PCs include a PCI bus in addition to a more general ISA expansion bus PCI is a 32 bit bus but supports a 64 bit extension for new processors such as the Pentium II It can run at clock speeds of 33 or 66 MHz At 32 bits and 33 MHz it yields a throughput rate of 133 megabits per second 64 bit implementations running at 6...

Страница 286: ...emory that can be read and written to by the microprocessor or other hardware devices In RAM data can be directly and randomly read or written with any choice for the address It s the storage location for data that needs to be immediately available for every application in use on your computer read To extract data from a storage device such as a diskette ROM Read Only Memory Memory in which stored...

Страница 287: ...n bytes rather than bits In today s SIMMs each chip holds 2 MB so a single SIMM holds 16 MB SIMMs are easier to install than individual memory chips The bus from a SIMM to the actual memory chips is 32 bits wide A newer technology called dual in line memory module DIMM provides a 64 bit bus To take advantage of the 64 bit bus on Pentium II processors use either DIMMs or pairs of SIMMs See DIMMs Sl...

Страница 288: ...wice as fast as the previous disk drive standard for PCs and is necessary to take advantage of new faster Ultra ATA disk drives The official name for the protocol is Ultra DMA 33 USB Universal Serial Bus An external bus standard that supports data transfer rates of 12 Mbps 12 million bits per second A single USB port can be used to connect up to 127 peripheral devices such as mice modems and keybo...

Страница 289: ...ected condition WRAM Windows RAM A type of RAM that supports two ports This enables a video adapter to fetch the contents of memory for display at the same time that new bytes are being pumped into memory This results in much faster display than is possible with conventional single port RAM WRAM is similar to VRAM but achieves even faster performance at less cost because it supports addressing of ...

Страница 290: ...lieved that the maximum data transmission rate over copper telephone wires was 33 6 Kbps but X2 achieves higher rates by taking advantage of the fact that most phone switching stations are connected by high speed digital lines X2 bypasses the normal digital to analog conversion and sends the digital data over the telephone wires directly to a modem where it is decoded ...

Страница 291: ...ver CD ASIC chip 4 11 Audio 10 8 connectors 1 10 controller 4 14 integrated on system board 4 7 4 14 B Back features 1 8 Backing up large drives in Windows 95 A 16 NEC Auto Backup 2 33 Bar retaining processor 3 53 3 54 3 55 Base memory 2 10 Battery discarding 3 80 installation 3 79 removal 3 79 Battery clip 3 79 BBS 9 5 BIOS 4 10 updates 2 19 BIOS Features Setup menu CMOS Setup 2 10 Boards expansi...

Страница 292: ...tures Setup menu 2 10 Chipset Features Setup menu 2 11 Exit Without Saving menu 2 17 Integrated Peripherals menu 2 15 Load Setup Defaults menu 2 13 Main menu 2 8 2 9 navigation keys 2 9 PNP PCI Configuration Setup menu 2 13 Power Management Setup menu 2 11 Save Exit Setup menu 2 16 Special Features Setup menu 2 13 Standard CMOS Setup menu 2 10 starting 2 8 Supervisor Password menu 2 16 User Passwo...

Страница 293: ...l support 9 3 Environmental and safety specifications 10 12 European compliance 10 12 Exit Without Saving menu CMOS Setup 2 17 Expansion board connectors 1 10 3 46 frame 3 49 3 50 installation 3 46 3 48 3 51 removal 3 46 3 48 3 50 slots 3 46 Extended memory 2 10 F Fax modem board 1 18 connector 1 10 problems 8 9 Features See System Features Field replaceable units list See FRU list FLASH diskette ...

Страница 294: ...l 3 73 3 74 3 75 IP addresses 2 31 A 5 IPX addresses 2 31 A 5 IRQs 2 2 ISA bus 4 12 J Jumper blocks system board 2 4 4 6 Jumper settings 2 3 CMOS clear 2 5 Lite ON CD ROM 2 6 NEC CD ROM 2 6 onboard VGA disable enable 2 4 power on mode 2 5 system board 2 4 4 6 tape backup unit 2 7 Zip drive 2 6 K Kensington Security Standard connector 1 13 Keyboard 1 17 cleaning 7 3 connector 1 9 problems 8 4 8 9 s...

Страница 295: ...6 configuring Windows 95 or Windows 98 2 31 configuring Windows NT 2 32 installing 2 31 removal A 5 NEC ToolTelligent suite 2 24 NEC WebTelligent software 2 24 2 25 configuring A 6 features 2 26 installing 2 28 requirements 2 27 Network domain information A 7 gateway information A 7 protocol A 7 protocol disabling A 7 protocol enabling A 7 Network board 1 18 NLX chassis 1 15 connector 1 15 5 2 5 3...

Страница 296: ... Celeron processor 3 53 chassis foot 3 80 desktop cover 3 3 DIMMs 3 36 diskette drive 3 21 3 23 3 24 expansion board 3 46 3 48 3 50 front control board 3 67 3 69 front panel 3 15 3 16 3 19 hard drive bracket 3 60 3 61 intrusion switch 3 73 3 74 3 75 LANDesk Client Manager A 5 A 6 left side brace from desktop 3 62 left side bracket from desktop 3 41 minitower side cover 3 8 minitower top cover 3 12...

Страница 297: ... Password menu CMOS Setup 2 16 Suspend mode 2 12 Swap box 1 19 Switch board See Front control board System cleaning 7 2 maintenance 7 2 troubleshooting 8 2 System board 1 4 1 14 4 2 alignment 3 40 3 43 BIOS 4 7 chipsets 4 7 components 4 7 connectors 4 2 4 4 4 7 FLASH ROM 4 7 installation 3 39 3 43 3 44 jumper blocks 2 4 4 6 jumper settings 2 3 2 4 4 6 memory 4 7 NLX form factor 1 15 removal 3 39 3...

Страница 298: ...elligent See NEC ToolTelligent suite Total memory 2 10 Troubleshooting 8 2 booting 8 7 CD ROM drive 8 5 8 10 diskette drive 8 5 8 8 fax modem board 8 9 hard drive 8 8 keyboard 8 9 keyboard mouse 8 4 memory 8 9 monitor 8 4 8 10 mouse 8 9 power 8 7 problem checklist 8 2 problem diagnostics 8 7 speakers 8 6 Type I PC card 1 19 Type II PC card 1 19 Type III PC card 1 19 U Uninstalling See Removing Upg...

Страница 299: ...talog button A 17 restoring software A 17 Windows 98 issues A 17 DVD ROM A 17 finding tape device icons A 17 Windows network security 1 13 Windows NT issues A 18 BootMagic installation A 18 configuring BootMagic A 18 A 19 network card drivers A 18 Y YMF740C audio controller 4 9 Z Zip drive 1 2 1 19 See also 5 1 4 inch device jumpers 2 6 specifications 10 11 ...

Страница 300: ...Regulatory Statements FCC Statement Note for Canada Battery Replacement Battery Disposal ...

Страница 301: ...ory Statements The following regulatory statements provide information about use of the PowerMate ES 5200 Series computer FCC Statement For United States Only Note for Canada Battery Replacement Battery Disposal ...

Страница 302: ...d and used in accordance with the instructions may cause harmful interference to radio communications However there is no guarantee that interference will not occur in a particular installation If this equipment does cause harmful interference to radio or television reception which can be determined by turning the equipment off and on the user is encouraged to try to correct the interference by on...

Страница 303: ...anada This Class B digital apparatus meets all requirements of the Canadian Interference Causing Equipment Regulations Cet appareil numérique de la classe B repecte toutes les exigences du Règlement sur le matériel brouilleur du Canada ...

Страница 304: ...l your NEC CSD dealer or the NEC CSD Technical Support Center WARNING There is a danger of explosion if the battery is incorrectly replaced Replace only with the same or equivalent type recommended by the manufacturer Discard used batteries according to the manufacturer s instructions ATTENTION Il y a danger d explosion s il y a replacement incorrect de la batterie Remplacer uniquement avec une ba...

Страница 305: ... incineration landfilling or mixing of batteries with the municipal solid waste stream is prohibited by law in most areas Return batteries to a federal or state approved battery recycler This may be where your purchased the battery or a local seller of automotive batteries Contact your local waste management officials for other information regarding the environmentally sound collection recycling a...

Страница 306: ...NEC Computer Systems Division Packard Bell NEC Inc 1 Packard Bell Way Sacramento CA 95828 0903 www nec computers com 456 00043 000SRV 5 99 ...

Отзывы: