326
8 USING STO FUNCTION
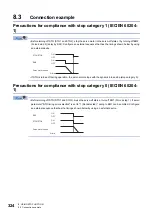
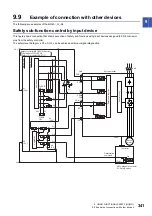
8.3 Connection example
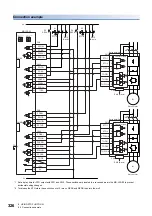
Connection example
*1 Set a delay time for STO output with SW1 and SW2. These switches are located in a recessed area in the MR-J3-D05 to prevent
accidental setting changes.
*2 To release the STO state (base circuit shut-off), turn on RESA and RESB then turn them off.
STO1
4
5
3
6
7
8
CN3
CN8
SDO1A+
4A
4B
SDO1A-
SDI1A+
1A
1B
SDI1A-
SDI2A+
SRESA+
SDO2A+
TOFA
3A
3B
1A
1B
6A
6B
8A
SDI2A-
SDO2A-
SRESA-
CN9
CN10
STO1
TOFB2
TOFCOM
STO2
STOCOM
TOFB1
SW1
*1
FG
4
5
3
6
7
8
CN3
CN8
TOFB2
TOFCOM
STO2
STOCOM
TOFB1
SDO1B+
3A
3B SDO1B-
SDI1B+
2A
2B
SDI1B-
SDI2B+
SRESB+
SDO2B+
TOFB
4A
4B
2A
2B
5A
5B
8B
+24V
7A
0V
7B
SDI2B-
SDO2B-
SRESB-
CN9
CN10
SW2
*1
MR-J3-D05
S1
24 V
0 V
RESA
*2
STOA
S3
RESB
*2
STOB
MC
M
MC
M
S4
S2
CN8A
CN8B
EM2 (B-axis)
Servo amplifier
EM2 (A-axis)
Servo amplifier
Servo motor
Servo motor
Control circuit
Control circuit
EM2
(A-axis)
EM2
(B-axis)
Содержание MELSERVO-J5 MR-J5-G Series
Страница 1: ...MR J5 User s Manual Hardware MR J5 _G_ MR J5W_ _G_ MR J5 _A_ Mitsubishi Electric AC Servo System ...
Страница 2: ......
Страница 473: ...12 USING A FULLY CLOSED LOOP SYSTEM 12 7 Absolute position detection system 471 12 MEMO ...
Страница 477: ......


