C-79
12.2 Setting the Day of the
Week and Time
■
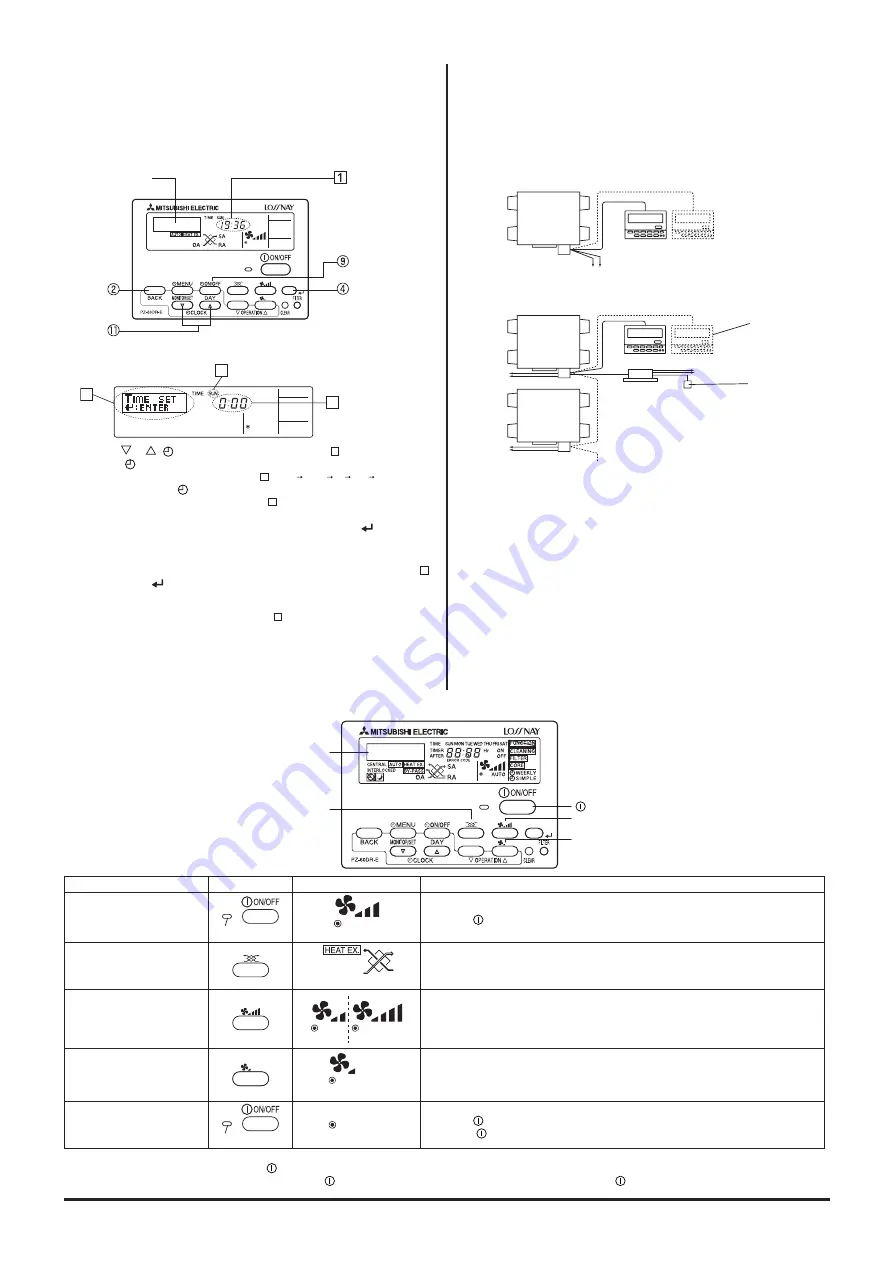
Use this screen to change the current day of the week and time setting.
Note:
The day and time will not appear if clock use has been disabled or the simple timer
has activated at Function Selection of remote controller.
<How to Set the Day of the Week and Time>
1. Press the
or
[
CLOCK] button
A
to show display
2
.
2. Press the [
ON/OFF (DAY)] button
9
to set the day.
* Each press advances the day shown at
3
: SUN
MON
...
FRI
TSA
3. Press the appropriate [
CLOCK] button
A
as necessary to set the time.
* As you hold the button down, the time (at
4
) will increment first in minute
intervals, then in 10-minute intervals, and then in 1-hour intervals.
4. After making the appropriate settings at Steps 2 and 3, press the
button
4
to
lock in the values.
2
3
4
Day of the Week Setting
Time Setting
Dot display
Day of the Week &
Time display
Typical System Setup
In either case, up to two remote controllers can be used.
Two remote controller operation
• When two individual remote controllers have been installed, the most recent
control signals will be given priority.
Independent operation of the Lossnay unit:
Interlocked operation with an air conditioners, etc.:
Remote controller(s)
Up to two remote controllers can be used
Lossnay
Power supply
The Lossnay can
be controlled same
as in independent
Lossnay operation.
The Lossnay can
be started and
stopped via external
equipment.
Operation switch
for the external
device
A maximun of up to 15 Lossnay units
may be connected.
Indoor unit
Lossnay
Lossnay
Power supply
Remote controller(s)
Power
supply
Power
supply
Note:
Your new entries at Steps 2 and 3 will be cancelled if you press the BACK button
2
before pressing the
button
4
.
5. Press the BACK button
2
to complete the setting procedure. This will return the
display to the standard control screen, where
1
will now show the newly set day
and time.
* To change the time or day of the week, start from Step 1 above.
Note:
If you are using two remote controllers, setting the time and day of the week in one
remote controller will cause the new setting to be applied to the other as well.
Operation
Relevant button
Relevant display items
Sequence
1. Starting the Lossnay unit
Operation lamp
“High”
Press the [
ON/OFF] button and confirm that the Operation lamp turns on.
2. Setting the ventilation mode
“HEAT EX.” non-automatic
Press the Function selector button: Each time it is pressed, the corresponding display will
change in accordance with the sequence [HEAT EX.] (non-automatic) --> [BY-PASS] (non-
automatic) --> [AUTO].
3. Selecting the fan speed
“Low” “Extra
High”
Press the Fan Speed Adjustment button to select either Low or High (Extra High) fan
speed. High and Extra-High can be selectable by initial setting.
4. Selecting the Extra Low fan
speed*
1
*
2
“Extra Low”
Press the “Extra Low” fan speed button.
Extra low operation will begin. Pressing the Fan Speed Adjustment button will cause the
fan speed to revert to its original speed (before the Extra low mode began).
Pressing the Extra Low fan speed button again will return operation to Extra low mode.
5. Stopping the Lossnay unit
Operation lamp
Press the [
ON/OFF] button.*
2
(Press the [
ON/OFF] button to turn off the Operation lamp.)
*
1
If you press a button for a feature that is not installed at the Lossnay unit, the remote controller will display the “NOT AVAILABLE” message.
*
2
If set to “24-hour Ventilation”, pressing the [
ON/OFF] button will cause this to be displayed in the dot display “24HR VENTILATION”, and the operation will switch to
Extra low fan speed mode. To stop operation, press the [
ON/OFF] button twice within 3 seconds, or press and hold the [
ON/OFF] button for 5 seconds.
Dot display
Function selector button
ON/OFF button
Fan Speed Adjustment button
“Extra Low” fan speed button
12.3 Using the Remote Controller
Содержание LGH-100RX5 -E
Страница 1: ...Lossnay Remote Controller ...
Страница 2: ......
Страница 94: ...C 94 ...
Страница 95: ...C 95 5 ...
Страница 96: ...C 96 ...
Страница 97: ...C 97 ...
Страница 98: ...C 98 5 3 ...
Страница 99: ...C 99 ...
Страница 106: ...Y08 004 Jan 2009 MEE ...


