1-24
System Overview
Parallel Port
The A770 includes a 25-pin, D-type parallel port for connecting a parallel
printer or another external parallel device, such as an external floppy disk
deive. The parallel port supports both EPP/ECP functions. The parallel port is
located on the rear panel of the A770.
VGA Port
The A770 includes one 15-pin, sub-D VGA alalog port for connecting an
external monitor. It is accessible on the rear panel of the A770. It is not
necessary to connect an external monitor to the A770, but by using an external,
you can achieve higher resolutions than on the internal flat-panel display.
USB2.0 Port
The A770 provides a USB2.0 (Universal Serial Bus) port for connecting USB
compliant devices. Most peripheral devices require the user to shutdown the
system, plug in the device and restart the system in order to use the new device.
USB devices can be conveniently connected and disconnected while the
system is running. The USB port transfers data at 480 MB/sec. Please refer to
the device-specific documentation for information on connecting and using
USB devices. The USB port is located on the rear panel of the A770.
IrDA Port
The A770 provides an IrDA port, on the rear panel, for connecting an
IrDA-compliant device port provides wireless support for your system. You
can use this port to quickly transfer large amounts of data to another
IrDA-compliant system or device. This port complies with all IrDA standards.
Содержание A770
Страница 1: ...A770 ENHANCE SERIES NOTEBOOK OPERATOR S MANUAL MITAC Technology Corporation P N 799001180012 R00 ...
Страница 2: ......
Страница 11: ...i Open Size With Rubber Bumper 315mm W 70mm H 260mm D Weight 14 3 lbs 6 5 kg ...
Страница 15: ...iii 2 4 5 Wireless LAN Utility Installation PROSET 2 18 ...
Страница 17: ...v 4 4 Cleaning 4 2 ...
Страница 19: ...vii List of Tables Table 1 1 Standard A770 Notebook Computer 1 2 ...
Страница 20: ...viii ...
Страница 26: ...1 6 System Overview 9 Carring Handle 10 Opening Latch 11 LCD Rubber Bumpers Figure 1 2 Features of the A770 ...
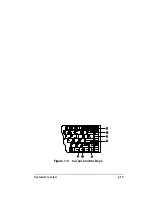
Страница 35: ...System Overview 1 15 Figure 1 6 Cursor Control Keys ...
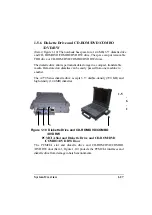
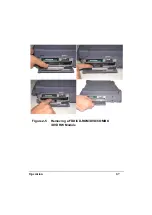
Страница 54: ...Operation 2 7 Figure 2 5 Removing a FDD CD ROM DVD COMBO DVD RW Module ...
Страница 66: ...Operation 2 19 2 When the TSRC XP htm file appear then select START Control Panel button ...
Страница 67: ...Operation 2 20 3 When the Control Panel screen appear then click on performance and Maintenance button ...
Страница 68: ...Operation 2 21 4 When the Performance and Maintenance screen appear and then click on System button ...
Страница 69: ...Operation 2 22 5 When the System Properties screen appear and then click on Hardware and Device Manager button ...
Страница 71: ...Operation 2 24 7 When the Unknown Device Properties screen appear and then click on Reinstall Driver button ...
Страница 73: ...Operation 2 26 10 When the Hardware Update Wizard screen appears click on Finish button ...
Страница 101: ...SetupConfiguration Utility 3 20 4 Use IRQ5 as below ...

