


© 2015 Sensata Technologies
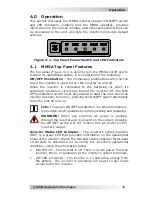
Installation
23
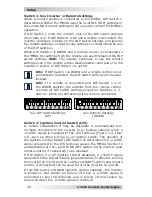
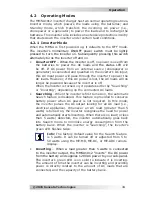
2.8 Functional
Test
After all electrical connections
to the inverter, batteries, AC source,
and loads (using a sub-panel)
have been completed, follow these
steps to test the installation and the inverter’s operation.
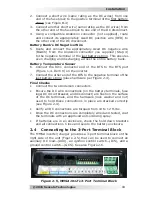
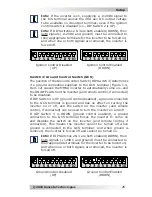
1. Check the battery voltage and polarity before connecting the
batteries to the inverter. Use a multimeter to verify 10 to 15
VDC at the batteries’ positive and negative terminals.
2. Apply battery power to the inverter by switching the DC
disconnect on (or close the DC circuit-breaker). The inverter
remains off, but the LED status indicators go through a start-
up test (see Section 4.1.1) to indicate that DC power has been
connected and is ready to be turned on.
3. Prior to turning on the inverter, ensure all connected loads (e.g.,
medical devices) are switched off or disconnected from the AC
outlets.
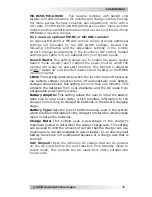
4. a) If a remote switch is connected, press the remote’s ON/OFF
switch to turn on the inverter.
b) If there is no remote switch connected, lightly press and
release the inverter’s ON/OFF power switch—located on the top
of the inverter—to turn the inverter on.
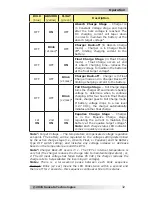
Verify inverter’s INV LED status indicator is solid (not blinking)—
indicating the inverter is providing AC power. If the LED is
blinking, turn off Search mode (DIP Switch 4 in UP position).
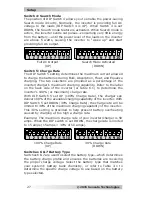
5. Check the output voltage of the inverter by connecting a
multimeter to the outlets powered by the inverter. Verify the
voltage is 120 VAC +/– 5 VAC.
6. Turn on or connect a load and verify it comes on. Continue to
keep the load connected and turned on.
7. Press the remote’s ON/OFF switch to turn the inverter off. If no
remote switch is connected, press and release the inverter’s ON/
OFF power switch to turn the inverter off. The INV LED status
indicator and the connected load should go off.
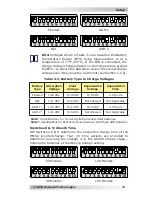
8. Apply AC power to the inverter’s AC input. After the AC input
power is quali
fi
ed (approximately 15 seconds), the incoming
AC power transfers through the inverter to the AC output and
the connected load is powered. Verify one of the inverter’s CHG
LEDs illuminates and the connected load comes on.
9. Even though the connected load is on, the inverter is currently
disabled/off. Press the remote’s ON/OFF switch (or press and
release the ON/OFF power switch on the inverter) to enable/
turn-on the inverter.
10. Disconnect the incoming AC power to the inverter. Verify the
connected load remains on—but now is powered by the inverter.
If the inverter passes all the steps, the inverter is ready for use.
If the inverter fails any steps, refer to the Troubleshooting section.