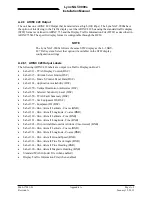
Lynx NGT-9000s
Installation Manual
4.6.3 Directional Antenna (NY156 and NY164)
The TAS Antenna Calibration (installation checkout paragraph 3.10.2.8) must be performed anytime the
Lynx NGT-9000s or Directional Antenna is removed from the aircraft. Specific details on the installation
of the antenna can be found in the installation section.
1.
Removal Procedure
a.
Remove 10-32 hardware (nut and bolts) Qty 4, O-ring, and adapter plate.
b.
Disconnect three antenna cables.
2.
Installation Procedure
a.
Connect each of the three antenna cables. Check to ensure that each cable is connected to the
correct antenna connector. Each connector/cable has a matching color band.
b.
Attach the antenna to the aircraft, with the special adapter plate and o-ring, using 10-32
hardware. Ensure correct direction of antenna. Refer to Figure 2-15 for details.
•
Before installing the antenna on an aircraft remove the tape, which holds the O-RING
gasket in place during shipment (refer to SL-206). If the O-ring is in a separate bag,
remove and install it in the O-ring groove on the bottom of the antenna.
•
For pressurized aircraft, use a sealant that meets the requirements of SAE AMS-S-8802 such
as Flamemaster CS3204 class B. For non-pressurized aircraft, use a non-corrosive sealant that
meets the physical requirements of MIL-A-46146 such as General Electric RTV162.
3.
Functional Check Procedure
a.
Cycle power to the Lynx NGT-9000s and system components.
b.
Perform the TAS Antenna Calibration (installation checkout paragraph 3.10.2.8) prior to doing
a functional check.
c.
Perform a functional check (paragraph paragraph 3.10, Installation Checkout) to verify unit is
functioning correctly.
•
Refer to the fault isolation section if errors are detected.
4.6.4 L-Band (UAT/1090) Antenna
1.
Refer to the aircraft manufacturer's data and the antenna manufacturer's installation instructions to
remove and replace the antenna(s).
a.
Perform a functional check (paragraph paragraph 3.10, Installation Checkout) to verify unit is
functioning correctly.
•
Refer to the fault isolation section if errors are detected.
4.6.5 GPS Antenna
1.
Refer to the aircraft manufacturer's data and the antenna manufacturer's installation instructions to
remove and replace the antenna(s).
a.
Perform a functional check (paragraph paragraph 3.10, Installation Checkout) to verify unit is
functioning correctly.
•
Refer to the fault isolation section if errors are detected.
0040-17001-01
Maintenance
Page 4-31
Revision A
January 15, 2015

