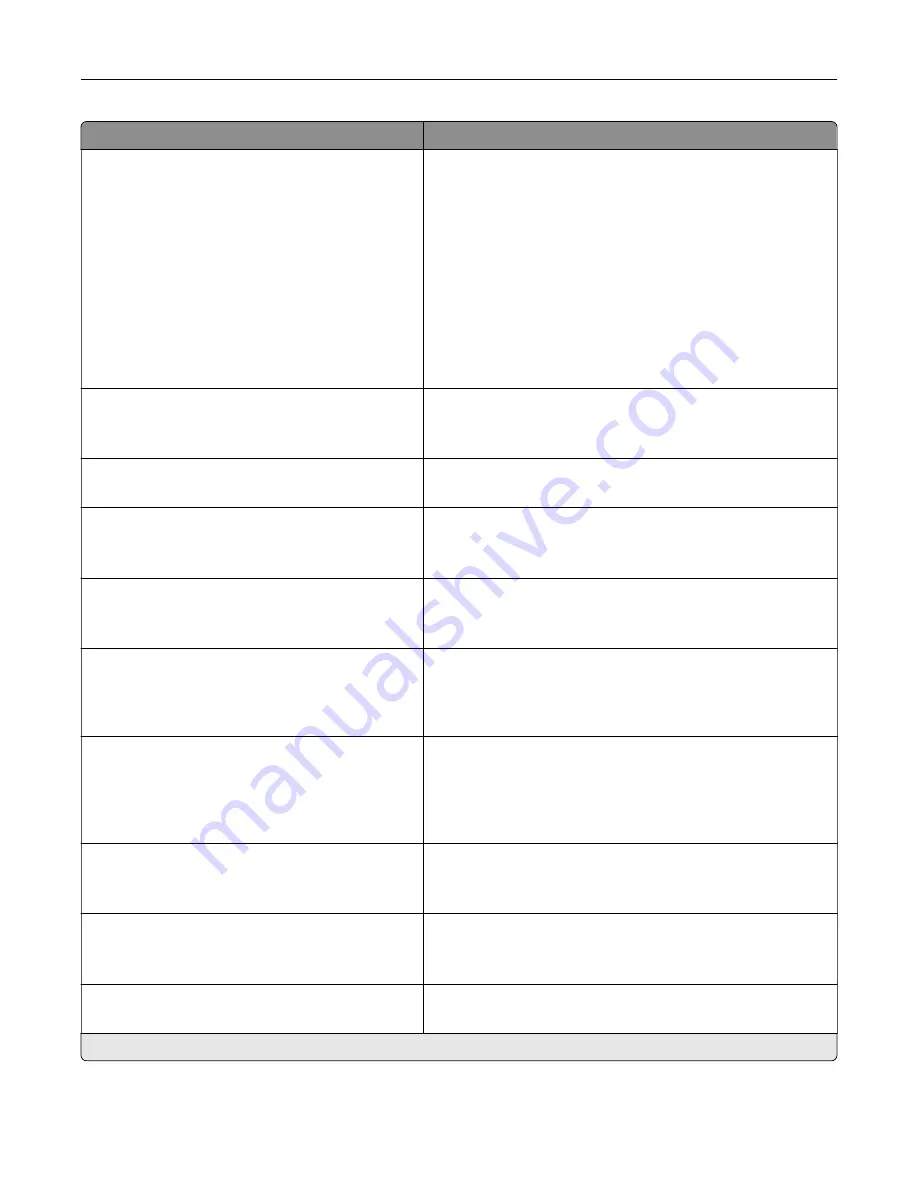
Menu item
Description
Date and Time
Configure
Current Date and Time
Manually Set Date and Time
Date Format (MM
‑
DD
‑
YYYY*)
Time Format (24 hour clock*)
Time Zone (UTC
‑
5:00*)
Network Time Protocol
Enable NTP (On*)
NTP Server
Enable Authentication
Configure the printer date and time and network time protocol.
Paper Sizes
U.S.*
Metric
Specify the unit of measurement for paper sizes.
Note:
The country or region selected in the initial setup
wizard determines the initial paper size setting.
Screen Brightness
20–100% (100*)
Adjust the brightness of the display.
Flash Drive Access
Enabled*
Disabled
Enable access to the flash drive.
Allow Background Removal
Off
On*
Specify whether background removal is allowed.
Allow Custom Job scans
Off
On*
Specify whether the Custom Job Scanning setting appears for
copy, scan, and fax.
Note:
This menu item appears only when a hard disk is
installed.
One Page Flatbed Scanning
Off*
On
Set the printer to scan any type of job involving the scanner
glass as a single page.
Note:
The printer returns to the home screen after
performing a single flatbed scan instead of displaying
prompts.
Output Lighting
Off*
On
Enable the integrated output light or indicator light of an
optional output bin.
Audio Feedback
Button Feedback (On*)
Volume (5*)
•
Enable audio feedback for button presses, panel
interactions, paper loaded prompts, and error notifications.
•
Adjust the feedback volume.
Screen Timeout
5–300 seconds (60*)
Set the idle time before the display shows the home screen or
before the printer logs out a user account automatically.
Note:
An asterisk (*) next to a value indicates the factory default setting.
Understanding the printer menus
68
Содержание XC6152
Страница 65: ...5 Touch Scan Here If necessary change the scan settings 6 Scan the document Scanning 65 ...
Страница 161: ... Scanner glass pad 3 Open door E Maintaining the printer 161 ...
Страница 162: ...4 Wipe the following areas ADF glass in door E Maintaining the printer 162 ...
Страница 163: ... ADF glass pad in door E 5 Close the door and then close the scanner cover Maintaining the printer 163 ...
Страница 173: ...2 Remove the waste toner bottle 3 Remove the imaging unit 4 Remove the photoconductor unit Maintaining the printer 173 ...
Страница 175: ...Replacing an imaging unit 1 Open door A 2 Remove the waste toner bottle Maintaining the printer 175 ...
Страница 179: ...3 Remove the pick roller 4 Unpack the new pick roller Maintaining the printer 179 ...
Страница 189: ...4 Insert the new transfer roller 5 Remove the white packing material 6 Close door B Maintaining the printer 189 ...
Страница 196: ...2 Open door G 3 Remove the staple cartridge 4 Unpack the new staple cartridge Maintaining the printer 196 ...
Страница 198: ...2 Open door G 3 Pull out the staple cartridge holder Maintaining the printer 198 ...
Страница 216: ...2 Open door G 3 Pull out the staple cartridge holder Clearing jams 216 ...
Страница 274: ...4 Remove the paper bail 5 Remove the standard bin insert Upgrading and migrating 274 ...


