or prescribed service conditions. The printer has a non-serviceable printhead assembly that contains a laser
with the following specifications:
Class: IIIb (3b) AlGaAs
Nominal output power (milliwatts): 20
Wavelength (nanometers): 755–800
Power consumption
Product power consumption
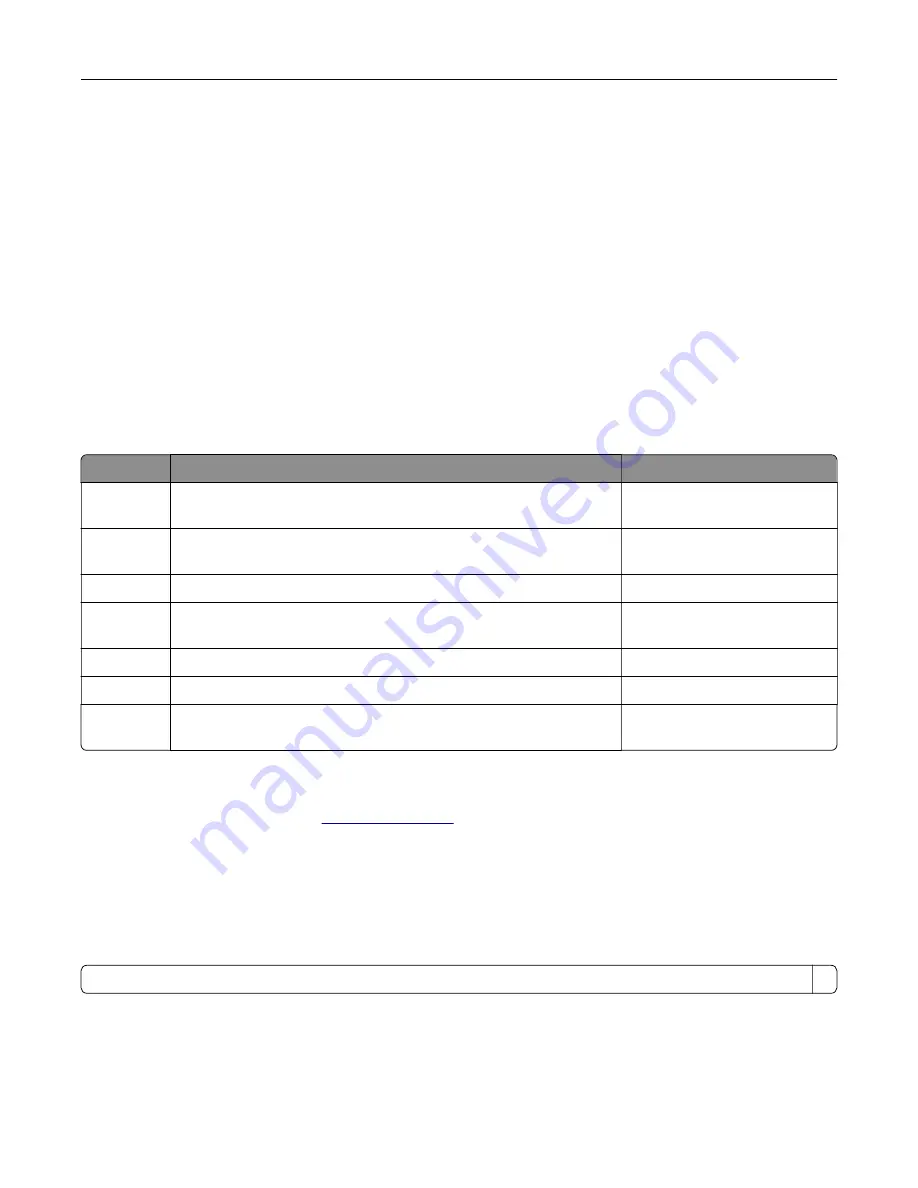
The following table documents the power consumption characteristics of the product.
Note:
Some modes may not apply to your product.
Mode
Description
Power consumption (Watts)
Printing
The product is generating hard
‑
copy output from electronic inputs. 760 (one-sided); 740 (two-
sided)
Copy
The product is generating hard
‑
copy output from hard
‑
copy original
documents.
870
Scan
The product is scanning hard
‑
copy documents.
115
Ready
The product is waiting for a print job.
80 (higher power usage); 70
(lower power usage)
Sleep Mode The product is in a high
‑
level energy
‑
saving mode.
1.46
Hibernate
The product is in a low
‑
level energy
‑
saving mode.
0.3
Off
The product is plugged into an electrical outlet, but the power switch
is turned off.
0.2
The power consumption levels listed in the previous table represent time-averaged measurements.
Instantaneous power draws may be substantially higher than the average.
Values are subject to change. See
for current values.
Sleep Mode
This product is designed with an energy-saving mode called
Sleep Mode
. The Sleep Mode saves energy by
lowering power consumption during extended periods of inactivity. The Sleep Mode is automatically engaged
after this product is not used for a specified period of time, called the
Sleep Mode Timeout
.
Factory default Sleep Mode Timeout for this product (in minutes):
1
By using the configuration menus, the Sleep Mode Timeout can be modified between 1 minute and 120 minutes.
If the print speed is less than or equal to 30 pages per minute, then you can set the timeout only up to 60
minutes. Setting the Sleep Mode Timeout to a low value reduces energy consumption, but may increase the
response time of the product. Setting the Sleep Mode Timeout to a high value maintains a fast response, but
uses more energy.
Notices
284
Содержание XC6152
Страница 65: ...5 Touch Scan Here If necessary change the scan settings 6 Scan the document Scanning 65 ...
Страница 161: ... Scanner glass pad 3 Open door E Maintaining the printer 161 ...
Страница 162: ...4 Wipe the following areas ADF glass in door E Maintaining the printer 162 ...
Страница 163: ... ADF glass pad in door E 5 Close the door and then close the scanner cover Maintaining the printer 163 ...
Страница 173: ...2 Remove the waste toner bottle 3 Remove the imaging unit 4 Remove the photoconductor unit Maintaining the printer 173 ...
Страница 175: ...Replacing an imaging unit 1 Open door A 2 Remove the waste toner bottle Maintaining the printer 175 ...
Страница 179: ...3 Remove the pick roller 4 Unpack the new pick roller Maintaining the printer 179 ...
Страница 189: ...4 Insert the new transfer roller 5 Remove the white packing material 6 Close door B Maintaining the printer 189 ...
Страница 196: ...2 Open door G 3 Remove the staple cartridge 4 Unpack the new staple cartridge Maintaining the printer 196 ...
Страница 198: ...2 Open door G 3 Pull out the staple cartridge holder Maintaining the printer 198 ...
Страница 216: ...2 Open door G 3 Pull out the staple cartridge holder Clearing jams 216 ...
Страница 274: ...4 Remove the paper bail 5 Remove the standard bin insert Upgrading and migrating 274 ...


