DANGER
Some laser products contain an embedded Class 3A or Class 3B laser diode. Note the
following.
Laser radiation when open. Do not stare into the beam, do not view directly with optical
instruments, and avoid direct exposure to the beam.
Class 1 Laser Product
Laser Klasse 1
Laser Klass 1
Luokan 1 Laserlaite
Appareil A Laser de Classe 1
`
7. Slide the drive through the front of the server.
8. Touch the static-protective package that contains the new optical drive to any unpainted metal surface
on the server; then, remove the drive from the package and place it on a static-protective surface.
9. Follow the instructions that come with the drive to set any jumpers or switches.
10. Attach the drive retention clip that you removed from the previous drive to the side of the new drive.
11. Align the drive in the drive bay and slide the drive into the CD/DVD drive bay until the drive clicks into
place.
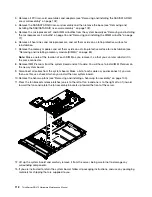
12. Connect the drive cable to the system board. The following illustration shows the cable routing for
the CD/DVD drive:
Note:
The CD/DVD cable should go on the top of the operation information panel cable (in the middle)
and the Video/USB cable (on the bottom) when all three cables are installed in the server.
13. Reconnect the power cord and any cables that you removed.
14. Turn on the peripheral devices and the server.
Removing a CD/DVD cable
To remove the CD/DVD cable, complete the following steps:
1. Read the safety information in Chapter 2 “Safety information” on page 3 and “Installation guidelines”
on page 67.
2. Turn off the server and peripheral devices and disconnect all power cords.
3. Remove the cover (see “Removing and replacing the cover” on page 72).
4. Remove the fans in fan connectors 2, 3, and 4 (see “Removing a hot-swap fan assembly” on page 100).
5. Remove the CD/DVD drive.
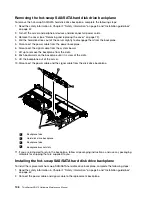
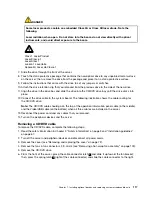
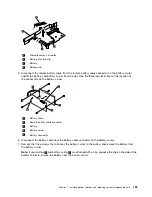
6. From the front of the server, grasp the cable connector latch
1
and slide it up toward the fan bracket;
then, press the spring latch
2
(right of the cable connector) and slide the cable connector to the right.
Chapter 7
.
Installing optional devices and replacing customer replaceable units
117
Содержание ThinkServer RD210
Страница 1: ...ThinkServer RD210 Hardware Maintenance Manual ThinkServer RD210 Types 3795 3796 3818 and 3819 ...
Страница 2: ......
Страница 3: ...ThinkServer RD210 Hardware Maintenance Manual ThinkServer RD210 Types 3795 3796 3818 and 3819 ...
Страница 7: ...Korean Class A warning statement 172 Copyright Lenovo 2005 2010 vii ...
Страница 8: ...viii ThinkServer RD210 Hardware Maintenance Manual ...
Страница 22: ...14 ThinkServer RD210 Hardware Maintenance Manual ...
Страница 26: ...18 ThinkServer RD210 Hardware Maintenance Manual ...
Страница 70: ...62 ThinkServer RD210 Hardware Maintenance Manual ...
Страница 74: ...66 ThinkServer RD210 Hardware Maintenance Manual ...
Страница 142: ...134 ThinkServer RD210 Hardware Maintenance Manual ...
Страница 172: ...164 ThinkServer RD210 Hardware Maintenance Manual ...
Страница 179: ...Japanese Voluntary Control Council for Interference VCCI statement Japanese recycling statements Appendix A Notices 171 ...
Страница 181: ......
Страница 182: ...Part Number 40M2493 Printed in USA 1P P N 40M2493 40M2493 ...


