background image

62

FLUE EXHAUST INSTALLATION

ATTENTION: Use only air intake/ fumes evacuation kit produced by Lamborghini Caloreclima.

CONCENTRIC FLUE PIPE

Fit the concentric elbow pipe positioning it on the desired direction and insert on it the sealing gasket. Fit the air

intake and flue pipes, observing the distances indicated on the installation scheme. The flue pipe should slope

slightly outward.

DOUBLE FLUE PIPE

FLUE EXHAUST FOR FAN-FORCED DRAUGHT VERSION (B22): max length 7.5 m

CONCENTRIC FLUE EXHAUST: max length 3 m

DOUBLE FLUE PIPE WITH Æ82 mm DIAPHRAGM:

max length (delivery) 6 m.

DOUBLE FLUE PIPE WITH Æ94 mm DIAPHRAGM:

max length (delivery) 18 m.

Installing an elbow to connect the boiler to the chimney will cause a drop in pressure. The values set out in the

table below indicate the necessary modifications to the length of the linear pipes.

TYPE OF INSTALLATION

ELBOW FITTED AT 90

°

ELBOW FITTED AT 45

°

Flue exhaust for fan-forced draught version (B22)
Concentric flue exhaust
Double flue pipe (intake/exhaust)

0,6 m

1 m

0,6 m

0,3 m
0,5 m
0,3 m

FLUE PIPE FOR FAN-FORCED

DRAUGHT VERSION (B22)

SELECTING THE RIGHT AIR DIAPHRAGM

 (A)

Flue exhaust for fan-forced draught version (B22)

Ø82 mm.

Concentric flue exhaust from 0.35 m to 1 m

Ø82 mm.

Concentric flue exhaust from 1 m to 3 m

Ø94 mm. STANDARD

Double flue pipe (intake/outlet)

Ø94 mm. STANDARD

75

CONEXIONES ELÉCTRICAS - ESQUEMAS

Hay que conectar la caldera a una red de alimentación de 220-230V-50Hz monofásica + tierra a través del

cable con 3 hilos que se da en dotación y respetando la polaridad LÍNEA-NEUTRO.

La conexión tiene que efectuarse mediante un interruptor bipolar con una apertura de los contactos de unos 3

mm. por lo menos. Si hubiera que cambiar el cable de alimentación habría que utilizar un cable tipo “HAR

H05 VV-F” 3 x 0,75 mm

2

La caldera está dotada de un cable para la conexión del control remoto de longitud de 1 m., que deberá ser

sustituido con otro cable de longitud adecuada para la colocación del remoto.

El control remoto deberá ser instalado en una pared interior a aproximadamente 1,5 m. del suelo, lejos de

fuentes de calor y de la luz solar directa. Evitar la instalación en hornacinas, detrás de puertas o cortinas. La

sujeción a la pared deberá ser realizada con tacos a expansión en dotación. Se prevé un agujero de paso

para los cables de la conexión eléctrica. Además se puede fijar el control remoto directamente en una caja

empotrada estándar con tres módulos.

La conexión a la caldera va realizada utilizando dos conductores con sección mínima de 0,5 mm˝ y longitud

máxima de 50 m. El polo positivo debe estar conectado al borne 5 y el polo negativo al borne 4. La conexión

con polaridad equivocada aunque no daña el control remoto impide el funcionamiento.

La instalación debe cumplir las NORMAS VIGENTES de seguridad.
Realicen una buena instalación de puesta a tierra.

Tensión

Volt

230

Frecuencia

Potencia

absorbida

Hz

kW

50

0,148

Grado de protección

Nivel sonoro

IP

dB (A)

44

45

Содержание thin 24 MCS W TOP U/IT

Страница 1: ...ENTO MODUL VEL MANUALE DI INSTALLAZIONE E MANUTENZIONE INSTALLATION AND MAINTENANCE MANUAL MANUAL PARA LA INSTALACI N Y EL MANTENIMIENTO MANUAL DE INSTALA O E MANUTEN O PREGASI CONSEGNARE L INSERTO MA...

Страница 2: ..._____________________________56 HYDRAULIC CIRCUIT ____________________________________________________57 INSTALLATION _________________________________________________________58 STARTING UP __________...

Страница 3: ......

Страница 4: ...reach of children as they are potential sources of danger This boiler is designed to heat water to a temperature below boiling atmospheric pressure It must be connected to a heating system compatible...

Страница 5: ......

Страница 6: ...t push button with lock out warning light 11 Hot water pressure switch 12 Lack of water pressure switch 13 Manual air purge valve 14 Electric box 15 Instantaneous water heater 16 Hot water circuit dra...

Страница 7: ......

Страница 8: ...ESSURE CURVES OUTPUT GAS NOZZLE CALIBRATION Pressure on nozzles mbars Delivery Burner nozzles min max m3 h mm Gas type NATURAL GAS G20 20mbars LIQUID GAS B G30 28 30mbars LIQUID GAS P G31 37mbars 2 5...

Страница 9: ......

Страница 10: ...PS Hot water pressure switch P san Hot water potentiometer RT RL3 relay contact RS R4 relay contact RP RL2 relay contact RF Anti interference resistance SB Lock out warning light SR Heating detector S...

Страница 11: ......

Страница 12: ...rical power at the boiler is OFF proceed with the electrical connections using bi polar wiring do not route the wiring parallel to the main power supply wires leads If it is not possible to avoid taki...

Страница 13: ......

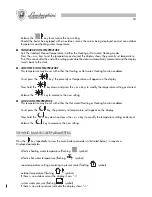
Страница 14: ...th the Heating or Hot water Heating functions enabled HOURLY PROGRAMMING OF TEMPERATURE VALUES Press key V to select the desired day on the indicators The display will then show the programme graph fo...

Страница 15: ......

Страница 16: ...d In addition to the displayed value the symbol graphically illustrates the temperature setting Release the key to memorise the new setting Should the boiler be equipped with an outdoor sensor the val...

Страница 17: ......

Страница 18: ...it will be necessary to reset all the parameters starting from section 1 ERROR MESSAGES In the event of a boiler malfunction the control unit governs the warning signals and is used to reset normal o...

Страница 19: ......

Страница 20: ...t 5 seconds after the last modification to exit this function and recommence normal operation TEMPERATURE CONTROL SELCTING THE FUNCTION MODE These procedures allow the user to select one of the three...

Страница 21: ......

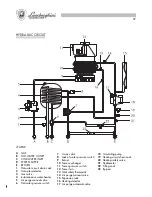
Страница 22: ...purge manual valve 6 Hot water pressure switch 7 3 way valve 8 Lack of water pressure switch 9 Burner 10 Fumes exchanger 11 Fumes pressure switch 12 Fumes fan 13 Total safety thermostat 14 Air purge...

Страница 23: ......

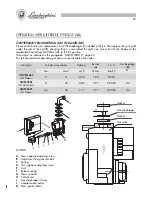
Страница 24: ...tted with the high double pipe flue exhaust kit CONCENTRIC FLUE EXHAUST KIT To install the concentric kit insert the funnel 1 supplied with the boiler in the fan Insert the diaphragm 3 between the adh...

Страница 25: ......

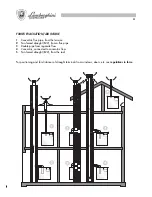
Страница 26: ...race 2 Fan forced draught B22 from a flue pipe 3 Double pipe from separate flues 4 Concentric connected to concentric flues 5 Fan forced draught B22 from the roof For positioning and for distances of...

Страница 27: ......

Страница 28: ...following operations should be carried out remove the power supply contacts from the coil E power the gas valve with the boiler on in the SUMMER position and bleed off domestic hot water at the maxim...

Страница 29: ......

Страница 30: ...page 63 For jets diameter and operating gas pressure see the table here under Jets pressure mbars Delivery Burner jets min max m3 h mm Gas type NATURAL GAS G20 20mbars LIQUID GAS B G30 28 30mbars LIQ...

Страница 31: ......

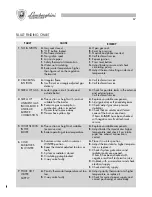
Страница 32: ...te is imperfect C Flames tend to move away D Flames have yellow tips A Replace unsuitable components B Adjust gas delivery on the modulating device C Check adjust gas valve pressure stabilizer D Check...

Страница 33: ......

Страница 34: ...L USUARIO A la atenci n del sr INSTALADOR Entregar el presente manual para el uso al USUARIO GB 16 WALL HUNG GAS BOILER FOR HIGH EFFICIENCY MODULATING USER MANUAL For the attention of the INSTALLATION...

Страница 35: ......

Страница 36: ...ous for children or inexperienced persons Do not obstruct the inlet or dissipation screens Do not make the boiler wet with splashes of water or other liquids Do not rest any object upon the boiler Use...

Страница 37: ......

Страница 38: ...rious damage to the other appliances connected to it Ask qualified personnel LAMBORGHINI SERVICE to check a the internal and external tightness of the gas system b that the gas delivery is that requir...

Страница 39: ......

Страница 40: ...comfort temperature level and low tempera ture level keys The indicator light will take on the desired value and programming will advance by one step the next indicator light to be programmed will the...

Страница 41: ......

Страница 42: ...the key down and press the or keys to modify the temperature setting as desired Release the key to memorise the new setting LOW ROOM TEMPERATURE This temperature may be set with either the Hot water H...

Страница 43: ......

Страница 44: ...ptional control unit for distance operation Operating mode TEL input open The control unit operates as described in the handbook TEL input closed The control unit switches to remote mode that is heati...

Страница 45: ......

Страница 46: ...is imperfect C Flames tend to move away D Flames have yellow tips A Replace unsuitable components B Adjust gas delivery on the modulating device C Check adjust gas valve pressure stabilizer D Check th...

Страница 47: ......

Отзывы: