Page
110
7
System Men
u
9) Solo Settings
This configures the special settings for the Solo part. Changing these settings will also change these settings in
the Performance menu.
Solo Priority
Since the Solo part allows you to play only one note at a time (monophonic), it is important to select which note will be
played by the Solo part when more than one key is played at a time.
There are three options:
Top Note
The Solo part plays only the highest note among the notes played at one time.
Bottom Note
The Solo part plays only the lowest note among the notes played at one time.
Last Note
The Solo part plays only the last key played among the notes played at one time.
Trigger Mode
The trigger mode determines whether or not the note played by the Solo part will be re-triggered when certain notes
are released. There are two options:
Retrigger
When the note played by the Solo part is released, depending on the Solo priority setting the next
available priority note will be played automatically by the Solo part.
For example: when the Solo Priority is set to Top Note and you release the highest note the next note
below the note you released becomes the highest note and will now be played by the Solo part.
No Retrigger
When the note played by the Solo part is released, The Solo part will not automatically play the next
available priority note.
The Solo part will only play a new note based upon the Solo priority setting. For example, when the
Solo priority is set to Top Note and you release the highest note the Solo part will only play a note
when you press a key that is higher than the currently held notes.
Portamento Time
Portamento Time
determines how long it takes for the pitch to slide up or down from one note to the next when
portamento is active.
Solo Mode
When using Solo Part, you can select between two Solo Modes.
Layer
The sound assigned to the Solo part will be layered on top of the RIGHT 1 and RIGHT 2 Parts.
Split
Only the sound assigned to the Solo part will be heard when you play above a specified key (split
point) on the keyboard. The default split point is C5 but you can freely change the split point to any
key on the keyboard. When the Solo Part is activated in Split mode the split point will be displayed
in the LCD screen using the same 88 note diagram that is used to display the Left/Split split point.
The keys assigned to the Solo Part above the specified split point will be shown with a black bar
above them. There is no arrow to indicate the Solo split point because the split point for the Solo
Part cannot be changed on the main screen.
Note:
Any changes to these settings will also change the settings in the Performance menu.
Portamento time can also be set from the Performance button menu. Press and hold the PERFORMANCE button, then
select PERFORMANCE BUTTON ASSIGN from the menu. Select SOLO PORTAMENTO as the setting, then touch edit
to set the portamento time.
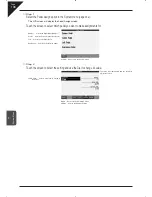
PRIORITY : Selects the note priority.
TRIGGER MODE : Selects the Trigger mode.
PORTAMENT TIME : Adjusts Portamento
time.
SOLO MODE : Selects the SOLO mode
settings.
MENU : Takes you to the previous menu.
Содержание Concert Performer CP139
Страница 1: ...1 OVERVIEW OF CONTROLS 2 SOUNDS 3 STYLES 4 RECORDER 5 USB USAGE Quick Start Guide ...
Страница 2: ......
Страница 38: ...Page 38 USER NOTES ...
Страница 39: ...Page 39 ...
Страница 42: ...All descriptions and specifications in this manual are subject to change without notice ...
Страница 217: ...Page 177 11 Appendices User Notes ...
Страница 218: ......
Страница 219: ......


