background image

CMN-91 
Installation and Operation Manual 


Operation 


© 2016 Imagine Communications Corp.          Proprietary and Confidential. 

Revision D | Page 75 


To move the luma bar limits, set the ALARMS 

 VIDEO 

 GAMUT 

 LUM GAMUT UPPER (or LOWER) 

 THRESHOLD 525/59.94 or THRESHOLD 625/50 selection option. 

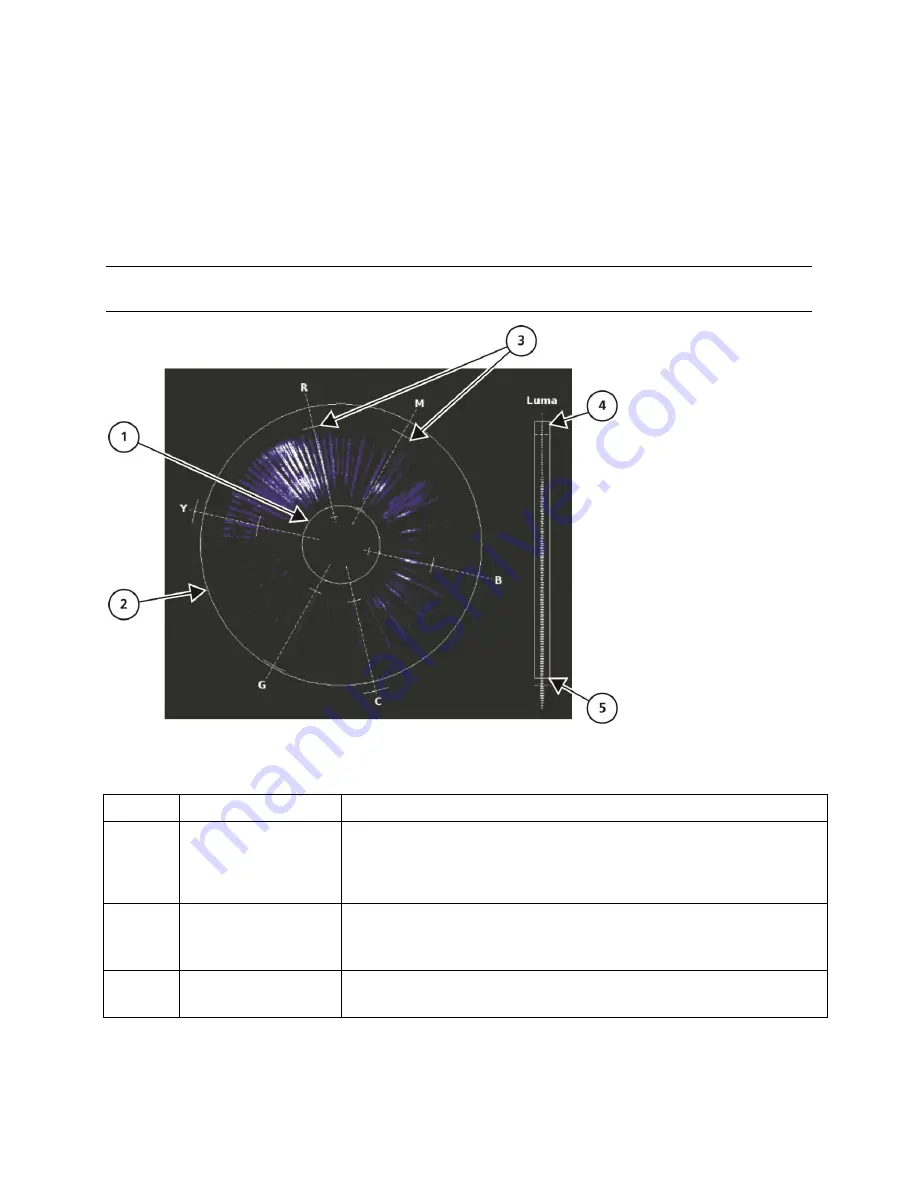
The other identifiers are radials that extend at the angle of the designated color. These six lines follow 
the same displacement as the vector display. Note that since the PAL display is derived solely from 
component information, there are not two phases for PAL signals. The +V phase is used (making the 
vectors look similar to NTSC). 

There is an alarm persistence of two seconds associated with any alarm indication. After an alarm has 
cleared, two seconds will pass before the gamut alarm indicator returns to normal. 


Figure 39:


Composite Gamut Vector Display Graticule Markings     

Description of Composite Gamut Indicators  

Key 

Indicator 

Description 

Lower Gamut Ring 

The lower gamut ring indicates the Gamut alarm Peak Lower limit. 
When the Gamut alarm is enabled and the Peak Lower limit is 
exceeded, the lower gamut ring turns red. 

Upper Gamut Ring 

The upper gamut ring indicates the gamut alarm peak upper limit. 
When the gamut alarm peak upper limit is exceeded, the upper gamut 
ring turns red. 

Vector Excursion Mark  The excursion marks help to visualize the minimum/maximum value of 

100% color bars. 

Содержание CMN-91

Страница 1: ...CMN 91 Compact Video and Audio Monitor Revision D March 2013 Installation and Operation Manual ...

Страница 2: ... changes in equipment design specifications components or documentation as progress may warrant to improve the performance of the product Trademarks Product names and other appropriate trademarks e g D Series Invenio PowerSmart Versio are trademarks or trade names of Imagine Communications or its subsidiaries Microsoft and Windows are registered trademarks of Microsoft Corporation All other tradem...

Страница 3: ...2 Operator s Safety Summary 13 Ensuring Safety 13 Explanation of Symbols 14 Certification Labels and Symbol Locations 14 Directives and Compliances 14 Restriction on Hazardous Substances RoHS Directive 15 Waste from Electrical and Electronic Equipment WEEE Directive 15 Introduction 17 Product Features 17 Standard Features 17 Optional Features 18 Video Formats Supported 19 Front Panel and Back Pane...

Страница 4: ...9 Terms 39 Controlling the CMN 91 39 Front Panel Controls 40 Web Based Panel Controls 42 Remote Control Panel Controls 45 Setting Up Sleep Mode 45 Selecting Inputs 46 Display Selections 46 Full Screen Display 47 Quad Display 48 Overlay Display 49 Main Title Bar 50 Icons 50 Status Bar 51 Selecting an Internal or External Reference 51 Selecting a Function 51 Accessing and Navigating the Setup Menu 5...

Страница 5: ...p Menu 81 Moving a PIP 82 Scaling a PIP 82 Removing a PIP 82 Audio Display 83 Audio Scales 83 Vertical Audio Displays 84 Expanding the Audio Display 90 Audio Mapping 91 Audio Setup Menu 91 Alarm Display 91 Alarm Log Display 91 Alarm Status Display 93 Video Alarms 94 Audio Alarms 95 Time Code Alarms 95 GPI Alarms 95 Timing Display 95 SDI Input and External Reference Formats Supported 98 Things to R...

Страница 6: ... Selection Descriptions 108 Waveform Setup Menu 108 Menu Selections 109 Menu Selection Descriptions 110 Vector Setup Menu 111 Menu Selections 111 Menu Selection Descriptions 111 Gamut Setup Menu 112 Menu Selections 112 Menu Selection Descriptions 112 Picture Setup Menu 113 Menu Selections 113 Menu Selection Descriptions 114 Audio Setup Menu 116 Menu Selections 116 Menu Selection Descriptions 118 T...

Страница 7: ...132 Alarm Setup Menus 132 Video Alarms Setup Menu 132 Menu Selections 132 Menu Selection Descriptions 136 Audio Alarms Setup Menu 137 Menu Selections 137 Menu Selection Descriptions 139 Time Code Alarms Setup Menu 141 Menu Selections 141 Menu Selection Descriptions 141 GPI Alarms Setup Menu 142 Menu Selections 142 Menu Selection Descriptions 142 Alarm Log 143 Alarm Status 143 External Control 145 ...

Страница 8: ...onnector 161 Ethernet RJ45 Connector 161 USB Connector 162 Power Connector 162 Copyrights 163 FreeType License 163 LibJPEG License 163 CMU UCD Copyright Notice 163 Networks Associates Technology Inc Copyright Notice BSD 164 Cambridge Broadband Ltd Copyright Notice BSD 164 Sun Microsystems Inc Copyright Notice BSD 165 Sparta Inc Copyright Notice BSD 165 Cisco BUPTNIC Copyright Notice BSD 166 Fabaso...

Страница 9: ...CMN 91 Installation and Operation Manual Contents 2016 Imagine Communications Corp Proprietary and Confidential Revision D Page 9 Glossary 179 Index 193 ...

Страница 10: ... the location of specific information in this manual Finding Specific Information in this Guide If you are looking for Go to Alarm descriptions Alarm Descriptions on page 132 Back panel information Connecting the CMN 91 on page 32 Browser interface Browser Interface on page 145 Connecting Connecting the CMN 91 on page 32 Control panels Front Panel and Back Panel Views on page 23 Customer Service i...

Страница 11: ...er 2010 Minor corrections to headphone specifications and LTC GPI D Sub connector D March 2013 Addition of Closed Captioning functionality Writing Conventions To enhance your understanding the authors of this manual have adhered to the following text conventions Term or Convention Description Bold Indicates dialog boxes property sheets fields buttons check boxes list boxes combo boxes menus submen...

Страница 12: ... any item is damaged 5 Remove all packaging material from the product and its associated components before you install the unit Product Servicing CMN 91 modules are not designed for field servicing All hardware upgrades modifications or repairs require you to return the modules to the Customer Service center For more information see CMN 91 Service and Support on page 24 Returning a Product In the ...

Страница 13: ...s Before switching on the unit ensure that the operating voltage set at the unit matches the line voltage if appropriate If a different operating voltage is to be set use a fuse with the appropriate rating Refer to the Installation Instructions Units of Protection Class I with an AC supply cable and plug that can be disconnected must be operated only from a power socket with protective ground cont...

Страница 14: ...ure may be sufficient to constitute a risk of electric shock to persons CAUTION Identifies conditions or practices that can result in damage to the equipment or other property Important operating and maintenance servicing instructions are included in the literature accompanying the product Certification Labels and Symbol Locations On Imagine Communications equipment certification labels and symbol...

Страница 15: ...ducts sold in the European Union will be fully RoHS compliant and lead free Spare parts supplied for the repair and upgrade of equipment sold before July 1 2006 are exempt from the legislation Equipment that complies with the EU directive will be marked with a RoHS compliant symbol as shown below Figure 2 RoHS Compliance Symbol Waste from Electrical and Electronic Equipment WEEE Directive The Euro...

Страница 16: ...ctive companies selling electric or electronic devices in the EU will affix labels indicating that such products must be properly recycled Contact your local Sales representative for information on returning these products for recycling Equipment that complies with the EU directive will be marked with a WEEE compliant symbol as shown below Figure 3 WEEE Compliance Symbol ...

Страница 17: ... or DVITC and an internal clock Remote interfaces include 10 100Base T Ethernet and plug and play USB port supporting storage and recall of presets and frame capture transfer The CMN 91 instruments are digital instruments with all digital architecture therefore no periodic calibration is required When a CMN 91 unit is equipped with the optional battery mount a user supplied lithium ion battery can...

Страница 18: ...ideo CMN 91 S Supports SD SDI video CMN 91 3GB Supports SD SDI HD SDI and 3Gb s SDI video CMN S2H F Field upgrade for CMN 91 S to support HD SDI video CMN S23GB F Field upgrade for CMN 91 S to support HD SDI and 3Gb s SDI video CMN H23G F Field upgrade for CMN 91 to support 3Gb s SDI CMN AB Anton Bauer battery mount CMN AB F Field upgrade for an Anton Bauer battery mount CMN IDX IDX battery mount ...

Страница 19: ...upported Video Formats Video Formats CMN 91 S CMN 91 CMN 91 3GB DVB ASI and SMPTE 310 Analog Composite SD SDI HD SDI 3 Gb s SDI Dual Link YCbCr 10 Bit 4 4 4 Dual Link RGB and RGB A 10 Bit 4 4 4 and 4 4 4 4 Dual Link YCbCr and RGB 12 Bit 4 4 4 3 Gb s Formats Format 10 bit 4 2 2 YCbCr 10 bit 4 4 4 YCbCr 10 bit 4 4 4 4 YCbCr A 10 bit 4 4 4 RGB 10 bit 4 4 4 4 RGB A 12 bit 4 2 2 YCbCr 12 bit 4 4 4 YCbC...

Страница 20: ...ations Corp Proprietary and Confidential Revision D Page 20 1080p 1080p 60 1080p 59 94 1080p 50 1080p 30 1080p 29 97 1080p 25 1080p 24 1080p 23 98 1080psF 30 1080psF 29 97 1080psF 25 1080psF 24 1080psF 23 98 720p 720p 60 720p 59 94 720p 50 720p 30 720p 29 97 720p 24 720p 23 98 ...

Страница 21: ...1080p 59 94 A When a 3 Gb s Level B signal is detected the standard is shown with the letter B appended to the format 1080p 59 94 B Dual Link Formats Format 10 bit 4 2 2 YCbCr 10 bit 4 4 4 YCbCr 10 bit 4 4 4 4 YCbCr A 10 bit 4 4 4 RGB 10 bit 4 4 4 4 RGB A 12 bit 4 2 2 YCbCr 12 bit 4 4 4 YCbCr 12 bit 4 4 4 RGB 1080i 1080i 60 1080i 59 94 1080i 50 1080p 1080p 60 1080p 59 94 1080p 50 1080p 30 1080p 29...

Страница 22: ...D Page 22 HD Formats 10 bit 4 2 2 YCbCr 1080i 1080I 60 1080I 59 94 1080I 50 1080p 1080P 30 1080P 29 97 1080P 25 1080P 24 1080P 23 98 720p 720p 60 720p 59 94 720p 50 720p 30 720p 29 97 720p 24 720p 23 98 Segmented Frame 1080P 30sF 1080P 29 97sF 1080P 25sF 1080P 24sF 1080P 23 98sF SD Formats 10 bit 4 2 2 YCbCr 525 59 94 625 50 ...

Страница 23: ...he CMN 91 See Front Panel Controls on page 40 for descriptions of the front panel components See Connecting the CMN 91 on page 32 for descriptions of the back panel components Figure 4 Front View Figure 5 Back View The CMN 91 can also be controlled by using either a web based control panel or an optional RCU CMS remote control unit See Web based Panel Controls on page 42 for more information on th...

Страница 24: ...ns Customer Service Department at 1 888 534 8246 If the problem cannot be resolved over the telephone and the instrument must be shipped to Imagine Communications for service or repair Obtain a Return Authorization RA number from the Imagine Communications Customer Service Department Attach a tag to the unit with the following information Your company name address and telephone number The name of ...

Страница 25: ...packing material for any future shipping requirements Installing the Optional Battery to Power the CMN 91 WARNING The battery used in this device may present a risk of fire or chemical burn if mistreated Do not disassemble incinerate or heat above the manufacturer s maximum temperature limits See the manufacturer s documentation for the appropriate maximum temperature limits for your selected batt...

Страница 26: ...e an IDX Endura 7 7S 10 or 10S battery Visit www idxtek com dealer_locator for ordering information If the battery mount was not purchased with the unit perform the following 1 Remove the portable case from the CMN 91 Set all mounting hardware aside as you will use it to reinstall the portable case 2 Remove the cover from the CMN 91 Set all mounting hardware aside as you will use it to reinstall t...

Страница 27: ...N 91 make sure that the flow of air to the ventilation holes on the top and sides of the chassis is not obstructed Rack mounting the CMN 91 is illustrated in for the DRC 3 rack mount case and in for the DRC 2A double rack mount case for installing one or two CMN 91 units lists the parts required to rack mount the CMN 91 into the DRC 3 rack mount case and lists the parts required to rack mount the ...

Страница 28: ...illips head screws These instructions are for installing units without the optional rack mounting extensions For installing units with the optional extensions see DRC 3 Rack Mount with Rack Extensions Installation on page 28 To mount the CMN 91 into a DRC 3 rack mount without rack extensions follow these steps 1 Slide the CMN 91 unit ITEM 1 in the DRC 3 rack case ITEM 2 2 Using in Phillips head sc...

Страница 29: ...e extension bracket ITEM 9 in place on each side of chassis and then loosely install the kep nuts ITEM 10 screws ITEM 11 and washers ITEM 12 into the proper holes that align with the slots in the metal extension mount ITEM 8 4 Install the remaining hardware ITEMS 12 13 and 14 through the rack rails and the appropriate slots in the back of the bracket ITEM 9 and then tighten the hardware 5 Tighten ...

Страница 30: ...ure 7 Mounting the CMN 91 in a Rack Using the DRC 2A See below for information about installing the flush mount rack ears Parts Required to Rack Mount the CMN 91 Using the DRC 2A Key Item No Qty Description 1 149111 1 unit Dual rack case assembly 2 149140 2 1 each side Extension bracket mount 3 149150 2 1 each side Extension bracket 4 043120 4 2 each side 8 32 kep nuts ...

Страница 31: ...ount 13 832124 2 reference Metal rack ear spacer 14 866083 1 optional Optional bracket kit for mounting CMN 91 in a DRC 2A dual rack case To install the optional flush mount rack ears ITEM 12 first remove existing rack ears Using the metal spacers ITEM 13 attach the flush mount rack ears Figure 8 Installing Optional Flush Mount Rack Ears To mount the CMN 91 into a DRC 2A rack mount case follow the...

Страница 32: ...il it seats fully against the back flanges of the DRC 2A and the bezel of the CMN 91 is fully seated around the front of the DRC 2A Because the CMN 91 is much shorter from front to back it cannot seat against the back flanges of the DRC 2A Use the optional bracket kit to provide a back flange for the CMN 91 8 Secure the CMN 91 to the DRC 2A rack case using in Phillips head screws ITEM 9 and tooth ...

Страница 33: ...net default settings for the CMN 91 are as follows IP 192 0 0 100 Subnet Mask 255 255 255 192 Gateway 255 255 255 255 1 Prior to performing the CMN 91 network configuration obtain TCP IP addresses from the system administrator or the Internet service provider ISP These addresses are a static IP address unless using Dynamic Host Configuration Protocol DHCP a subnet mask and an optional gateway IP B...

Страница 34: ... PC connection connect the host PC with a network card to the ENET connector on the back panel of the CMN 91 using a CAT5 crossover cable not included Figure 10 CMN 91 Dedicated PC Connection For a network connection connect the network hub to the back panel of the CMN 91 using a CAT5 network cable not included Figure 11 CMN 91 Network PC Connection ...

Страница 35: ...s subnet mask and gateway To avoid conflicts the static IP address subnet mask and gateway should be obtained from the system administrator g Press the Left Right arrow button to highlight ACCEPT and then press ENTER to accept the entered values h Press the EXIT button to exit the submenu Using the IP Configuration Utility The Imagine Communications Device IP Configuration Utility is used to set t...

Страница 36: ...pens 7 Click Next The License Agreement dialog box opens 8 Click I Agree The Installation Options dialog box opens NOTE Leave the Automatically start the WinPcap driver at boot time option checked This allows the utility to access the driver from any Windows user even if the user does not have administrative privilege If you uncheck this option the driver will not be loaded until the utility is ru...

Страница 37: ...uration Setup Menu on page 124 for more information so it may not be located there when reconfiguring the IP address after the initial installation However the MAC address is always displayed in the main title bar for a few seconds after powering up the device regardless of the menu setting In the About Display Screen see About Menu on page 130 for more information This will only be useful if the ...

Страница 38: ...tained from your IT group or personnel responsible for your network It consists of an IP address a subnet mask and possibly a gateway Ensure that the IP address you have obtained is unique and is a static IP address Enter the IP information into the appropriate fields of the To Device group If a gateway is not needed leave the Gateway field blank When you have entered the IP information into the T...

Страница 39: ...next section for more information The CMN 91 is controlled in these ways Quick Controls Controls on the front panel that adjust parameters that are frequently used See Front Panel Controls on page 40 for more information about front panel controls Menu Settings Shortcut menus within a function that are used to control the parameters for the individual function Global Setup Menu Settings Setup menu...

Страница 40: ...ront Panel setup menu selection option Multiple buttons may be high tally at the same time The last control selected is the active control Key Label Description 1 POWER Power switch button press and release to turn unit power on Press and hold to turn unit power off 2 A B SDI input button press to toggle between SDI input A and B 3 DISP Display button press and release to freeze a display Once a d...

Страница 41: ...phone audio volume Press and hold to access the audio channel selection matrix 14 WFM Waveform selection button press and release for a waveform display Press and hold to access the Waveform Setup menu 15 VEC Vector selection button press and release for a vector display Press and hold to access the Vector Setup menu 16 GMT Gamut selection button press and release for a gamut display Press and hol...

Страница 42: ...nd release to enable controls to horizontally or vertically adjust the contents of a WFM LTC or REF waveform display 29 GAIN Gain Control selection button press and release to activate Gain controls 30 Up Down arrow knob Use to move the waveform display 31 CURS Cursor selection button press and release to select cursor functionality for a waveform or vector display 32 Curved arrow knob Use for vec...

Страница 43: ...oard s CTRL key and click the desired Web RCU buttons Key Label Description 1 A B SDI input button click to toggle between SDI input A and B 2 MLT Multi display button click to toggle between a full display and a multi display screen or press and hold to access the MLT Setup menu 3 REF External Reference selection button click to toggle between internal and external reference 4 CLEAR Clear Display...

Страница 44: ...n selection button click for a LTC or Reference waveform display or press and hold to access the OPT Setup menu 18 LINE Line selection button click to activate Line Selection mode 19 CURS Cursor selection button click to select cursor functionality for a waveform or vector display 20 CURV Use for vector cursor and output audio level 21 GAIN Gain Control selection button use in conjunction with HOR...

Страница 45: ... a display is frozen click to toggle between live and frozen mode 37 SDI Data button press and release to freeze data Once data is frozen press and release to toggle between live and frozen mode Remote Control Panel Controls The optional RCU CMS provides remote control operation of VMM 4SNY CMN 41 CMN 41L and CMN 91 units The RCU CMS is connected to VMM 4SNY or CMN units via an Ethernet cable A de...

Страница 46: ...ressing the input button again will change to the new input from the previous input High tally indicates input A is selected Display Selections The CMN 91 unit screen display shows data in either a full screen mode quad screen mode 4 display panes or overlay mode 2 or 3 display panes The screen display always contains the Main Title Bar the display and the status bar To toggle between display sele...

Страница 47: ...tation of a waveform picture alarm vector gamut audio or timing display for a single input at a time Descriptions of these display types start with Waveform Display on page 55 Figure 15 Full Screen Display with PIP Enabled Description of Full Screen Display Key Description 1 Main title bar 2 Display icon area 3 PIP display optional 4 Full screen display 5 Full screen status bar 6 Specific elements...

Страница 48: ...riptions of this display type are in Waveform Display on page 55 Quad display mode is selected in the MLT setup menu see MLT Setup Menu on page 121 Figure 16 Quad Display Description of Quad Display Key Description 1 Main title bar 2 Display icon area 3 Picture display 4 Waveform display can be replaced by the Timing display Refer to the display description for more information 5 Vector display ca...

Страница 49: ...play Overlay mode is a combination of the waveform vector and if desired picture in picture PIP displays Descriptions of these display types start on Waveform Display on page 55 Overlay screen mode is selected in the MLT setup menu see MLT Setup Menu on page 121 Figure 17 Overlay Display Description of Overlay Display Key Description 1 Main title bar 2 Display icon area 3 Vector display 4 Overlay ...

Страница 50: ...nformation To move a selected display component Make sure the VIEW button is in high tally To move the selected display to the desired location on the screen Use the Up Down and Left Right arrow knobs To scale the size of the selected display Use the curved arrow knob Main Title Bar The main title bar is displayed at the top of the screen and contains the Company name date and time icon indicators...

Страница 51: ... and configuration applied See the specific function section Waveform Vector Gamut Picture PIP Audio Alarm Timing and Option for more detailed information on the status bar that is displayed Selecting an Internal or External Reference To toggle between internal and external reference press and release the REF button Selecting a Function To directly select specific functions for the display press t...

Страница 52: ...d The captured image can be saved and transferred to an external device via a USB flash drive or an Ethernet connection The Import Export Setup menu is used to transfer the image to a USB device A web browser is used to transfer an image using the Ethernet interface The captured image is saved as a PNG Portable Network Graphics formatted file To capture a display press the DISP button Only one cap...

Страница 53: ...a can be cached in the unit at a time The data remains cached until the data is cleared The SDI capture is used for detailed study of one frame of the incoming video signal The following displays can be examined when a SDI capture is displayed waveform picture vector gamut and alarms All menu items affecting the listed displays can be manipulated while a SDI capture is displayed Video alarms limit...

Страница 54: ...le Navigator dialog box For more information on the File Navigator dialog box see File Navigator on page 123 Recalling Captured Data To recall captured data make sure the captured data is shown and then press the RECALL button This recalls the captured data from internal memory via the File Navigator dialog box For more information on the File Navigator dialog box see File Navigator on page 123 Cl...

Страница 55: ...orm Setup menu selection options press and hold the WFM function button To clear the Waveform Setup menu press the SETUP or the EXIT button The first table below shows the units of measure that appear for a video format The second table below lists the critical amplitude limits which are indicated on the screen by special dashed lines for the video formats that can be displayed Video Formats and U...

Страница 56: ...ation Nomenclature 1 Input Displays selected input A or B 2 Standard Displays the Line Rate Frame Rate this is selected in the Video Setup menu 3 Format Displayed as YCbCr RGB YRGB or Composite this can be selected in the Display Format selection options of the Waveform Setup menu 4 Filter For component displayed as Flat Low Pass or Bowtie For composite displayed as Flat Low Pass Chroma or Flat an...

Страница 57: ...plitude cursor as AMP and the selected numerical value followed by the unit of measure mV units or IRE 10 Gain Displays the selected gain Gain ranges are x0 5 to x15 0 11 Zoom Displays Zoom when enabled blank when Zoom is disabled 12 WFM graticule Shows the WFM RGB YCbCr or Composite graticule the graticule is dependent upon the Video format Zoom and scale selections Graticules are configured by s...

Страница 58: ...form display Moving the Waveform To move the Waveform display relative to the graticule select the POS button and then use the Left and Right arrow knob for horizontal movement and the Up and Down arrow knob for vertical movement Press each knob to return to the default position To move the waveform in the particular direction scroll the Left Right horizontal direction or Up Down vertical directio...

Страница 59: ...H V button Figure 22 Sample H V Display Setting the Vertical and Horizontal Amplification Range Gain is used to set the range of the vertical and horizontal amplification in the video signal The standard gain in the video signal is x1 The CMN 91 can be used to set the gain amplification in the video signal using the GAIN button The vertical gain setting appears in the upper left portion of the wav...

Страница 60: ...on To cycle through the horizontal gain sequence press and release the GAIN button and then press the Left Right arrow knob Horizontal gain sequence selections are x1 0 x5 0 x10 0 and back to x1 0 When vertical sweep is selected the gain sequence changes to x1 0 x5 0 and x25 0 Figure 23 Establishing the Gain Selecting Components To step through single or multiple components in a signal press and r...

Страница 61: ...und the zoom point Placing the Waveform Display in Line Select Mode To enable the monitoring of a single line of a video signal press and release the LINE button To view a line in Line Select mode 1 Press the LINE button to place the selected waveform display in Line Select mode At the bottom center of the display the Line number and the Odd or Even field appear Figure 24 Establishing Line Select ...

Страница 62: ...dications Press and release the CURS button Press the CURS button again to disable the cursor indications To select the TIME cursor Press the Left Right arrow knob to select the REF cursor Press the arrow knob again to select the DELTA cursor Press the arrow knob again to select both cursors To select the AMP cursor Press the Up Down arrow knob to select the REF cursor Press the arrow knob again t...

Страница 63: ...e Waveform Setup menu press and hold the WFM function button For more information on the Waveform Setup menu see Waveform Setup Menu on page 108 Vector Display A vector display shown below illustrates the general location for the various vector fields To access the vector display press and release the VEC function button To access the Vector Setup menu selection options press and hold the VEC func...

Страница 64: ...s set in Standard selection option of the Vector Setup menu 5 Line select information Shown as Line and the number with the Odd or Even field Odd or even Field will only show for certain video formats 6 Reference Displays the reference as INT EXT toggled by pressing the REF button 7 Vector graticule Shown as Vector graticule 8 Phase cursor readout Displays phase cursor as VEC PHASE and number in d...

Страница 65: ... and Operation Manual Operation 2016 Imagine Communications Corp Proprietary and Confidential Revision D Page 65 Figure 27 Vector NTSC Graticule Figure 28 Vector NTSC Zoom Upper Left Figure 29 Vector NTSC Zoom Upper Right ...

Страница 66: ... 91 Installation and Operation Manual Operation 2016 Imagine Communications Corp Proprietary and Confidential Revision D Page 66 Figure 30 Vector NTSC Zoom Lower Right Figure 31 Vector NTSC Zoom Lower Left ...

Страница 67: ...CMN 91 Installation and Operation Manual Operation 2016 Imagine Communications Corp Proprietary and Confidential Revision D Page 67 Figure 32 Vector PAL Zoom Center Figure 33 Vector SD with I Q ...

Страница 68: ...ector display Setting the Vector Gain Gain is used to set the range of the amplification in the video signal The standard gain in the vector is x1 0 The CMN 91 can be used to set the gain amplification in the video signal using the Gain button The gain setting appears in the upper left portion of the vector display as shown below To scroll through the gain selection range press and release the GAI...

Страница 69: ...ons are x0 5 x1 0 x2 5 x5 0 Figure 35 Establishing the Vector Gain Setting Display Options To cycle through display options press and release the ZOOM button Zoom display options are Expand the center Expand the upper left quadrant Expand the upper right quadrant Expand the lower right quadrant Expand the lower left quadrant Normal view Vector Zoom is helpful when an increased resolution of phase ...

Страница 70: ... LINE button to place the selected vector display in Line Select mode At the bottom center of the display the Line number and the Odd or Even field appear Figure 36 Establishing Line Select In a Progressive p format odd and even selection is not available 2 Press the Up Down arrow knob to alternate between Odd and Even fields 3 Rotate the Up Down arrow knob to select the line to be displayed or pr...

Страница 71: ...ve cursor REF DELTA or both is shown with small arrows at the outer end of the line To select a cursor line for control 1 Press the curved arrow knob to select the REF or DELTA line to control The REF line is the solid line and the DELTA line is the dotted line 2 Rotate the curved arrow knob to move the REF or DELTA line to the desired location 3 Press the curved arrow knob for the next cursor Rot...

Страница 72: ...al amplitudes outside the ranges when the signal is transcoded to composite or RGB color space The gamut displays show RGB limits or composite video limits A gamut display diagram is shown and described below The diagram illustrates the general location for the various gamut fields To access the gamut display press and release the GMT function button To access the Gamut Setup menu selection option...

Страница 73: ...lection from the Video Setup menu Figure 38 Gamut Display Diagram Description of Gamut Display Diagram Field Identifier Field Information Nomenclature 1 Input Displays selected input A or B 2 Standard Displays the Line Rate Frame Rate 1080i 59 94 this is selected in the Video Setup menu 3 Format Displayed as Composite and RGB this can be selected in the Gamut Setup menu 4 Line select information S...

Страница 74: ...Gamut upper threshold setting and yy is shown as mV For Composite xxx is the Peak upper threshold setting In Composite yy is determined by the format IRE for NTSC and Units or mV for PAL 11 Chroma alarm limits Displayed as RGB for RGB or Single Color and PEAK for Composite 12 Luma Mono bar graticule Shows the Luma Mono bar graticule 13 Zoom Zoom when enabled blank when disabled 14 Gamut Graticule ...

Страница 75: ...k similar to NTSC There is an alarm persistence of two seconds associated with any alarm indication After an alarm has cleared two seconds will pass before the gamut alarm indicator returns to normal Figure 39 Composite Gamut Vector Display Graticule Markings Description of Composite Gamut Indicators Key Indicator Description 1 Lower Gamut Ring The lower gamut ring indicates the Gamut alarm Peak L...

Страница 76: ...isplay shown in and described in is similar to the Composite Gamut Display The RGB Gamut vector displays video amplitudes which are in mV in a polar format to represent color information The rings turn red when the alarm is enabled and the values exceed the threshold setting Each R G and B pixel is plotted using amplitude and phase The amplitude is derived from the R G B component The phase is der...

Страница 77: ...When the RGB Gamut alarm is enabled and the Lower limit is exceeded the lower gamut ring turns red 2 Upper Gamut Ring The upper gamut ring indicates the RGB Gamut alarm Upper limit When the RGB Gamut alarm is enabled and the Upper limit is exceeded the upper gamut ring turns red 3 Vector Excursion Mark The excursion marks help to visualize the minimum maximum values of 100 color bars 4 Mono Mono i...

Страница 78: ...rnate between the Odd and Even fields for interlaced formats 3 Rotate the Up Down arrow knob to select the line to be displayed Setting Display Options To cycle through the displays of the Composite or RGB gamut graticule press and release the ZOOM button Graticule display views include the following Expand the center Expand the upper left quadrant Expand the upper right quadrant Expand the lower ...

Страница 79: ...picture A Picture display diagram is shown and described below Only one picture can be displayed To access the Picture Setup menu press and hold the PICT button To clear the Picture Setup menu press the SETUP or the EXIT button Pictures can be used as thumbnails For more information see Picture Setup Menu on page 113 Figure 42 Picture Display Diagram Description of Picture Display Diagram Field Id...

Страница 80: ...Setup selection option 5 Closed Captioning Indicates the presence and type of CCdata 6 Picture Displays a picture of selected video input 7 Timecode Displays location of the timecode information when timecode is enabled The picture display changes according to the aspect ratio and anamorphic selections in the global Setup menu A picture display diagram shown as the left drawing below shows the 4 3...

Страница 81: ...played Picture Setup Menu To access the Picture Setup menu press and hold the PICT function button For more information on the global Picture Setup menu see Picture Setup Menu on page 113 PIP Display The Picture In Picture PIP function shows a thumbnail of the selected input s picture display with the selected function display information appearing in the background The PIP function is available w...

Страница 82: ...sure the PIP function button and the VIEW button are in high tally Use the Up Down and Left Right arrow knobs to reposition the PIP on the display Scaling a PIP To scale a PIP display s size make sure the PIP function button and the VIEW button are in high tally Use the curved arrow knob to resize the PIP on the display Removing a PIP To remove a PIP from the display make sure the PIP function but...

Страница 83: ... channel bar graphs for a total of four channels with two Lissajous and two Phase bars Three two channel bar graphs for a total of six channels with three Phase bars or CineSound 5 1 with two Phase bars Four two channel bar graphs for a total of eight channels with four Phase bars or CineSound 5 1 AUX 6 1 or 7 1 with up to three phase bars Eight two channel bar graphs for a total of sixteen channe...

Страница 84: ...aph Display with Lissajous Diagram Two Bar Graph Display with Lissajous Diagram Field Identifier Field Information Nomenclature 1 Input Displays selected input A or B 2 Status Displays audio type as Mute AES or Embedded Displays audio clip or mute alarm indicators 3 Channel Number Shown as 1 16 AES is 1 2 and Embedded is 1 16 4 Device Displays labels for lissajous bar graphs and headphone outputs ...

Страница 85: ...Level Markers Shows peak levels for the signal this can be adjusted in the Audio Meter Setup selection options 9 Meter Response Displays the selected meter response VU Peak True Peak VU Peak VU True Peak Custom 10 Audio Graticule with meter labels Shown as stereo pairs L1 R1 SMPTE 320M or custom label 11 Phase Bar Phase Meter of bar graph 1 Figure 47 Four Bar Graph with Lissajous Display Diagram F...

Страница 86: ...d for example M 2 6 Lissajous Display 1 Lissajous of bar graph 1 with labels for R L and the number of the meter being monitored for example M 1 7 Zoom Zoom when enabled blank when disabled 8 Scale Selection Displays the selected meter scale Type I Type IIa Type IIb Type I 8 Nordic DIN 45406 dBFS Zero REF dBFS Custom dB and Custom dBFS 9 Level Markers Shows peak and reference levels for the signal...

Страница 87: ... or mute alarm indicators 3 Phase Bar 2 Phase Meter of bar graph 2 4 Channel Number Shown as 1 16 AES is 1 2 and Embedded is 1 16 5 Device Displays labels for lissajous bar graphs and headphone outputs 6 Phase Bar 3 Phase Meter of bar graph 3 7 Level Markers Shows peak and reference levels for the signal this can be adjusted in the Audio Meter Setup selection options 8 Zoom Zoom when enabled blank...

Страница 88: ...own as L1 R1 L2 R2 L3 and R3 or Custom label 12 Phase Bar 1 Phase Meter of bar graph 1 Figure 49 Eight Bar Graph Display Diagram Eight Bar Graph Display Diagram Field Identifier Field Information Nomenclature 1 Input Displays selected input A or B 2 Status Displays audio type as Mute AES or Embedded Displays audio clip or mute alarm indicators 3 Channel Number Shown as 1 16 AES is 1 2 and Embedded...

Страница 89: ...up selection options 8 Zoom Zoom when enabled blank when disabled 9 Scale Selection Displays the selected meter scale Type I Type IIa Type IIb Type I 8 Nordic DIN 45406 dBFS Zero REF dBFS Custom dB and Custom dBFS 10 Meter Response Displays selected meter response VU Peak True Peak VU Peak VU True Peak Custom 11 Audio Graticule with meter labels Shown as L1 R1 L2 R2 L3 R3 L4 and R4 or Custom label...

Страница 90: ...ank when disabled 13 Scale Selection Displays the selected meter scale Type I Type IIa Type IIb Type I 8 Nordic DIN 45406 dBFS Zero REF dBFS Custom dB and Custom dBFS 14 Meter Response Displays selected meter response VU Peak True Peak VU Peak VU True Peak Custom 15 Audio Graticule with meter labels Shown as L1 R1 L2 R2 L3 R3 L4 R4 L5 R5 L6 R6 L7 R7 L8 or R8 or Custom label 16 Phase Bar 1 Phase Me...

Страница 91: ...ormation on the global Audio Setup menu see Audio Setup Menu on page 115 Alarm Display To access the alarm display press and release the ALRM function button To access the Alarm Setup menu press and hold the ALRM function button The default alarm display is the Alarm Log For information on individual alarms see Alarm Descriptions on page 132 Alarm Log Display The Alarm Log display lists all the al...

Страница 92: ...lay Diagram Field Identifier Field Information Nomenclature 1 Input Displays selected input A or B 2 Column Labels Displays the labels for the number in the alarm list ALARM NAME DATE TIME TIMECODE LENGTH Duration and PEAK VALUE Certain alarm parameters do not have a level measurement that can report a peak value This is indicated when NO RPV No Report Peak Value appears in the PEAK VALUE column 3...

Страница 93: ...he most recent alarm is tagged as 01 To scroll through the alarm list use the Up Down navigation buttons To erase the current group of alarms press the CLEAR button A GPI output dry contact closure can be used to alert other devices when an alarm occurs To set up the GPI use the UNIT CONFIGURATION GPIO selection option See Unit Configuration Setup Menu on page 124 Alarm Status Display The Alarm St...

Страница 94: ...ower and upper limits thresholds duration and total number of alarms The alarm name text can appear in a colored state The colored states are White indicates alarm is not enabled Green indicates alarm is enabled and not exceeding alarm limits Red indicates the alarm is enabled and exceeding an alarm limits There is a two second persistence for any alarm name color change To scroll through the Alar...

Страница 95: ...arms selection option To show the available Time Code Alarm selection options press the ENT navigation button For more information on the global Time Code Alarms Setup menu see Time Code Alarms Setup Menu on page 140 GPI Alarms Up to four general purpose interface alarms can be enabled To access the Alarms Setup menu press and hold the ALRM button If necessary use the Up Down navigation arrows to ...

Страница 96: ...cted reference in Field Identifier 1 also displays the input s line rate frame rate shown in as 525 59 94 selected in the Video Setup menu 3 VERT Vertical The offset line in full video lines between the reference and the displayed video Displays the Vertical Error Measurement as VERT xxx Line s where xxx is the measured difference between the reference and the test input alignment of the vertical ...

Страница 97: ... When a signal is processed there is the potential for it to be delayed with respect to a reference signal The timing display is used to indicate when a video input is deviating in time from the reference See Timing Setup Menu on page 120 for more information on reference selection The reference input indicator REF located in the center of the timing display indicates the reference timing point fo...

Страница 98: ...External Reference Format SDI Input Format NTSC PAL 1080i60 p30sf 1080i59 94 p29 97sf 1080i50 p25sf 1080p30 1080p29 97 1080p25 1080p24 1080p23 98 1080p24sf 1080p23 98sf 720p60 720p59 94 720p50 720p30 720p29 97 720p24 720p23 98 525 59 94 625 50 1080i60 p30sf 1080i59 94 p29 97sf 1080i50 p25sf 1080p60 1080p59 94 1080p50 1080p30 1080p29 97 1080p25 1080p24 1080p23 98 1080p24sf 1080p23 98sf 720p60 720p5...

Страница 99: ...ition video lines a single video line adjustment will cause a change of two or more lines in the timing display This is due to the standard definition video lines which are longer than the high definition video lines represented by the timing display The information of the Timing Display should not be used when captured SDI freeze data is displayed Timing Setup Menu To access the Timing Setup menu...

Страница 100: ...eration 2016 Imagine Communications Corp Proprietary and Confidential Revision D Page 100 Centering the Waveform To center the waveform horizontally press the Left Right arrow knobs To center the waveform vertically press the Up Down arrow knobs ...

Страница 101: ...ions Corp Proprietary and Confidential Revision D Page 101 Figure 54 LTC Display Diagram Figure 55 External Reference Display Diagram Preset Display Selections Presets are used to store menu configurations and display settings A total of 99 presets can be stored in the CMN 91 ...

Страница 102: ...through the available list using the curved arrow knob 3 Press the PRST STORE button to store a new Preset Overwriting Existing Presets To overwrite a preset 1 Press the PRST button to bring up the Presets dialog box 2 Press selection button 1 to 99 or scroll through the available list using the curved arrow knob to make the desired selection 3 Press the PRST button to overwrite an existing Preset...

Страница 103: ... SETUP UP DOWN LEFT RIGHT ENT and EXIT buttons Setup Position Knobs and Navigation Button Functions Button Knob Function Press to exit the Setup menu Press to enter or exit the Setup menu Press to select a menu item or open a menu or submenu Press to move up in a menu or submenu tree Press to move right to the next submenu Press to move out of a submenu Press to move down in a menu or submenu Rota...

Страница 104: ...page 124 Gamut Setup Menu on page 112 Import Export Setup Menu on page 122 MLT Setup Menu on page 121 OPT Setup Menu on page 121 Picture Setup Menu on page 113 Time Code Source Setup Menu on page 107 Timing Setup Menu on page 120 Vector Setup Menu on page 111 Video Setup Menu on page 104 Waveform Setup Menu on page 108 Video Setup Menu The Video Setup selection options are used to automatically or...

Страница 105: ...5 Selection Option Selection Option 1080p Frame Rate 60 59 94 50 30 29 97 25 24 23 98 1080psF 1080psF Frame Rate 30sF 29 97sF 25sF 24sF 23 98sF 720p 720p Frame Rate 60 59 94 50 30 29 97 24 23 98 625 50 525 59 94 Structure Auto Detect 10 bit YCbCr 4 2 2 10 bit YCbCr 4 4 4 10 bit RGB 4 4 4 12 bit YCbCr 4 4 4 12 bit RGB 4 4 4 12 bit YCbCr 4 2 2 ...

Страница 106: ... force the unit into frames with 525 line 60 1000 1001 Hz video mode Structure This selection option is used to configure the signal handling path to a 10 bit or 12 bit RGB or YCbCr sampling structure 12 bit modes are not available with formats 1080p 60 1080p 59 94 and 1080p 50 4 4 4 and 4 2 2 are the format rates selected with the 10 bit and 12 bit sampling structures 4 2 2 is only available with...

Страница 107: ...hrough the column selections use the Right Left arrow knobs or buttons To scroll through individual cell selections use the Up Down arrow knobs or buttons To assign an input to a meter press the ENT button Different audio types AES or Embedded can be assigned to a meter output Figure 56 Audio Mapping Matrix Display Time Code Source Setup Menu The Time Code Source setup menu is used to determine th...

Страница 108: ...al Interval Time Code 0 ANC DVITC 1 Ancillary Digital Vertical Interval Time Code 1 DVITC Digital Vertical Interval Time Code DVITC is monitored on selected lines After DVITC is selected adjust the line selection in the DVITC LINE 525 or DVITC LINE 625 submenus to the selected line The range for DVITC LINE 525 is adjustable from Line 10 to 30 and DVITC LINE 625 is adjustable from line 6 to 30 For ...

Страница 109: ...tion Display Format YCbCr RGB Composite YCbCr alpha RGB alpha YRGB Component Filter Flat Low pass Bowtie Composite Filter Flat Low pass Chroma Flat and low pass Component Overlay Blanking Blank All Show SAV EAV Show All Error Highlighting Graticule Digital Waveform Graticule Volts Percent NTSC Pedestal PAL Waveform Scale Volts Units Intensity 0 to 100 72 Contrast 0 to 100 31 Persistence 0 to Infin...

Страница 110: ...ay is selected for a single input the components of the input signal are displayed over each other that is R over G over B in an RGB signal Blanking The blanking selections are Blank All EAV SAV and Show All Blank All displays only the active video of the input signal default Show EAV SAV displays the active video and the EAV SAV headers of the input signal Show All displays the ancillary data EAV...

Страница 111: ...tence and attack selections for the vector display Menu Selections Vector Setup Menu Selection Option Selection Option Standard 75 100 75 100 I Q Lines Scale to Composite Intensity 0 to 100 86 Contrast 0 to 100 55 Persistence 0 to Infinite 0 Attack 1 to Maximum 10 Menu Selection Descriptions Standard Standard is used to set the marks on the vector display The marks on the vector help to visualize ...

Страница 112: ...nsity 0 to 100 86 Contrast 0 to 100 55 Persistence 0 to Infinite 0 Menu Selection Descriptions Single Color RGB Composite Color Plot These selection options are used to set the color for plotting RGB pixels The pixels can be one single color or RGB red green or blue Multiple colors help to indicate which color of the RGB signal moves beyond the inner and outer parameters of the gamut graticule The...

Страница 113: ...amut error highlighting selections for the Picture display Menu Selections Picture Setup Menu Selection Option Selection Option Selection Option Markers Center Safe Title Corners Safe Title Box Safe Action Corners Safe Action Box Clean Aperture Corners Clean Aperture Box Custom Corners Custom Box Custom Position 1 to 49 20 Custom Length 3 to 47 5 Closed Caption Display CC1 CC2 CC3 CC4 T1 T2 T3 T4 ...

Страница 114: ...to 90 of the picture height and 90 of the picture width Clean Aperture shows the limits for the active pixel area Brackets appear on the picture or a box surrounds the picture to show these limits The center marker identifies the location of the center of the picture Custom Corners and Custom Box allows the setup of customized markers for a picture display Custom Position is used in conjunction wi...

Страница 115: ...by matching the intensity of all green bars when a SMPTE split field color bar signal is applied Blue Blue is a setup feature that is used to show the blue color component of the input video Use the Blue feature to set the Saturation and Hue by matching the intensity of all blue bars when a SMPTE split field color bar signal is applied Red Red is a setup feature that is used to show the red color ...

Страница 116: ...Selection Option 2 Channels 4 Channels 6 Channels Vertical CineSound 8 Channels Vertical CineSound 5 1 AUX CineSound 6 1 CineSound 7 1 16 Channels Meter Setup Reference Level 22 dBFS to 8 dBFS 20 dBFS Peak Program Level Type I 1 dB to 11 dB 8 dB Type IIa 1 dB to 11 dB 8 dB Type IIb 1 dB to 11 dB 8 dB Type I 8 1 dB to 19 dB 8 dB Nordic 1 dB to 11 dB 6 dB DIN 45406 1 dB to 13 dB 8 dB dBFS 1 dB to 21...

Страница 117: ...m dBFS Top 0 dBFS to 20 dBFS 0 dBFS Custom dBFS Bottom 40 dBFS to 90 dBFS 40 dBFS Custom dB Top 0 dB to 20 dB 10 dB Custom dB Bottom 20 dB to 70 dB 30 dB Zoom Center at Reference Level Center at dB Level 60 dB to 20 dB 0 dB Zoom Range 4 dB to 20 dB 10 dB Peak Hold Time Off 1 to 10 seconds Infinite Meter Labels Stereo Pairs SMPTE 320M Custom Custom Labels 1 8 Channel 1 8 Use arrow keys to edit and ...

Страница 118: ... Meter Response VU Peak True Peak VU Peak VU True Peak Custom Custom Attack 0 to 20 ms 0 ms Custom Decay 0 3 to 5 0 seconds 1 5 seconds Lissajous Setup Persistence 0 to Infinite 0 Attack 1 to Maximum 50 Automatic Gain Control Plot Soundstage X Y Configure Phase Bar s Polarity Normal Reverse Damping Slow 1 to 10 5 Fast AES Validity Bit Status Readout Menu Selection Descriptions 2 Channels This sele...

Страница 119: ...on option is used to set the Zoom modes Selections are Center at Reference Level Center at dB level and Zoom Range The Center at dB level has a range from 60 dB to 20 dB the default selection is 0 dB The Zoom range is from 4 dB to 20 dB the default selection is 10 dB Peak Hold Time This selection option is a user selectable duration value of Off 1 to 10 seconds or Infinite The duration only applie...

Страница 120: ...Bar s Phase bars are used to monitor the instantaneous phase relationship between two channels of audio On a vertical audio display the marking indicates a phase difference of 0 and the marking indicates a phase difference of 180 A properly phased stereo pair produces a phase pointer that moves within the green zone whereas a reversed channel produces a pointer that moves within the red zone Polar...

Страница 121: ...til SET ZERO REF is selected Set Zero Ref This selection option is used to apply the current offset setting as the zero reference point OPT Setup Menu The OPT or Options setup menu is used to select Longitudinal Time Code LTC or Reference Waveform Menu Selections OPT Setup Menu Selection Option LTC Reference Waveform MLT Setup Menu The MLT Setup menu is used to select whether a four quadrant or ov...

Страница 122: ...d to determine how long a data point pixel in the displayed waveform and vector remains on the display The range of persistence is 0 to Infinite The default selection is 0 Attack Attack is the initial intensity that the data point pixel appears in the display The range of attack is 1 to Maximum The default selection is 6 Alarms Setup Menu For information on alarm setup and descriptions see Alarm D...

Страница 123: ...File Navigator Dialog Box Local File Explorer The left column of the File Navigator dialog box labeled as Local File Explorer shows what is available to be transferred to the USB drive The stored presets are located in the PRESETS folder and the frame captures are located in the CAPTURES folder To move between folders and files use the navigation buttons To enter a folder press the ENT button USB ...

Страница 124: ...nt Timing Zero Reference Persistence Menu Selection Descriptions DISP Captures This selection option is used to clear a display capture from the CMN 91 unit s memory SDI Captures This selection option is used to clear an SDI capture from the CMN 91 unit s memory Audio Peak Hold This selection option is used to clear the peak audio hold Alarm Log This selection option is used to clear the alarm log...

Страница 125: ...tup Menu Menu Selections Unit Configuration Setup Menu Selection Option Selection Option Selection Option Selection Option Display Setup Input Color Blue Green Cyan Red Magenta Brown Gray Dark Gray Light Blue Light Green Light Cyan Light Red Light Magenta Yellow White Graticule Color Blue Green Cyan Red Magenta Brown Gray Dark Gray Light Blue Light Green Light Cyan ...

Страница 126: ...ction Option Light Red Light Magenta Yellow White Cursor Color Blue Green Cyan Red Magenta Brown Gray Dark Gray Light Blue Light Green Light Cyan Light Red Light Magenta Yellow White Aspect Ratio 4 3 16 9 16 10 Sleep Mode Off to 60 Minutes Monochrome Display Graticule Intensity 0 to 100 50 Cursor Intensity 0 to 100 Front Panel High Tally 35 to 100 80 Low Tally 0 to 10 5 LCD Backlight Level Low Hig...

Страница 127: ... Alarm 4 No Action Output Function Polarity Normally Open Normally Closed Setup Follow Input A Follow Input B Follow Alarms IP Configuration Ethernet Config Screen System Time Time Setup Screen Show Clock Flash Update From USB File Navigator Screen Feature Upgrade From USB File Navigator Screen Menu Selection Descriptions Display Setup The Display Setup selection options are used to configure the ...

Страница 128: ...e Display This selection option is used to provide a black and white display output Graticule Intensity This selection option is used to raise or lower the brightness of the displayed graticule The range of graticule intensity is 1 to 100 The default selection is 50 Cursor Intensity This selection option is used to raise or lower the brightness of the displayed cursor The range cursor intensity is...

Страница 129: ...ange each time the CMN 91 is powered on DHCP Enable is set to OFF by default IP Address The IP Address is used to select a static IP address unless DHCP will be used The IP address must not be the same address as another instrument or PC on the network Network conflicts will occur if two devices have the same IP address See the System Administrator to determine a static IP address that will avoid ...

Страница 130: ...he unit Select Feature Update from USB in the Unit Configuration setup menu Use the File Navigator to select the update file Press the ENT button to proceed into feature upgrade mode When complete the screen blanks and the unit reboots In the Unit Configuration setup menu select ABOUT to verify the option was installed successfully The serial number on the device must match the serial number on th...

Страница 131: ...ine Communications Corp Proprietary and Confidential Revision D Page 131 Menu Selection Descriptions The About screen contains the model serial number module device and version Figure 58 About Display Screen To exit the About display screen press the EXIT navigation button ...

Страница 132: ... SD and 13 5ns for HD Use this as a guideline to select the appropriate CES value Not all alarms have CES associated with them in such cases use the duration to increase or decrease the general sensitivity Duration is used to determine how long an error must persist before it is reported Set the duration to 0 to cause an error to be displayed as soon as the CES value is met Alarm Setup Menus The A...

Страница 133: ...onds 2 seconds Loss of Payload Identifier Enable Duration 0 to 60 seconds 2 seconds Gamut RGB Gamut Upper Enable Threshold 650 to 750 mV 710 mV Sensitivity 1 to 20 CES 15 CES Duration 0 to 60 seconds 2 seconds RGB Gamut Lower Enable Threshold 50 to 50 mV 10 mV Sensitivity 1 to 20 CES 15 CES Duration 0 to 60 seconds 2 seconds Luminance Gamut Upper Enable Threshold 525 59 94 90 to 108 IRE 105 IRE Th...

Страница 134: ... 15 CES Duration 0 to 60 seconds 2 seconds Peak Gamut Lower Enable Threshold 525 59 94 40 to 0 IRE 20 IRE Threshold 625 50 40 to 0 Units mV setting 20 Units Sensitivity 1 to 20 CES 15 CES Duration 0 to 60 seconds 2 seconds Captioning CC Not Detected EIA 608 Enable Duration 0 to 60 seconds 2 seconds CC Not Updating 608 Enable Duration 0 to 60 seconds 2 seconds CC Not Detected 708 Enable Duration 0 ...

Страница 135: ...ds 2 seconds CRC HD Enable Duration 0 to 60 seconds 2 seconds EDH SD Enable Duration 0 to 60 seconds 2 seconds Letterbox SD Enable Top Border Top Border 525 59 94 Line 21 to Line 139 Top Border 625 50 Line 19 to Line 159 Enable Bottom Border Bottom Border 525 59 94 Line 140 Line to 262 Bottom Border 625 50 Line 160 to Line 312 Threshold 10 to 350 mV 286 mV Duration 0 to 60 seconds 2 seconds Pillar...

Страница 136: ...ctive video falls below the adjustable threshold for a period in excess of the duration setting Loss of Payload ID The Loss of Payload ID alarm is used to indicate when the SMPTE 352M Video Payload ID ancillary data packet is not detected in the received data stream for a period in excess of the duration setting Gamut Gamut alarms are used to indicate when components of an RGB Luma or peak signal ...

Страница 137: ...alues for the specified duration the Pillarbox HD alarm occurs High Definition only Picture Shift The Picture Shift alarm activates when the luma portion of the video does not exceed the amplitude threshold along any of the four borders of active video The Left Right and Top Bottom border settings define the tolerance of the Picture Shift alarm If one or more pixels are above the threshold for eac...

Страница 138: ...econds Loss of AES Data Enable Duration 0 to 60 seconds 2 seconds Loss of Embedded Data Enable Group 1 Pair 1 Enable Group 1 Pair 2 Enable Group 2 Pair 1 Enable Group 2 Pair 2 Enable Group 3 Pair 1 Enable Group 3 Pair 2 Enable Group 4 Pair 1 Enable Group 4 Pair 2 Duration 0 to 60 seconds 2 seconds Continuous Tone Enable Channel 1 Enable Channel 16 Threshold 1 to 20 dB Duration 0 to 60 seconds 2 se...

Страница 139: ...e Group 1 Pair 1 Enable Group 1 Pair 2 Enable Group 2 Pair 1 Enable Group 2 Pair 2 Enable Group 3 Pair 1 Enable Group 3 Pair 2 Enable Group 4 Pair 1 Enable Group 4 Pair 2 Duration 0 to 60 seconds 2 seconds Low Audio Enable Channel 1 Enable Channel 16 Level 60 to 0 dBFS Duration 0 to 60 seconds 2 seconds BCH Enable Duration 0 to 60 seconds 2 seconds Menu Selection Descriptions Peak Audio The Peak A...

Страница 140: ... excess of the duration setting Continuous Tone The Continuous Tone alarm occurs when a continuous sound level is present for a period in excess of the duration setting Audio Clip The Audio Clip alarm occurs when the digital audio is at a maximum level for a period in excess of the duration setting The Audio Clip indicator appears in the table below the audio meters when an Audio Clip alarm occurs...

Страница 141: ... Threshold 1 to 30 frames Duration 0 to 600 seconds 240 seconds DVITC Loss of Time Code Enable Duration 0 to 600 seconds 240 seconds D VITC Line Enable Line Number 525 59 94 Line 10 to Line 30 Line 14 Line 625 625 50 Line 6 to Line 30 lines Line 14 Duration 0 to 600 seconds 240 seconds D VITC Continuity D VITC CRC Enable Duration 0 to 600 seconds 240 seconds Menu Selection Descriptions LTC Loss of...

Страница 142: ... Line The D VITC Line alarm is used to select the line number on which the D VITC time code is detected for the D VITC Continuity and D VITC CRC fields When time code is not detected on the selected line number the alarm activates D VITC Continuity The D VITC Continuity alarm occurs when a break or interruption in the digital vertical interval time code VITC frames occur for a period in excess of ...

Страница 143: ...pper limits thresholds and duration and total number of alarms The alarm name text can appear in a colored state The colored states are as follows White indicates alarm is not enabled Green indicates alarm is enabled and not exceeding alarm limits Red indicates the alarm is enabled and exceeding an alarm limits There is a two second persistence for any Alarm Name color change Use the same navigati...

Страница 144: ...larm Descriptions 2016 Imagine Communications Corp Proprietary and Confidential Revision D Page 144 An alarm status display diagram is shown in that topic The diagram illustrates the general location for the various alarm status display fields ...

Страница 145: ...ris The user ID admin is the default user ID and Harris is the default password These are set at the factory but can be changed by the user via the Accounts web page Keep in mind though that once the user ID and password have been changed the only way to reset the unit to the default user ID and its default password is to send the unit back to the factory for repairs Once the user ID and password ...

Страница 146: ...eb RCU or RCU CMS session while previously established control session Web RCU or RCU CMS exists the request will be granted after the previously established session is terminated A Web RCU session that was terminated due to conflict with another control session can be re established by repeating the logon procedure Accessing the Index of Captures Click the CAPTURES button on the web based control...

Страница 147: ...n the User ID text box A password for the new account confirm the password by entering it again in the Confirm Password text box An access level of User System or Administrator from the Access Level drop down list box 3 Click Save to accept the new account or click Reset to clear the previously entered information and start again Editing Accounts To edit password and access level information 1 Cli...

Страница 148: ...hange the user access level by making a different selection at the Access Level drop down list box 4 Click Save to accept the account changes or click Reset to restore the original information and start again Deleting Accounts To delete a user account 1 Click the Accounts button on the web based control panel The Accounts Display page opens 2 In the Edit Delete existing account s box locate the un...

Страница 149: ...e cables are correctly connected and the unit is set up restart the unit by doing the following 1 Push and hold the SETUP button Up Down knob and Left Right knob for a minimum of five seconds until the SYSTEM RESET message appears on the display 2 Press and hold the ENT button to reset the unit s configuration All front panel and Setup menu selections will be reset to the factory default settings ...

Страница 150: ...hone output The headphone volume is set too low or the output is set to Mute in the Audio Mapping Matrix Adjust the headphone volume or select the proper channel to be monitored in the Audio Mapping Matrix Audio level reading is too low The input reference level is not correctly set Use the SETUP MENU to check the input reference level setting Picture width is not correct The aspect ratio is not s...

Страница 151: ...V Input return loss 10 dB 1 485 GHz 2 97 GHz Cable EQ 80 M Belden 1694A HD SDI Input Specifications Item Specification Input type 2 active looping inputs Input connector type BNC female Input impedance 75 nominal Signal source amplitude 800 mV nominal Signal source DC offset 0 5 V Input return loss 15 dB 270 MHz 1 485 GHz Cable EQ 100 M Belden 8281 SD SDI Input Specifications Item Specification In...

Страница 152: ...6 dB Tri level sync amplitude 600 mV p p Tri level sync amplitude tolerance 3 dB Return loss 40 dB 100 kHz to 5 MHz Digital Audio Input Specifications Item Specification Audio formats AES EBU embedded audio AES input connector type 1 BNC female AES input impedance 75 nominal AES input return loss 25 dB 0 1 MHz to 6 MHz unbalanced AES input level 0 2 to 2 0 V AES input sample rate audio inputs are ...

Страница 153: ... 10 Output DC offset 0 0 V 0 5 V DVI Output Specifications Item Specification Output connector DVI I connector supporting DVI D Output resolution 1024 768 XGA Digital levels Per DDWG DVI rev 1 Pixel rate 65 Mp s Display accuracy 1 waveform 1 vector 37 ns timing digital 300 ns timing analog Analog Monitoring Output Specifications Headphone Item Specification Number connector One stereo output one 3...

Страница 154: ...current 100 mA 50 VDC Peripheral interface USB 2 0 supporting storage devices and keyboard Connector USB 2 0 Type A female Display Display Specifications Item Specification General A full screen display for viewing an input as picture waveform vector audio alarm status or timing Waveform Composite YCbCr or RGB parade overlay of like formats Sweep time base 1H or 2H with x1 x5 and x10 horizontal ma...

Страница 155: ... at 50 kHz Time Code Specifications Item Specification Input LTC via back panel connector Ancillary Time Code HD only DVITC extracted from SD inputs Display Displayed directly SDI Freeze Item Specification Freeze capable displays Waveform Vector Picture Waveform and vector frozen displays Display frozen Display live Picture displays Display frozen Display live Frozen waveform control The following...

Страница 156: ...display plots R G and B amplitudes with magnitude in mV concentric circles represent minimum and maximum ranges Magnification Magnification Specifications Item Specification Waveform sweep gain selection x1 x5 and x10 pressing the horizontal knob will cycle through x1 x5 and x10 horizontal magnification Waveform step gain selection x0 5 x1 0 x2 5 and x5 0 pressing the vertical knob will cycle thro...

Страница 157: ...s dedicated LAN Power Requirements Power Requirements Specifications Item Specification Power connector 15 VDC nominal 11 VDC minimum 17 VDC maximum Power consumption 20 W nominal Over voltage protection 50 VDC nominal Mechanical Mechanical Specifications Item Specification Dimensions Height 5 22 in 13 26 cm Width 8 46 in 21 49 cm Depth 5 8 in 14 73 cm Weight 5 0 lb 2 27 kg Battery mount optional ...

Страница 158: ...N 91 Installation and Operation Manual Breakout connector for LTC GPI One power cord One power supply assembly Optional Accessories Item Specification TVM WRTY1 Full extended warranty plan adds three years to the standard two year warranty including a one year extension on the LCD display warranty CMN 911 Can be controlled from a PC using a web browser or an optional RCU CMS remote control unit Su...

Страница 159: ... for an Anton Bauer battery mount CMN IDX IDX battery mount CMN IDX F Field upgrade for an IDX battery mount DRC 3 Double rack mount case BLK 1 Blank panel for DRC 3 PTC 3 Portable case with handle PTC 3A Portable case with handle and tilt stand PTC 3 CC Padded soft case to hold PTC 3 DRC 2A Double rack mount case CMN IN DRC2 Bracket kit to mount a CMN 91 in a DRC 2A RCU CMS Remote control unit op...

Страница 160: ...ut Connector Pinout Signal Pinout Signal 1 TMDS data 2 16 Hot plug detect 2 TMDS data 2 17 TMDS data 0 3 TMDS data 2 4 shield 18 TMDS data 0 4 TMDS data 4 19 TMDS data 0 5 shield 5 TMDS data 4 20 TMDS data 5 6 DDC clock 21 TMDS data 5 7 DDC data 22 TMDS clock shield 8 Not used 23 TMDS clock 9 TMDS data 1 24 TMDS clock 10 TMDS data 1 C1 Not used 11 TMDS data 1 3 shield C2 Not used 12 TMDS data 3 C3...

Страница 161: ...5 Pin Female D Sub Connector Pinouts for LTC GPI Connector Pinout Signal Pinout Signal 1 ERROR SUM 9 LTC GND 2 GPI IN 1 10 LTC 3 GPI IN 2 11 LTC 4 GPI IN 3 12 N C 5 GPI IN 4 13 GND 6 ERROR SUM RETURN 14 N C 7 GND 15 GND 8 GND Ethernet RJ45 Connector Figure 64 Ethernet RJ45 Connector Ethernet RJ45 Connector Pinouts Pinout Signal Pinout Signal 1 TX 5 N C 2 TX 6 RX 3 RX 7 N C 4 N C 8 N C ...

Страница 162: ...Proprietary and Confidential Revision D Page 162 USB Connector Figure 65 USB Connector USB Connector Pinouts Pinout Signal Pinout Signal 1 VCC 4 GND 2 Data 5 GND 3 Data 6 GND Power Connector Figure 66 Power Connector Power Connector Pinouts Pinout Signal Pinout Signal 1 GND 3 N C 2 N C 4 Power ...

Страница 163: ... granted provided that the above copyright notice appears in all copies and that both that copyright notice and this permission notice appear in supporting documentation and that the name of CMU and The Regents of the University of California not be used in advertising or publicity pertaining to distribution of the software without specific written permission CMU AND THE REGENTS OF THE UNIVERSITY ...

Страница 164: ...MERCHANTABILITY AND FITNESS FOR A PARTICULAR PURPOSE ARE DISCLAIMED IN NO EVENT SHALL THE COPYRIGHT HOLDERS OR CONTRIBUTORS BE LIABLE FOR ANY DIRECT INDIRECT INCIDENTAL SPECIAL EXEMPLARY OR CONSEQUENTIAL DAMAGES INCLUDING BUT NOT LIMITED TO PROCUREMENT OF SUBSTITUTE GOODS OR SERVICES LOSS OF USE DATA OR PROFITS OR BUSINESS INTERRUPTION HOWEVER CAUSED AND ON ANY THEORY OF LIABILITY WHETHER IN CONTR...

Страница 165: ...n and use in source and binary forms with or without modification are permitted provided that the following conditions are met Redistributions of source code must retain the above copyright notice this list of conditions and the following disclaimer Redistributions in binary form must reproduce the above copyright notice this list of conditions and the following disclaimer in the documentation and...

Страница 166: ... THIS SOFTWARE EVEN IF ADVISED OF THE POSSIBILITY OF SUCH DAMAGE Cisco BUPTNIC Copyright Notice BSD Copyright 2004 Cisco Inc and Information Network Center of Beijing University of Posts and Telecommunications All rights reserved Redistribution and use in source and binary forms with or without modification are permitted provided that the following conditions are met Redistributions of source code...

Страница 167: ...IMITED TO THE IMPLIED WARRANTIES OF MERCHANTABILITY AND FITNESS FOR A PARTICULAR PURPOSE ARE DISCLAIMED IN NO EVENT SHALL THE COPYRIGHT HOLDER BE LIABLE FOR ANY DIRECT INDIRECT INCIDENTAL SPECIAL EXEMPLARY OR CONSEQUENTIAL DAMAGES INCLUDING BUT NOT LIMITED TO PROCUREMENT OF SUBSTITUTE GOODS OR SERVICES LOSS OF USE DATA OR PROFITS OR BUSINESS INTERRUPTION HOWEVER CAUSED AND ON ANY THEORY OF LIABILI...

Страница 168: ...nts to know that what they have is not the original so that any problems introduced by others will not reflect on the original authors reputations Finally any free program is threatened constantly by software patents We wish to avoid the danger that redistributors of a free program will individually obtain patent licenses in effect making the program proprietary To prevent this we have made it cle...

Страница 169: ...he Program is not required to print an announcement These requirements apply to the modified work as a whole If identifiable sections of that work are not derived from the Program and can be reasonably considered independent and separate works in themselves then this License and its terms do not apply to those sections when you distribute them as separate works But when you distribute the same sec...

Страница 170: ... permission to modify or distribute the Program or its derivative works These actions are prohibited by law if you do not accept this License Therefore by modifying or distributing the Program or any work based on the Program you indicate your acceptance of this License to do so and all its terms and conditions for copying distributing or modifying the Program or works based on it 6 Each time you ...

Страница 171: ...ion number of this License you may choose any version ever published by the Free Software Foundation 10 If you wish to incorporate parts of the Program into other free programs whose distribution conditions are different write to the author to ask for permission For software which is copyrighted by the Free Software Foundation write to the Free Software Foundation we sometimes make exceptions for ...

Страница 172: ...es are designed to make sure that you have the freedom to distribute copies of free software and charge for this service if you wish that you receive source code or can get it if you want it that you can change the software and use pieces of it in new free programs and that you are informed that you can do these things To protect your rights we need to make restrictions that forbid distributors to...

Страница 173: ...r many libraries However the Lesser license provides advantages in certain special circumstances For example on rare occasions there may be a special need to encourage the widest possible use of a certain library so that it becomes a de facto standard To achieve this non free programs must be allowed to use the library A more frequent case is that a free library does the same job as widely used no...

Страница 174: ... all the notices that refer to this License and to the absence of any warranty and distribute a copy of this License along with the Library You may charge a fee for the physical act of transferring a copy and you may at your option offer warranty protection in exchange for a fee 2 You may modify your copy or copies of the Library or any portion of it thus forming a work based on the Library and co...

Страница 175: ...r the terms of Sections 1 and 2 above provided that you accompany it with the complete corresponding machine readable source code which must be distributed under the terms of Sections 1 and 2 above on a medium customarily used for software interchange If distribution of object code is made by offering access to copy from a designated place then offering equivalent access to copy the source code fr...

Страница 176: ...able shared library mechanism for linking with the Library A suitable mechanism is one that 1 uses at run time a copy of the library already present on the user s computer system rather than copying library functions into the executable and 2 will operate properly with a modified version of the library if the user installs one as long as the modified version is interface compatible with the versio...

Страница 177: ... of patent infringement or for any other reason not limited to patent issues conditions are imposed on you whether by court order agreement or otherwise that contradict the conditions of this License they do not excuse you from the conditions of this License If you cannot distribute so as to satisfy simultaneously your obligations under this License and any other pertinent obligations then as a co...

Страница 178: ...n will be guided by the two goals of preserving the free status of all derivatives of our free software and of promoting the sharing and reuse of software generally No Warranty 15 BECAUSE THE LIBRARY IS LICENSED FREE OF CHARGE THERE IS NO WARRANTY FOR THE LIBRARY TO THE EXTENT PERMITTED BY APPLICABLE LAW EXCEPT WHEN OTHERWISE STATED IN WRITING THE COPYRIGHT HOLDERS AND OR OTHER PARTIES PROVIDE THE...

Страница 179: ...ished jointly by the Audio Engineering Society AES and the European Broadcasting Union EBU Anchor Element The perceptual loudness reference point or element around which other elements are balanced in producing the final mix of the content or that a reasonable viewer would focus on when setting the volume control Artifacts Unwanted visible effects in the picture created by disturbances in the tran...

Страница 180: ...ite Video A single video signal that includes all color video and timing information A composite signal includes luminance chrominance blanking pulses sync pulses and color burst information Chrominance The color portion of a video signal that represents the saturation and hue Black gray and white have no chrominance color signals have both chrominance and luminance CH Chroma Chrominance Luminance...

Страница 181: ...value of the Dialog Level carried in the AC 3 bit stream Dialog Level The loudness in LKFS units of the Anchor Element Differential Gain A measurement that specifies how much the chrominance gain is affected by the luminance level Expressed as a percentage showing the largest amplitude change between any two levels it indicates how much color saturation variance occurs when the luminance level cha...

Страница 182: ... stream ID Embedded Audio Digital audio information multiplexed onto a serial digital data stream Up to sixteen channels can be multiplexed on a single stream of 601 video minimizing cabling and routing requirement ENG Electronic News Gathering Encoded Clip Softness In the encoded legalization process softness as applied to encoded clips refers to the processing of the video at the point of the cl...

Страница 183: ...z progressive or non interlaced system produces 60 frames of video in one second Common frame rates are 24 film 25 29 97 30 50 59 94 and 60 Frame Synchronizer An electronic device that synchronizes two or more video signals Using one input as a reference it locks a second signal to the reference Frame Store An electronic method of capturing and storing a single frame of video Full On VTM Series un...

Страница 184: ...nstallation Categories Categories of measurements that occur on circuits attached or not attached to a live electrical supply outlet Installation Categories are as follows Category I is for measurements that occur on circuits not attached to a live electrical supply outlet 115 230 VAC The voltages come from secondary power sources The secondary power source includes circuits energized by low volta...

Страница 185: ...decibel If a 0 dB full scale 1 kHz sine wave is input applied to the left centre or right channel input the indicated loudness will equal 3 01 LKFS The weighting coefficients are different for each channel LS Left Surround LTC Longitudinal Time Code A SMPTE timecode standard usually recorded onto the linear audio track of a VTR LU Loudness Unit The loudness unit is the scale unit of the loudness m...

Страница 186: ... 13818 2 Video 13818 3 Audio and 13818 4 Compliance MPS Multi Program Stream MTG Master Time Generator Multi On TVM VTM Series units contains preconfigured screens for VTM Classic Data Analyzer Custom Timing and Waveform Vector screens only Multicast A means of targeting content to those devices that know to join the group described by a Class D IP Address and Port Combination Multi Level Effects ...

Страница 187: ...system to separate the active video from the blanking level by maintaining the black level above the blanking level by a small amount PES Packetized Elementary Stream see extended definition on the following page PID Packet Identifier see extended definition on the following page PIP Picture in Picture A scaled view of the full motion video and audio level meters for a given Program The scaled vie...

Страница 188: ...rogram A transport stream combination of a video stream and one or more audio and data streams associated with that video stream In analog terms Program refers to the Base Band video and audio produced by the final output of a switcher A program nominally has a video essence and one or more audio essences synchronized with the video with dedicated clocking It may also have associated data synchron...

Страница 189: ...ed by component video level rules Typically the maximum value for R G or B is 700 mV and the absolute minimum value for any of these signals is 0 mV Reclocking The process of regenerating digital data with a clock recovered from the input data Resolution A measure of the finest detail that can be seen or resolved in a reproduced image RS Right Surround RS 422 Recommended Standard number 422 an E I...

Страница 190: ...al expressed in dB decibels as a ratio of between the audio or video signal s maximum peak to peak signal voltage and the measured voltage of noise present when the signal is removed Higher SNR figures indicate that any noise introduced by system components will not be perceived in the picture and sound output signals Signal to Noise Ratio 8VSB SNR As applies to 8VSB transmissions this is a calcul...

Страница 191: ...scillator THD Total Harmonic Distortion TPL True Peak Level TRAIM Timing receiver autonomous integrity monitoring GPS related term Transport Stream ATSC TS Consists of the following 1 Packets 188 bytes fixed length with descriptive data 2 Carries several programs 3 has a PID which identifies the type of TS packet video audio other and 4 carries descriptive information about the program True Peak L...

Страница 192: ...groups of SHDW programs VITC Vertical Interval Time Code a method for recording on to video tape the timecode address for each video frame inserted in the vertical interval Waveform A visual representation of a signal in the shape of a wave that plots amplitude versus time White Level The brightest part of a video signal corresponding to approximately 1 0 Volt White Balance An electronic process u...

Страница 193: ...splay 53 Clearing Captured Data 54 CMN 91 Service and Support 23 CMU UCD Copyright Notice 163 Communication Interfaces 156 Composite Gamut 75 Connecting the CMN 91 32 Contact Information 2 Control 153 Controlling the CMN 91 39 Copyrights 163 D Deleting Accounts 148 Directives and Compliances 14 Display 154 Display Selections 46 DRC 2A Rack Mount Installation 30 DRC 3 Rack Mount Installation 27 DRC...

Страница 194: ...arranty 171 178 O Obtaining Documents 12 Operation 55 Operator s Safety Summary 13 OPT Setup Menu 122 Option Display Selections 100 Optional Features 18 Outputs 152 Overlay Display 49 Overwriting Existing Presets 103 P Picture Display 80 Picture Setup Menu 82 114 Pinouts 160 Placing the Gamut Display in Line Select Mode 78 Placing the Picture in Line Select Mode 81 Placing the Vector Display in Li...

Страница 195: ...3 The GNU v2 License 167 Things to Remember When Using the Timing Display 99 Time Code Alarms 96 Time Code Alarms Setup Menu 141 Time Code Source Setup Menu 109 Timing Display 96 Timing Setup Menu 100 121 Trademarks 2 Troubleshooting 149 U Unit Configuration Setup Menu 126 Unpacking a Product 12 Unpacking Shipping Information 12 USB Connector 162 USB File Explorer 125 Using the IP Configuration Ut...

Отзывы: