2-12
2
3.
Verify communication to the unit by sending it the *IDN? query
and reading back the unit’s IDN message. GPIBkybd users can
use the pulldown arrow on the right side of the Device Command
window and select *IDN?.
4.
Use the SCPI Command tree in Table 3-2 to put together the SCPI
command for the parameter you want to change. (See paragraph 3.6
if you need help using SCPI commands.) Enter the commands into
your interactive program (GPIBkybd Device Command Window)
and press “Send”. If you are querying a value press the “Query”
if the program has that choice. If not, you will have to manually
“Read” the response. ICS’s GPIBkybd program has an auto query
function so it will automatically read back a response if you just
press “Send”. The following example shows how to change and
query the baud rate.
SYST:COMM:SER:BAUD 19200
‘sets the baud rate
SYST:COMM:SER:BAUD?
‘queries the baud rate
‘should reply 19200
5.
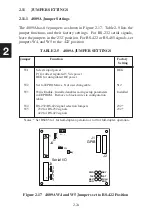
Use caution when changing the unit’s GPIB address. The change
takes place immediately when the command is executed. Provide
a 0.1 second delay before querying the new address setting.
i.e.,
to change the GPIB address to 20
SYST:COMM:GPIB:ADDR 20
‘ send address 20
‘Wait 0.1 seconds
Change the device’s GPIB address in the interactive program to
the new address, in this case 20. Query the device to be sure the
address changed.
SYST:COMM:GPIB:ADDR?
‘should read back 20
6.
Use the
*SAV 0
command (That is asterisk S A V space 0) to
save the new address values in the unit’s nonvolatile memory. The
*SAV 0
command stores the current I/O configuration settings as
the power-on values.
*SAV 0
Содержание 4809A
Страница 5: ...ii This page left intentionally blank...
Страница 51: ...2 30 2 This page left intentionally blank...
Страница 89: ...4 8 4 This page intentionally left blank...
Страница 99: ...5 10 5 This page left intentionally blank...
Страница 125: ...A 26 A3 This page intentionally left blank...
Страница 131: ...I Index 6 This page left intentionally blank...


