


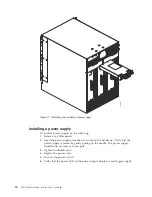

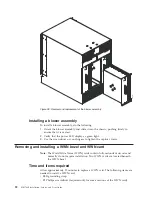


Installing a blower assembly
To install a blower assembly, do the following:
1.
Orient the blower assembly and slide it into the chassis, pushing firmly to
ensure that it is seated.
2.
Verify that the power LED displays a green light.
3.
Use the screwdriver or your fingers to tighten the captive screws.
Removing and installing a WWN bezel and WWN card
Note:
The World Wide Name (WWN) cards contain fully redundant circuits and
normally do not require installation. Two WWN cards are located beneath
the WWN bezel.
Time and items required
Allow approximately 20 minutes to replace a WWN card. The following items are
needed to install a WWN card:
v
ESD grounding strap
v
#2 Phillips screwdriver (required only for some versions of the WWN card)
b
76
8ig
001
Figure 38. Removal and replacement of the blower assembly
92
SAN768B Installation, Service, and User Guide
Содержание SAN768B
Страница 2: ......
Страница 8: ...vi SAN768B Installation Service and User Guide ...
Страница 12: ...x SAN768B Installation Service and User Guide ...
Страница 14: ...xii SAN768B Installation Service and User Guide ...
Страница 16: ...xiv SAN768B Installation Service and User Guide ...
Страница 28: ...xxvi SAN768B Installation Service and User Guide ...
Страница 32: ...xxx SAN768B Installation Service and User Guide ...
Страница 42: ...10 SAN768B Installation Service and User Guide ...
Страница 62: ...30 SAN768B Installation Service and User Guide ...
Страница 78: ...46 SAN768B Installation Service and User Guide ...
Страница 100: ...68 SAN768B Installation Service and User Guide ...
Страница 154: ...122 SAN768B Installation Service and User Guide ...
Страница 178: ...146 SAN768B Installation Service and User Guide ...
Страница 184: ...152 SAN768B Installation Service and User Guide ...
Страница 202: ...170 SAN768B Installation Service and User Guide ...
Страница 207: ......
Страница 208: ... Part Number 45W8666 Printed in USA GA32 0574 05 1P P N 45W8666 ...