


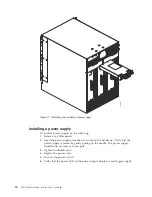

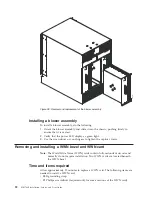


Installing a control processor blade (CP8)
Attention:
Follow ESD precautions (“ESD precautions” on page xxi).
To install a CP blade (slot 6 or 7):
1.
Open the ejector handles to approximately 45 degrees. Orient the CP blade so
that the handles are toward you and the flat metal side is on your left.
2.
Align the flat metal side of the CP blade inside the lower and upper blade
guides in the slot. Slide the CP blade into the slot until it is firmly seated.
3.
Tighten the thumb screw inside each handle using a Phillips screwdriver.
4.
Turn the CP blade on by sliding the ON/OFF switch in the top handle up, to
cover the thumb screw.
5.
Verify that the power LED is green. If not, ensure that the CP blade has power
and is firmly seated and that the ejectors are in the locked position.
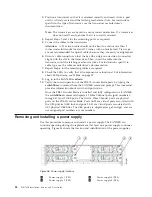
b768ig018
Figure 33. Removing the control processor (CP8) blade
Chapter 5. Removing and installing components
79
Содержание SAN768B
Страница 2: ......
Страница 8: ...vi SAN768B Installation Service and User Guide ...
Страница 12: ...x SAN768B Installation Service and User Guide ...
Страница 14: ...xii SAN768B Installation Service and User Guide ...
Страница 16: ...xiv SAN768B Installation Service and User Guide ...
Страница 28: ...xxvi SAN768B Installation Service and User Guide ...
Страница 32: ...xxx SAN768B Installation Service and User Guide ...
Страница 42: ...10 SAN768B Installation Service and User Guide ...
Страница 62: ...30 SAN768B Installation Service and User Guide ...
Страница 78: ...46 SAN768B Installation Service and User Guide ...
Страница 100: ...68 SAN768B Installation Service and User Guide ...
Страница 154: ...122 SAN768B Installation Service and User Guide ...
Страница 178: ...146 SAN768B Installation Service and User Guide ...
Страница 184: ...152 SAN768B Installation Service and User Guide ...
Страница 202: ...170 SAN768B Installation Service and User Guide ...
Страница 207: ......
Страница 208: ... Part Number 45W8666 Printed in USA GA32 0574 05 1P P N 45W8666 ...