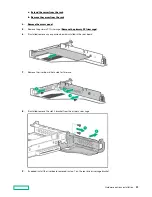
a. Extend the server from the rack.
b. Remove the server from the rack.
4.
5.
Remove the primary PCI riser cage (
Remove the primary PCI riser cage).
6.
If installed, remove any expansion boards installed in the riser board.
7.
Remove the riser board. Set aside for later use.
8.
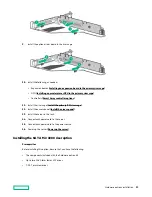
If installed, remove the slot 2 bracket from the primary riser cage.
9.
If needed, install the riser board removed in step 7 on the rear drive riser cage bracket.
Hardware options installation
85
Содержание HPE ProLiant DX360 Gen10
Страница 7: ...Regulatory information 183 Documentation feedback 184 Acronyms and abbreviations 185 7 ...
Страница 44: ...Operations 44 ...
Страница 74: ...8 Route and connect the data cable 9 Route and connect the power cable Hardware options installation 74 ...
Страница 101: ... Full length Hardware options installation 101 ...
Страница 107: ... 10 SFF SAS SATA NVMe Combo 4 LFF Hardware options installation 107 ...
Страница 125: ...8 Using a Torx T 10 screwdriver remove the Power UID USB assembly 8 SFF 4 LFF Hardware options installation 125 ...
Страница 129: ...6 Install the 4 LFF display port USB module 7 Route and connect the cable Hardware options installation 129 ...
Страница 150: ...2 SFF backplane to P816i a controller 10 SFF NVMe backplane to NVMe riser Cabling 150 ...
Страница 151: ...2 SFF NVMe backplane to primary riser 1 SFF rear backplane to system board SATA Cabling 151 ...


